


As we come to the original deadline for the design challenge, the area seems eerily quiet. Perhaps everyone’s just busy working away – but so was I!
So far, I’ve covered the contents of the kit, showed you how I soldered the WL-ICLEDs to the Adafruit breakouts, achieved “first light” using FastLED, did some PCB and 3D printing design and built them successfully, leaving just the software elements to consider.
This post will be less photo-centric than previous posts – code isn’t particularly photogenic. But why don’t I start off with the results of my labour …
Video
In the video above, I show you the current state of the project – both my ring light and my Arduino shield. It’s not perfect, but it’s functional and pretty much all I need for the time being. But it did take some intense work over a day or two to make it all happen.
Firmware Design
Before I started coding everything, I had to think carefully about how I wanted everything to work. Already, as part of the hardware design, I chose the Raspberry Pico W as I wanted wireless connectivity. This gave me the option of either Wi-Fi or Bluetooth. While the former is known to be more performant, it was also more power hungry. Bluetooth can be very light on power, but it has lower performance and more limited range.
What ultimately made the decision for me was the question of just “how” I would be controlling the light itself. I have almost no experience building mobile apps, but I could easily build terminal apps for the PC. If I’m using Wi-Fi, I could have it connect to my home network and blast a few UDP packets with commands its way (or to the broadcast address, which is quite inefficient) and be done with it. On Bluetooth, I’d need to manage a connection to the device which could be tricky and quite OS-dependent. But I really wanted to be able to control it from a smartphone as that easily beats needing to build a dedicated remote control or using a PC, nor did I want to build separate apps. So, what to do about it?
The answer was obvious to me – it should be a “web app”. Well, not in the glorified big, massive framework-driven things that we like to call web apps nowadays, but it should be based around something that can be run in a web browser.
In my head, it would work as follows:
- The ring light’s Pico W could either broadcast its own Wi-Fi AP for devices to connect to, or connect to an AP which is hard coded in firmware. Perhaps in the future, it broadcasts its own AP, accepts configuration details and then connects to the provided details instead.
- Once connected to a network, it will have an IP address where it can run a simple webserver (TCP socket that supports just the barest of HTTP commands).
- It serves a lightweight webpage that has all the controls I need, as an HTML form of some sort. JavaScript (my arch nemesis) will be involved to do some of the automation, but ultimately, the script will POST its results to the web-server.
- The webserver will have a handler that decodes this POST request and makes the necessary changes to the LED pixel data arrays used by FastLED which will then update the LEDs accordingly.
It all seems achievable to me … but I don’t like JavaScript, nor have I actually been formally taught or learned it, so I’m going to have to stumble my way through the dark a bit there …
The (Library) Ingredients
It’s here that I will make my big acknowledgements to the various software and libraries that made this project possible. I know that writing all of this code from scratch would have been painful and taken me much longer.
- Arduino IDE (https://www.arduino.cc/en/software)
- Earle Philhower’s arduino-pico Core (https://github.com/earlephilhower/arduino-pico)
- Zach Vorhies and Daniel Garcia’s FastLED library (https://github.com/FastLED/FastLED)
- Khoi Hoang’s WiFiWebServer library (https://github.com/khoih-prog/WiFiWebServer)
The code that I had built mostly comes from snippets of example code from these libraries, altered to fit my project’s needs.
Hardware Ready
To get started developing, I started with a clean slate at first. I added Wi-Fi connection code, based upon the Arduino ConnectWithWPA example and checked that the connection was being established. This worked first time, so I proceeded to use the PostServer example in the WiFiWebServer library to check that it could serve a webpage and read the posted data. This worked too, so I was already almost halfway there. There’s no HTTPS, but that’s not a major problem since it’s being used on an internal network.
The next step would be to modify the web page to collect what I needed it to collect and display the way I would like. Then I could re-integrate the FastLED code from my modified demoreel_100 example and write the handler function that would update the pixel array data and that would be all done! That part would be most straightforward.
Wrangling Javascript and HTML
This is perhaps where I spent most of my time. When I was growing up, I wrote only the most basic HTML in my computer science classes – coding webpages by hand was the “norm”, so I’ve continued that tradition with coding by hand. Unfortunately for me, I’m coding inside an Arduino program, which means that every double-quote has to be escaped (\”) or else you get build issues, and the webpage was essentially one long multi-line string, broken up by “\” so the formatting quirks definitely added to the challenge.
The first step was simply to add all the UI elements needed to the form – this includes the radio buttons and sliders. Then, to format them nicely, I wrapped them inside <table> tags, the old-fashioned, pre-CSS way. For JavaScript, rather than have a .js file as a separate file to be fetched from the server, I’ve inlined them in plenty of <script> blocks. It isn’t ideal, but it does the trick.
But to really get the webpage working in the way I desired took several iterations and wrangling with JavaScript and HTML:
- Originally, the webpage is designed as a form that can be filled, the submit button is pushed and then the page is reloaded. This is very slow. Imagine every change of lighting setting needs the submission of a form and a full reload.
To fix this requires using JavaScript functions and the fetch API to do an AJAX request (nothing to do with cleaning, it’s Asynchronous JavaScript and XML). After reading up this posting on Dev+Coffee, I decided to define a function (formfunc) which does the actual posting of the form to the server. Then, I defined a whole stack of event listeners for change and input for each of the fields so that when a change happens, the formfunc function is called to submit the form. A key feature is that this doesn’t cause the page to reload – the form previously had its submit button (now commented out in HTML) that I had originally configured to submit without reloading (as formfunc returns false) to reduce page flicker and latency. - Unfortunately, since any change or change-in-motion will cause form submissions to fire continually, I found that the Pico W was having trouble keeping up with the stream of events, so a “throttle” was needed to cut down events. Thanks to this webpage, I managed to integrate the throttle into the code so that when the sliders are moved, the results go through the throttle function which thins out the calls to formfunc to 5Hz at most.
- While I had some sliders, I wanted the actual value of the sliders to be visible and for the sliders to be big enough to actually use. That was easily fixed by adding a width parameter to the range input type using the inline CSS <style> tag, affecting all sliders in one fell swoop. Then JavaScript code was used to get the value from the slider and write it into the <div> for the value. I could have made these text inputs so users could type a precise value into the box, but somehow I felt that this wouldn’t be necessary as the LEDs aren’t exactly calibrated for colour accuracy nor is exact colour necessary most of the time.
- I needed some pre-set colour buttons to load the most common RGB values to avoid needing to fiddle around with each slider for common operations. This was achieved with <button> tags which were set to call a JavaScript function I called setColour which received a string argument with the colour required. It would go through an “if tree” and apply the RGB values to the sliders and update the associated <div>s accordingly.
- It needed to appear a reasonable size and fill the screen on mobile – so I used the <style> tag to set the page width to 640px, but also a <meta> tag to set the viewport. With the two, it seems to load with reasonable size in both mobile and desktop environments.
It took a lot of jumping back and forth between different resources online to learn the necessary tricks to make it all work, plus some time sitting in the element inspector and console scratching my head when things didn’t work. Ultimately, I think I have prevailed in the end.
The Result
The result of a few hours of iterative tinkering is this code, which is rather sparse and devoid of comments, but is still somewhat chunked into logical parts:
// A Better Microscope &<br>PCB Macro Photography Light V1.0
// element14 Light-Up-Your-Life Design Challenge
// by Gough Lui - October-November 2025

// Build Requires:
// - PCB, Wurth Elektronik WL-ICLEDs, Raspberry Pi Pico W, 3D Prints
//   (see element14 Community Design Challenge Post)
// - Arduino IDE (https://www.arduino.cc/en/software/)
// - Earle Philhower III Arduino Pico Core (https://github.com/earlephilhower/arduino-pico)
// - WiFiWebServer Library (https://github.com/khoih-prog/WiFiWebServer)
// - FastLED Library (https://github.com/FastLED/FastLED)

#include <WiFi.h>
#include <WiFiClient.h>
#include <WebServer.h>
#include <FastLED.h>

#define BRIGHTNESS         255
//#define FRAMES_PER_SECOND  120

// FIRST STRING - EDGE FIRING
#define DATA_PIN    11 // Raspberry Pi Pico
#define LED_TYPE    WS2812B
#define COLOR_ORDER GRB
#define NUM_LEDS    18
CRGB leds[NUM_LEDS];

// SECOND STRING  - DOWN FIRING
#define DATA_PIN2    10 // Raspberry Pi Pico
#define LED_TYPE2    WS2816
#define COLOR_ORDER2 RGB
#define NUM_LEDS2    18
CRGB leds2[NUM_LEDS2];

// THIRD STRING - WIDE AREA DIFFUSE
#define DATA_PIN3    3 // Raspberry Pi Pico
#define CLK_PIN3     2
#define LED_TYPE3    APA102
#define COLOR_ORDER3 GBR
#define NUM_LEDS3    18
CRGB leds3[NUM_LEDS3];

// LED Parameters
int led_edge;
int led_down;
int led_wide;
int led_rvalue;
int led_gvalue;
int led_bvalue;
int led_ivalue;
int led_wvalue;

// Wi-Fi Parameters
char ssid[] = "YOUR_SSID_HERE";
char pass[] = "YOUR_PASSPHRASE_HERE";
int status = WL_IDLE_STATUS;

WebServer server(80);

const String postForms = "<!DOCTYPE html><html>\
<head>\
<meta name=\"viewport\" content=\"width=device-width, initial-scale=1.0\">\
<title>A Better Microscope & PCB Macro Photography Light Controller</title>\
<style>\
body {\
max-width: 640px\;\
}\
input[type=\"range\"] {\
width: 500px;\
}\
</style>\
</head>\
<body>\
<script>\
function throttle(callback, limit) {\
let lastCall=0;\
return function (...args) {\
const now = Date.now();\
if (now-lastCall>=limit) {\
lastCall=now;\
callback.apply(this,args);\
}\
};\
}\
function formfunc () {\
var form = new FormData(document.getElementById(\"paramform\"))\;\
fetch(\"post/\", {\
method: \"POST\",\
body: form\
})\
.then(res => res.text())\
.then(txt => {\
console.log(txt)\;\
})\
.catch(e => console.error(e))\;\
return false;\
}\
</script>\
<center><h1>A Better Microscope &<br>PCB Macro Photography<br>Light Controller</h1>\
by <a href=\"https://goughlui.com/\">Gough Lui</a> - V1.0 - Oct-Nov 2025<br>\
element14 Light Up Your Life Design Challenge in conjunction with<br>Wurth Elektronik WL-ICLEDs.</center>\
<form id=\"paramform\" method=\"post\" enctype=\"application/x-www-form-urlencoded\" action=\"#\" onsubmit=\"return formfunc()\;\">\
<h3>LED Selection</h3>\
<table><tr><td>Edge-Firing LED:</td><td><input type=\"radio\" id=\"led_edge\" name=\"led_edge\" value=\"1\">\
<label for=\"led_edge\"> ON</label> <input type=\"radio\" id=\"led_edge2\" name=\"led_edge\" value=\"0\" checked>\
<label for=\"led_edge2\"> OFF</label></td></tr>\
<tr><td>Down-Firing LED:</td><td><input type=\"radio\" id=\"led_down\" name=\"led_down\" value=\"1\">\
<label for=\"led_down\"> ON</label> <input type=\"radio\" id=\"led_down2\" name=\"led_down\" value=\"0\" checked>\
<label for=\"led_down2\"> OFF</label></td></tr>\
<tr><td>Wide-Area LED:</td><td><input type=\"radio\" id=\"led_wide\" name=\"led_wide\" value=\"1\">\
<label for=\"led_wide\"> ON</label> <input type=\"radio\" id=\"led_wide2\" name=\"led_wide\" value=\"0\" checked>\
<label for=\"led_wide2\"> OFF</label></td></tr></table>\
<h3>Colour Selection</h3>\
<table><tr><td>Red:</td><td><input type=\"range\" id=\"led_rvalue\" name=\"led_rvalue\" min=\"0\" max=\"255\" value=\"0\"></td><td><span id=\"rsliderValue\"></span></td></tr>\
<script>\
const slider1 = document.getElementById(\"led_rvalue\");\
const output1 = document.getElementById(\"rsliderValue\");\
output1.innerHTML = slider1.value\;\
slider1.addEventListener(\"input\", function() {\
  output1.innerHTML = this.value\;\
})\;\
</script>\
<tr><td>Green:</td><td><input type=\"range\" id=\"led_gvalue\" name=\"led_gvalue\" min=\"0\" max=\"255\" value=\"0\"></td><td><span id=\"gsliderValue\"></span></td></tr>\
<script>\
const slider2 = document.getElementById(\"led_gvalue\");\
const output2 = document.getElementById(\"gsliderValue\");\
output2.innerHTML = slider2.value\;\
slider2.addEventListener(\"input\", function() {\
  output2.innerHTML = this.value\;\
})\;\
</script>\
<tr><td>Blue:</td><td><input type=\"range\" id=\"led_bvalue\" name=\"led_bvalue\" min=\"0\" max=\"255\" value=\"0\"></td><td><span id=\"bsliderValue\"></span></td></tr></table>\
<script>\
const slider3 = document.getElementById(\"led_bvalue\");\
const output3 = document.getElementById(\"bsliderValue\");\
output3.innerHTML = slider3.value\;\
slider3.addEventListener(\"input\", function() {\
  output3.innerHTML = this.value\;\
})\;\
</script>\
<center><button onclick=\"setColour('Red')\" style=\"color: red;\">Red</button>\
<button onclick=\"setColour('Green')\" style=\"color: green;\">Green</button>\
<button onclick=\"setColour('Blue')\" style=\"color: blue;\">Blue</button>\
<button onclick=\"setColour('White')\">White</button>\
<button onclick=\"setColour('Cyan')\" style=\"color: cyan;\">Cyan</button>\
<button onclick=\"setColour('Yellow')\" style=\"color: yellow;\">Yellow</button>\
<button onclick=\"setColour('Magenta')\" style=\"color: magenta;\">Magenta</button></center>\
<script>\
function setColour(rcolour) {\
const slider1 = document.getElementById(\"led_rvalue\");\
const output1 = document.getElementById(\"rsliderValue\");\
const slider2 = document.getElementById(\"led_gvalue\");\
const output2 = document.getElementById(\"gsliderValue\");\
const slider3 = document.getElementById(\"led_bvalue\");\
const output3 = document.getElementById(\"bsliderValue\");\
if (rcolour == \"Red\") {\
slider1.value = 255;\
slider2.value = 0;\
slider3.value = 0;\
} else if (rcolour == \"Green\") {\
slider1.value = 0;\
slider2.value = 255;\
slider3.value = 0;\
} else if (rcolour == \"Blue\") {\
slider1.value = 0;\
slider2.value = 0;\
slider3.value = 255;\
} else if (rcolour == \"White\") {\
slider1.value = 255;\
slider2.value = 255;\
slider3.value = 255;\
} else if (rcolour == \"Cyan\") {\
slider1.value = 0;\
slider2.value = 255;\
slider3.value = 255;\
} else if (rcolour == \"Yellow\") {\
slider1.value = 255;\
slider2.value = 255;\
slider3.value = 0;\
} else if (rcolour == \"Magenta\") {\
slider1.value = 255;\
slider2.value = 0;\
slider3.value = 255;\
};\
output1.innerHTML = slider1.value\;\
output2.innerHTML = slider2.value\;\
output3.innerHTML = slider3.value\;\
}\
</script>\
<h3>Angle Selection</h3>\
<table><tr><td>Start:</td><td><input type=\"range\" id=\"led_ivalue\" name=\"led_ivalue\" min=\"1\" max=\"18\" value=\"1\"></td><td><span id=\"isliderValue\"></span></td></tr>\
<script>\
const slider4 = document.getElementById(\"led_ivalue\");\
const output4 = document.getElementById(\"isliderValue\");\
output4.innerHTML = slider4.value\;\
slider4.addEventListener(\"input\", function() {\
  output4.innerHTML = this.value\;\
})\;\
</script>\
<tr><td>Width:</td><td><input type=\"range\" id=\"led_wvalue\" name=\"led_wvalue\" min=\"1\" max=\"18\" value=\"18\"></td><td><span id=\"wsliderValue\"></span></td></tr></table>\
<script>\
const slider5 = document.getElementById(\"led_wvalue\");\
const output5 = document.getElementById(\"wsliderValue\");\
output5.innerHTML = slider5.value\;\
slider5.addEventListener(\"input\", function() {\
  output5.innerHTML = this.value\;\
})\;\
</script>\
<br>\
<!--<center><input type=\"submit\" value=\"Submit\"></center>-->\
</form>\
<script>\
document.addEventListener(\"DOMContentLoaded\", function() {\
const i1 = document.getElementById(\"led_edge\");\
const i2 = document.getElementById(\"led_down\");\
const i3 = document.getElementById(\"led_wide\");\
const i1b = document.getElementById(\"led_edge2\");\
const i2b = document.getElementById(\"led_down2\");\
const i3b = document.getElementById(\"led_wide2\");\
const i4 = document.getElementById(\"led_rvalue\");\
const i5 = document.getElementById(\"led_gvalue\");\
const i6 = document.getElementById(\"led_bvalue\");\
const i7 = document.getElementById(\"led_ivalue\");\
const i8 = document.getElementById(\"led_wvalue\");\
i4.addEventListener(\"input\", throttle(formfunc,100));\
i5.addEventListener(\"input\", throttle(formfunc,100));\
i6.addEventListener(\"input\", throttle(formfunc,100));\
i7.addEventListener(\"input\", throttle(formfunc,100));\
i8.addEventListener(\"input\", throttle(formfunc,100));\
i1.addEventListener(\"change\", formfunc);\
i2.addEventListener(\"change\", formfunc);\
i3.addEventListener(\"change\", formfunc);\
i1b.addEventListener(\"change\", formfunc);\
i2b.addEventListener(\"change\", formfunc);\
i3b.addEventListener(\"change\", formfunc);\
i4.addEventListener(\"change\", formfunc);\
i5.addEventListener(\"change\", formfunc);\
i6.addEventListener(\"change\", formfunc);\
i7.addEventListener(\"change\", formfunc);\
i8.addEventListener(\"change\", formfunc);\
});\
</script>\
</body>\
</html>";

void handleRoot() {
  server.send(200, "text/html", postForms);
  //Serial.println("Root Request Handled!");
}

void handleForm() {
  if (server.method() != HTTP_POST) {
    server.send(405, "text/plain", "Method Not Allowed");
  } else {
    //String message = "POST form was:\n";
    //for (uint8_t i = 0; i < server.args(); i++) {
    //  message += " " + server.argName(i) + ": " + server.arg(i) + "\n";
    //}
    String message = "OK";
    server.send(200, "text/plain", message);
    //Serial.println("Post Request Handled!");
    //Serial.println(message);
  }
  // Separate POST values into variables
  for (uint8_t i = 0; i < server.args(); i++) {
    if (server.argName(i) == "led_edge") {
      //Serial.println("Updated Parameter led_edge");
      led_edge = server.arg(i).toInt();
    } else if (server.argName(i) == "led_down") {
      //Serial.println("Updated Parameter led_down");
      led_down = server.arg(i).toInt();
    } else if (server.argName(i) == "led_wide") {
      //Serial.println("Updated Parameter led_wide");
      led_wide = server.arg(i).toInt();
    } else if (server.argName(i) == "led_rvalue") {
      //Serial.println("Updated Parameter led_rvalue");
      led_rvalue = server.arg(i).toInt();
    } else if (server.argName(i) == "led_gvalue") {
      //Serial.println("Updated Parameter led_gvalue");
      led_gvalue = server.arg(i).toInt();
    } else if (server.argName(i) == "led_bvalue") {
      //Serial.println("Updated Parameter led_bvalue");
      led_bvalue = server.arg(i).toInt();
    } else if (server.argName(i) == "led_ivalue") {
      //Serial.println("Updated Parameter led_ivalue");
      led_ivalue = server.arg(i).toInt();
    } else if (server.argName(i) == "led_wvalue") {
      //Serial.println("Updated Parameter led_wvalue");
      led_wvalue = server.arg(i).toInt();
    }
  }
  // Edit the LED arrays
  FastLED.clear();
  if(led_edge) {
    for(int z=(led_ivalue-1);z<(led_ivalue+led_wvalue-1);z++) {
      leds[z%NUM_LEDS][0] = led_rvalue;
      leds[z%NUM_LEDS][1] = led_gvalue;
      leds[z%NUM_LEDS][2] = led_bvalue;
    }
  }
  if(led_down) {
    for(int z=led_ivalue-1;z<(led_ivalue+led_wvalue-1);z++) {
      leds2[z%NUM_LEDS2][0] = led_rvalue;
      leds2[z%NUM_LEDS2][1] = led_gvalue;
      leds2[z%NUM_LEDS2][2] = led_bvalue;
    }
  }
  if(led_wide) {
    for(int z=led_ivalue-1;z<(led_ivalue+led_wvalue-1);z++) {
      leds3[z%NUM_LEDS3][0] = led_rvalue;
      leds3[z%NUM_LEDS3][1] = led_gvalue;
      leds3[z%NUM_LEDS3][2] = led_bvalue;
    }
  }
}

void handleNotFound() {
  String message = "File Not Found\n\n";
  message += "URI: ";
  message += server.uri();
  message += "\nMethod: ";
  message += (server.method() == HTTP_GET) ? "GET" : "POST";
  message += "\nArguments: ";
  message += server.args();
  message += "\n";
  for (uint8_t i = 0; i < server.args(); i++) {
    message += " " + server.argName(i) + ": " + server.arg(i) + "\n";
  }
  server.send(404, "text/plain", message);
}

void setup() {
  Serial.begin(115200);
  FastLED.addLeds<LED_TYPE,DATA_PIN,COLOR_ORDER>(leds, NUM_LEDS);
  FastLED.addLeds<LED_TYPE2,DATA_PIN2,COLOR_ORDER2>(leds2, NUM_LEDS2);
  FastLED.addLeds<LED_TYPE3,DATA_PIN3,CLK_PIN3,COLOR_ORDER3>(leds3, NUM_LEDS3);
  FastLED.setBrightness(BRIGHTNESS);
  FastLED.clear();
  //while (!Serial) {
  //}
  Serial.println("A Better Microscope & PCB Macro Photography Light");
  Serial.println("by Gough Lui (goughlui.com) - Oct-Nov 2025 - V1.0");
  Serial.println("-------------------------------------------------");
  Serial.print("Attempting to connect ");
  while (status != WL_CONNECTED) {
    status = WiFi.begin(ssid, pass);
    Serial.print(".");
    delay(5000);
  }
  Serial.println(" OK!");

  // print the SSID of the network you're attached to:
  Serial.print("SSID: ");
  Serial.println(WiFi.SSID());
  // print the MAC address of the router you're attached to:
  byte bssid[6];
  WiFi.BSSID(bssid);
  Serial.print("BSSID: ");
  Serial.print(bssid[5], HEX);
  Serial.print(":");
  Serial.print(bssid[4], HEX);
  Serial.print(":");
  Serial.print(bssid[3], HEX);
  Serial.print(":");
  Serial.print(bssid[2], HEX);
  Serial.print(":");
  Serial.print(bssid[1], HEX);
  Serial.print(":");
  Serial.println(bssid[0], HEX);
  // print the received signal strength:
  long rssi = WiFi.RSSI();
  Serial.print("signal strength (RSSI):");
  Serial.println(rssi);

  // print your WiFi shield's IP address:
  IPAddress ip = WiFi.localIP();
  Serial.print("IP Address: ");
  Serial.println(ip);
  // print your MAC address:
  byte mac[6];
  WiFi.macAddress(mac);
  Serial.print("MAC address: ");
  Serial.print(mac[5], HEX);
  Serial.print(":");
  Serial.print(mac[4], HEX);
  Serial.print(":");
  Serial.print(mac[3], HEX);
  Serial.print(":");
  Serial.print(mac[2], HEX);
  Serial.print(":");
  Serial.print(mac[1], HEX);
  Serial.print(":");
  Serial.println(mac[0], HEX);

  server.on("/", handleRoot);
  server.on("/post/", handleForm);
  server.onNotFound(handleNotFound);

  server.begin();
  Serial.println("HTTP server started!");
}

void loop() {
  server.handleClient();
  FastLED.show();
  //FastLED.delay(1000/FRAMES_PER_SECOND);
}
If intending to use the code yourself, the SSID and passphrase need to be provided for your network. Also, note that the USB-CDC serial port is enabled for debugging and some initial connection details are printed to this port for debugging purposes, while other prints are mostly suppressed to save processing time.
Using the code, I was able to display the controller on both phone and PC.
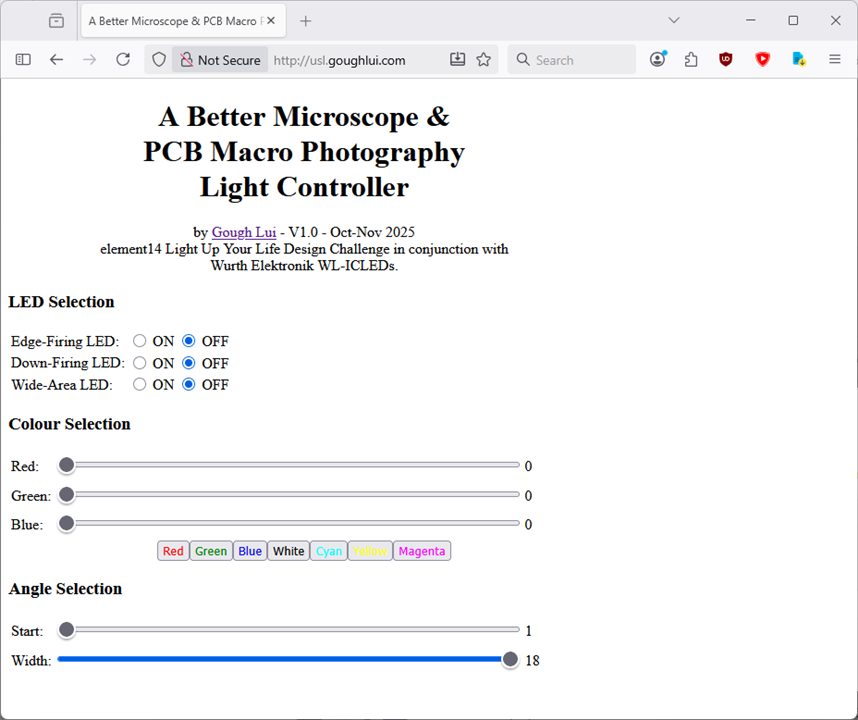
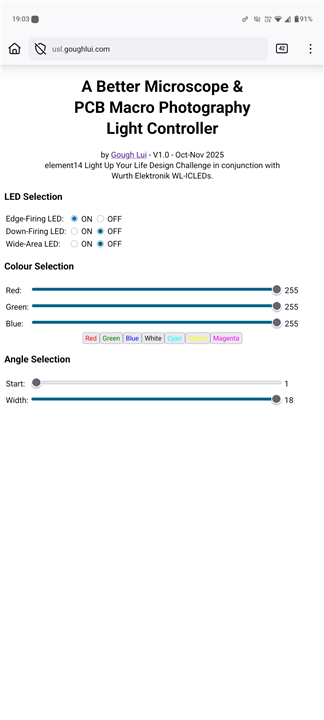
The HTML form is all hand-coded, so it’s ugly, and it uses outdated table tags to format the page. But it’s good enough for me for now – even though the Pico W has some space in its flash to accommodate larger and more complex “blobs” of data, I’d rather keep it simple for performance and ease of debugging.
To make it a bit more convenient, I’ve added a static DNS bind for usl.goughlui.com to the IP address of the Pico W (and reserved its DHCP address lease, so it will always be at the same address). This is a bit more tedious than mDNS (which could be easily re-added as it was in the original PostServer example), but in my experience, mDNS resolution on my network isn’t all that robust.
The full behaviour is on show in the video above, but if you skipped it, here’s a short, animated GIF showing the width and angle selection in operation:
Perhaps better performance could be had by explicitly calling the FastLED.show() call on the other core, so it has a consistent refresh rate and doesn’t interfere with the server client checking call, but that does increase the risk of “tearing” (a partial refresh) occurring.
Making Use of the Shield
While the ring light above is the main event, I decided that the shield also needed some love, so I decided to make it into a tiny signboard displaying a fixed message instead. To do this, I used Adafruit NeoMatrix (https://github.com/adafruit/Adafruit_NeoMatrix) and its dependencies which were auto-installed by Arduino IDE.
Part of the challenge is that the display is only 5x5, so a five-pixel high font needed to be used. Luckily for me, Adafruit_GFX has one – TomThumb.
The code is as follows and is based on the included demo in the NeoMatrix library:
// element14 Light-Up-Your-Life Design Challenge
// by Gough Lui - October-November 2025
// Adapted from Adafruit_NeoMatrix example for single NeoPixel Shield
// for use with my Arduino Shield with Wurth Elektronik WL-ICLEDs (5x5)

// Build Requires:
// - PCB, Wurth Elektronik WL-ICLEDs, Arduino Zero
//   (see element14 Community Design Challenge Post)
// - Arduino IDE (https://www.arduino.cc/en/software/)
// - Adafruit NeoMatrix and all dependencies
//   (https://github.com/adafruit/Adafruit_NeoMatrix)

#include <Adafruit_GFX.h>
#include <Adafruit_NeoMatrix.h>
#include <Adafruit_NeoPixel.h>
#include <Fonts/TomThumb.h>

#define PIN 12

// MATRIX DECLARATION:
Adafruit_NeoMatrix matrix = Adafruit_NeoMatrix(5, 5, PIN,
  NEO_MATRIX_TOP     + NEO_MATRIX_LEFT +
  NEO_MATRIX_ROWS    + NEO_MATRIX_PROGRESSIVE,
  NEO_GRB            + NEO_KHZ800);

void setup() {
  matrix.begin();
  matrix.setTextWrap(false);
  matrix.setBrightness(12);
  matrix.setTextColor(matrix.Color(random(64,256),random(64,256),random(64,256)));
  matrix.setFont(&TomThumb);
}

int x    = matrix.width();
int pass = 0;

void loop() {
  matrix.fillScreen(0);
  matrix.setCursor(x, 5);
  matrix.print(F("element14 Light Up Your Life Design Challenge, in conjunction with \
Wurth Elektronik, featuring WL-ICLEDs. By Gough Lui - Oct/Nov 2025"));
  if(--x < -490) {
    x = matrix.width();
    matrix.setTextColor(matrix.Color(random(64,256),random(64,256),random(64,256)));
  }
  matrix.show();
  delay(67);
}
I modified it for the longer message, to change the font, but also to pseudorandomly change the colour by selecting an RGB value where each of R, G and B were in the range of 64 to 255, so excessively dark colours would not be chosen, but at the cost to saturation.
The full result is visible in the video above – but an abbreviated animated GIF is below for everyone else:
Conclusion
The firmware (or software) development was somewhat intense at times, but that’s mainly because I’m not much of a JavaScript fan even though I ended up choosing to develop a crude “web app” that’s more of a slightly tricked-up webpage. It’s not pretty, but it certainly does the trick – the firmware element of it was mostly already there, thanks to the plethora of libraries available.
It's not perfect – the 48-bit LEDs that I chose to use the WS2816 type to drive using FastLED flicker when ramping up and down suggesting a bit allocation issue (perhaps endianness, or the way the current-scaling bits are used). But as this is an issue with the library, I’m not sure if this is something I’ll have the time to chase.
Finally, I also have to see just how it performs at its intended purpose – illuminating PCBs and chips under a macro lens or microscope. Will it work? How will the white balance and colour cast turn out? Will it need calibration? That’s all unknown for now.
But I hope you’ve enjoyed this progress update, as we continue towards the deadline in around two weeks’ time.


