


To control the mini fridge remotely, I developed an Android app that connects on a Bluetooth channel to the Curiosity Nano board.
Other posts in this serie
- ColdCase - Blog# 1 - Introduction
- ColdCase - Blog #2 - The refrigerated cell
- ColdCase - Blog #3 - Preparing the environment
- ColdCase - Blog #4 - The software
- ColdCase - Blog #5 - Final assembly
- ColdCase - Blog #6 - The Android app
- ColdCase - Blog #7 - Final assembly
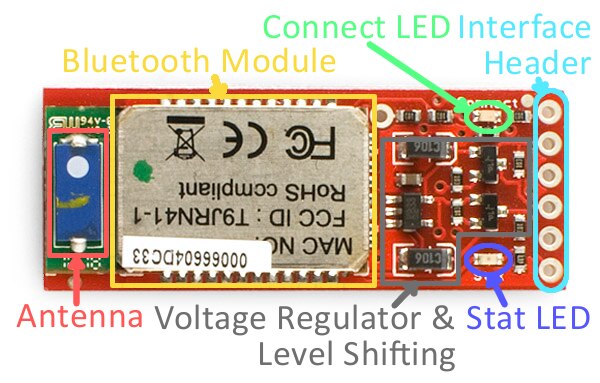
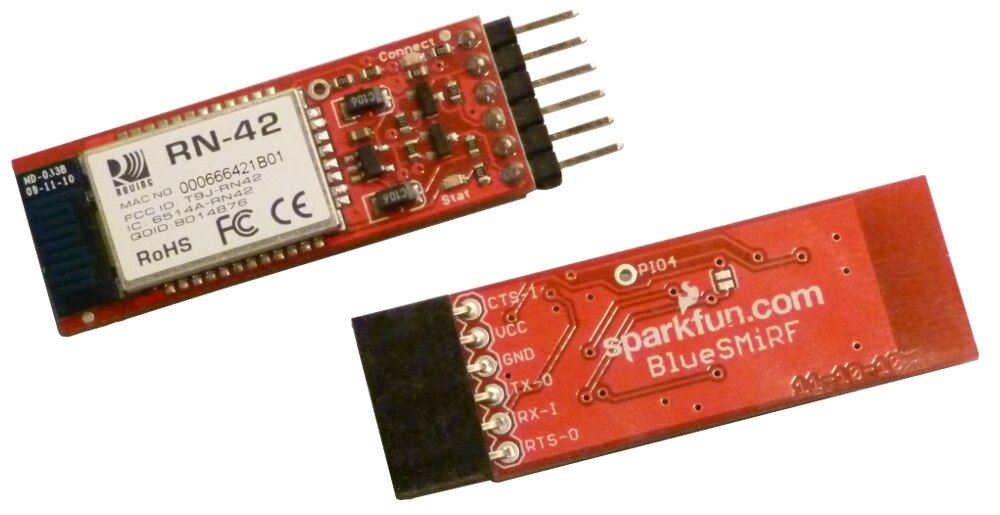
1. Bluesmirf module
Inside the mini fridge, I installed a Bluesmirf board. This board is now obsolete, but it can easily be replaced by a more up-to-date board that implements the Bluetooth serial-replacement profile
The Bluesmirf has a default baudrate of 115200 and I am not going to change this default. The init() function performs the following tasks
- Switch from data mode command mode, by sending the string “$$$”
- Send the command to set Bluetooth slave mode (this is not strictly required, since this is the Bluesmirf’s default mode
- Switch from command mode back to data mode by sending the string “---”
void BlueSmirf::init()
{
    SERCOM3_USART_Write((uint8_t*)"$$$", 3);
    SYSTICK_DelayMs(100);

    SERCOM3_USART_Write((uint8_t*)"SM,0\r", 5);
    SYSTICK_DelayMs(100);

    SERCOM3_USART_Write((uint8_t*)"---\r", 4);
    SYSTICK_DelayMs(100);
}
‘$’: Start-of-frame character
<Mode>: 0=automatic, 1=manual. In manual mode, user can drive the robot up, down, left or right
<Command>: the command to execute.
The supported commands are
Open front door
Close front door
When no command has to be executed, this field is 0
<Outputs>: output status to set. This is a bits field, where the bits have the following meanings
Bit 0: 1=switch fan on
Bit 1: 1=switch Peltier cell on
‘#’: End-of-frame character
The response has the following fields
‘$’: Start-of-frame character
<Application status>: 0=automatic, 1=manual. In manual mode, user can drive the robot up, down, left or right
<Outputs>: current status of the outputs. This is a bits field, where the bits have the following meanings
Bit 0: 1= motor roller running, 0=motor roller stopped
Bit 1: 1= valve open, 0=valve closed
<Temperature>: current temperature in degrees multiplied by 10, represented on two bytes (first byte is the MSB)
<Humidity>: current Y position, represented on two bytes (first byte is the MSB)
‘#’: End-of-frame character
All the logic to manage the communication protocol is implemented in class BlueSmirf (see bluesmirf.h and bluesmirf.cpp)
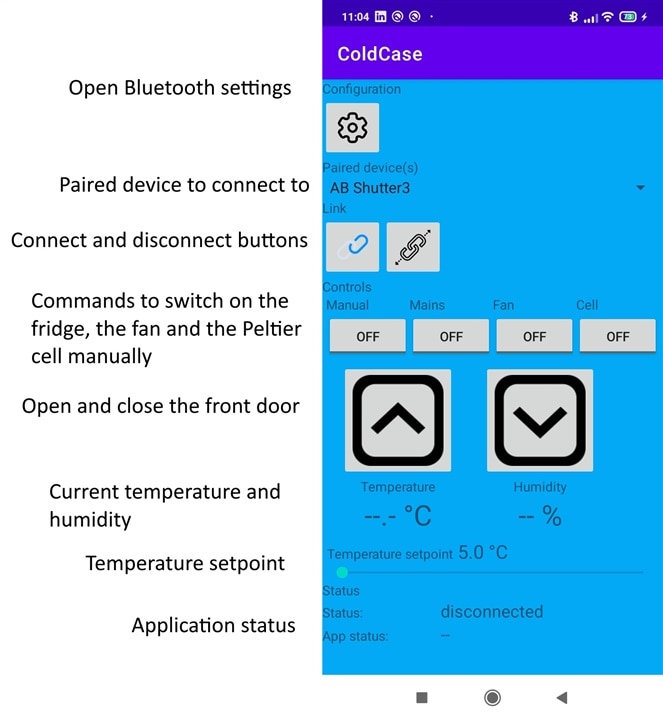
3. Android app
User can interact with the robot by means of an Android app, whose interface is shown in picture below
4. Biometric authentication
When user wants to open the fridge's door from the app, its identity is authenticated by means of fingerprint detection. This is implemented in the BiometricCheck class. First, the application checks if the biometric authentication has been enabled on the phone. If this is not the case, the authentication fails and user is not allowed to open the fridge's door
    private void checkBiometric() {

        BiometricManager biometricManager = BiometricManager.from(context);
        String error;
        switch (biometricManager.canAuthenticate()) {
            case BiometricManager.BIOMETRIC_SUCCESS:
                Log.d(TAG, "App can authenticate using biometrics.");
                showBiometricDialog();
                break;
            case BiometricManager.BIOMETRIC_ERROR_NO_HARDWARE:
                error = "No biometric features available on this device";
                showToast(error);
                break;
            case BiometricManager.BIOMETRIC_ERROR_HW_UNAVAILABLE:
                error = "Biometric features are currently unavailable.";
                showToast(error);
                break;
            case BiometricManager.BIOMETRIC_ERROR_NONE_ENROLLED:
                error = "The user hasn't associated any biometric credentials with their account.";
                showToast(error);
                break;
        }
    }
If the biometric authentication is available, the biometric dialog is initialized. Here, we also define the callback to be called when authentication is successful or fails
   private void initBiometrics() {
        executor = ContextCompat.getMainExecutor(context);

        FragmentActivity fragment = (FragmentActivity) context;
        biometricPrompt = new BiometricPrompt(fragment, executor, new BiometricPrompt.AuthenticationCallback() {
            @Override
            public void onAuthenticationError(int errorCode, @NonNull CharSequence errString) {
                super.onAuthenticationError(errorCode, errString);
                showToast("Authentication error: " + errString);
                listener.onFailed();
            }

            @Override
            public void onAuthenticationSucceeded(
                    @NonNull BiometricPrompt.AuthenticationResult result) {
                super.onAuthenticationSucceeded(result);
                listener.onSuccess();
            }

            @Override
            public void onAuthenticationFailed() {
                super.onAuthenticationFailed();
                showToast("Authentication failed");
                listener.onFailed();
            }
        });

        //create prompt dialog
        promptInfo = new BiometricPrompt.PromptInfo.Builder()
                .setTitle("Biometric login for my app")
                .setSubtitle("Log in using your biometric credential")
                .setNegativeButtonText("Cancel")
                .build();
    }
Finally, the biometric authentication dialog is shown
   private void showBiometricDialog() {
        //initialize everything needed for authentication
        initBiometrics();

        //show biometric dialog for authentication
        biometricPrompt.authenticate(promptInfo);
    }
-

DAB
-
Cancel
-
Vote Up
0
Vote Down
-
-
Sign in to reply
-
More
-
Cancel
-

amgalbu
in reply to DAB
-
Cancel
-
Vote Up
0
Vote Down
-
-
Sign in to reply
-
More
-
Cancel
Comment-

amgalbu
in reply to DAB
-
Cancel
-
Vote Up
0
Vote Down
-
-
Sign in to reply
-
More
-
Cancel
Children