


A change of plan.
I said to start writing early this week as my time limits according to my plan were over for trying to make the Nokia 5110 LCD work with node.js using MRAA initialization.
Some days ago, I wrote as a comment about the code that I could also try for this purpose.
The idea came from Andy who so kindly pointed to the js code for using the Nokia 5110 LCD with its Philips PCD8544 controller under javascript for the Beaglebone.
Τhat code (https://github.com/kkeller/Nokia5110) could easily converted for Edison Arduino board. The IO pins and b.functions for Beaglebone were substituted as well as the call to bonescript (var b = require('bonescript');) changed to MRAA (var m = require('mraa'); ).
It was our logical conclusion.
I tried running the modified files under node.js but I did not get any results on the LCD, so I started debugging and looking for possible issues from my modification.
From the results that I got I was under the impression that SPI was not set properly. So I decided to put the results of my test code as a comment on my previous post #5.
I then started to look at various documentation concerning MRAA and how SPI could be initialized and properly used, seeking some examples, especially under javascript.
Although not in js, I considered the following initialize procedure as a typical complete example:
mraa_spi_context spi = mraa_spi_init(0);
mraa_spi_mode(spi, MRAA_SPI_MODE0 );
mraa_spi_frequency(spi,1000000);
mraa_spi_lsbmode(spi, 0)
mraa_spi_bit_per_word(spi,8);
and started to think that I should make it my guide in order to include the equivalent of it in js on the code that I was testing for Nokia 5110.
I then studied from the following link: https://iotdk.intel.com/docs/master/mraa/node/classes/spi.html#method_Spi
the MRAA API Classes and in particular the SPI Class, but it was yet not clear to me as a newcomer to javascript that that the described method was enough to initialize the SPI on the Edison Arduino board, so I went into further searching about examples and I eventually run up into the Sparkfun OLED through the link https://www.npmjs.com/package/edison-oled which had quite interesting information about connecting a display through SPI to the Edison.
I went through the code and the wrapper for some time and then as time was starting to leave me behind my scheduled plan I decided that I had better stop my debugging and move towards another direction.
I evaluated again my alternative options for the use of displays for the project.
Plan B was the Grove 16 characters by 2 lines display that came with the Edison pack and Plan C was to use the Sparkfun OLED together with the Sparkfun Base board that would make the hardware for the project a matter of simply connecting the power to the system.
It had an extra cost as I would have to buy extra boards, but again I evaluated the pros and cons and eventually made up my mind to go that way, so last Saturday I placed my order for the two boards, so that I could have them within this week. Meanwhile I could prepare the code.
Hardware-wise, I would simply have to remove the Edison core board from the Intel breadboard and simply snap it to the Sparkfun board from the one side, while from the other side I would snap the OLED board. Just soldering the 2 pin power header in one of the boards and that is all.
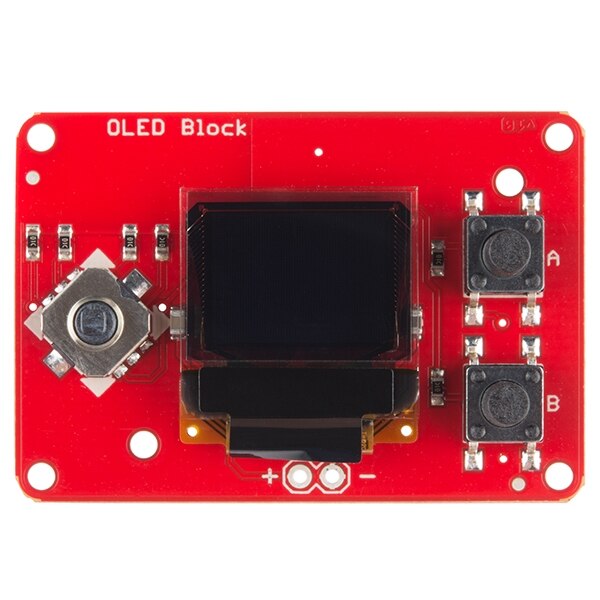
The OLED block included a small joystick and a pair of push-buttons, so that would enable me adequately to implement the control of my SDR Client without soldering anything else.
The up and down movements of the joystick can be used to change the frequency and the two buttons for the Band and the Mode change, while the button incorporated with the joystick could be used for the Step change. As the monochrome OLED is 64 x 48 it does not differ much from my Nokia LCD that is 84 x 48. Moreover its graphics capabilities can be used at least to provide two different size fonts. A bigger one for the frequency and a smaller one for the control of the functions.
The OLED display is of course only 0.66” (diagonally) compared to the approx. 1” of the Nokia LCD, but I end up with an Upcycle module with the smallest possible footprint, so it fulfills one of my other major goals which is the overall size of the modification module that will be “planted” in my receiver! Despite its smaller size, I am sure it will fit nicely 3 lines with small font data and 1 line with large font data and being a white on black OLEM will glow nicely at night.
The schematic of the OLED block can be looked over here: https://cdn.sparkfun.com/datasheets/Dev/Edison/oled_block.pdf . One extra bit of warning. Sparkfun does not use exactly the same pins that I did to connect Nokia 5110 on the Edison Arduino, as the product is intended to be used with the company's Block system that is stackable on the Edison core module.
I then went on and installed through the npm (node package manager) the edison-oled repository that inclued the code plus a number of examples that will make my project development move faster.
I simply executed the command
$ npm install edison-oled
and it installed without problems.
I then went the “tests” folder and through the examples as well as the wrapper code to get an idea of how I should work from now on.
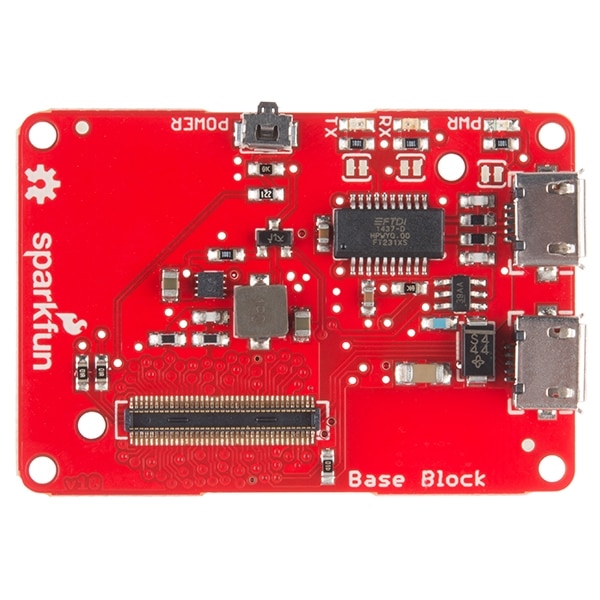
The Sparkfun Base Block (https://www.sparkfun.com/products/13045) on the other side will provide the necessary USB port that will enable me to connect the Audio USB card that will drive the audio of my Receiver and will inter-connect Edison with the OLED and Controls Block.
Having said that, I start as of today preparing my js code for the project with a quick redesign of the operational functions and controls to match the needs of the new hardware.
At the same time, I will keep as a background task of my bedtime the possibility to make the Nokia LCD eventually work with Edison Arduino under Node.js with MRAA as I had originally thought. I hope that using the OLED and going through its code may prove helpful for me in doing so.
I do put here part of the initialization code that it is being used by Sparkfun and was mentioned previously, as I believe it is very informative about the way that a Display driver should interact with the SPI and it may be useful to more people. Please be aware that it has simply been copy-pasted for that purpose and should be read as a guidline only. It is not full code..
var edison =
//setup pins needed for SPI
var cspin = (111, edison.OUTPUT, edison.HIGH); //chip select --> edison_oled.c code uses 111 mraa uses 9
var dcpin = (14, edison.OUTPUT, edison.HIGH); //data/command --> edison_oled.c code uses 14 mraa uses 36
var rstpin = (15, edison.OUTPUT, edison.HIGH); //reset --> edison_oled.c code uses 15 mraa uses 48
var sclkpin = (109, edison.SPI, edison.HIGH); //sclk --> edison_oled.c code uses 109 mraa uses 10
var mosipin = (115, edison.SPI, edison.HIGH); //mosi --> edison_oled.c code uses 115 mraa uses 11
var misopin = (114, edison.SPI, edison.HIGH); //miso --> edison_oled.c code uses 114 mraa uses 24
//create spi
var spi = (edison.SPI_MODE_0, 10000000, false, cspin);
//reset screen
rstpin;
//should add a wait time here for a few milliseconds
rstpin;
//should add a wait time here for a few milliseconds
rstpin;
//send commands to OLED
dcpin; // DC pin LOW
spi;
spi;
spi;
//send data to OLED
dcpin; //DC pin HIGH
spi;
That is all for the time being. Next time I hope to be able to introduce the new design.
Top Comments