element14 Community
element14 Community
    Register Log In
  • Site
  • Search
  • Log In Register
  • About Us
  • Community Hub
    Community Hub
    • What's New on element14
    • Feedback and Support
    • Benefits of Membership
    • Personal Blogs
    • Members Area
    • Achievement Levels
  • Learn
    Learn
    • Ask an Expert
    • eBooks
    • element14 presents
    • Learning Center
    • Tech Spotlight
    • STEM Academy
    • Webinars, Training and Events
    • Learning Groups
  • Technologies
    Technologies
    • 3D Printing
    • FPGA
    • Industrial Automation
    • Internet of Things
    • Power & Energy
    • Sensors
    • Technology Groups
  • Challenges & Projects
    Challenges & Projects
    • Design Challenges
    • element14 presents Projects
    • Project14
    • Arduino Projects
    • Raspberry Pi Projects
    • Project Groups
  • Products
    Products
    • Arduino
    • Avnet Boards Community
    • Dev Tools
    • Manufacturers
    • Multicomp Pro
    • Product Groups
    • Raspberry Pi
    • RoadTests & Reviews
  • Store
    Store
    • Visit Your Store
    • Choose another store...
      • Europe
      •  Austria (German)
      •  Belgium (Dutch, French)
      •  Bulgaria (Bulgarian)
      •  Czech Republic (Czech)
      •  Denmark (Danish)
      •  Estonia (Estonian)
      •  Finland (Finnish)
      •  France (French)
      •  Germany (German)
      •  Hungary (Hungarian)
      •  Ireland
      •  Israel
      •  Italy (Italian)
      •  Latvia (Latvian)
      •  
      •  Lithuania (Lithuanian)
      •  Netherlands (Dutch)
      •  Norway (Norwegian)
      •  Poland (Polish)
      •  Portugal (Portuguese)
      •  Romania (Romanian)
      •  Russia (Russian)
      •  Slovakia (Slovak)
      •  Slovenia (Slovenian)
      •  Spain (Spanish)
      •  Sweden (Swedish)
      •  Switzerland(German, French)
      •  Turkey (Turkish)
      •  United Kingdom
      • Asia Pacific
      •  Australia
      •  China
      •  Hong Kong
      •  India
      •  Korea (Korean)
      •  Malaysia
      •  New Zealand
      •  Philippines
      •  Singapore
      •  Taiwan
      •  Thailand (Thai)
      • Americas
      •  Brazil (Portuguese)
      •  Canada
      •  Mexico (Spanish)
      •  United States
      Can't find the country/region you're looking for? Visit our export site or find a local distributor.
  • Translate
  • Profile
  • Settings
Upcycle It
  • Challenges & Projects
  • Design Challenges
  • Upcycle It
  • More
  • Cancel
Upcycle It
Blog [Upcycle it Design Challenge] Embedded Web SDR client on Analog Radio Receiver #2: Software Concept
  • Blog
  • Forum
  • Documents
  • Polls
  • Files
  • Events
  • Mentions
  • Sub-Groups
  • Tags
  • More
  • Cancel
  • New
  • Share
  • More
  • Cancel
Group Actions
  • Group RSS
  • More
  • Cancel
Engagement
  • Author Author: konstantinoskonstas
  • Date Created: 4 Apr 2017 3:56 AM Date Created
  • Views 1126 views
  • Likes 2 likes
  • Comments 5 comments
  • upcycled_sdr
  • software concept for web sdr client
Related
Recommended

[Upcycle it Design Challenge] Embedded Web SDR client on Analog Radio Receiver #2: Software Concept

konstantinoskonstas
konstantinoskonstas
4 Apr 2017

While waiting for the Edison to arrive, I had planned to discuss about the software.

Before doing that, I will refer to some software related issues that I faced, while trying to set up an Edison environment on my computer so that I can be ready by the time the hardware arrives.


Unfortunately I do not have my old faithful Linux HP anymore, so I am using a Lenovo 10” 4 core ATOM tablet PC with 2 GB of RAM that has Win10 Home edition pre-installed. The machine is fine for doing almost all my tasks, including CAD and Spice, plus running Arduino IDE 1.6.5 which I consider quite stable for my projects. I had tried much newer versions, but had port problems (USB) with a number of boards. As I have all my development libraries installed here and had prototyped the 2 first processes of my project here, I decided to download the Edison board for this version of IDE which I did quite easily, but yet no Edison to verify its functionality.

At the same time I decided to also install Intel's version of Arduino IDE 1.5.3/Intel 1.0.4 which I did with no problem. However, whenever I try to run it, I get incompatibility messages that practically make it difficult to run that IDE, as all the underscored names of my .ino files are not accepted.

image

Using the 1.6.5 IDE, I had no problem.

I only hope that the Edison board that I downloaded for that IDE will work with no serious issues

Also I had a problem downloading the Intel toolkit with Eclispe for Win10 Home, but I eventually found a way to overcome it.

Frankly speaking, I was expecting the Arduino IDE to be more updated.

Meanwhile, I also downloaded the latest versions of Yocto and Ubilinux, to have them handy for flashing.


The Software

As there is no previous experience with Edison the idea and current prototyping was tried on Arduino and SDK Ver. 1.6.5, while WiFi communication and USB Audio that will be controlled from Edison’s embedded Yocto or Ubilinux will be tried when the Edison is available.

For this reason, the programming task has been split into 4 processes to maintain compatibility with the first two that have already been tested on Arduino.

These are:

    1. Buttons and Rotary control

    2. LCD control 

    3. WiFi layer control

    4. USB Audio layer control

The first two processes are interfaced as presented in the previous Hardware section.


WEB SDR Server connectivity and control

In order to connect to the UTwente WEB SDR, we need to enter into a browser an URL in the form: “http://websdr.ewi.utwente.nl:8901/”.

We can directly tune to the desired frequency and demodulation mode, by concatenating the string template “?tune=xxxxx.yyzzz”.

xxxxx.yy stands for the desired tuning Frequency in KHz or MHz followed by two optional decimals (yy; for hundredths and tenths of Hz), concatenated by another two or three characters (zzz) which correspond to the demodulation mode, namely AM, CW, LSB, USB.

This will be referred as the “Tuning Sentence”.

For example, the URL “http://websdr.ewi.utwente.nl:8901/?tune=198am”, instructs the WEB SDR Server to tune to 198 KHz with AM demodulation; that is the frequency of BBC Radio 4’s transmission in Long Wave. Note that the browser should support either HTML5 or Java.


The 4 Processes

For Process 1, we need to synthesize the templated string part of the Tuning Sentence, i.e., xxxxx.yyzzz by means of the Rotary Encoder Control and/or the f++/f-- buttons, and the Mode button.

Process 2 then visually displays the frequency and demodulation mode on the LCD.

Process 3 sends the Tuning Sentence to the WEB SDR Server, and returns as streaming audio the digitized contents of the frequency in the demodulation mode that has been selected or “Tuned-in”.

Finally, Process 4 redirects the audio to the USB DAC and through its headphone/speaker output drives the Upcycled Radio’s analog audio amplifier using its original volume, and EQ controls.


In that way, we have a “new” dual function Analog & Digital Radio for Bedtime listening!

Ideally, if the Edison Subsystem is packed with a small physical overhead, it could also be fitted to other smaller transistor or valve  radios.


Code for the control of the inexpensive Nokia 5110 clone LCD is provided by the well documented library of Oliver Kraus  (https://github.com/olikraus/u8glib/), which supports a multitude of colour and monochrome graphic LCDs, as I explained the other time. Before concluding to using this library, I tried some others, but their documentation was not explicit enough to allow me to design the screen layout from scratch in a way that would suit my visioning for such a client.

A bit of advice after "playing" with libraries for Arduino, especially for newcomers. Use libraries that you understand what they are doing and have some reasonable amount of documentation. Otherwise they can be a nightmare for you. Trust me, I have come to that conclusion the very hard way. When you see something strange, ask the author of that library. If you do not get a clear answer you should consider looking for an alternative library!


After running one or two different layouts and discussing with some more Amateurs about their functionality and appearance on the LCD, the following setting was concluded.

image

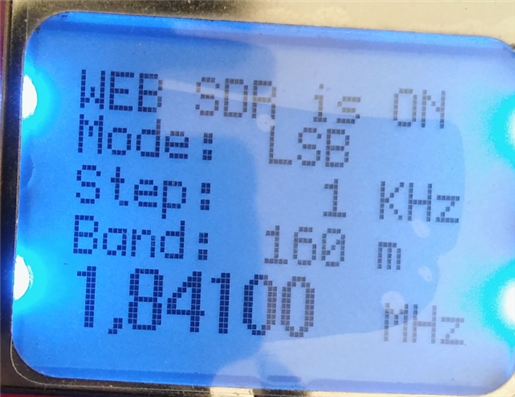
The code for the push buttons that control the Frequency Stepping (tuning resolution 10 Hz, 100 Hz, 1 KHz, etc.), Demodulation Mode (AM, CW, etc.) and Band Switching operations, cycles through the available options.

For example pressing the Mode button multiple times, programmatically goes through the following values: AM => CW => LSB => USB => AM, and so on.

For Band selection a number of Start frequencies are predefined; the first one is assigned as the default.

For each selection, Process 2 displays on the LCD the corresponding Wavelength Meter Band from an internal lookup table.

The frequencies are:

  153000 <= Start of LW (Long Wave Band)

  530000 <= Start of MW (Medium Wave Band)   

  1800000 <= Start of 160 meter Ham Band

  3500000 <= Start of 80 meter Ham Band

  7000000 <=  Start of 40 meter Ham Band

10100000 <= Start of 30 meter Ham Band

14000000 <= Start of 20 meter Ham Band

18068000 <= Start of 17 meter Ham Band

21000000 <= Start of 15 meter Ham Band

24890000 <= Start of 12 meter Ham Band

28000000 <= Start of 10 meter Ham Band

All the above can be altered to suit your personal preferences.

Other settings are:

(Step) 10 Hz, 100 Hz, 1 KHz, 5 KHz, 9 KHz, 10 KHz, 100 KHz, 1 MHz, the default is set to 9 KHz for wideband AM reception in  Long  and Medium wave bands.

(Mode) AM (Amplitude Modulation), CW (Carrier Wave), LSB (Lower Sideband), and USB (Upper Sideband), the default Mode is AM.


This concludes the description of the Software concept that has already been tried with an Arduino board. My apologies for the bad quality of the pictures from my mobile. I am expecting a better camera shortly.

As soon as the Edison hardware arrives, I will try to convert the trial code for Edison and proceed with the remaining processes.

According to my planning this is the task of this week, should the Edison arrive early this week.

Having completed this writing, I went back home. On my door, I found a notification that a courier had a delivery for me, so I assume that my package will be delivered to me by tomorrow, which means that I will enter real business.


Till next Monday then...


Published Posts
[Upcycle it Design Challenge] Embedded Web SDR client on Analog Radio Receiver #1: Introduction
[Upcycle it Design Challenge] Embedded Web SDR client on Analog Radio Receiver #2: Software Concept
[Upcycle it Design Challenge] Embedded Web SDR client on Analog Radio Receiver #3: Meeting with Edison
[Upcycle it Design Challenge] Embedded Web SDR client on Analog Radio Receiver #4: Software Challenges with Edison
[Upcycle it Design Challenge] Embedded Web SDR client on Analog Radio Receiver #5: The Software Challenge goes on
[Upcycle it Design Challenge] Embedded Web SDR client on Analog Radio Receiver #6: Changing the Display
[Upcycle it Design Challenge] Embedded Web SDR client on Analog Radio Receiver #7: Hardware is ready!
[Upcycle it Design Challenge] Embedded Web SDR client on Analog Radio Receiver #8: Problem with Audio.
[Upcycle it Design Challenge] Embedded Web SDR client on Analog Radio Receiver #9: Problem with Browser
[Upcycle it Design Challenge] Embedded Web SDR client on Analog Radio Receiver #10: Making the Web SDR Client work!
[Upcycle it Design Challenge] Embedded Web SDR client on Analog Radio Receiver #11: One of its kind!
  • Sign in to reply

Top Comments

  • mcb1
    mcb1 over 8 years ago +1
    konstantinoskonstas Stick with the later version IDE 1.8.1 They have done a few fixes, and you can load the Edison into it using Board manager. First Steps - Intel Edison Arduino I had no end of issues…
  • konstantinoskonstas
    konstantinoskonstas over 8 years ago in reply to mcb1 +1
    mcb1 Thanks a lot Mark. You are 100% right. I got the hardware this morning and ever since I am playing with it. I flashed new version of Yokto 1.7.3 , setup SSH and WiFi and then came to the Arduino IDE…
  • konstantinoskonstas
    konstantinoskonstas over 8 years ago in reply to DAB

    @DAB

    Thanks once more.

    By all means.

    Konstantinos

    • Cancel
    • Vote Up 0 Vote Down
    • Sign in to reply
    • More
    • Cancel
  • konstantinoskonstas
    konstantinoskonstas over 8 years ago in reply to konstantinoskonstas

    mcb1

    I am sorry , I have an issue with sending mail on this board.

    I will touch upon it tomorrow.

    ... my 1.6.5 r.5 to 1.8.2 and everything worked fine.

    I will prepare a more detailed report over the next days and post it.


    I am rather tiered to type more right now.

    It was a long programing day.

    Konstantinos

    • Cancel
    • Vote Up 0 Vote Down
    • Sign in to reply
    • More
    • Cancel
  • konstantinoskonstas
    konstantinoskonstas over 8 years ago in reply to mcb1

    mcb1

    Thanks a lot Mark. You are 100% right.

    I got the hardware this morning and ever since I am playing with it.

    I flashed new version of Yokto 1.7.3 , setup SSH and WiFi and then came to the Arduino IDE issue.

    I simply upgraded my 1.6.

    • Cancel
    • Vote Up +1 Vote Down
    • Sign in to reply
    • More
    • Cancel
  • DAB
    DAB over 8 years ago

    Nice update.


    I see lots of possibilities with your approach, so I look forward to seeing your build.


    DAB

    • Cancel
    • Vote Up 0 Vote Down
    • Sign in to reply
    • More
    • Cancel
  • mcb1
    mcb1 over 8 years ago

    konstantinoskonstas

    Stick with the later version IDE 1.8.1

    They have done a few fixes, and you can load the Edison into it using Board manager.

    First Steps - Intel Edison Arduino


    I had no end of issues with the Intel version.


    Mark

    • Cancel
    • Vote Up +1 Vote Down
    • Sign in to reply
    • More
    • Cancel
element14 Community

element14 is the first online community specifically for engineers. Connect with your peers and get expert answers to your questions.

  • Members
  • Learn
  • Technologies
  • Challenges & Projects
  • Products
  • Store
  • About Us
  • Feedback & Support
  • FAQs
  • Terms of Use
  • Privacy Policy
  • Legal and Copyright Notices
  • Sitemap
  • Cookies

An Avnet Company © 2025 Premier Farnell Limited. All Rights Reserved.

Premier Farnell Ltd, registered in England and Wales (no 00876412), registered office: Farnell House, Forge Lane, Leeds LS12 2NE.

ICP 备案号 10220084.

Follow element14

  • X
  • Facebook
  • linkedin
  • YouTube