


| << Previous | Blog Index | Next >> |
|---|
This week I played a lot with the Edison software tools. In my fourth blog I described my first steps using the Arduino SDK. As I was not completely happy with that, I switched to XDK, Node.js and Node-RED. I also detected that my firmware wasn't updated by then. This is also fixed now.
Node-RED is a visual programming environment. To be honest normally my preference does not ly with visual programming, I rather prefer Matlab for instance above LabView. Nevertheless for this application Node-RED works very well, so I would give it a try. Please read on for all the details.
Setting up the Edison (update)
In blog post [Upcycle It] Nixie Display #4 - Got Started with the Intel Edison Development Board on macOS I explained how the operating system was installed and setup using macOS. Unfortunately I detected that there wasn't a new system installed. The Edison just ran from its preinstalled image. After some experimenting I discovered that the problem was caused by the USB connection to my laptop by means of a USB hub. After connecting the Edison directly to the laptop USB port I could install the latest Edison image:
root@edison_arduino:~# cat /etc/version
201606081705
root@edison_arduino:~#
Then I configured the device name, password and wifi from the command line:
root@edison_arduino:~# configure_edison --setup
Next I found an addressing conflict with the Edison's USB Gadget driver network with my own home network. They both operate at 192.168.2.* and due to the conflicting address space I couldn't use the WiFi connection. This could easily be solved by editing /etc/systemd/network/usb0.network and changing the default usb0 ip address (192.168.2.x). When I turn usb0 down or keep it up using a different ip (example: 192.168.5.15) everything works fine. More info here: https://communities.intel.com/thread/101731.
root@edison_arduino:~# cat /etc/systemd/network/usb0.network
[Match]
Name=usb0
[Network]
Address=192.168.5.15/24
root@edison_arduino:~#
Intel XDK
Next I installed the Intel XDK and tried the blinking LED demo as described on the intel getting start page https://software.intel.com/en-us/xdk/docs/getting-started-intel-xdk-nodejs-iot. After the first connect to the board it took quite some time for updating all the necessary software components on the Edison. After a reboot of the board I could upload and run the blinking LED application without any problem.
Here is the console log:
Intel XDK - IoT App Daemon v0.1.6 - Node: 4.4.3, Arch: ia32
Upload on board is not from current project - uploading complete project
transferring /tmp/xdk-1173ZPBm6hm0KAE4.tar from project to board
x LICENSE.md
x README.md
x main.js
x icon.png
x package.json
x utl/cfg-app-platform.js
x utl/version-compare.js
x xdk/project-info.json
IMPORTANT: Executing NPM on IoT target. Wait for "Upload Complete" message before you start your app.
install complete
Upload Complete
Not auto starting by request
Initializing IoT LED Blink
node version: 4.4.3
mraa version: v1.0.0
mraa platform type: 2
mraa platform name: Intel Edison
os type: Linux
os platform: linux
os architecture: ia32
os release: 3.10.98-poky-edison+
os hostname: edison_arduino
Using LED pin number: 13
Remember the problems I had starting the arduino sketch on boot time ([Upcycle It] Nixie Display #4 - Got Started with the Intel Edison Development Board on macOS).
With Node.js and XDK this works flawlessly. Just select 'Board Configuration' from the manage button,
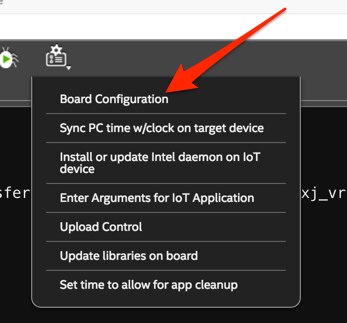
and check the 'Run previously loaded application at startup' checkbox.

Then I tried the I2C LCD demo from the available templates. I modified the code a bit:
/*
 * Drive the Grove RGB LCD (a JHD1313m1).
 *
 * This can be done using one of two methods:
 *
 * Use the UPM library, which contains direct support for the LCD device.
 *
 * Alternatively, in this app, we will drive the LCD directly from JavaScript
 * using the I2C interface directly. This approach is useful for learning
 * about using the I2C bus. The LCD file is an implementation in JavaScript
 * for some common LCD functions.
 *
 * Supported Intel IoT development boards are identified in the code.
 *
 * See LICENSE.md for license terms and conditions.
 *
 * https://software.intel.com/en-us/xdk/docs/using-templates-nodejs-iot
 */


/* spec jslint and jshint lines for desired JavaScript linting */
/* see http://www.jslint.com/help.html and http://jshint.com/docs */
/* jslint node:true */
/* jshint unused:true */


"use strict" ;


// we want mraa to be at least version 0.6.1
var mraa = require('mraa');
var version = mraa.getVersion();


if (version >= 'v0.6.1') {
    console.log('mraa version (' + version + ') ok');
}
else {
    console.log('meaa version(' + version + ') is old - this code may not work');
}


useLcd();


/**
 * Rotate through a color pallette and display the
 * color of the background as text
 */
function rotateColors(display) {
    var red = 0;
    var green = 0;
    var blue = 0;
    display.setColor(red, green, blue);
    setInterval(function() {
        blue += 64;
        if (blue > 255) {
            blue = 0;
            green += 64;
            if (green > 255) {
                green = 0;
                red += 64;
                if (red > 255) {
                    red = 0;
                }
            }
        }
        display.setColor(red, green, blue);
        display.setCursor(0,0);
        display.write('Upcycled NIXIE');
        display.setCursor(1,0);
        display.write('RGB=' + red + ' ' + green + ' ' + blue + '   ');
    }, 1000);
}


/**
 * Use the hand rolled i2c.js code to do the
 * same thing as the previous code without the
 * upm library
 */
function useLcd() {
    var i2c = require('./i2c');
    var display = new i2c.LCD(0);


    display.setColor(0, 60, 255);
    display.setCursor(1, 1);
    display.write('hi there');
    display.setCursor(0,0);
    display.write('more text');
    display.waitForQuiescent()
    .then(function() {
        rotateColors(display);
    })
    .fail(function(err) {
        console.log(err);
        display.clearError();
        rotateColors(display);
    });
}
And here is the result:
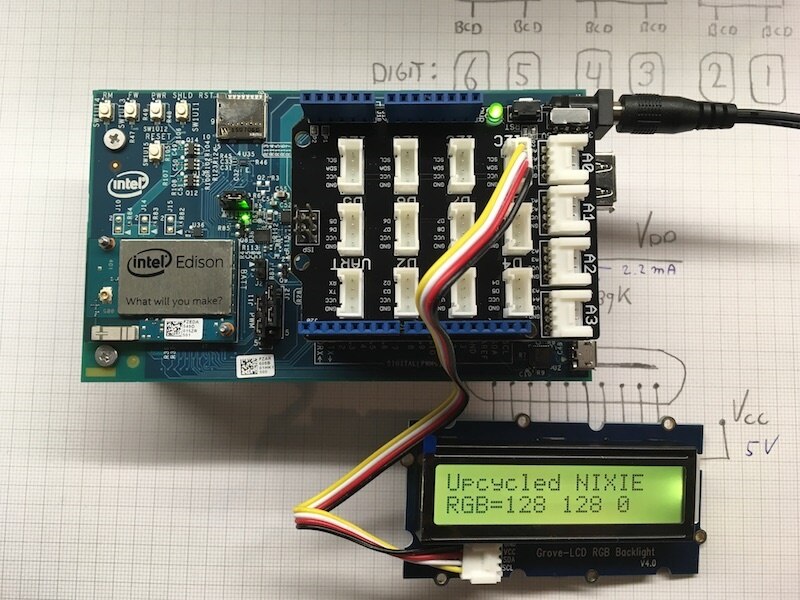
So far my experience with Node.js is positive and for the Edison I prefer this above the Arduino SDK.
Node-RED
Nice aspect of Node.js is that you can run nice stuff on top of it, such as Node-RED (https://nodered.org/ ) jasonwier92 already described some experiments with Node-RED (Getting To Know the Sensors with Node-Red [Upcycle It #3]). As you might remember from my [Upcycle It] Nixie Display #1 - Introduction I want to display weather, or other data from the internet on the Nixie display. Node-RED should make that perfectly possible using the node-red-node-openweathermap (http://flows.nodered.org/node/node-red-node-openweathermap).
Lets give it a try: (my procedure is slightly different from jasonwier92's)
root@edison_arduino:~# npm install --unsafe-perm node-red
root@edison_arduino:~# cd /usr/bin
root@edison_arduino:~# ln -s /home/root/node_modules/.bin/node-red node-red
root@edison_arduino:~# ln -s /home/root/node_modules/node-red/bin/node-red-pi node-red-pi
root@edison_arduino:~# cd
root@edison_arduino:~# npm install -g pm2
root@edison_arduino:~# pm2 start node-red --node-args="--max-old-space-size=128"
root@edison_arduino:~# pm2 save
root@edison_arduino:~# pm2 startup
root@edison_arduino:~# reboot
I skipped all the informational commands in the listing above, as they are not necessary, although very informative.
A video of the complete proces can be found here: (https://youtu.be/28fknvDEAwc ) at 18:50 the installation of Node-RED starts.
In order to control the grove starter kit sensors I need to install a node library for that. First one I found (http://flows.nodered.org/node/node-red-node-upm ) looks promising:
root@edison_arduino:~# npm install node-red-contrib-upm
root@edison_arduino:~# reboot
I tried die LCD module, but unfortunately that didn't work, I got a "TypeError: LCD.Jhd1313m1 is not a function" error when deployed.
Next I found a library with nodes from seed studio (http://flows.nodered.org/node/node-red-contrib-smartnode-seeed ):
root@edison_arduino:~# npm install node-red-contrib-smartnode
root@edison_arduino:~# npm install node-red-contrib-smartnode-seeed
root@edison_arduino:~# reboot
That one worked, with three simple blocks I got a clock up and running, here is a picture of the flow:
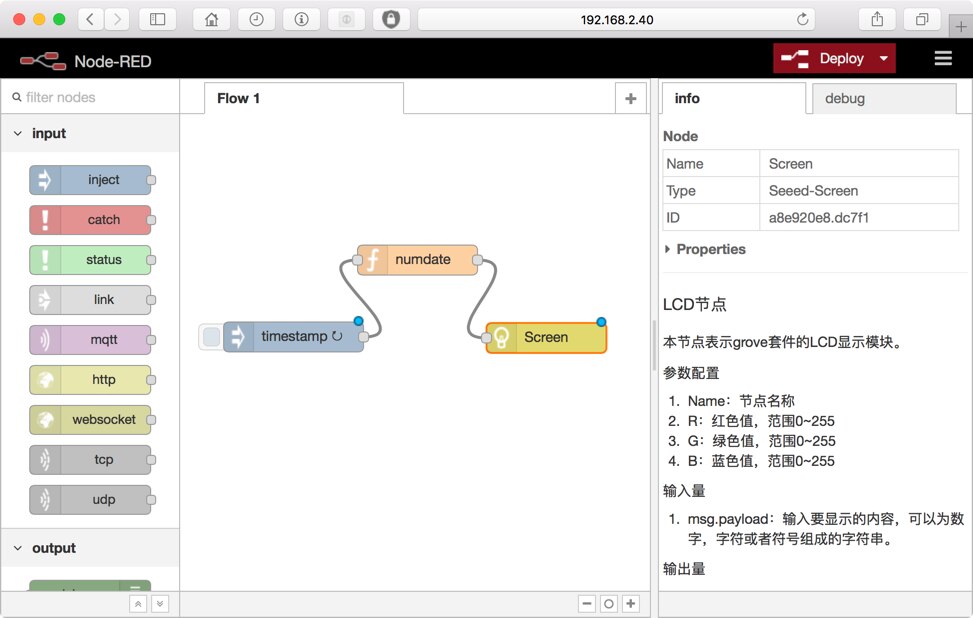
The timestamp injects the number of milliseconds since January 1st, 1970 into the flow. The 'numdate' is a function node in which I put code to convert the time number to a readable time string:
// Create a Date object from the payload
var date = new Date(msg.payload);
// Change the payload to be a formatted Date string
msg.payload = date.toString();
// Return the message so it can be sent on
return msg;
And the screen node is the LCD screen from the node-red-contrib-smartnode-seed node. As you can see the info field has the Chinese locale. That doesn't influence its functionality, but would be nice if there also is a english translation available. I will have a look at that later.
So using this three simple blocks I built a clock. What also is very convenient is that it automatically starts when powering up the edison.
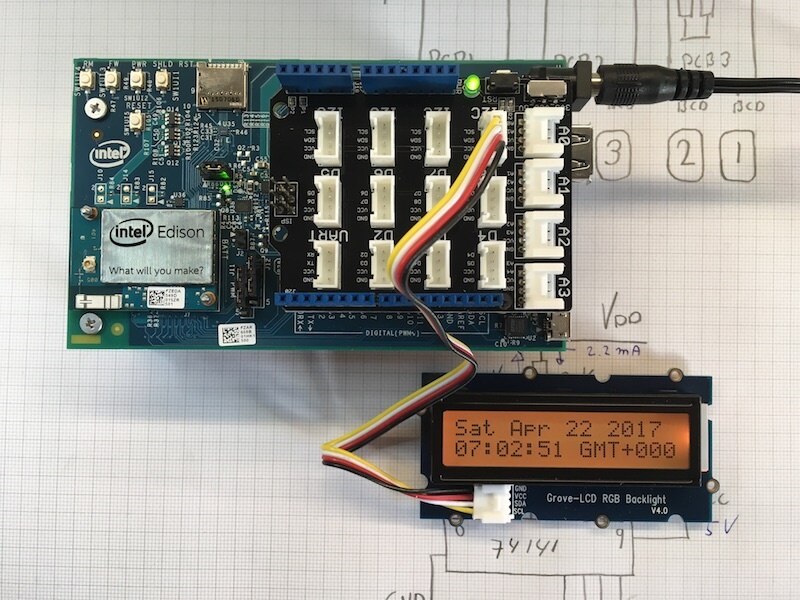
As you can see it is displaying GMT time, which is not my timezone. This could easily be fixed by changing the local time file:
root@edison_arduino:~# rm /etc/localtime
root@edison_arduino:~# ln -s /usr/share/zoneinfo/Europe/Paris /etc/localtime
root@edison_arduino:~# reboot
...................................
root@edison_arduino:~# date
Sat Apr 22 17:20:44 CEST 2017
Thats it for this week, Node-RED looks like the ideal candidate to continue my project  .
.
Next steps will be to test the node-red-node-openweathermap (http://flows.nodered.org/node/node-red-node-openweathermap) node and make a Node-RED node for connecting to the PCF8574 I/O extenders in order to control the Nixie tubes.
But first I need to work on the hardware. Last week my PCB's arrived, I will blog about that next week.
Stay tuned.
Top Comments
-

jasonwier92
-
Cancel
-
Vote Up
0
Vote Down
-
-
Sign in to reply
-
More
-
Cancel
-

gpolder
in reply to jasonwier92
-
Cancel
-
Vote Up
0
Vote Down
-
-
Sign in to reply
-
More
-
Cancel
-

jasonwier92
in reply to gpolder
-
Cancel
-
Vote Up
0
Vote Down
-
-
Sign in to reply
-
More
-
Cancel
-

gpolder
in reply to jasonwier92
-
Cancel
-
Vote Up
0
Vote Down
-
-
Sign in to reply
-
More
-
Cancel
-

jasonwier92
in reply to gpolder
-
Cancel
-
Vote Up
0
Vote Down
-
-
Sign in to reply
-
More
-
Cancel
Comment-

jasonwier92
in reply to gpolder
-
Cancel
-
Vote Up
0
Vote Down
-
-
Sign in to reply
-
More
-
Cancel
Children