element14 Community
element14 Community
    Register Log In
  • Site
  • Search
  • Log In Register
  • Members
    Members
    • Benefits of Membership
    • Achievement Levels
    • Members Area
    • Personal Blogs
    • Feedback and Support
    • What's New on element14
  • Learn
    Learn
    • Learning Center
    • eBooks
    • STEM Academy
    • Webinars, Training and Events
    • More
  • Technologies
    Technologies
    • 3D Printing
    • FPGA
    • Industrial Automation
    • Internet of Things
    • Power & Energy
    • Sensors
    • More
  • Challenges & Projects
    Challenges & Projects
    • Design Challenges
    • element14 presents
    • Project14
    • Arduino Projects
    • Raspberry Pi Projects
    • More
  • Products
    Products
    • Arduino
    • Dev Tools
    • Manufacturers
    • Raspberry Pi
    • RoadTests & Reviews
    • Avnet Boards Community
    • More
  • Store
    Store
    • Visit Your Store
    • Choose Another Store
      • Europe
      •  Austria (German)
      •  Belgium (Dutch, French)
      •  Bulgaria (Bulgarian)
      •  Czech Republic (Czech)
      •  Denmark (Danish)
      •  Estonia (Estonian)
      •  Finland (Finnish)
      •  France (French)
      •  Germany (German)
      •  Hungary (Hungarian)
      •  Ireland
      •  Israel
      •  Italy (Italian)
      •  Latvia (Latvian)
      •  
      •  Lithuania (Lithuanian)
      •  Netherlands (Dutch)
      •  Norway (Norwegian)
      •  Poland (Polish)
      •  Portugal (Portuguese)
      •  Romania (Romanian)
      •  Russia (Russian)
      •  Slovakia (Slovak)
      •  Slovenia (Slovenian)
      •  Spain (Spanish)
      •  Sweden (Swedish)
      •  Switzerland(German, French)
      •  Turkey (Turkish)
      •  United Kingdom
      • Asia Pacific
      •  Australia
      •  China
      •  Hong Kong
      •  India
      •  Korea (Korean)
      •  Malaysia
      •  New Zealand
      •  Philippines
      •  Singapore
      •  Taiwan
      •  Thailand (Thai)
      • Americas
      •  Brazil (Portuguese)
      •  Canada
      •  Mexico (Spanish)
      •  United States
      Can't find the country/region you're looking for? Visit our export site or find a local distributor.
  • Translate
  • Profile
Project14
  • Challenges & Projects
  • More
Project14
Documents Project14 | Winners Announcement: Photonics: Lasering In On the Science of Light!
  • Blog
  • Forum
  • Documents
  • Events
  • Members
  • Mentions
  • Sub-Groups
  • Tags
  • More
  • Cancel
  • New
Project14 requires membership for participation - click to join
Actions
  • Share
  • More
  • Cancel
Engagement
Author: tariq.ahmad
Date Created: 27 Apr 2020 3:30 PM
Last Updated: 27 Apr 2020 8:43 PM
Views: 351
Likes: 16
Comments: 22
Related
Recommended

Project14 | Winners Announcement: Photonics: Lasering In On the Science of Light!

Photonics

Enter Your Electronics & Design Project for a chance to win an $200 Shopping cart of product!

Submit an EntrySubmit an Entry  Back to homepage
Project14 Home
Monthly Themes
Monthly Theme Poll


"Thus, the photons which constitute a ray of light behave like intelligent human beings: out of all possible curves they always select the one which will take them most quickly to their goal." -  Max Planck, (1858-1947) was a German theoretical physicist whose discovery of energy quanta won him the Nobel Prize in Physics in 1918.


Congratulations to aspork42  for  WWCS - World's Worst Color Sensor - Project 14 Photonics Challenge   You are the winner of a $200 Shopping Cart and earn the Grand Prize Trophy Badge!


Congratulations to kk99 for Simple light flicker meter,  milosrasic98  for Ski Lamp,  and Jan Cumps for PiFace, Raspberry, LabVIEW and LEDs!  You are the First Place winners of the $100 Shopping Cart and earn First Place Trophies!


The Photonics competition gave you an opportunity to do projects around lasers, LEDs, phototransistors, LiDARs, TOF cameras, and more!  Photonics is the science of light. It is derived from the Greek word "phos" which means light.  It emerged as a field in 1960 with the invention of the laser and although the term was coined earlier, it came into common use in the 1980s with the adoption of fiber-optic cable by telecommunications companies, making the digital age we live in possible.  Amongst the things that photonics has made possible are high-speed internet, laser tattoo removal, LASIK eye surgery, and infrared goggles. Your project can involve anything that uses optoelectronic components to source, detect, and control light. This includes any applications that study how photoelectric or photovoltaic effect is used photodiodes (such as solar cells), phototransistors, photomultipliers optoisolators, and integrated optical circuit (IOC) elements; photoconductivity used in photoresistors, photoconductive camera tubes, and charge-coupled imaging devices; stimulated emission used in injection laser diodes and quantum cascade lasers; lossev effect or radiative recombination used in: light-emitting diodes (LED) and OLEDs; photoemissivity used in a photoemissive camera tube; and applications related to optocoupler and optical fiber communications.


Without further Ado here are your winners.......


{tabbedtable} Tab LabelTab Content

The Winners

The Grand Prize


WWCS - World's Worst Color Sensor - Project 14 Photonics Challenge  by aspork42 :


Community Member Scoring:


Grand Prize: 10 points, First Place:  1 point  Total Points: 11 Points


aspork42 has had an idea for a super basic color sensor for. along time.   He's not talking about fancy-schmancy color sensors, but rather something more basic... much much more basic... The concept here is to use a humble RGB LED and a photoresistor (aka "light dependent resistor" LDR). The thought is that if you can control the color of the light, then you know what spectrum is available at the sensor. This is the opposite of how most imagers work. The standard color image sensor has multiple pixels, each with a band-pass filter relative to roughly "red", "green", and "blue", and the light source contains spread-spectrum light (aka "white").  His plan was to sequentially turn on just one color light at a time, then read the analog value produced by the LDR through a voltage divider circuit.  He'll average 1000 readings, then scale them to a normalized 0-255 to represent 8-bit RGB color.  He's using an Arduino to control it. This isn't meant to be highly accurate, but there could be some applications for it. One that comes to mind (potentially) is a kids game where they place a colored block into a toy, and the toy can tell them what color it is. This changes out a multi-dolor sensor with dirt-cheap jellybean parts and works good enough to identify 10 colors.  For the actual sensor module hardware, he devised a simple holder for the LED and LDR. I hold the LED at +10° from vertical, and the sensor at +30°. This keeps the spectral reflections from the light going away from the sensor as to not blind it.


WWCS - World's Worst Color Sensor


"This was a very clever project.  While the electronics were relatively simple, the  photonics aspects of this project were well considered and well executed." - Community Member Judge

"Worlds Worst Color Sensor, Great explanation and experiment." - Community Member Judge

You don't have permission to edit metadata of this video.
Edit media
x
Upload Preview


"This is a beautifully simple project, which really makes the most of both LEDs and photoresistor by leveraging some clever physics. The 3D printed enclosure for the LEDs and photoresistor makes it a nice little hand tool. The result is great, I might build one for myself, so I can finally match paint colours while decorating the house during those COVID-19 days! "  - Community Member Judge

"There was a good combination of theory and practical implementation within the project. The video was well produced and gave a good explanation of the project works." -  Community Member Judge

"A well documented project." - Community Member Judge

First Place Winners:


Simple light flicker meter  by kk99 :


Community Member Scoring:


First Place:  4 points Total Points: 4 Points


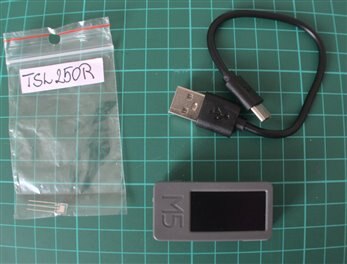
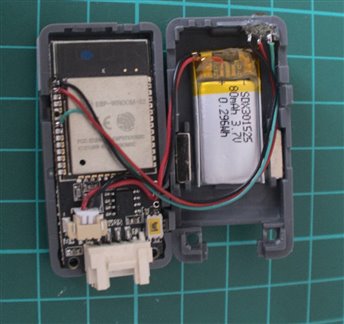
The basic idea was to create a simple device which allow to compare the quality of light sources e.g. LED bulbs. He uses a TSL250R IC containing photodiode and operational amplifier with configured feedback loop. This IC is optical sensor which output voltage is proportional to light intensitivity. He put this sensor inside to M5Stick case and connected directly to ESP32 module. Output from sensor is connected to GPIO with number 35.  Output data is sampled by ADC which is triggered by hardware timer of ESP32 board. After sampling there is calculated FFT. After that there is obtained frequency for maximum peak. Additionally there is displayed a plot with input data, so we could see amplitude of input signal. All data are presented on OLED display.


Simple light flicker meter


"This was another great photonics project.  A handy and clever tool to analyze the flicker of a light source.  What a cute little device!" - Community Member Judge


You don't have permission to edit metadata of this video.
Edit media
x
Upload Preview


"This is an interesting concept and the project was well delivered with a nice upgrade added after the initial build. There was plenty of detail in the blog about the build aspects."  - Community Member Judge

"A well executed and genuinely useful project" - Community Member Judge

PiFace, Raspberry, LabVIEW and LEDs  by Jan Cumps:


Community Member Scoring:


Grand Prize: 2 points  First Place:  2 points  Total Points: 4 Points


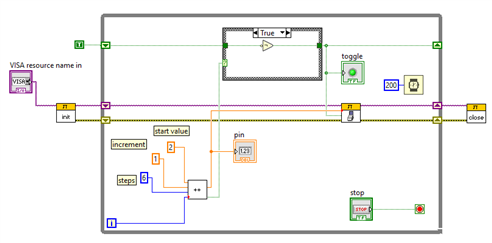
For the Project14 theme Photonics, Jan Cumps  created a LabVIEW flow that will switch on 6 LEDS in sequence, then switch them off again. Another Blinky .  There's more though. It shows the SCPI service he wrote for Linux in action, together with the custom LabVIEW IVI driver created for that project. The functionality is simple. Six outputs of a PiFace are switched on in sequence. Then they are switched off in sequence again.


There are a few things in this flow that are commonly used in LabVIEW

  • while loop: the outer square, that runs until you tell it to stop. With a shift register to pass the exit value back to the input of the loop
  • case block: the smaller square, in this case having a path for TRUE or FALSE case. (if then else)
  • IVI Driver blocks: the 3 Pi blocks with the yellow header are custom IVI driver blocks. Most SCPI instruments provide such blocks. I use a connection block, then a switch to control the outputs of a PiFace Digital hat, and a disconnect block.
  • a reusable block: the incrementor (with the ++ label inside) is a custom reusable block I made. Versatile and pre-tested/


All code, either LabVIEW, Raspberry Pi C / C++, shell scripts and service wrappers, are documented in this blog series. The generic incrementer and this specific LabVIEW example is attached to the project blog.


PiFace, Raspberry, LabVIEW and LEDs

"A good explanation of using LabVIEW programming to produce a very effective building block for other applications. I liked the overall sophistication in the approach to blink some LEDs." - Community Member Judge


You don't have permission to edit metadata of this video.
Edit media
x
Upload Preview


"A great LabVIEW/SCPI project with some LEDs as the final link in an impressive chain" - Community Member Judge

"PiFace and LEDs, very good explanation of MATLAB." - Community Member Judge

Ski Lamp  by milosrasic98:


Community Member Scoring:


Grand Prize: 2 points  First Place:  2 points  Total Points: 4 Points


For this project, milosrasic98 decided to upgrade an old project that he did about 8 months ago, but hadn't posted anything about here. He bought a standard RGB LED strip set, which came with 5m of RGB LED strip, a small IR remote control and a 12V power supply. One of his favorite sports is skiing and for a long time, he wanted to mount my skis on the wall, but it would be boring to do it in an ordinary way. So he cut out a mountain of a piece of wood, put the LED strip behind it and hanged it up like that, he loved how it looked and it worked okay, but with limited number of colors, and of course, only controllable using the small remote that came with it. So he decided by using an ESP8266-07 with some additional hardware, to make it better, to keep all of the functionality it has now, but add the option of controlling it by a phone app.


Ski Lamp


"This is a very nice art project, driven by some great electronics/software and hacking.  This really came together well!" - Community Member Judge

"Ski Lamp, very well written project." - Community Member Judge

You don't have permission to edit metadata of this video.
Edit media
x
Upload Preview


"A very detailed blog showing the build, the end result worked well and looked great. A great mixture of electronic skills and practical building methods." - Community Member Judge

"Simple and effective! This projects creates a lovely wall light, with many effects available at the touch of your phone!  The woodwork just adds a nice finishing touch to an  already excellent project." - Community Member Judge

The Runners Up

Runners Up:


The following members received first place votes.


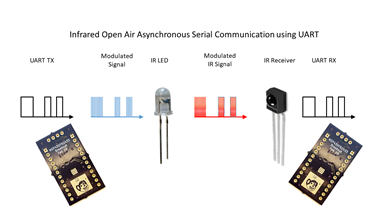
Photonics:  Wireless Communication with Infrared  by fmilburn


Community Member Scoring:


First Place:  4 points, Total Points: 4 Points


This blog describes how infrared receivers such as the Vishay TSOP38238TSOP38238 work and rather than using a library or built-in hardware it describes an oddball way of wireless communication of my own design. A microcontroller will be used to turn UART transmissions into a modulated signal which can then be read into UART on the receiving microcontroller using the TSOP38328.  While located with the Photonics Project14 Photonics entries, it is not an official entry and it is not my intention to have it eligible for a prize.


Photonics: Wireless Communication with Infrared


"This is a great practical demonstration project, showing a working IR communications link. Very useful and handy way to wirelessly communicate." - Community Member Judge

"Really well done and nicely written up. A shame it never got used for its original purpose. I'd like to vote for this but it seems the author would rather I didn't." - Community Member Judge

You don't have permission to edit metadata of this video.
Edit media
x
Upload Preview


"Another well presented project by Frank with good details of the build within the blog and a positive outcome that can be built on for other projects." - Community Member Judge

"IR Communication, well written." - Community Member Judge

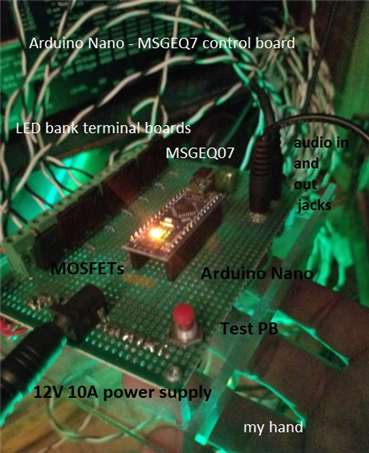
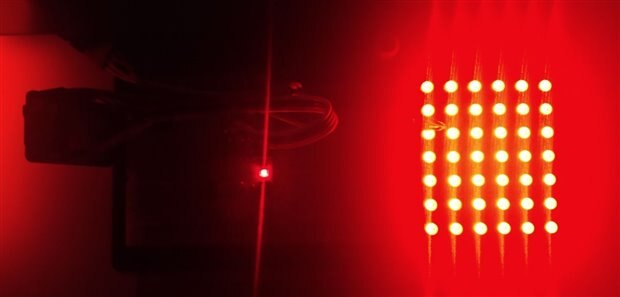
Arduino MSGEQ7 Light Organ - high power LED banks for your backyard party  by robogary:


Community Member Scoring:


First Place:  2 points, Total Points: 2 Points


This is a LED light Organ project meant for summertime evening fun. Imagine grilling on your house deck, patio, or beachfront..........relaxing (or rockin' and rollin' ) with a stereo playing, and 100+ feet (35 meters) of deck railing ( backyard fence or yard ) bursting in a multitude of LED colors to the tunes, lighting up the night sky. That is the goal of this project. 5M LED strips are relatively inexpensive, wickedly bright , can be bought in a wide variety of colors and in waterproof versions.


Arduino MSGEQ7 Light Organ - high power LED banks for your backyard party

"An entertaining end result producing some nice effects. The blog was well written and interesting to read."  - Community Member Judge


You don't have permission to edit metadata of this video.
Edit media
x
Upload Preview


"A great project. I could see lots of teenager rooms fitted with LEDs strips, flashing away to their favourite tunes! And, as a plus, this project which could be easily adapted to many other uses! Excellent!" - Community Member Judge


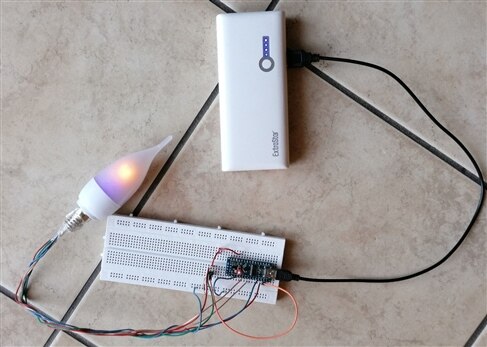
Candle in the wind  by redcharly


Community Member Scoring:


Grand Prize:  2 points, Total Points: 2 Points


This project is a simple game that inspired my 4-year-old son.  redcharly  saw him spellbound looking at the flame of a candle, the candle of a birthday cake.  He tried to make him play a bit with LEDs but the charm of a flame that moves as if it were alive cannot be equaled by a cold LED. Looking at the flame of a candle, he tried to simulate it with a simple circuit that can be used to introduce some of the potentials of an Arduino board to my students. If we look closely at the flame of a candle, we can see that it takes on different colors. Below, near the wick, there will be bluish shades, while going up the color changes from blue to red-orange to get bright yellow. In addition to this chromatic variation, we will also have to take into consideration the effect of the convective currents that cause the flame to wave and move continuously in an unpredictable way, especially in its upper part. These two aspects relating to a candle flame can be modeled using Arduino's PWM modulation and Random function. This is therefore an excellent opportunity to show students what PWM modulation is and what its typical uses are.


Candle in the wind


You don't have permission to edit metadata of this video.
Edit media
x
Upload Preview


"A well written blog with an interesting use for PWM signals. The end result was very effective." - Community Member Judge

You don't have permission to edit metadata of this video.
Edit media
x
Upload Preview


"Very original project, loved how those rectangular LEDs are used, and the end result is pretty amazing! Great project, well done." - Community Member Judge


Color Classification on ESP32Cam  by ankur608 :


Community Member Scoring:


First Place:  1 points Total Points: 1 Points


Color Classification on ESP32Cam


"A good blog that produced a working outcome that could be used for other projects." - Community Member Judge

You don't have permission to edit metadata of this video.
Edit media
x
Upload Preview


In the comments below:


Be sure to Congratulate the Winners and Keep Being Awesome!

  • past_contest
  • photonicsch
  • Share
  • History
  • More
  • Cancel
Anonymous

Top Comments

  • aspork42
    aspork42 over 2 years ago +7

    Congrats to everyone! There was certainly some tough competition this time around. I loved (as always) the huge amount of variety in projects. I loved milosrasic98 project since it involved such innovation…

  • balearicdynamics
    balearicdynamics over 2 years ago +5

    Congratulations to the winners. And a great appreciation for the Grand Prix winner. It is a project I liked a lot.


    Enrico

  • gecoz
    gecoz over 2 years ago +5

    Congratulations to the winners and all the contestants. Really fabulous projects, thanks for sharing with us.

  • aspork42
    aspork42 over 1 year ago in reply to Jan Cumps

    That's awesome! I should stock up on those also

    • Cancel
    • Up +3 Down
    • Reply
    • More
    • Cancel
  • Jan Cumps
    Jan Cumps over 1 year ago in reply to Fred27

    Fred27  wrote:


    They're ferrules. Great for crimping around stranded wire ends.

    yes. Also great for these DIN rail terminal blocks (I ordered 10 extra of those with the cart))

    • Cancel
    • Up +1 Down
    • Reply
    • More
    • Cancel
  • Fred27
    Fred27 over 1 year ago in reply to dubbie

    They're ferrules. Great for crimping around stranded wire ends.

    • Cancel
    • Up +3 Down
    • Reply
    • More
    • Cancel
  • dubbie
    dubbie over 1 year ago in reply to Jan Cumps

    Jan,


    What is that in the top photograph? I couldn't work it out, even when I used my magnifying glass.


    Dubbie

    • Cancel
    • Up +2 Down
    • Reply
    • More
    • Cancel
  • Jan Cumps
    Jan Cumps over 1 year ago in reply to tariq.ahmad

    My shopping cart was inspired by shabaz' reviews ...


    and jc2048's posts:

    • Cancel
    • Up +5 Down
    • Reply
    • More
    • Cancel
  • tariq.ahmad
    tariq.ahmad over 1 year ago in reply to Jan Cumps

    Hi Jan Cumps ,


    Sorry about that.


    Just wrapped up the winners announcement for NanoRama and some big things are out of the way so I'm going to follow up with the rest of the Photonics winners and make sure everything is in order.  

    • Cancel
    • Up +3 Down
    • Reply
    • More
    • Cancel
  • Jan Cumps
    Jan Cumps over 1 year ago in reply to Jan Cumps

    Jan Cumps  wrote:


    Oops, I'm a few price claims behind because I don't remember the procedure for the shopping cart. Help, tariq.ahmad 

    Got it. How to Redeem Your Shopping Cart for Project14

    • Cancel
    • Up +1 Down
    • Reply
    • More
    • Cancel
  • Jan Cumps
    Jan Cumps over 1 year ago

    Oops, I'm a few price claims behind because I don't remember the procedure for the shopping cart. Help, tariq.ahmad

    • Cancel
    • Up +2 Down
    • Reply
    • More
    • Cancel
  • dubbie
    dubbie over 2 years ago

    Congratualtions to everyone. All good projects and worthy winners.


    Dubbie

    • Cancel
    • Up +2 Down
    • Reply
    • More
    • Cancel
  • kmikemoo
    kmikemoo over 2 years ago

    Congratulations to the winners!  Awesome projects.

    • Cancel
    • Up +3 Down
    • Reply
    • More
    • Cancel
>
Element14

element14 is the first online community specifically for engineers. Connect with your peers and get expert answers to your questions.

  • Members
  • Learn
  • Technologies
  • Challenges & Projects
  • Products
  • Store
  • About Us
  • Feedback & Support
  • FAQs
  • Terms of Use
  • Privacy Policy
  • Legal and Copyright Notices
  • Sitemap
  • Cookies

An Avnet Company © 2022 Premier Farnell Limited. All Rights Reserved.

Premier Farnell Ltd, registered in England and Wales (no 00876412), registered office: Farnell House, Forge Lane, Leeds LS12 2NE.

ICP 备案号 10220084.

Follow element14

  • Facebook
  • Twitter
  • linkedin
  • YouTube