

In 2016, I managed to get my hands on the Raspberry Pi 3 Model B, and now I have been fortuitous to get my hands on the new Raspberry Pi 3 Model B+, and of course it makes sense to push it through the same, gruelling benchmarks as its predecessors. You can read the previous benchmark blog here: A Comprehensive Raspberry Pi 3 Benchmark.
I have managed to use the same benchmark software as before, Roy Longbottom's benchmark collection still exists, fortunately. Though nBench - a really old benchmarking tool which was used back on the AMD K6-400 and such range of processors, is not so easy to acquire anymore. Produced by BYTE magazine, it can be compiled for the Raspberry Pi and other boards. Thanks to the web archive you can find the previous benchmarks along with a download of the source code.
While the main processor of the Raspberry Pi changes from each iteration, the VideoCore IV doesn't really change, and I've yet to see any real benchmarking software to try it out. So if anyone's aware of a suitable benchmarking tool or software, then I'll run it on each version of the Pi and try it out. Though I will admit, running glxgears with vertical sync' turned off did show some interesting results. A true benchmark of the VideoCore wouldn't only test the processing power of it though, it would also test settings such as texture capability, texture throughput and vertices rendering.
What's New in the Pi 3 Model B+?
You're likely already familiar with the specifications of the Raspberry Pi. So let's go over what's new in the Pi 3 Model B+ :
| Component / Board | Raspberry Pi 3 Model B+ |
|---|---|
| Processor Chipset | BCM 2837B0 64bit ARMv8 Cortex A53 Quad Core |
| Processor Speed | 1.4Ghz per core |
| Max Power Draw | 2.5A |
| Wireless LAN | 2.4Ghz and 5Ghz Dual-Band Antenna, supporting IEEE 802.11 b/g/n/ac |
| Bluetooth | Supports Bluetooth 4.2, Bluetooth |
| Ethernet / Local Area Network | Up to 300mbps (802.3ab over USB 2.0) |
The new Raspberry Pi processor is still following the trend of supporting 64bit, though we're still waiting for Raspbian to catch up and run as a 64bit distribution. Being fair to Raspbian, Debian arm64 is still picking up the pace to be fully supported and its full time release was only recently with Debian 8, Jessie.
Identifying the Processor
There are a few commands we can run to get information from the processor, this tells us the features and instruction sets it supports, the command in this case is cpuinfo:
| cpuinfo - Raspberry Pi 3 Model B+ | cpuinfo - Raspberry Pi 3 Model B | cpuinfo - Raspberry Pi 2 Model B | cpuinfo - Raspberry Pi 1 Model B+ |
|---|---|---|---|
|
model name : ARMv7 Processor rev 4 (v7l) Features: half thumb fastmult vfp edsp neon vfpv3 tls vfpv4 idiva idivt vfpd32 lpae evtstrm crc32 CPU implementer : 0x41 CPU architecture: 7 CPU variant : 0x0 CPU part : 0xd03 CPU revision : 4 Hardware : BCM2835 Revision : a020d3 |
model name : ARMv7 Processor rev 4 (v7l) Features : half thumb fastmult vfp edsp neon vfpv3 tls vfpv4 idiva idivt vfpd32 lpae evtstrm crc32 CPU implementer : 0x41 CPU architecture: 7 CPU variant : 0x0 CPU part : 0xd03 CPU revision : 4 Hardware : BCM2709 Revision : a02082 |
model name : ARMv7 Processor rev 5 (v7l) Features : half thumb fastmult vfp edsp neon vfpv3 tls vfpv4 idiva idivt vfpd32 lpae evtstrm CPU implementer : 0x41 CPU architecture: 7 CPU variant : 0x0 CPU part : 0xc07 CPU revision : 5 Hardware : BCM2709 Revision : a01041 |
model name : ARMv6-compatible processor rev 7 (v6l) Features : half thumb fastmult vfp edsp java tls CPU implementer : 0x41 CPU architecture: 7 CPU variant : 0x0 CPU part : 0xb76 CPU revision : 7 Hardware : BCM2708 Revision : 0010 |
The processor is running in ARMv7 due to the 32bit version of Raspbian that's running on the processor. The Model B+ carries across the new features of the processor as the Model B.
| lscpu - Raspberry Pi 3 Model B+ | lscpu - Raspberry Pi 3 Model B | lscpu - Raspberry Pi 2 Model B | lscpu - Raspberry Pi 1 Model B+ |
|---|---|---|---|
|
Architecture: armv7l Byte Order: Little Endian CPU(s): 4 On-line CPU(s) list: 0-3 Thread(s) per core: 1 Core(s) per socket: 4 Socket(s): 1 Model: 4 Model name: ARMv7 Processor rev 4 (v7l) CPU max MHz: 1400.0000 CPU min MHz: 600.0000 |
Architecture: armv7l Byte Order: Little Endian CPU(s): 4 On-line CPU(s) list: 0-3 Thread(s) per core: 1 Core(s) per socket: 4 Socket(s): 1 Model name: ARMv7 Processor rev 4 (v7l) CPU max MHz: 1200.0000 CPU min MHz: 600.0000 |
Architecture: armv7l Byte Order: Little Endian CPU(s): 4 On-line CPU(s) list: 0-3 Thread(s) per core: 1 Core(s) per socket: 4 Socket(s): 1 Model name: ARMv7 Processor rev 5 (v7l) CPU max MHz: 900.0000 CPU min MHz: 600.0000 |
Architecture: armv6l Byte Order: Little Endian CPU(s): 1 On-line CPU(s) list: 0 Thread(s) per core: 1 Core(s) per socket: 1 Socket(s): 1 Model name: ARMv6-compatible processor rev 7 (v6l) CPU max MHz: 700.0000 CPU min MHz: 700.0000 |
lscpu is returning an additional parameter of 'Model' with the latest version of Raspbian, either lscpu has been updated or we're getting more information from the processor this time around.
If you want to run these commands yourself on your Raspberry Pi with Raspbian then you can make sure you have them installed thusly:
sudo apt-get update
sudo apt-get install lscpu cpuinfo lshw
From a terminal window either within your desktop environment or from pressing CTRL-ALT-F1 (to F7, typically).
Revisiting the Benchmarks of Old
Power Usage
You can find some strange little devices that will plug in line with your USB hardware and it will tell you the most useful of things, such as how much power is being drawn! So I thought "sweet! Let's see how much power these draw while idle!" - using an in-line USB device I had to hand, I've literally copied the output from the device. Not all of the results are relevant for the wired connection we're using.
| Raspberry Pi 3 Model B+ | Raspberry Pi 3 Model B | Raspberry Pi 2 Model B | Raspberry Pi 1 Model B+ | ||||||||||||||||||||||||||||||||||||||||||||||||
|---|---|---|---|---|---|---|---|---|---|---|---|---|---|---|---|---|---|---|---|---|---|---|---|---|---|---|---|---|---|---|---|---|---|---|---|---|---|---|---|---|---|---|---|---|---|---|---|---|---|---|---|
|
|
|
|
These values are how much power the Raspberry Pi is pulling from the power supply, each Raspberry Pi was set to boot to the terminal, so that the X windows environment was not running. The only devices connected were a HDMI to DVI adapter to a 19" Widescreen monitor, a Dell USB keyboard, a 16gByte Class 10 microSD card and the power supply, which was providing 5 Volts, 2 Amps. There was no ethernet cable plugged in (though I can note that when it was, the power usage went up in all cases).
The boards were all tested using the Official Raspberry Pi 2.5A, 5V power supplyRaspberry Pi 2.5A, 5V power supply , though the readings acquired above were not (since I didn't in the last benchmark tests). Although the Raspberry Pi can sort of run on 500mA, 5V and a lot of people do so from either a laptop USB port or a 'phone charger'. If you're trying to get any serious kind of use from the Raspberry Pi, and you're trying to narrow down problems you're experiencing with it, you want to ensure it's using a 'known good' and reliable power supply like the Official power supply unit, and really I am not just saying that, the thunderbolt icon for low power (or the rainbow icon in the corner) is pretty frustrating and it's likely your Raspberry Pi will slow itself down because it cannot be provided with enough power.
That being said, we're seeing the Model B+ reported a drop in voltage at idle than its previous counterparts, with a significant increase in current, it's almost double. The Pi3 B+ sees a new circuit to handle power management, and we see later in this blog that the Pi 3 Model B+ runs as hot when idle as the original Pi 1 Model B at full load as well.
SysBench
Now this software has been around since 2004, it was originally intended for input/output (io) file operations and database benchmarking. Thanks to being open source it gradually developed into an almost all-round system benchmark which also includes aspects of processor testing as well as IO and databases.
SysBench's processor tests verify prime numbers by going through all possible divisions and only being satisfied when the result is zero. This does mean that it does not test all features of the processor, except for raw number crunching. SysBench was ran with the following parameters:
sysbench --num-threads=1 --test=cpu --cpu-max-prime=20000 --validate run
sysbench --num-threads=4 --test=cpu --cpu-max-prime=20000 --validate run
Here is a breakdown of the command line parameters:
sysbench - The name of the software to run
--num-threads - This is the number of processes to run, in the tests we run 1 thread and then 4 threads, this means that it will create 1 or 4 processes and run one process per core. Since the Raspberry Pi 1 Model B+ has one core it made sense to run a one core test on each model of Raspberry Pi for fairness alongside running 4 threads.
--test=cpu - This parameter ensures we are only testing the processor, as mentioned previously SysBench can perform other tests, too
--cpu-max-prime - This is the maximum prime number value we want to calculate up to.
--validate - This ensures that the results we have returned are valid
run - The software can emulate or test rather than actually perform the requested benchmark, so we want to tell it to actually run it.
| sysbench with 1 thread - Raspberry Pi 3 Model B+ | sysbench with 1 thread - Raspberry Pi 3 Model B | sysbench with 1 thread - Raspberry Pi 2 Model B | sysbench with 1 thread - Raspberry Pi 1 Model B+ | ||||||||||||||||||||||||||||||||||||||||||||||||||||
|---|---|---|---|---|---|---|---|---|---|---|---|---|---|---|---|---|---|---|---|---|---|---|---|---|---|---|---|---|---|---|---|---|---|---|---|---|---|---|---|---|---|---|---|---|---|---|---|---|---|---|---|---|---|---|---|
|
Total time 318.9072 s
diff between min and max 43.05 ms |
Total time 477.0617 s
diff between min and max 2.22 ms |
Total time 768.6476 s
diff between min and max 5.73 ms |
Total time 1318.933 s
diff between min and max 168.64 ms |
| sysbench with 4 threads - Raspberry Pi 3 Model B+ | sysbench with 4 threads - Raspberry Pi 3 Model B | sysbench with 4 threads - Raspberry Pi 2 Model B | sysbench with 3 threads - Raspberry Pi 1 Model B+ | ||||||||||||||||||||||||||||||||||||||||||||||||||||
|---|---|---|---|---|---|---|---|---|---|---|---|---|---|---|---|---|---|---|---|---|---|---|---|---|---|---|---|---|---|---|---|---|---|---|---|---|---|---|---|---|---|---|---|---|---|---|---|---|---|---|---|---|---|---|---|
|
Total time 79.5341 s
diff between min and max 0.44 s |
Total time 92.8556 s
diff between min and max 69.63 ms |
Total time 145.1134 s
diff between min and max 91.73 ms |
Total time 1321.493 s
diff between min and max 160.06 ms |
It should be noted that I have a pre-release version of Raspbian to support the Pi 3 B+ in this instance and there's definitely something amiss with the max amount of time it took to calculate a prime number on sysbench for a single core process, we can clearly see that the minimum amount of time per request is lower than the Pi 3 B, and that's what we would expect to happen. After running sysbench a few times the total time decreased overall, this test should be run again after the official release of Raspbian for the Pi 3 B+ and any kinks are sorted out. Alternatively, we could point the finger at the introduction of SystemD in the linux system (many would).
nBench
I thought it would be good to include this for retro' computing sake, especially considering that the Raspberry Pi is intended to be going back to the roots of learning how to code and programme with a capable hands-on computer platform. nBench has been around for so long that you can compare these benchmark results against older processors such as the 386 and even 486 based processors right up to the Intel Core i7. It can even run on Android.
The software is intended to test three main components of the processor, the capabilities of the CPU (Central Processing Unit), FPU (Floating Point Unit) and memory system. You can find more information on this site. Once you have compiled nBench then it is simply ran with a single command of what the program is called. In the results, the higher the number, the better, as it is the number of iterations it can perform per second, summarised.
| nbench - Raspberry Pi 3 Model B+ | nbench - Raspberry Pi 3 Model B | nbench - Raspberry Pi 2 Model B | nbench - Raspberry Pi 1 Model B+ | ||||||||||||||||||||||||
|---|---|---|---|---|---|---|---|---|---|---|---|---|---|---|---|---|---|---|---|---|---|---|---|---|---|---|---|
|
|
|
|
Since I threw this benchmark in for fun, here are some other processors that have taken the same benchmark, to put these in perspective:
| nbench - AMD K7 Thunderbird | nbench - Pentium 3 900Mhz |
nbench - LG Optimus GT540 | ||||||||||||||||||
|---|---|---|---|---|---|---|---|---|---|---|---|---|---|---|---|---|---|---|---|---|
|
|
|
MemTester
This software is mainly intended to diagnose or test your system RAM (Random Access Memory). You can read more about it in its man page on linux. In this test I have put a limit on it, it is to only test 256mByte of RAM. This helps to make it a fair test across the different models of Raspberry Pi. If you are not aware, the Raspberry Pi shares its system RAM with the VideoCore processor, and it is not really recommended to deny the VideoCore processor from using any of the RAM available. So that means we cannot test the entire 512mByte or 1gByte of RAM available on the Pi 1 or Pi 2 and 3.
Memtester by itself does not time how long it takes to check the amount of memory we specify. However, we can set how many times it does it. There is also a command in Linux called 'time' which, when used in conjunction with a command, tells us how long it has taken for the command to run. Using this simple command we can check how long it has taken to test 256mByte of RAM on each Raspberry Pi:
sudo (time memtester 256M 1) 1> memtester.txt
| Raspberry Pi Board | Time Taken |
|---|---|
| 1 Model B+ | 76 minutes 23.296 seconds |
| 2 Model B | 23 minutes 39.07 seconds |
| 3 Model B | 8 minutes 37.078 seconds |
| 3 Model B+ | 7 minutes 47.683 seconds |
It amazes me how even with an iteration revision the Raspberry Pi 3 Model B+ manages to be faster yet again.
Roy's Benchmark Collection
Memory Reading Speed Test 32bit Version 4 (memSpeedPiA6)
| Memory KBytes Used | Double MB/S - Raspberry Pi 3 Model B+ | Double MB/S - Raspberry Pi 3 Model B | Double MB/S - Raspberry Pi 2 Model B | Double MB/S - Raspberry Pi 1 Model B+ |
|---|---|---|---|---|
|
8 16 32 64 128 256 512 1024 2048 4096 8192 |
930 1939 1828 1778 1778 1779 1779 1148 1194 1102 1197 |
1523 1641 1523 1524 1524 1525 1409 1094 1075 1023 1071 |
1015 1015 1016 930 853 853 682 393 310 301 307 |
602 538 292 262 176 142 132 134 134 136 134 |
When benchmarking on an operating system it's often difficult to seclude other processes from interfering, in the numbers here it's interesting to see that the speed has a little difficulty moving data around at 8kB, and we see again between the Pi 3B and the Pi 3B+ that the 512kB chunk point starts to hit performance.
NEON Speed Test v1.0
| Raspberry Pi 3 Model B+ | Raspberry Pi 3 Model B | Raspberry Pi 2 Model B |
|---|---|---|
 |
 |
|

NEON technology was added with the Raspberry Pi 2. This increase in speed result should mean that the Pi 3 is faster at handling calculations relating to video, vector graphics rendering (so gaming and 3D) and potentially audio processing. Again it is interesting to see the point at which the performance starts to fall off.
There was also another NEON related test, which was the Linpack Single Precision Benchmark. This related the speed to MFLOPS, The Raspberry Pi 3 Model B+ shows a 17% speed increase over the Raspberry Pi 3 Model B, and a 80% speed increase over the Raspberry Pi 2 Model B.

Pi 2 : 299.93 MFLOPS
Pi 3 B : 462.07 MFLOPS
Pi 3 B+ : 539.68 MFLOPS
Networking the Raspberry Pi
Two years ago the Pi Foundation introduced us to networking the Raspberry Pi using wireless technologies thanks to on board wireless local area network (WLAN) and Bluetooth Low Energy (BLE) with the Pi 3 model B, with the Pi 3 Model B+ we're seeing a significant standards upgrade for all of the networking components. Not only has the wired local area network (LAN) been upgraded thanks to a new USB 2.0 chip, so has the WLAN chip.
Ethernet on the Raspberry Pi 3 will now run up to 300 megabits per second, technically speaking this is gigabit Ethernet (802.3ab) and it is limited by the throughput speed of USB 2.0 (approx. 480mbit/sec), this is still a significant increase from the 100 megabits per second (802.3u) seen on every previous Raspberry Pi.
The introduction of 5 GHz WLAN brings us up to date with 802.11n and 802.11ac IEEE specifications, allowing the Raspberry Pi to connect on frequencies that are less congested than the over-used 2.4 GHz band which is shared with Bluetooth, most radio frequency controlled keyboards, mice, joy pads, game pads, DECT phones, and radio controlled toys, oh and microwave ovens!
The 802.11n and 802.11ac standards are also faster than the previous implementations (802.11b/g, although you can run 802.11n over 2.4Ghz it is still limited to 54 megabits per second like the previous standards), where as 802.11n/ac can go much, much higher. Typically it is limited by the implementation and how many antennas are used (utilising Multiple In, Multiple Out (MIMO) speeds in excess of 100 megabits per second through to gigabits per second are not unheard of, though unlikely on the Raspberry Pi at present).
Testing Network Throughput
With the new network adapters on the Pi 3 B+ it makes sense to put them through their paces, it has been many years since I have had access to a proper academic network testing laboratory from my University days, so instead I set up the hardware at home. To understand how I setup the core structure of this network, I felt it would help to have a rather broken-out view of the network layout (or topology):
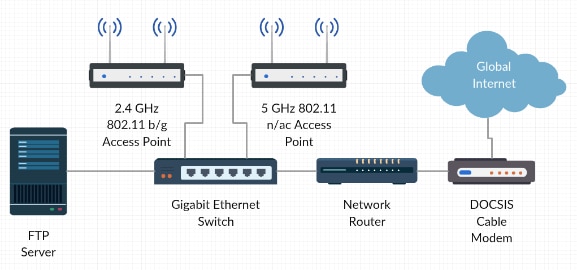
Using a File Transfer Protocol (FTP) server to test transfer speeds is, to me, the most visceral and raw test of data transfer you can do. Without encryption sat on top of the method of communication, or protocol, it is very bare bones and just takes your network connection and throws data across it. Which is what we are interested in!
It is unlikely you would strictly find a setup exactly like depicted in the diagram above like this, in your own home. Devices are not usually split into their individual components unless you are at a networking data centre, medium to large size business, or a University campus. At home you're more likely to see a device like this:
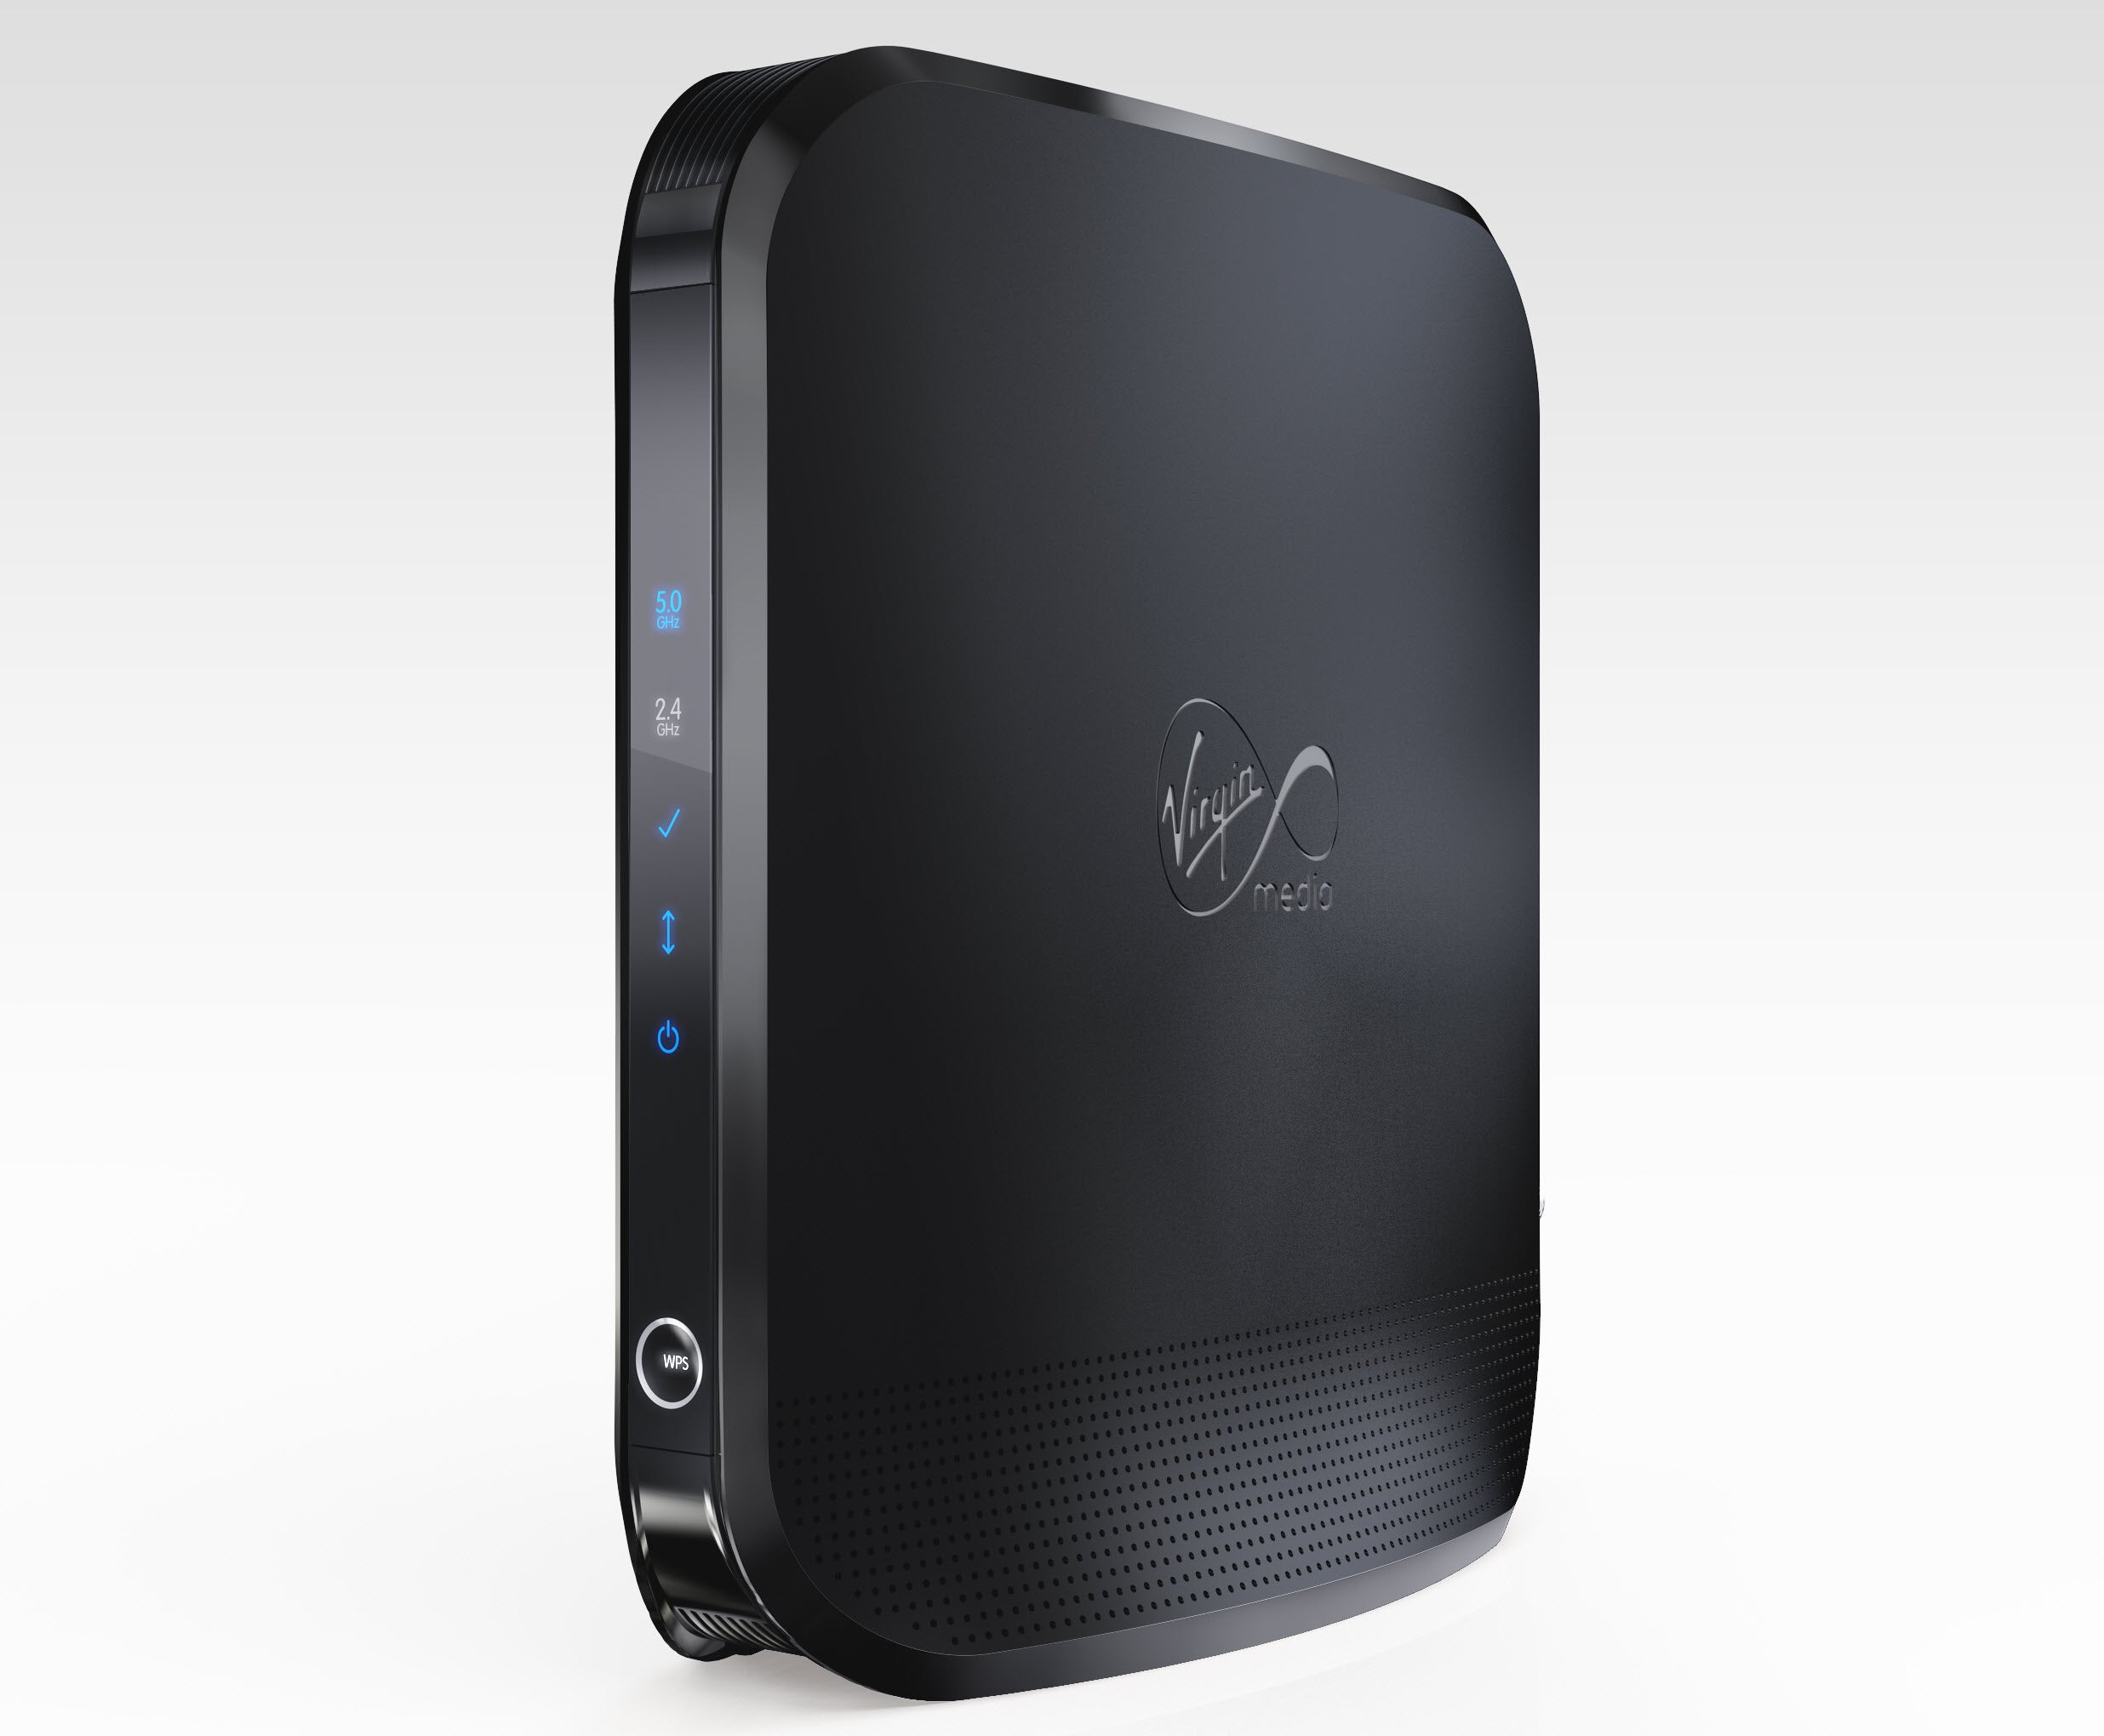
These are typically called 'gateways' though everyone calls these a 'home router' or a 'home modem', it actually integrates the wireless access points, ethernet switch, network router and cable modem in one device and is usually based around an ARM micro-controller or equivalent. Thanks Virgin Media. For the purpose of these tests we are only interested in the network to the left of the 'router' in the detailed diagram above, we do not actually 'talk' or transfer data out to the global internet with any of these tests that I have performed.
Setting up the Tests
The FTP server in the diagram is actually a desktop computer system that is used as my main computer in the house, it runs a 'Solid State Drive' (SSD) which is a storage device based on a type of memory rather than spinning metal disks, a 2.8Ghz intel Core i7 processor, gigabit ethernet and 16 gigabytes of RAM. I decided it was best to use some hardware that would not be the main restrictive component in the testing of the Raspberry Pi models.
Each Raspberry Pi model tested was then plugged into the official 2.5A, 5V power supply, keyboard, mouse and monitor screen.
A copy of the latest Raspbian image was downloaded from the RaspberryPi.org site and stored on the FTP server, this was some 1.6gByte in size as a zip file.
The file was then transferred either over the the following:
- On board 2.4 GHz WLAN
- On board 5 GHz WLAN
- On board Ethernet (100mbps or up to 300mbps)
- USB 2.4 GHz WLAN (WiPi)
- USB 3.0 Gigabit Ethernet adapter
Thinking about it, finding a compatible 5 GHz USB WLAN adapter would have also been a good comparison test, oh well, maybe next time.
To compare the speeds, the file was then saved in the following ways:
- Over FTP and saved to the SD Card
- Over FTP and saved to an SSD connected to the Pi Desktop HAT via USB
If you're not familiar with the Pi Desktop, it is an enclosure and Raspberry Pi HAT which is designed to help you run your Raspberry Pi as a desktop computer (Desktop Computer Kit for Raspberry Pi ) by allowing you to connect your Raspberry Pi to an SSD and boot from it over USB. It made sense to use this as a basis of testing the file transfer as the SDCard could impose a limit on the transfer speed.
These tests were performed on the following boards:
- Raspberry Pi 1 Model B+ (required WiPi)
- Raspberry Pi 2 Model B v1.1 (required WiPi)
- Raspberry Pi 2 Model B v1.2 (required WiPi)
- Raspberry Pi 3 Model B (2.4 GHz WLAN, no 5 GHz)
- Raspberry Pi 3 Model B+
The test script was pretty simple. Using the linux command wget to pull the file from the FTP server, it automatically timed the download, and for a granular comparison, I set the transfer speed to megabits as opposed to megabytes. This test was performed in triplicate so I could then take an average for time and also speed. This test was then dumped to a text file.
Saving to SDCard script (script run in /home/pi):
#!/bin/bash
wget --report-speed=bits ftp://192.168.0.15/image.zip 2> wget1.txt
rm image.zip
wget --report-speed=bits ftp://192.168.0.15/image.zip 2> wget2.txt
rm image.zip
wget --report-speed=bits ftp://192.168.0.15/image.zip 2> wget3.txt
rm image.zip
Saving to the SSD via USB:
#!/bin/bash
wget --report-speed=bits ftp://192.168.0.15/image.zip 2> wget1.txt -O /media/sda2/home/pi/Downloads/image.zip
rm /media/sda2/home/pi/Downloads/image.zip
wget --report-speed=bits ftp://192.168.0.15/image.zip 2> wget2.txt -O /media/sda2/home/pi/Downloads/image.zip
rm /media/sda2/home/pi/Downloads/image.zip
wget --report-speed=bits ftp://192.168.0.15/image.zip 2> wget3:.txt -O /media/sda2/home/pi/Downloads/image.zip
rm /media/sda2/home/pi/Downloads/image.zip
The SSD had been mounted on /media/sda2. Upon connecting the HAT via USB, the command 'pmount' was used to mount it, the command had to be installed via the package manager.
The Speed Results are in!
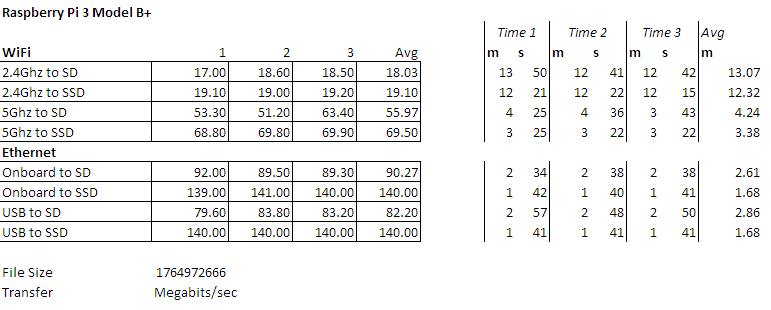
From the early versions of the Raspberry Pi we're seeing a steady increase in data transfer speed capability. It appears that the limitation now is the transfer speed to/from the SDCard used for the Raspberry Pi, though with the introduction of the Pi 3 Model B+ we still see a speed increase between the Raspberry Pi models, it is evident that the best transfer method when using one Raspberry Pi with the Model B+ is going to be the on board ethernet, followed up closely by the 5 GHz WLAN.


The reason why I had chosen to test a USB 3.0 Ethernet adapter is that I read a blog post that advised using one because it was faster than the on board controller chip. I am pleased to say that it is now on par and there's no reason to spend money on additional hardware, unless say, you're using it as a 'firewall' or 'proxy' gateway and need the throughput.

The speeds across the boards were reasonably consistent with a few percentage of change on each run, and while there's not a lot between the Pi 3 Model B and the Pi 3 Model B+ for 2.4 GHz WLAN (and obviously using a USB Ethernet adapter), the strength of the Pi 3 Model B+ definitely shows in the new USB and Ethernet controller chip and wireless LAN chip as the speeds match and exceed the default alternative.
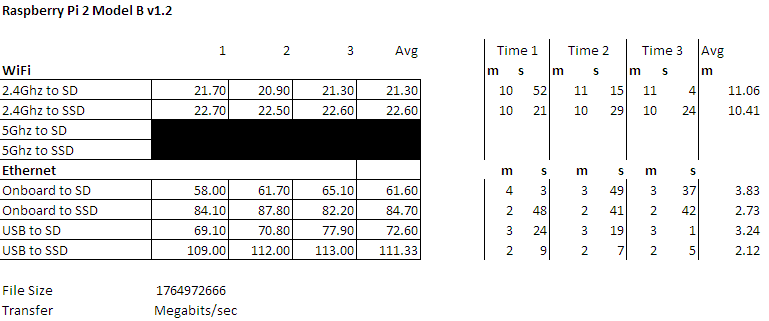
For your perusal, you can see the individual network speed results, along with a bonus set from an accidentally overclocked Raspberry Pi 3 Model B to 1.4GHz, the benefit of seeing this benchmark is to show that the speed of the data transfer isn't entirely locked to the processor speed alone and there have been other improvements as well.
| {gallery} Network Speed Results |
|---|
|
Raspberry Pi: 1 Model B+ |
|
Raspberry Pi: 2 Model B v1.1 |
|
Raspberry Pi: 2 Model B v1.2 |
|
Raspberry Pi: 3 Model B |
|
Raspberry Pi: 3 Model B - Overclocked - Oops! |
|
Raspberry Pi: 3 Model B+ |


Cool Runnings
If you were around for the Raspberry Pi 3 launch you may remember that there were photographs circulating that showed it ran a bit warm (Raspberry Pi Operating Temperature Comparison (A+, B+, Zero, Pi 2, Pi 3) ). You'll be pleased to know that with the Pi 3 Model B+ the thermal management is performing really well. With the new SoC package the processor can dissipate heat a lot better, even when it is under load.
Thanks to FLIR's C2 thermal cameraFLIR's C2 thermal camera, we're able to take photographs, and thanks to a touch of thermal tape, even the emissivity of the metal cover on the SoC managed to not get in the way (you can adjust for it with the camera, but I was taking no chances!)
| {gallery} Raspberry Pi Thermal Imagery |
|---|
|
Raspberry Pi: The original Pi 1 Model B |
|
Raspberry Pi: 1 Model A+ |
|
Raspberry Pi: 1 Model B+ |
|
Raspberry Pi: 2 Model B v1.2 |
|
Raspberry Pi: 2 Model B v1.1 |
|
Raspberry Pi: 3 Model B |
|
Raspberry Pi: 3 Model B+ |


In Summary - It's Cooler and Faster
There appears to be no doubt that with each version of the Raspberry Pi there are improvements. If I was upgrading from even an original Raspberry Pi this is a significant improvement, and from the last version of Raspberry Pi, it's a very good step up.
We will soon be in a position with the Raspberry Pi, thanks to the Power over Ethernet HAT, where we can purely power and boot it from the end of an Ethernet cable. Making the device a cool, energy efficient Internet of Things capable device, or thin client. Especially with the other connectivity on board.
This appears to be an improvement that addresses those concerns a lot of people had, and I'm very interested to see where we can go from here.
What do you think? Is this fast enough for you? What improvements would you like to see and why? Or do you have any suggestions or recommendations for benchmarks that I can run? Let me know by clicking 'add comment' after registering.

Top Comments