element14 Community
element14 Community
    Register Log In
  • Site
  • Search
  • Log In Register
  • About Us
  • Community Hub
    Community Hub
    • What's New on element14
    • Feedback and Support
    • Benefits of Membership
    • Personal Blogs
    • Members Area
    • Achievement Levels
  • Learn
    Learn
    • Ask an Expert
    • eBooks
    • element14 presents
    • Learning Center
    • Tech Spotlight
    • STEM Academy
    • Webinars, Training and Events
    • Learning Groups
  • Technologies
    Technologies
    • 3D Printing
    • FPGA
    • Industrial Automation
    • Internet of Things
    • Power & Energy
    • Sensors
    • Technology Groups
  • Challenges & Projects
    Challenges & Projects
    • Design Challenges
    • element14 presents Projects
    • Project14
    • Arduino Projects
    • Raspberry Pi Projects
    • Project Groups
  • Products
    Products
    • Arduino
    • Avnet Boards Community
    • Dev Tools
    • Manufacturers
    • Multicomp Pro
    • Product Groups
    • Raspberry Pi
    • RoadTests & Reviews
  • Store
    Store
    • Visit Your Store
    • Choose another store...
      • Europe
      •  Austria (German)
      •  Belgium (Dutch, French)
      •  Bulgaria (Bulgarian)
      •  Czech Republic (Czech)
      •  Denmark (Danish)
      •  Estonia (Estonian)
      •  Finland (Finnish)
      •  France (French)
      •  Germany (German)
      •  Hungary (Hungarian)
      •  Ireland
      •  Israel
      •  Italy (Italian)
      •  Latvia (Latvian)
      •  
      •  Lithuania (Lithuanian)
      •  Netherlands (Dutch)
      •  Norway (Norwegian)
      •  Poland (Polish)
      •  Portugal (Portuguese)
      •  Romania (Romanian)
      •  Russia (Russian)
      •  Slovakia (Slovak)
      •  Slovenia (Slovenian)
      •  Spain (Spanish)
      •  Sweden (Swedish)
      •  Switzerland(German, French)
      •  Turkey (Turkish)
      •  United Kingdom
      • Asia Pacific
      •  Australia
      •  China
      •  Hong Kong
      •  India
      •  Korea (Korean)
      •  Malaysia
      •  New Zealand
      •  Philippines
      •  Singapore
      •  Taiwan
      •  Thailand (Thai)
      • Americas
      •  Brazil (Portuguese)
      •  Canada
      •  Mexico (Spanish)
      •  United States
      Can't find the country/region you're looking for? Visit our export site or find a local distributor.
  • Translate
  • Profile
  • Settings
RoadTests & Reviews
  • Products
  • More
RoadTests & Reviews
Blog TI Ultrasonic Sensor - Create a KiCad Part for the Sensor IC with KiPart
  • Blog
  • RoadTest Forum
  • Documents
  • RoadTests
  • Reviews
  • Polls
  • Files
  • Members
  • Mentions
  • Sub-Groups
  • Tags
  • More
  • Cancel
  • New
Join RoadTests & Reviews to participate - click to join for free!
  • Share
  • More
  • Cancel
  • Author Author: Jan Cumps
  • Date Created: 28 Dec 2015 6:16 PM Date Created
  • Views 3186 views
  • Likes 7 likes
  • Comments 3 comments
Related
Recommended
  • RoadTest
  • tdc1000-tdc7200evm
  • liquid_level_sensors
  • fpga
  • ultrasonic_sensor
  • steminc
  • texas_instruments
  • tdc1000
  • xess

TI Ultrasonic Sensor - Create a KiCad Part for the Sensor IC with KiPart

Jan Cumps
Jan Cumps
28 Dec 2015


This is an almost 100% off-topic blog in the TI Ultrasonic Sensing RoadTest series. I'm going to create a KiCad component for the TDC1000 with the KiPart utility.


Creating a 28 pin component takes quite some click-and-navigate work with the default KiCad component editor. With the utility, it's a less-than-10-minute job.


You don't have permission to edit metadata of this video.
Edit media
x
image
Upload Preview
image


KiPart


devbisme (or devbisme2 ?) from xess was tired of creating KiCad components in the GUI component editor.
If you know that he's into the fpga business - where pin counts run into the hundreds and even thousands - that comes as no surprise.

In stead of accepting the situation, he developed the nifty KiPart tool.


I've blogged about the tool before (yes, I'm a fanboy).
Today I've used it to generate a component for the TDC1000 Ultrasonic Analog Front End in less than 10 minutes (the raw video, recorded in one take, was 9'27" including waffle and tangents, edited down to 6'20") .


KiPart Related Blog
KiCAD lovers, check out KiPart
Create my first KiCad part with KiPart utility


Generating the Data for KiPart


The source for the KiPart utility is a CSV file that describes the component. We need to list the pin names and a few attributes.

But hey, we don't want to type. All info can be grabbed from the TDC1000 Datasheet.


image


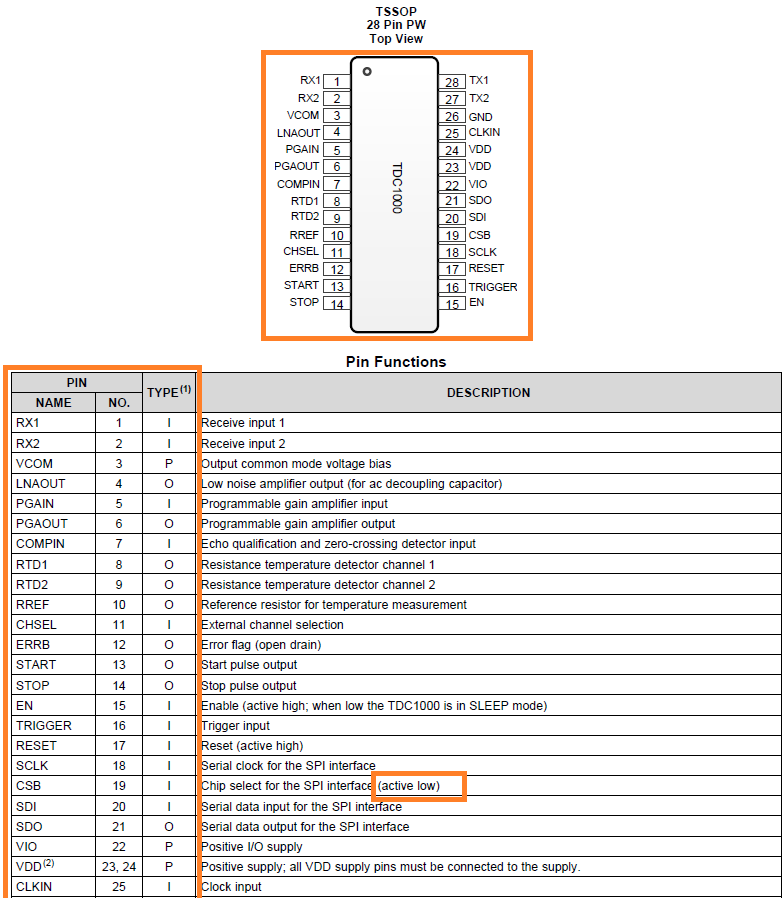
It's easy to move the data from the datasheet to a spreadsheet, because the info is nicely listed in a structured table in the PDF.

This is how the end result looks like:

TDC1000
typepinnameside
input1RX1left
input2RX2left
pwr3VCOMleft
output4LNAOUTleft
input5PGAINleft
output6PGAOUTleft
input7COMPINleft
output8RTD1left
output9RTD2left
output10RREFleft
input11CHSELleft
output12ERRBleft
output13STARTleft
output14STOPleft
input15ENright
input16TRIGGERright
input17RESETright
input18SCLKright
input19~CSBright
input20SDIright
output21SDOright
pwr22VIOright
pwr23VDDright
pwr24VDDright
input25CLKINright
pwr26GNDright
output27TX2right
output28TX1right


There are a few things that I had to do by hand:


image


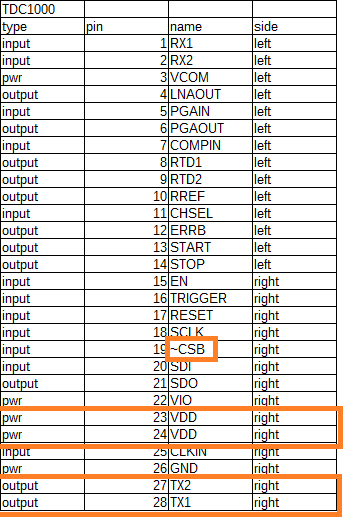
Because the SPI CHIP SELECT pin 19 is active low, I added a tilde (~) in front of the name.

That results in the correct annotation in KiCad:


image


Pin 23 and 24 were listed on the same line in the datasheet. I split them up manually in the spreadsheet.
And the two last pins were on the next page. Easy to forget! Take care that your number of lines in the spreadsheet match the pin count of the component.


I entered input, output or pwr in the type column (A) based upon the I, O or P/GND value in the datasheet table. This could have been done with a formula - and I would have done that if the pin count was higher.

In the pin column, I entered left or right exactly as in the top view of the datasheet.


Then I invoked KiPart:


>kipart TDC1000.csv -s num -f -o TDC1000.lib -w


Miliseconds later I had a part ready to be used in KiCad's schema editor.


image

Check the links above to install the KiPart utility and for the documentation.


The spreadsheet (in Libre/Open Office format), CSV file and KiCad library are attached to this blog.


Related Posts
RoadTest: Unboxing the TI Ultrasonic Sensing evaluation module
TI Ultrasonic Sensor - A Very First Trial of the GUI
TI Ultrasonic Sensor - Prepping the Transponder
TI Ultrasonic Sensor - First Measurements
TI Ultrasonic Sensor - Set the Parameters for Level Measurement and Content Identification
TI Ultrasonic Sensor - Show 3 Signals on a 2 Channel Oscilloscope (RIGOL DS1052E)
TI Ultrasonic Sensor - Liquid Identification and Concentration
TI Ultrasonic Sensor - Create a KiCad Part for the Sensor IC with KiPart
TI Ultrasonic Sensor - SPI Traffic Snooping

TI Ultrasonic Sensor - RoadTest Review

Attachments:
TDC1000.zip
  • Sign in to reply

Top Comments

  • Jan Cumps
    Jan Cumps over 9 years ago in reply to DAB +3
    The standard way - with the GUI - is labor intensive. Each pin has to be created, rotated, placed, labeled and configured using keystrokes, mouseclicks and dialog navigation. The KiPart script is a serious…
  • fmilburn
    fmilburn over 6 years ago

    Thanks Jan,


    I saw something on this earlier but have not had time to try it yet so appreciate your demonstration.


    Frank

    • Cancel
    • Vote Up 0 Vote Down
    • Sign in to reply
    • More
    • Cancel
  • Jan Cumps
    Jan Cumps over 9 years ago in reply to DAB

    The standard way - with the GUI - is labor intensive. Each pin has to be created, rotated, placed, labeled and configured using keystrokes, mouseclicks and dialog navigation.

    The KiPart script is a serious time and effort saver. It's the best KiCad contribution outside of the CERN team's efforts that I've seen so far.


    It gives consistent part layout. When you can copy/paste pin info from the datasheet the time gained is large. When you can get a supplier's pin info in structured format (as #FPGA suppliers sometimes provide), the gain is huge.


    Laying out boards is fun. Creating a part for a chip with high pin count isn't image. So hooray for KiPart to take away that tedious burden from the engineer.

    • Cancel
    • Vote Up +3 Vote Down
    • Sign in to reply
    • More
    • Cancel
  • DAB
    DAB over 9 years ago

    Good post Jan.


    I wondered how much effort was needed to implement a new or custom part in cad/cam.


    Nice description.


    DAB

    • Cancel
    • Vote Up 0 Vote Down
    • Sign in to reply
    • More
    • Cancel
element14 Community

element14 is the first online community specifically for engineers. Connect with your peers and get expert answers to your questions.

  • Members
  • Learn
  • Technologies
  • Challenges & Projects
  • Products
  • Store
  • About Us
  • Feedback & Support
  • FAQs
  • Terms of Use
  • Privacy Policy
  • Legal and Copyright Notices
  • Sitemap
  • Cookies

An Avnet Company © 2025 Premier Farnell Limited. All Rights Reserved.

Premier Farnell Ltd, registered in England and Wales (no 00876412), registered office: Farnell House, Forge Lane, Leeds LS12 2NE.

ICP 备案号 10220084.

Follow element14

  • X
  • Facebook
  • linkedin
  • YouTube