RoadTest: AMD Xilinx Kria KV260 Vision AI Starter Kit
Author: feiticeir0
Creation date:
Evaluation Type: Development Boards & Tools
Did you receive all parts the manufacturer stated would be included in the package?: True
What other parts do you consider comparable to this product?: NVIDIA Jetson
What were the biggest problems encountered?: Documentation is not up to date
Detailed Review:
![]()
Hi all
First, I need to thank to Element's14 for choosing me to Road Test the Kria KV260 Vision Kit and to AMD for the help they tried to give me in the several forum posts that I have made.
This is my review of the AMD's Xilinx Kria KV260 Vision Starter Kit .
I dived into this without any experience with FPGAs. I never worked with one, nor have I ever programmed one (albeit I knew about VITIS and Vivado software and the VHDL and Verilog programming languages). I'm a software guy (Computer Science degree), not electronics.
This review will be based on the steps that I had to take to achieve this goal: Creating an application that will use Machine Learning to detect a license plate (my license plate) and open the garage door if it's my car with my license plate.
So, strap on, because this was a long journey.
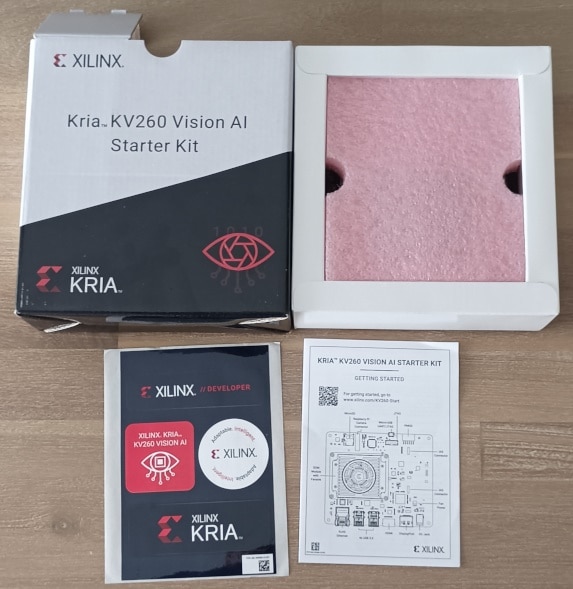
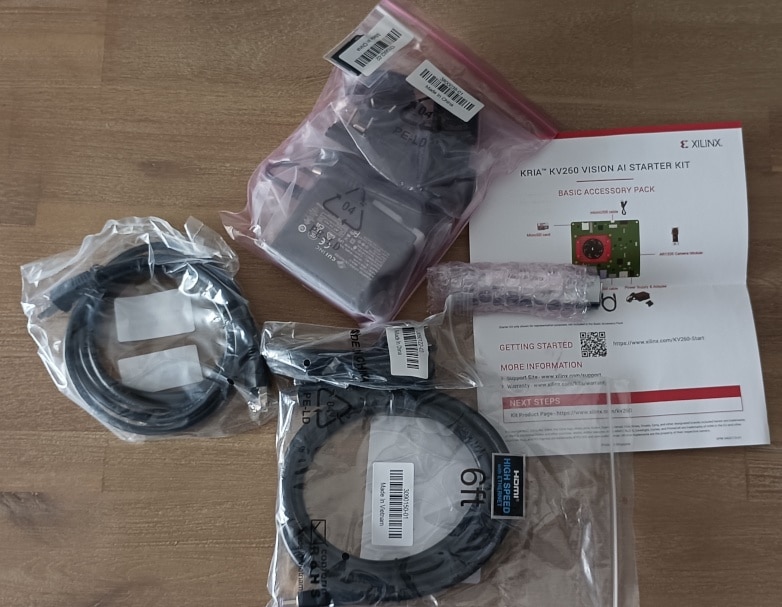
The KIT for the RoadTest comes in two boxes.

Inside the KV260 box comes the KV260 kit. It comes very well packaged.
It includes:
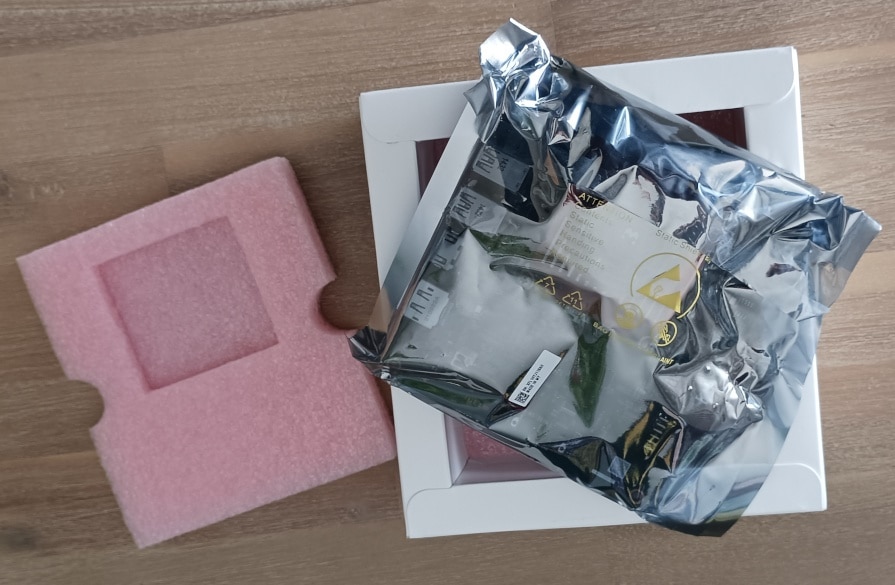
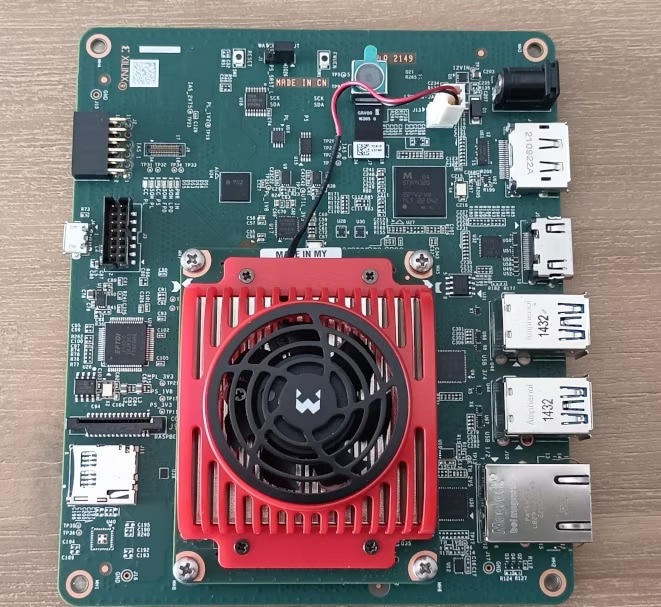
The KV260 SOM and carrier card are beneath the pink foam. It comes inside an anti-static bag. We'll get to it in a moment.
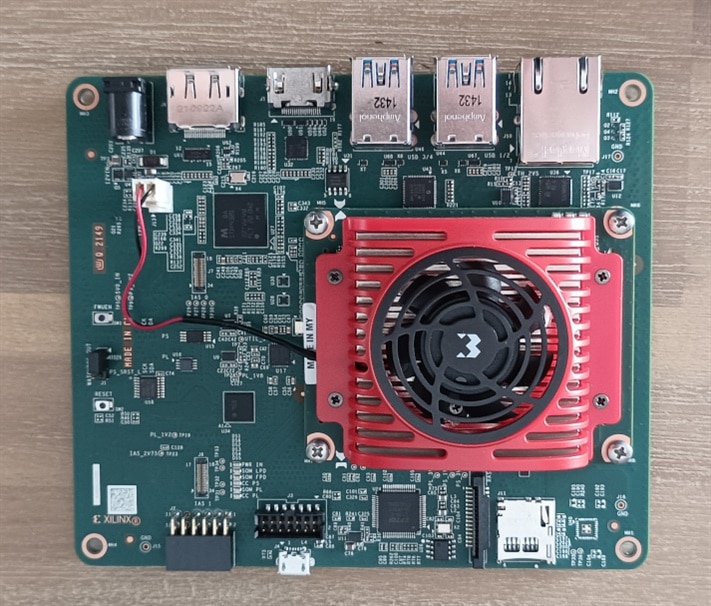
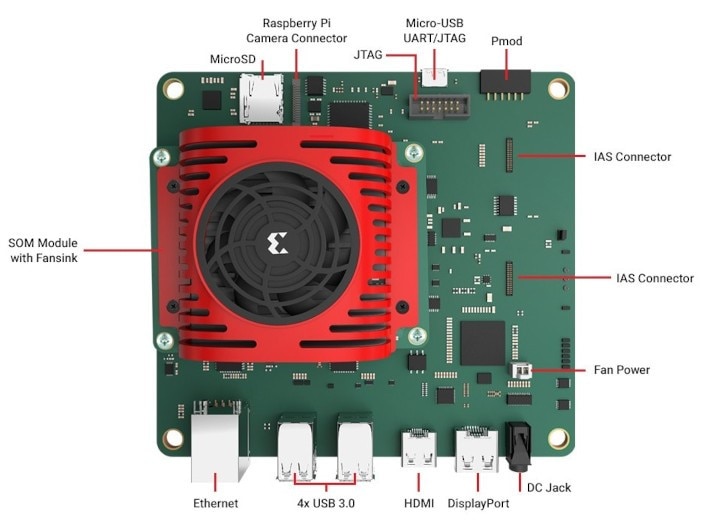
The Xilinx Kria KV260 Vision is a system-on-module (SoM) that is designed for embedded vision applications.
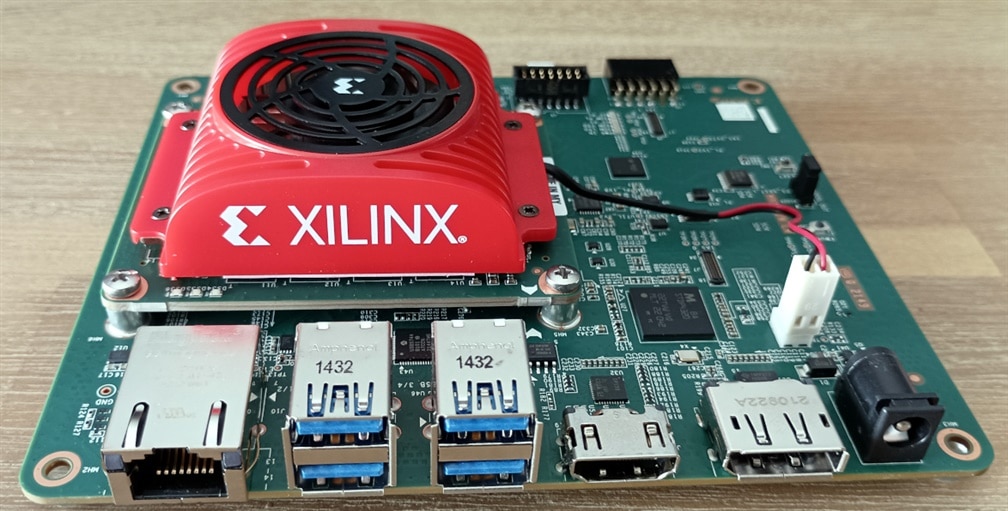
This Kit is comprised of the K26 SOM (System on Module) and the Carrier Board.
It features a Xilinx Zynq UltraScale+ MPSoC with a quad-core ARM Cortex-A53 processor and a programmable FPGA fabric, as well as a variety of interfaces and peripherals for camera and display connectivity.
The Kria KV260 is intended to be used as a building block for developing edge devices that require real-time processing and AI inferencing capabilities.
It also comes with support for the Vitis AI development environment and a range of software and hardware tools to facilitate application development.
Some characteristics and strengths:
It also has some weaknesses:
The interfaces present on the carrier board


We were also given the basic accessory pack. Inside comes all that's necessary to get started.
Because this is a Vision Kit and my project uses vision, I will talk about the camera. This is one of the things that got me excited (at this point).
The camera that comes with the Vision Kit is a 13MP camera, specifically OnSemi AP1302 13MP ISP for the image sensor.
But I have an issue with it: it's really, really small. Here's a comparison of it with a SD CARD...

For my application, it's not good. A general view of the camera within the KV260:
The camera uses an IAS connector to connect to the carrier board.
Because the KV260 is compatible with the Raspberry PI camera module - up to v2 - I probably will be using it since it can have a longer flat cable. The downside is that it only has 8MP. We will see how testing will go. I'll show examples of both.
The Xilinx Kria KV260 Vision SoM has a flexible boot process that can be customized to meet specific requirements.
The KV260 has a primary and secondary boot device that provides isolation of platform-specific boot firmware from the run-time operating system and application.
This allows for the user to focus on developing and updating its application code within the application image without having to rebuild and flash boot firmware.
The primary boot device is a QSPI memory located on the SOM and the secondary boot device is an SD card interface on the carrier card. By default, the KV260 Starter Kit carrier card sets the XCK26 boot mode to QSPI32. The SOM boots up to U-Boot using the QSPI contents and then U-Boot does a hand-off to the secondary boot device.
From the documentation, here's a representation of the boot devices
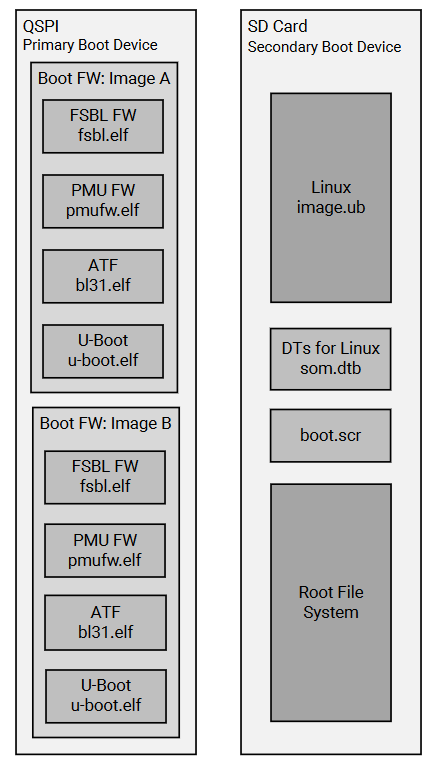
The primary boot device is a QSPI device located on the SOM. The necessary elements are packaged in a specific format and file captured as BOOT.BIN. The BOOT.BIN file contains the board-specific boot firmware that consists of the following elements:
U-Boot provides the functionality for the hand-off between the primary boot device and the secondary boot device. It will search for both the SD card and eMMC secondary boot devices; if
both are detected it will provide a menu interface to you to select the desired Linux boot target.
The primary boot device provides a redundant copy of boot firmware arranged in an A/B configuration. The A/B configuration provides a dynamic primary and secondary image operation
with corresponding update mechanisms.
On boot, the system automatically boots from the defined primary image, and, if boot fails, it falls back to the previously known good boot image
The secondary boot device on the KV260 Starter Kit is the SD card. It contains the operating system image and associated application files. The KV260 Starter Kit accelerated application references are built on the Linux operating system. The Getting Started web page provides a pre-built reference image that can be written to a microSD card for out-of-the-box functionality.
Here's the boot process in a nutshell:
Power-on/reset: The Kria KV260 powers on and initializes the on-board power and clock management circuits.
Boot ROM: The Kria KV260 contains a boot ROM that performs an initial boot process, which includes configuring basic system settings and loading the primary boot loader.
Primary boot loader: The primary boot loader is responsible for loading the Linux kernel and device tree.
Linux kernel: The Linux kernel is the core of the operating system and is responsible for managing system resources and providing device drivers.
Root file system: The root file system contains the Linux operating system and software applications.
Regarding operating systems, the Kria KV260 can run a variety of operating systems, including Linux and other real-time operating systems (RTOS). The Kria KV260 supports Linux distributions such as PetaLinux and Yocto, which can be customized to include specific features and packages. Additionally, the Kria KV260 also supports other operating systems that are compatible with the Zynq UltraScale+ MPSoC, such as FreeRTOS and VxWorks.
With Linux, it supports, besides PetaLinux, Ubuntu. The Ubuntu 22.04 is the primary OS targeted by the Xilinx pre-built applications and out of box workflows. PetaLinux images and Yocto integrations are available to support users intending to target a custom embedded Linux during evaluation and production..
The latest Ubuntu version supported is the 22.04 LTS and the PetaLinux is 2022.1 .
I still don't know what differences there are, but will find out and a new blog post will emerge detailing the boot process. I already know that a boot firmware update is necessary for both Linuxes, so I'll be detailing that, too.
Because this is a development kit targeted at edge computing and Machine Learning, of course, there are some libraries for that too.
The K26LTD SOM and KV260 Starter Kit are integrated with the Vitis software development platform and Vivado Design Suite. We can develop AI applications with the Vitis platform using, let's say, TensorFlow and then quantize/compile the model using the Vitis libraries and deploy it on the KV260 kit.
There are already some demonstration applications - pre-built and ready to deploy in a Kria Starter Kit. These accelerated application examples or “AAs” are available and updated asynchronous to the main Xilinx tools releases, but do have dependencies on a corresponding OS.
For the KV260 kit, these are the AAs available in the correspondent S.O version (I'm only posting the latest version available of the S.O.)
| Starter Kit Linux Version | KV260 Pre-built Apps Available |
| Kria Starter Kit Linux 2022.2.2 (PetaLinux) | Smart Camera, AI-Box ReID, Defect-defect (Limited Function), NLP-SmartVision |
| Kria Ubuntu 22.04 | Smart Camera, AI-Box ReID, Defect-defect, NLP-SmartVision |
I'm also going to show some examples of the AAs running.
The AMD Xilinx Kria KV260 Vision Starter Kit supports both PetaLinux and Ubuntu. That's a plus. Even if someone not familiar with Linux or with FPGAs, can work with it. Ubuntu is a widely known Linux distribution with GUI and very easy to work with - even for newbies. PetaLinux is a more advanced distribution with only CLI .
I'm going to try both images available for the KV260 - PetaLinux and Ubuntu. Because I always loved to be on the bleeding edge, I've decided to download and use the latest versions. If they are available and are not beta version, let's use them.
According to the Wiki, for the latest Linux images - Ubuntu 22.04 LTS or PetaLinux, a firmware upgrade is needed. Let's first download the boot update
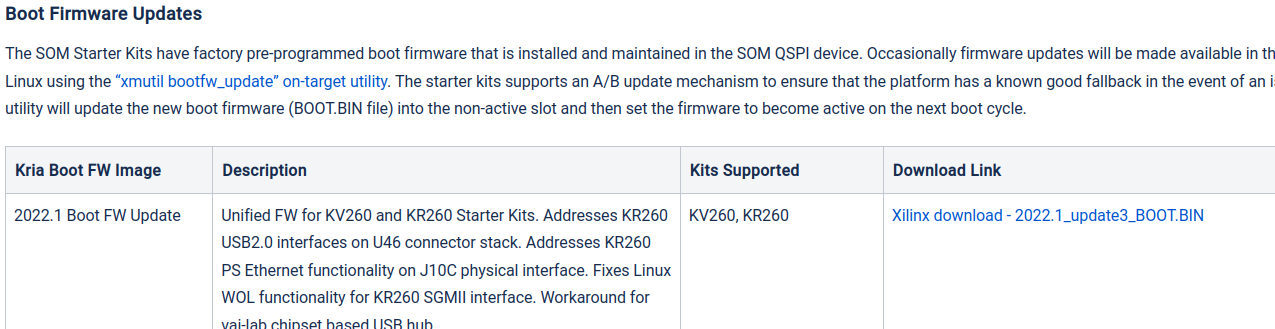
At this point, I don't know how to upgrade the firmware. I've been reading and there are some utilities that do this, but still don't know if I can use the PetaLinux latest version and upgrade the firmware from there, or if I need to download a previous version, upgrade the boot firmware and then use the latest PetaLinux .
Because this was my first time with the KV260, I didn't knew that there was a boot menu. I blame the documentation. Because on the WIKI, you are sent to the Getting started page. It's here that you are shown a pretty image of a micro USB cable connecting to the board and you're informed to use a console to watch the boot process. They will also tell you that you can login into a full blown Gnome desktop. But, there's a warning at the bottom of the page informing you that you need to upgrade the firmware for the latest improvements. That is true. On the WIKI page there's a recommended firmware and a yellow warning that to boot the latest versions, you need the upgrade.
They inform you that you have two options for the firmware upgrade:
For the image recovery tool you get sent (after searching in the page) to another page that explains how to do it. It's a bit daunting for a newbie who's afraid of breaking a nice shiny board. So, I've decided to install a previous PetaLinux version, upgrade the firmware and after that boot the latest PetaLinux version - 2022.1 (at the time). It took me a couple of hours - writing the PetaLinux image to the SDCARD twice takes a long long time.
I've downloaded the 2022.1 version - petalinux-sdimage_xilinx-k26-starterkit
The PetaLinux file is big,6.0GB and it's now being written to the SD CARD - a 32GB one.

After so, many, minutes, all was done

Inserting the SDCARD on the device and powering it on, at first, nothing appears on the screen. No HDMI image. Decided to try the DisplayPort. Still no image. What was going on ? I confess that the instructions for booting the PetaLinux are not clear or I didn't find any documentation on how to do it. This was my first time with it.
Decided to read about the Ubuntu installation - it's a bit more complete.
After reading the documentation, I've connected the USB port to the computer and something appeared on the logs. Only on the Ubuntu instructions is instructed to connect the micro USB cable to the board and open a terminal. Are they assuming that those who try Petalinux already know this?

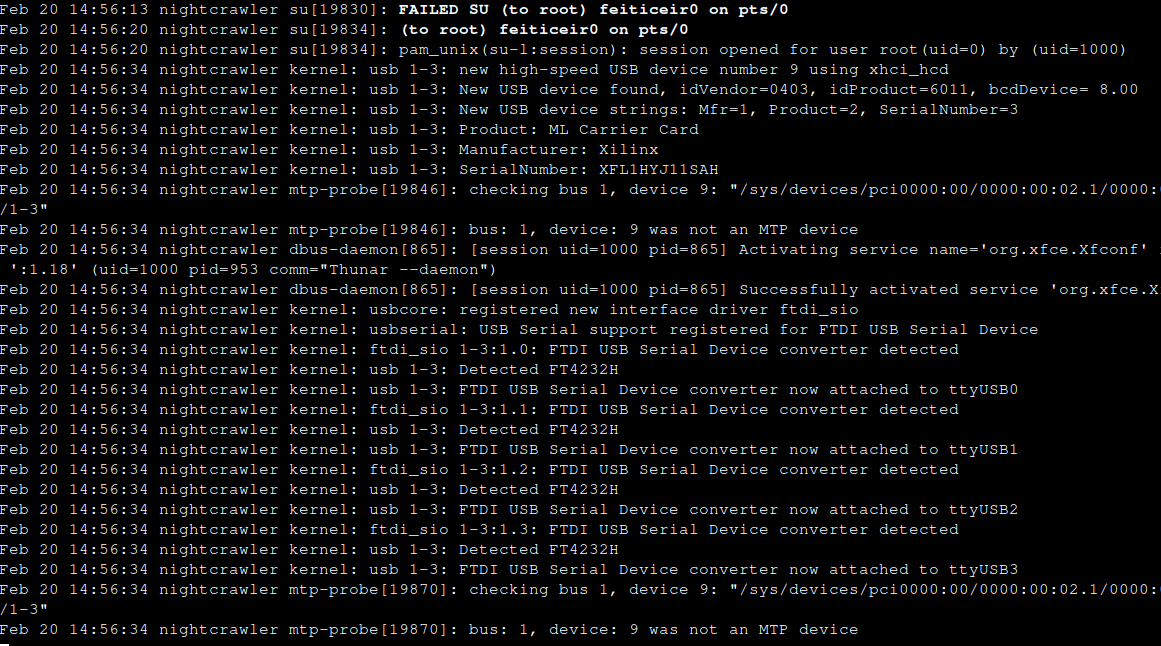
Minicom serial configuration: 115200,8,n,1,N
At first, I've tried all the serial ports and nothing. No prompt, nothing. Turning it off and on again, with ttyUSB2, ttyUSB3 and ttyUSB0, nothing. just a line on the screen.
Decided to try ttyUSB1 and finally something was appearing on the terminal. A Linux booting.
This is when I was booting the previous version - Kria Starter Kit 2021.1, so I could upgrade the firmware and be able to boot the latest version available.
To upgrade the firmware, I just followed the instructions.
Having now a network connection and a user and password, it's easy.
Copy the downloaded firmware (insert link) to the KV260
scp BOOT_xilinx-k26-starterkit-v2022.1-09152304_update3.BIN petalinux<at>192.168.2.228:
Inside the terminal:
sudo xmutil bootfw_update -i BOOT_xilinx-k26-starterkit-v2022.1-09152304_update3.BIN
sudo reboot
After the reboot, validate the boot
sudo xmultil bootfw_update -v
And that's that.
After a successful reboot, having a terminal and the boot firmware upgraded, let's try the latest PetaLinux version.
Again, put the image on the SD Card. Again, wait an endless time for the copy...

Let's put the SD Card in the KV260 and turn it on.
This time, the terminal just went until a login screen appeared - but not here (on the debug terminal - ttyUSB1)
I had to connect a USB keyboard to be able to login. This time I had image from the HDMI display. Hurray.
After a lot of reading on why I can't find the SmartCamera APP (or any other APP for that matter), finally I found some post on the Xilinx forums saying that the APPs are going to be released in a future time..
As of 2022 there's no packages available to download with xmutil. Nothing shows when doing xmultil getpkgs. All the documentation I've seen was for previous versions.
After reading and reading, I'm guessing I need to - install Ubuntu or create a PetaLinux image with the APP already there.
After some more reading about creating a PetaLinux image and almost desperation, I found a page on the Xilinx github.io that explains how to build PetaLinux with the Application Packages - because all the videos I've seen and pages that read, mostly on Hackster.io mention building the PetaLinux and using bsp files.
NOTE: The documentation is for the 2021.1 version. Still, let's give it a shot.
The getting started videos from the Xilinx website are all in the 2021 version and the apps are all there... But for this PetaLinux version - 2022.1 - they are not.
So, let's get started
First, we need to install the PetaLinux tools, latest version from here. This an installer and will do everything.

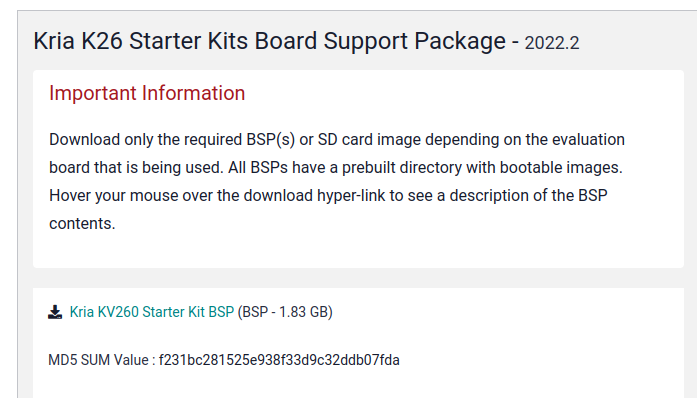
We also need to download the Kria K26 Starter Kit Board Support Package - the BSP file for the KV260
Let's install everything needed (I'm using Arch Linux). The installer complains about xterm and netstat .
sudo pacman -S xterm net-tools
and now we can start
./petalinux-v2022.2-10141622-installer.run -d <your directory of choice for the installation>
After a while, it says its done.

This is the contents of the directory

Now, activate the environment by running settings.sh (you may have to give it execution permissions first)
source settings.sh

I don't have a tftp server, but let's continue.
Now, we need to create a project using the bsp file we downloaded before (copy it to installation directory of PetaLinux)
petalinux-create -t project -s xilinx-kv260-starterkit-v2022.2-10141622.bsp
and in a moment:
INFO: Create project: INFO: Projects: INFO: * xilinx-kv260-starterkit-2022.2INFO: Has been successfully installed to /home/feiticeir0/petaLinux/INFO: New project successfully created in /home/feiticeir0/petaLinux/
Let's go into the project directory
cd xilinx-kv260-starterkit-2022.2/
Before we build the image, we want to add the AAs just for testing
Let's add some strings and variables
echo 'BOARD_VARIANT = "kv"' >> project-spec/meta-user/conf/petalinuxbsp.conf
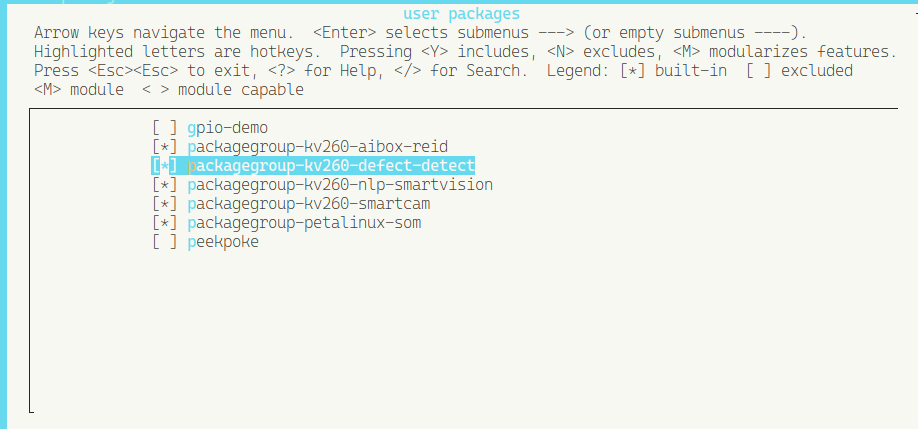
Now, let's add the application groups that we want into the rootfs config file so that the menuconfig gets populated with these entries.
echo 'CONFIG_packagegroup-kv260-smartcam' >> project-spec/meta-user/conf/user-rootfsconfig
echo 'CONFIG_packagegroup-kv260-aibox-reid' >> project-spec/meta-user/conf/user-rootfsconfig
echo 'CONFIG_packagegroup-kv260-defect-detect' >> project-spec/meta-user/conf/user-rootfsconfig
echo 'CONFIG_packagegroup-kv260-nlp-smartvision' >> project-spec/meta-user/conf/user-rootfsconfig
Let's run the petalinux rootfs config
petalinux-config -c rootfs
If you get an error about libtinfo.so.5, just go into /usr/lib and create a symlink from libtinfo.so.6 to libtinfo.so.5 and it will work .
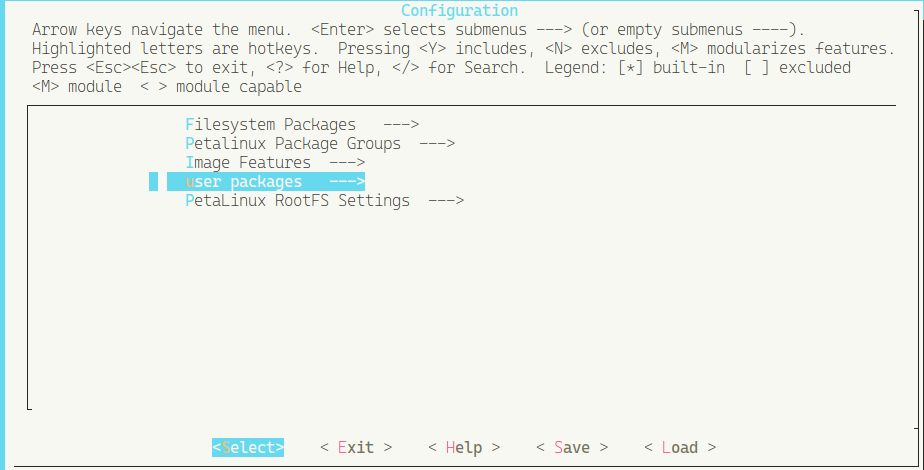
Now, go into user packages and select all the AAs
Exit and save the configuration
Let's create the image
The following commands build the image and package it.
petalinux-build
Building the Petalinux image gets all my CPUs almost at 100%
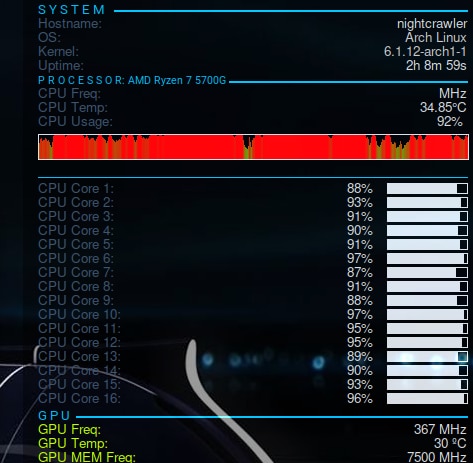
But my temperature is well ! Water cooling for the win !
But it didn't work...

Lets see the log...
And the errors are:

I've posted a question to Xilinx forum. Let's wait.
It turns out that the building of PetaLinux has changed and it is not done anymore like this. I just can't add those lines to the configuration. I'm leaving PetaLinux as it is . No AAs.
Since PetaLinux was a bust, Let's try Ubuntu
After perusing through the documentation, I'm guessing that AMD is really betting on Ubuntu and on the relationship with Canonical. We will find out why latter.
After downloading the Ubuntu image, let's decompress it and put it in the SD Card. Tea time.

After the tea, it's already in the SD CARD, lets try and boot it.
After a boot, I have a full Ubuntu desktop on the HDMI monitor and a remote ssh to it.
Don't tell anybody, but it's a tad slow. But, nothing that I wasn't expecting.

Let's try to run some examples.
According to the documentation, an upgrade is recommended and after that, install the Xilinx Development & Demonstration Environment.
sudo snap install xlnx-config --classic --channel=2.xNow let's wait until all is done

Next, we need to run xlnx-config.sysinit to install some PPAs
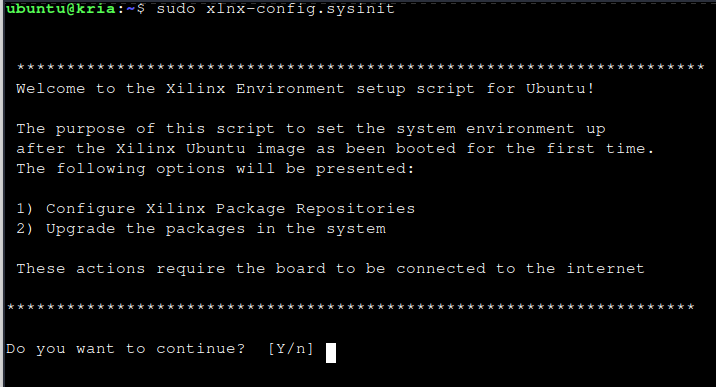
Yes we do. Answer yes to all the questions .
After a while we get all the repositories installed - the ones with the applications for us to test.
And another upgrade is done.
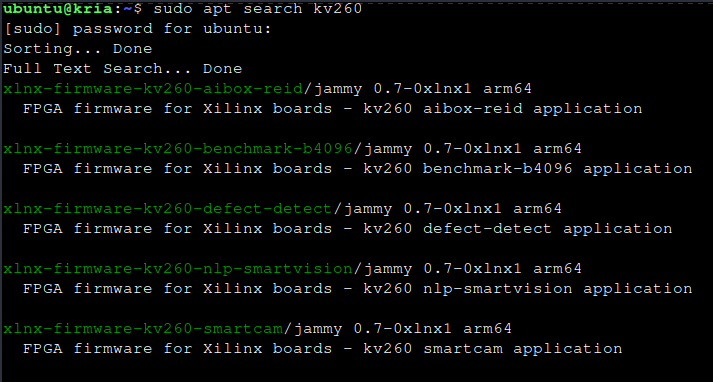
After a reboot, let's search for the AAs
sudo apt search kv260
And, finally some results
Let's install the SmartCam app
sudo apt install xlnx-firmware-kv260-smartcam
And after a while, we have it installed.
Let's try and run it
First, we need to disable the desktop environment
sudo xmutil desktop_disable
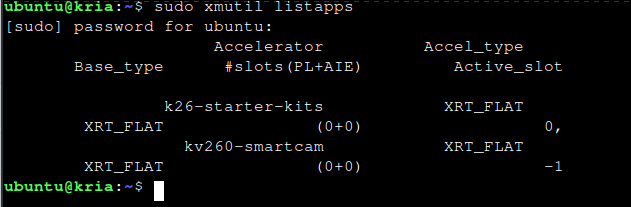
Next, see the apps listed with xmutil
sudo xmutil listapps
And it's there
Now, we need to unload the current app loaded and load the smartcam app
sudo xmutil unloadapp
remove from slot 0 returns: 0 (Ok)
sudo xmutil loadapp kv260-smartcam

Now that the APP is loaded.
After a few minutes trying to find the application binary, nothing.
Since this was a full Linux with Ubuntu apps, installed a small utility - mlocate - that creates a database with all the files and the location, making it really easy and fast to search for something. The downside is that from time to time you need to update the database. But I've decided to give it a go.
After creating the database, decided to search for the app or files and/or directories with the name
locate smartcam
Nothing relevant. What was going on ? Is the documentation wrong ?
After a lot more reading and reading and reading, it turns out that as of Ubuntu 22.04 for the KV260, applications are deployed as Docker containers.
I'm starting to think that the bleeding edge is not wort it !
Let's install docker, shall we ?
These are instructions from the Docker website for Ubuntu and these are the instructions recommended from the documentation.
sudo apt-get update
sudo apt-get install ca-certificates curl gnupg lsb-release
sudo mkdir -m 0755 -p /etc/apt/keyrings
curl -fsSL https://download.docker.com/linux/ubuntu/gpg | sudo gpg --dearmor -o /etc/apt/keyrings/docker.gpg
echo "deb [arch=$(dpkg --print-architecture) signed-by=/etc/apt/keyrings/docker.gpg] https://download.docker.com/linux/ubuntu \
  $(lsb_release -cs) stable" | sudo tee /etc/apt/sources.list.d/docker.list > /dev/null
Update apt
sudo apt-get updateInstall docker
sudo apt-get install docker-ce docker-ce-cli containerd.io docker-buildx-plugin docker-compose-pluginRun the hello-world
sudo docker run hello-world
Now that we have docker, let's add our user to the group
sudo usermod -a -G docker ubuntu
Let's continue with the Smartcam. Pull the latest version
docker pull xilinx/smartcam:2022.1
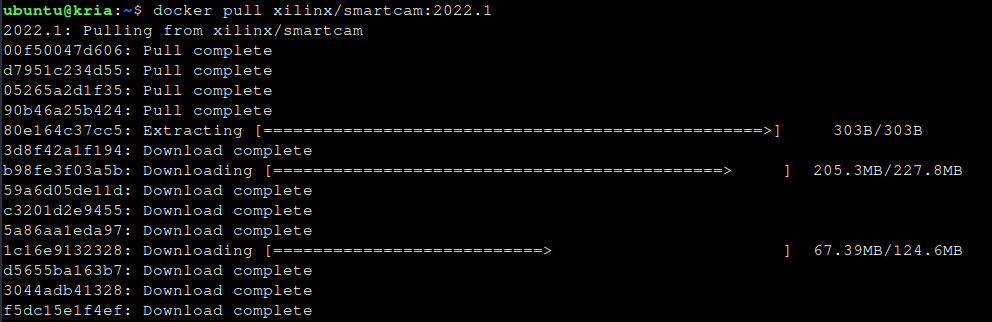
After a moment, the image is downloaded and extracted.
Let's launch the docker image
docker run \--env="DISPLAY" \-h "xlnx-docker" \--env="XDG_SESSION_TYPE" \--net=host \--privileged \--volume="$HOME/.Xauthority:/root/.Xauthority:rw" \-v /tmp:/tmp \-v /dev:/dev \-v /sys:/sys \-v /etc/vart.conf:/etc/vart.conf \-v /lib/firmware/xilinx:/lib/firmware/xilinx \-v /run:/run \-it xilinx/smartcam:2022.1 bash
and you get this:
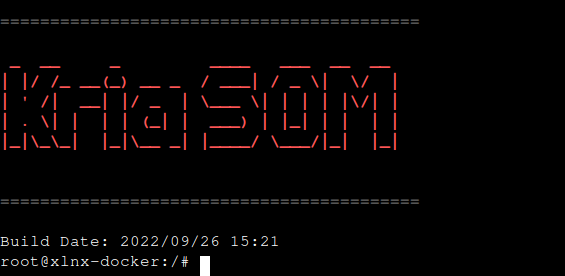
So far, so good, I'm guessing
Let's run the application in the command line. You can also run a jupyter notebook. View the documentation.
I'm going to use the IAS camera and output to the HDMI monitor
smartcam --mipi -W 1920 -H 1080 --target=dp

And now with the USB camera (Raspberry PI camera v2)
smartcam --usb 1 -W 1920 -H 1080 --target=dp

Clearly, there's a difference between the two cameras.
Now that we have both PetaLinux and Ubuntu working, let's continue to the goal of running a ML model.
I've written two blog posts about this. I've created two models to detect license plates using two different technologies.
One model uses TensorFlow Object Detection API and the other one uses YOLOv7 . YOLO is based on PyTorch.
Creating the models was not difficult and did not required anything from Xilinx.
You can find them in the following links
AMD Xilinx Kria KV260 Vision AI Starter Kit : License plate detection using TensorFlow
AMD Xilinx Kria KV260 Vision AI Starter Kit : License plate detection : YOLOv7
AMD Xilinx knew that one of the strengths of the Kria KV260 is Machine Learning, so one of the key features of the Kria KV260 is the possibility of running accelerated inference on AI Models. This was the key aspect I was keen on experimenting.
They provide the Vitis AI platform. It's a comprehensive AI inference development solution for AMD devices, like the Kria KV260. It consists of a rich set of AI models optimized deep learning processor unit (DPU) cores, tools, libraries, models, and example designs .
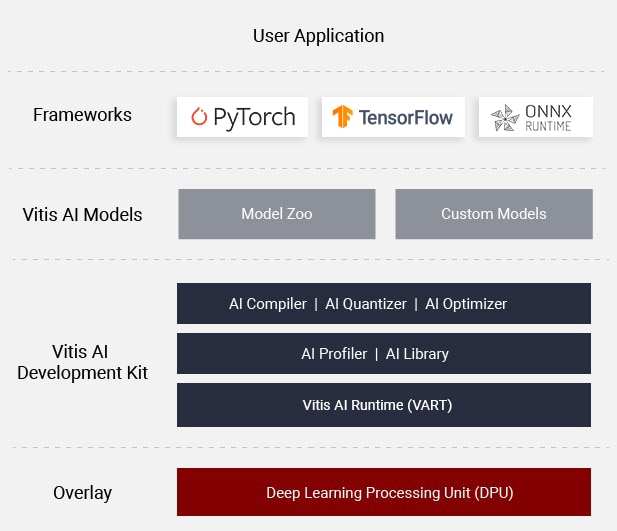

The VITIS-AI is composed of the following components:
DPUs - Configurable computation engines optimized for convolution neural networks. Efficient and scalable IP cores that can be customized to meet the needs of many different applications and devices.
Model Zoo - A comprehensive set of pre-trained and pre-optimized models that are ready to deploy on Xilinx devices.
Model Inspector - A tool and methodology through which developers can verify model architecture support.
Optimizer - An optional, commercially licensed tool that enables users to prune a model by up to 90%.
Quantizer - A powerful quantizer that supports model quantization, calibration, and fine tuning.
Compiler - Compiles the quantized model for execution on the target DPU accelerator.
Runtime (VART) - An inference runtime for Embedded applications.
Profiler - Performs an in-depth analysis of the efficiency and utilization of AI inference implementations on the DPU.
Library - Offers high-level C++ APIs for AI applications for embedded and data center use-cases.
They have a model zoo with a comprehensive set of models tested and ready to run, but also they support custom models. This is where my two models created above will enter. Because I'm using VITIS-AI 3.0 (the version available on GitHub)
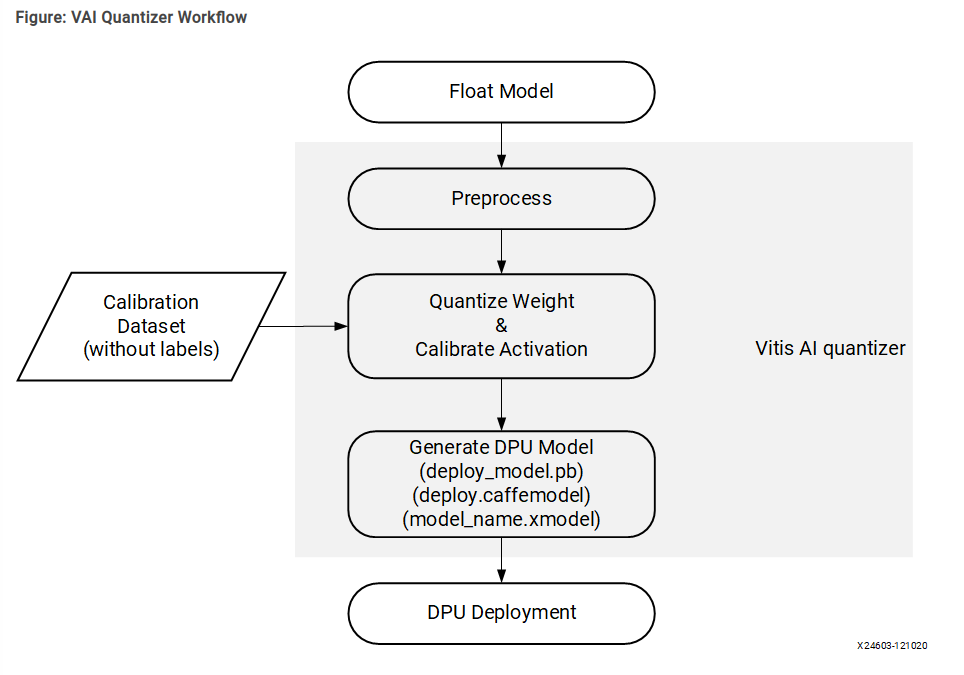
Before a model can run on the Kria KV260, it must be prepared. Because we're running inference on Edge devices, they typically have less power than a full desktop where the model has been created and trained. Because of this, there are some steps the model must take.
Typically, a trained model must go through (not necessary by order):
After this steps, the model is ready to be run by the Vitis AI Runtime (VART) on the Kria KV260.
At the time I didn't realized, but the DPU (Deep Learning Processor Unit) has some Neural Network configurations that it supports. Probably this is way my models didn't run. Need to read more about this.
We can run the model in the Kria KV260 using two methods. But the official documentation goes in the direction of the Vivado Software Suite. But if you're not a FPGA experienced user and have no experience with the Vivado software, it can be a pain.
I'm sure AMD want's to change this and there's a project called PYNQ that is more of non-FPGA users, like myself.
Unfortunately, or because AMD hasn't been able to update the documentation, the PYNQ reference in the documentation is only in the form of a link that you press if you're know about it or just clicks on it by mistake. We'll go there in a moment.
The VITIS-AI has some workstation requirements - the machine that will quantize and compile the model :
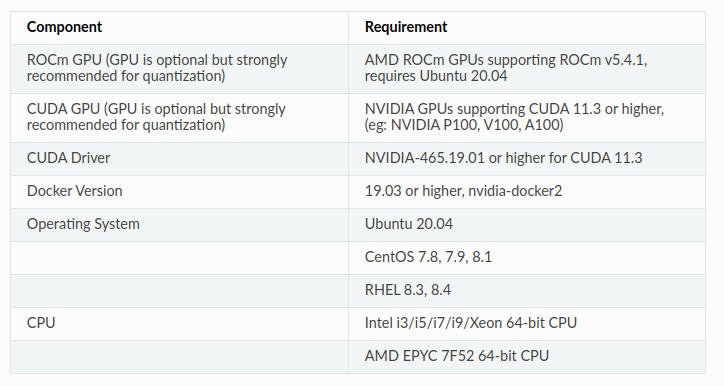
I did all this with Arch Linux and it worked, so, the above requirements are more what you’d call ‘guidelines’ than actual rules (anyone now this reference? :) )
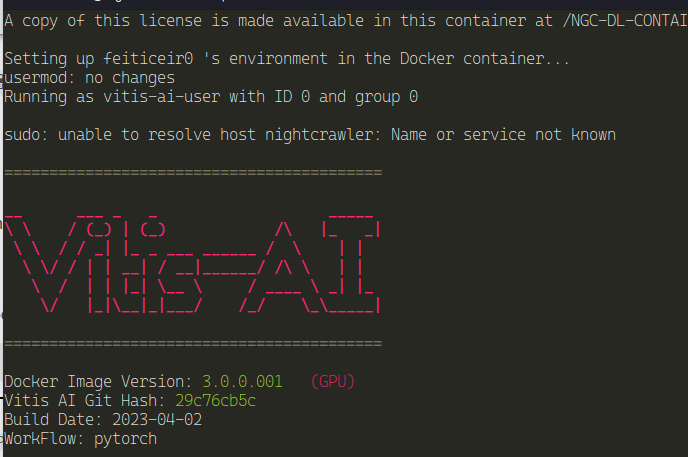
VITIS-AI provides docker images to run all the steps above. Whether your model is PyTorch or TensorFlow, using CPU or CUDA, they have it all.
Let's start by installing docker.
pacman -S docker
Add my user to the docker group
gpasswd -a feiticeir0 docker
Logout and login and we're set.
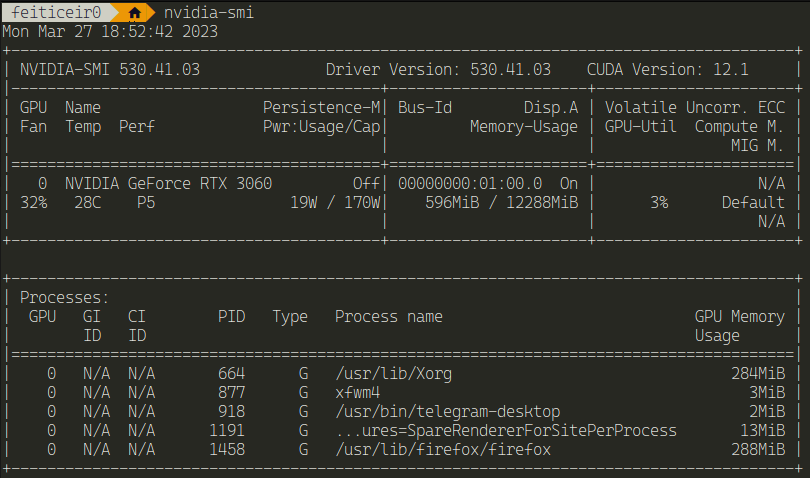
To have CUDA acceleration on the VITIS-AI docker image, beside having an NVIDIA graphics card (duh) it's necessary to install the nvidia-container-toolkit
Again, having Arch Linux (all their instructions are for Ubuntu), using yay
yay nvidia-container-toolkit
After this, just using nvidia-smi outside of the docker container and inside should show similar results
Next, we need to clone the VITIS-AI repository
git clone https://github.com/Xilinx/Vitis-AI
cd Vitis-AI
We need a docker image that comes with all the necessary software to quantize and compile the model to be able to use it for inference.
Since I have a capable GPU, I need a docker image with GPU support.
Because there are none ready, let's use the Xilinx recipes to create a docker image with TensorFlow v2 and GPU support
cd docker
Here's the possible docker images that we can create:
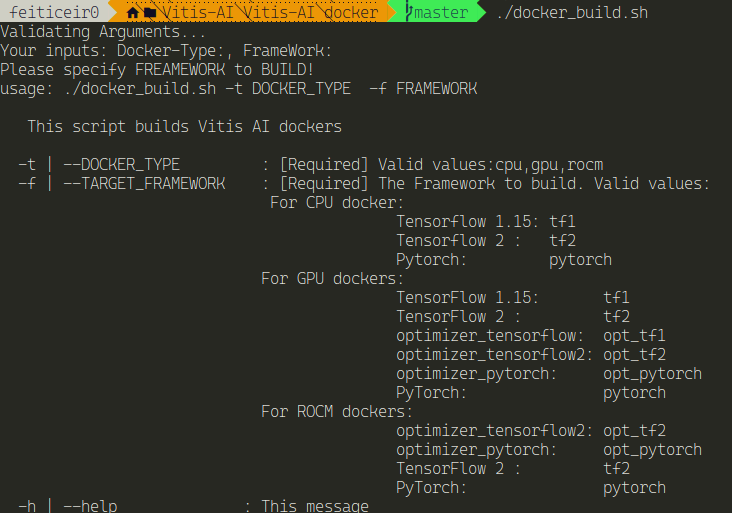
At first, I created a TensorFlow image. Reading the help above and nothing is mentioned in the documentation, I created the optimized Tensorflow image for the GPU.
./docker_build.sh -t gpu -f opt_tf2
This means I'm going to use the GPU (-t flag) and TensorFlow2 (-f flag)
After a while, it's ready to run.
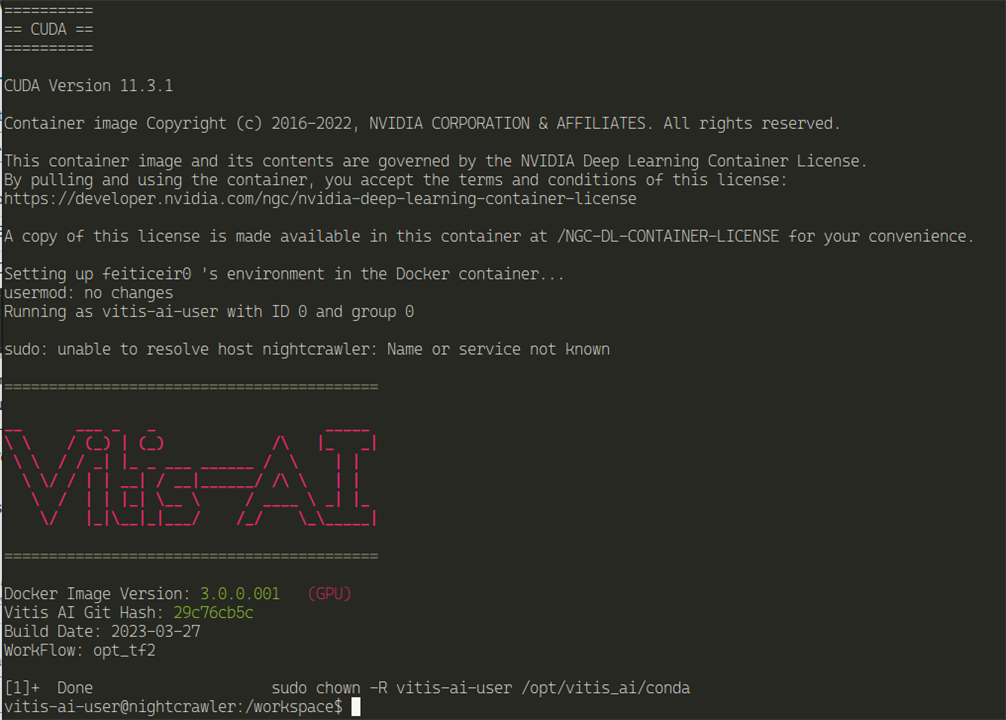
./docker_run.sh xilinx/vitis-ai-opt-tensorflow2-gpu:latest
A docker with TensorFlow and GPU support ready for Kria KV260 Vision Kit.
To be able to run the models on the board, we need to prepare it by installing an SDK image.
In the Vitis-AI directory:
cd board_setup/mpsoc
Give the script execution permissions
chmod +x host_cross_compiler_setup.sh
Execute it.
./host_cross_compiler_setup.sh
And it starts doing something
Now, let's enable cross-compiling
unset LD_LIBRARY_PATHsource /home/feiticeir0/petalinux_sdk_2022.2/environment-setup-cortexa72-cortexa53-xilinx-linux
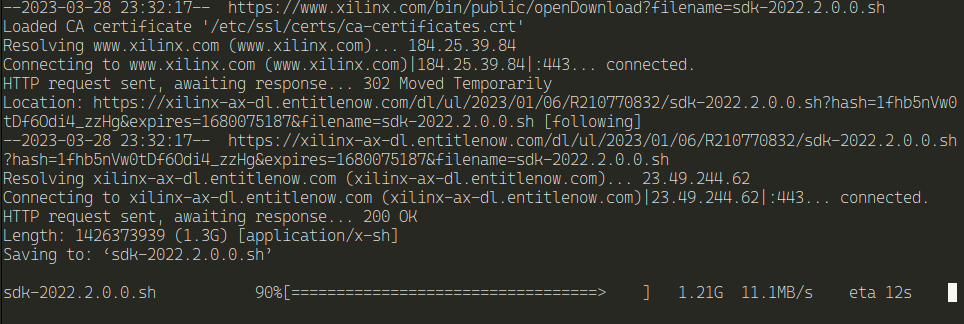
Next, we need to download an SD Card image for the KV260. Registration is required.
After flashing the SD Card, just boot it and we now have access to a dashboard running on http://<ip_address>:5006/kria-dashboard
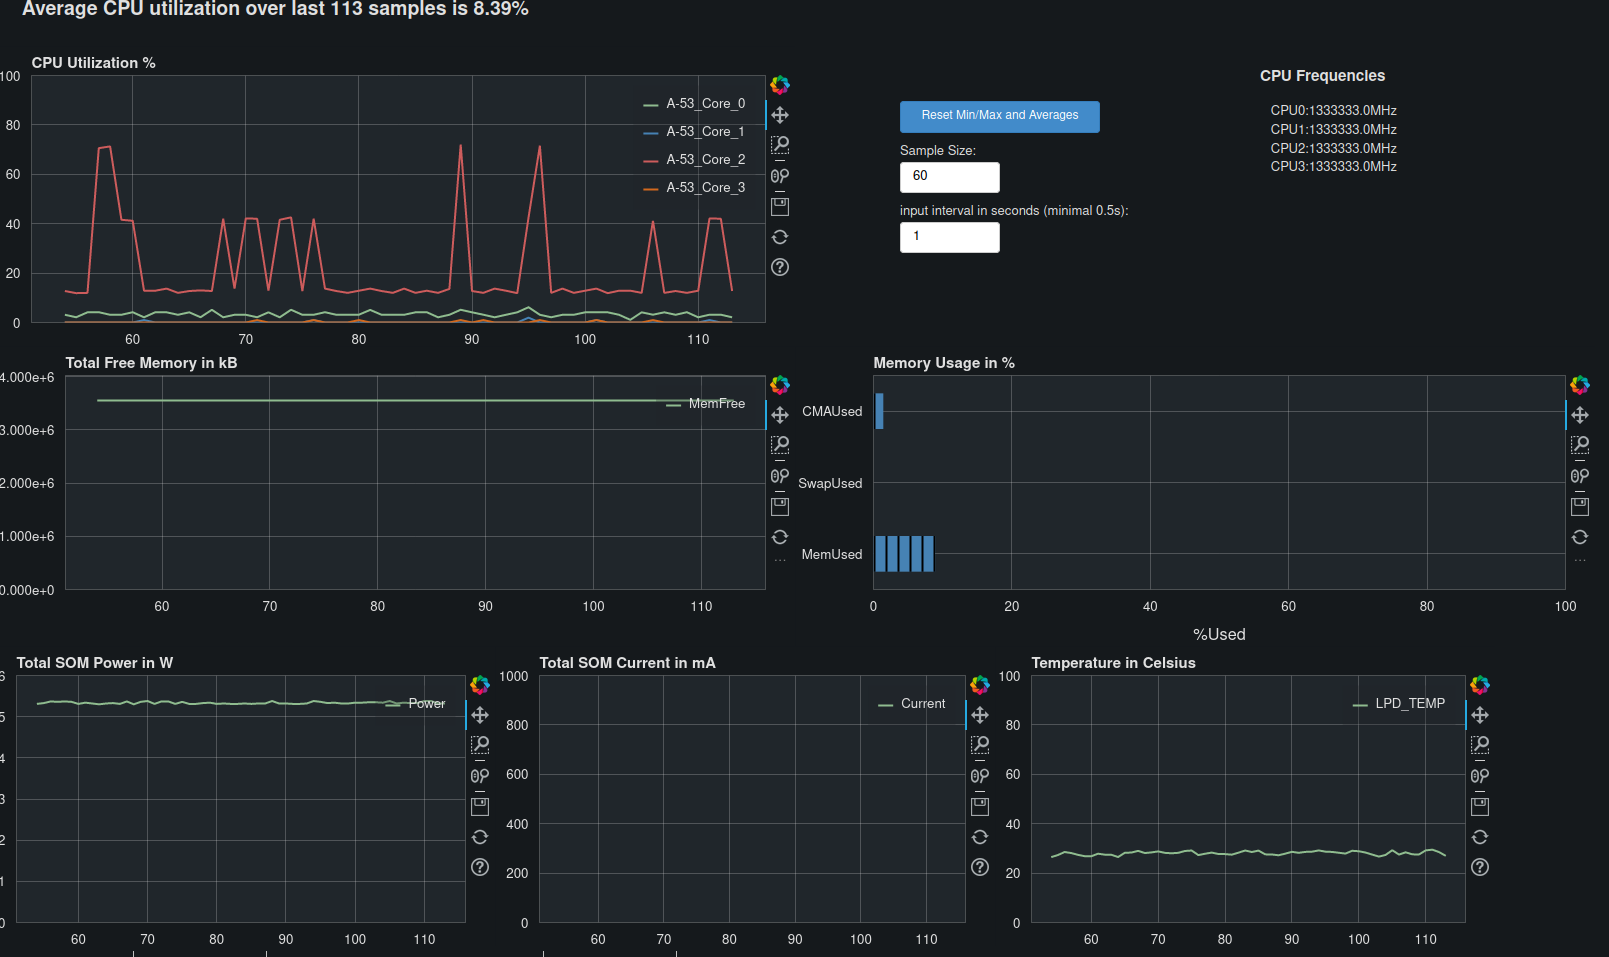
Using the debug port and minicom, we have this:
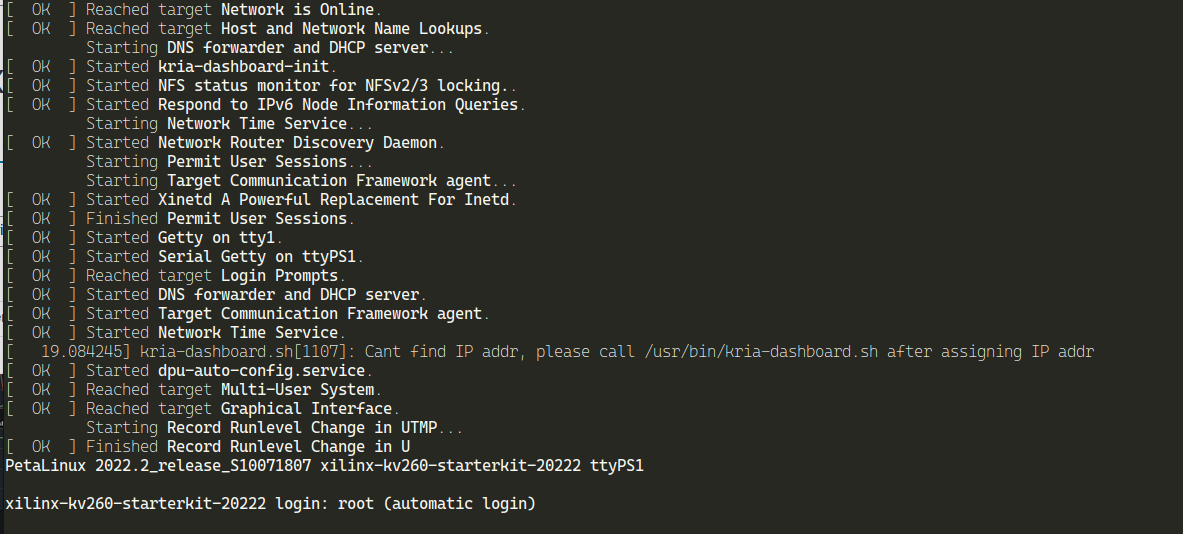
But we can also login using ssh with root user (default password is root)
After login in, we can optimize the system.
cd dpu_sw_optimize/zynqmp
and run the zynqmp_dpu_optimize.sh
This will:
./zynqmp_dpu_optimize.sh

Let's update the board
dnf upgrade
After a while (big while...), the board is updated.
Reboot the board
reboot
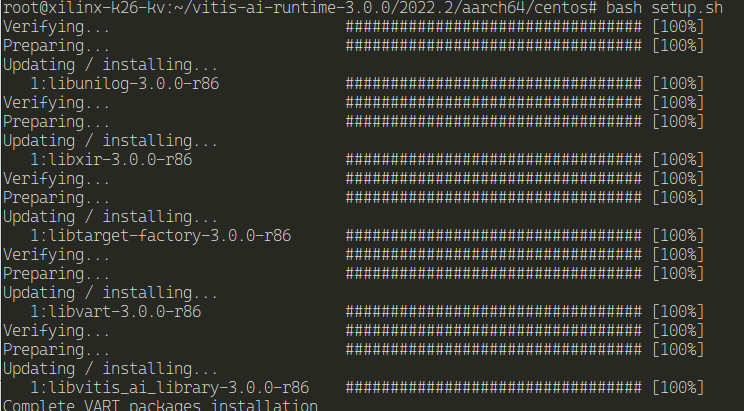
After it boots again, Lets now install the VITIS-AI runtime on the board
dnf install packagegroup-petalinux-vitisai
Now, let's update it
Download the files from here
decompress the file
tar -zxvf vitis-ai-runtime-3.0.0.tar.gz
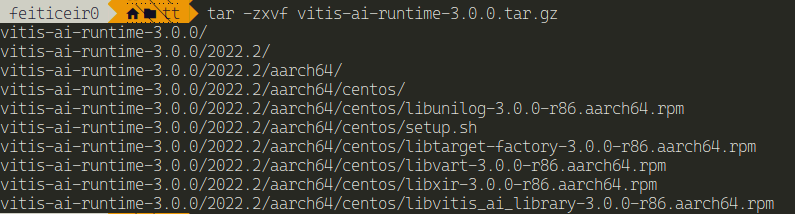
Copy the files to the board
scp -r centos root@192.168.5.6:
But every time, I got this:

So, I end up using wget on the board to download the files.
decompress them - using the same command as above
Next, execute the setup
cd vitis-ai-runtime-3.0.0/2022.2/aarch64/centos/
bash setup.sh
Now, let's test a model
We're going to test the TensorFlow resnet50 - like the documentation
NOTE: Don't use this model. This is for Tensorflow v1. The quick start version of the documentation still shows this for Tensorflow v1. We need Tensorflow v2.
The tools also changed - and again, the quick start documentation still is for Tensorflow v1... Why ? Why ?
Bellow I corrected the model name for TF2 - tf2_resnet50_imagenet_224_224_7.76G_3.0
The following steps are the same, but with another model name.
Next steps are in the host machine
cd Vitis-AI (the same directory we cloned from github above)
Download the model
wget https://www.xilinx.com/bin/public/openDownload?filename=tf_resnetv1_50_imagenet_224_224_6.97G_3.0.zip -O tf_resnetv1_50_imagenet_224_224_6.97G_.0.zipunzip it
unzip tf_resnetv1_50_imagenet_224_224_6.97G_3.0.zipBefore using the model in the Kria KV260, It's necessary to quantize it. Here are the steps involved by the quantizer
First, let's download the calibration images for the dataset
AMD Xilinx offers a dataset already prepared - Imagenet_calib.tar.gz and copy it to the Vitis-AI folder
Let's launch the docker image create above for TensorFlow
/docker_run.sh xilinx/vitis-ai-tensorflow2-gpu:3.0.0.001
But wait, that's not the docker image created above
No it's not. I had to create a new one, without the optimization (the opt_ versions) . Apparently the optimizer version is just for pruning and requires license.
Why isn't this on the documentation ?
Now that we're in docker image, let's activate the conda environment
conda activate vitis-ai-tensorflow2
If you do a ls in the "workspace" folder, you'll realize is just the VITIS-AI folder.

Now, uncompress the images
tar -zxvf Imagenet_calib.tar.gz -C tf_resnetv1_50_imagenet_224_224_6.97G_3.0/data
Enter the model directory so we can start the quantization process
cd tf_resnetv1_50_imagenet_224_224_6.97G_3.0/code/quantize/
Execute the quantize process
bash quantize.sh
and we get an error:
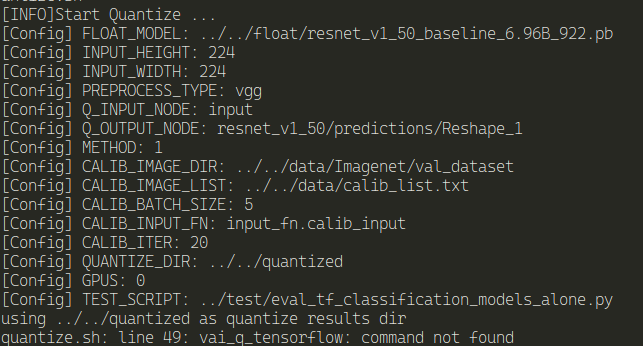
Why ? I'm certain I didn't make any mistake. This is the docker image created by the Vitis-AI scripts...
After having the docker image created and everything ready to run the tools, vai_q_tensorflow was nowhere to be found.
The culprit ? The quick start documentation.
I'm sure that everyone knows that when someone is using something for the first time, it's eager to get it running in no time. The details are for later, now, we just want to play the game.
After a bit of digging, it turns out that that, for TensorFlow2 this is not the way to go anymore.
According to the documentation for quantizing the model it's necessary to install it from source, but the instructions are.. well, crap..
They just say to run the following commands:
sh build.sh
pip install pkgs/*.whl
And where do I run this ? Is some directory inside the VITIS-AI repository that I cloned ? After pressing the link on the documentation, I realized that is a directory in the repository.
Let's try it.
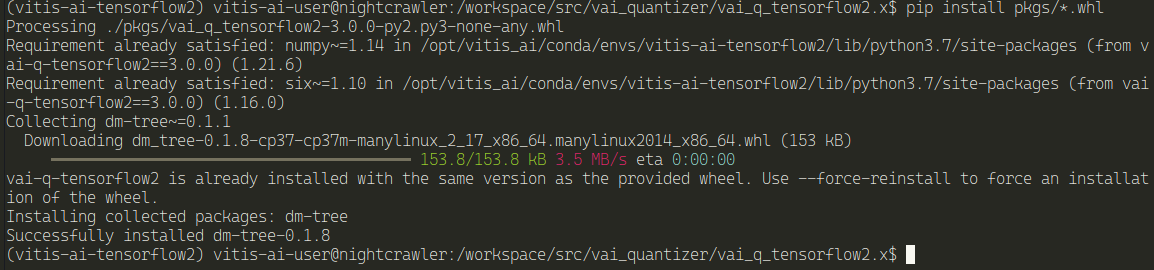
cd src/vai_quantizer/vai_q_tensorflow2.x
Let's run the above commands
sh build.sh
It worked

Install the pkgs
pip install pkgs/*.whl
And now, we need to quantize the model
Again, because I was reading the quick start documentation, this didn't work. Because the it still uses a TensorFlow v1 model as an example. Really ?
If you want to know what happened, here's the blog post. AMD Xilinx Kria KV260 Vision AI Starter Kit : Using VITIS-AI
After realizing my mistake, I went back and used a TensorFlow v2 model - Resnet50 for Tensorflow2
Inside there's a model.yaml file that has the links for the model for specific cards or, like the one we're going to get, not quantized..
Vitis has a model-zoo with a lot of models to test.
It also has a downloader script that simplifies the selection and download of the model. But now, I'm going manually.
This is the model: tf2_resnet50_imagenet_224_224_7.76G_3.0
You can read more about the versions, boards and how to download here.
Download the model
wget https://www.xilinx.com/bin/public/openDownload?filename=tf2_resnet50_imagenet_224_224_7.76G_3.0.zip -O tf2_resnet50_imagenet_224_224_7.76G_3.0.zip
uncompress it
unzip tf2_resnet50_imagenet_224_224_7.76G_3.0.zip
This model is already quantized, we can skip that step.
Let's compile it
First, let's create an output directory to hold the files
mkdir tf2_resnet50_imagenet_224_224_7.76G_3.0/output
Compile the model for KV260 DPU
vai_c_tensorflow2 -m
tf2_resnet50_imagenet_224_224_7.76G_3.0/quantized/quantized.h5 -a
/opt/vitis_ai/compiler/arch/DPUCZDX8G/KV260/arch.json -o
tf2_resnet50_imagenet_224_224_7.76G_3.0/output -n model_compiled
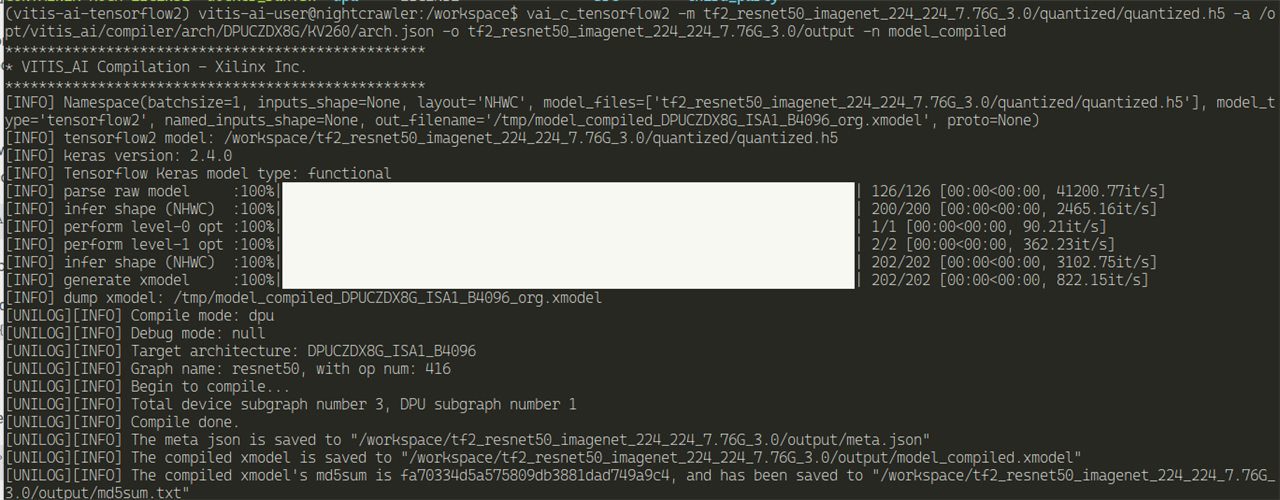
An explanation of the arguments
And we have xmodel for our KV260 from TensorFlow v2

Using PyTorch
I've only shown using TensorFlow2, but here's the Pytorch version. Everything is almost the same, except the Docker image to run and the scripts to use when quantizing and compiling a PyTorch model.
Build a docker container for Pytorch.
./docker_build.sh -t gpu -f opt_pytorch
After it's finished, let's run it
./docker_run.sh xilinx/vitis-ai-opt-pytorch-gpu:latest
First, let's run the Pytorch docker container
In the Vitis-AI directory
./docker_run.sh xilinx/vitis-ai-pytorch-gpu:latest
Because we're using VITIS-AI 3.0, vai_q_pytorch is already installed, not as a program, but a Python plugin.
Let's check it out
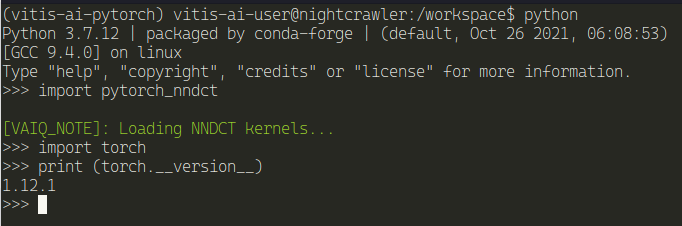
And now we're ready to quantize and compile a Pytorch model.
Now it's time for deployment.
Like I've described above, I must now use the Vivado Software Suite to deploy this model. Because I don't know how to use it and I know the learning curve is a bit step, kudos to AMD for the PYQN project - that they should publicize more. It will broaden the audience.
But, this does not end here. I have a model ready, but from their model zoo. What about my custom models ? I still need to detect a license plate.
Now that I know what I need to run a model in the Kria KV260, let's try with a custom made model.
Both this models were created using Transfer Learning.
Transfer Learning is a ML technique that uses pre-trained models as a starting point for a new detection task . We use an already trained model, instead of creating a new one from scratch, for building a new custom object detection model. This will save resources and time and will allow us to use the knowledge learned from a larger dataset that can help improve the performance of our model.
Both models use Object Detection.
Object detection is a computer vision task that has seen massive improvement because of Machine Learning. It involves identifying and locating objects within an image or video and drawing bounding boxes around each object.
In the case of my model trained with TensorFlow, I've used the TensorFlow Object Detection API. (NOTE: This no longer maintained. Google recommends scenic or TF-Vision.
In the case of my model trained with PyTorch, I've used YOLOv7 (and YOLOv5 and several others).
Before we dive into the steps, and just to save you from reading all the way through (please read if you're interested in knowing the exact steps) I never got this done.
It wasn't for lack of trying and testing and changing and creating new models and try all again - Never one of my models worked in the quantization.
I first tried the YOLOv7 model. Didn't work with the following error
At first I thought that it could be because I'm using a recent version of PyTorch and it could not be supported. According to the documentation, I only see YOLOv6_pt being the latest version supported. I decided to go for YOLOv5 (I already had a model ready).
But, I got the same error again. It was when I decided to try the Xilinx forums and the YOLO Github.
From the Github issue never got a reply. But AMD did reply to me.
Quenton Hall from AMD replied to me and sent me the YOLO models package that they've used for VITIS-AI 3.0 . Kudos to him for trying to help me.
It included 3 models:
I did try them all.
Because they required older version of PyTorch and Python, I had to use Anaconda (miniconda3) to create environments with specific versions.
But got stuck in the glibc versions that my machine is running. I didn't go any further.

I even tried the yolov5-nano version with Python 3.6, but got stuck even earlier because of PyTorch version and the AdamW optimizer.

Don't know if AMD needs to update something to support the latest versions or I really need to learn PyTorch and create a model from scratch instead of using YOLO.
It was time to turn my attention to TensorFlow
This is my attempt of doing the same above, but using a TensorFlow model.
The TensorFlow quantizing process for Vitis-AI requires a model whether in Keras format (h5) or SavedModel .
The TensorFlow Object Detection API saves the model in the SavedModel format.
The TensorFlow process, on my opinion, is simpler.
I used the following script for the quantizing process:
import tensorflow as tffrom tensorflow_model_optimization.quantization.keras import vitis_quantize#load model in savedmodel format - exported from TensorFlow Object Detection API#model = tf.saved_model.load('./export/saved_model/')keras_model = tf.keras.models.load_model('./export/saved_model')#keras_model = tf.saved_model.load('./export/saved_model')# quantize modelquantizer = vitis_quantize.VitisQuantizer(keras_model)quantized_model = quantizer.quantize_model(calib_dataset=calib_dataset, calib_steps=100, calib_batch_size=10, **kwargs)# save the modelquantized_model.save('quantized_model.h5')
It did not work.
ValueError: Unable to create a Keras model from SavedModel at
./export/saved_model. This SavedModel was exported with
`tf.saved_model.save`, and lacks the Keras metadata file. Please save
your Keras model by calling `model.save` or
`tf.keras.models.save_model`. Note that you can still load this
SavedModel with `tf.saved_model.load`.
I did try to save the model in the keras format, but the error was the same.
But, because I'm stubborn, I've decided to go for the long haul and created a new model of object detection using Keras and designing the neural network (well, I've used one of the excellent Nicholas Renotte Youtube videos on Machine Learning) instead of going for the Object Detection API. This time, I was sure that the h5 saved model had the Keras metadata file (I was hopping at this point).
TensorFlow can use the GPU for the training of the network, but I wasn't being able to do so. The first time I run the training session, it took almost 4h to train the model and I didn't had the code to save the model. Bummer. They now provide a docker image for this process.
PyTorch works better when using the GPU for training the model.
Using the docker image, it trained the model in just 12 minutes. Wow.
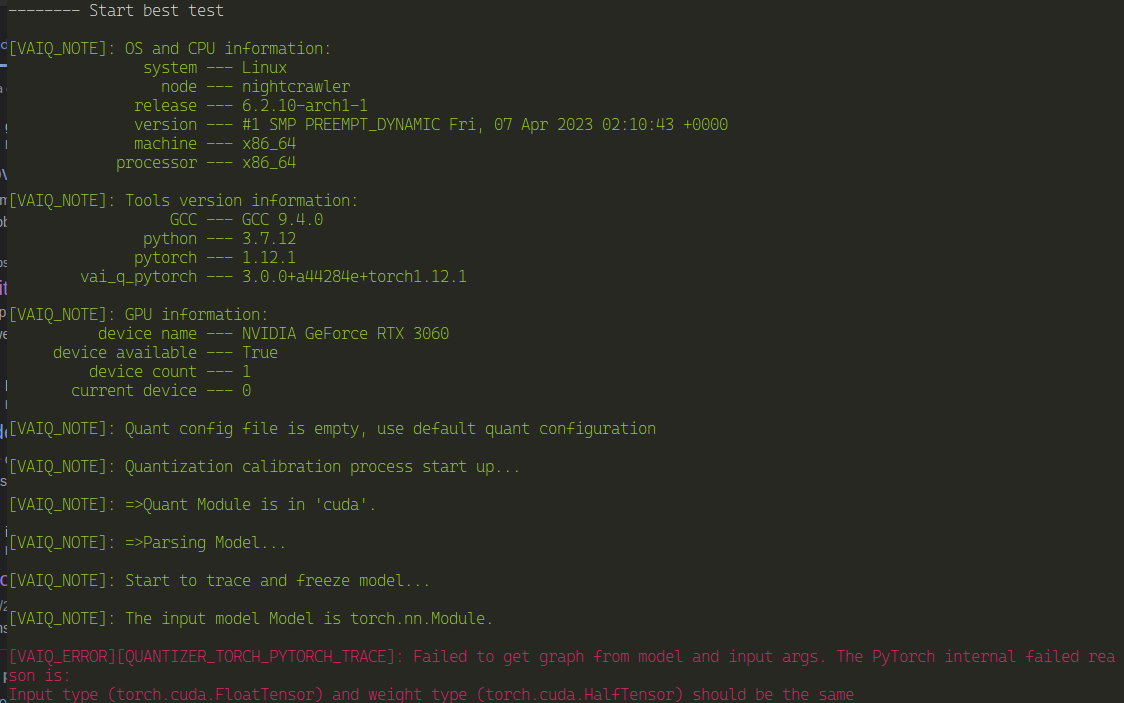
I tried again the quantizing process, this time with the keras saved file. Of couse it didn't work.
This time, the model's shape was the problem:
ValueError: Cannot assign value to variable '
block1_conv1/kernel:0': Shape mismatch.The variable shape (3, 3, 3, 64),
 and the assigned value shape (3, 3, 512, 512) are incompatible.
(vitis-ai-tensorflow2) vitis-ai-user@nightcrawler:/workspace/tf2_license_plate$
I'm missing something here, because I get errors about the shape, but the input shape is right and the model summary confirms it:
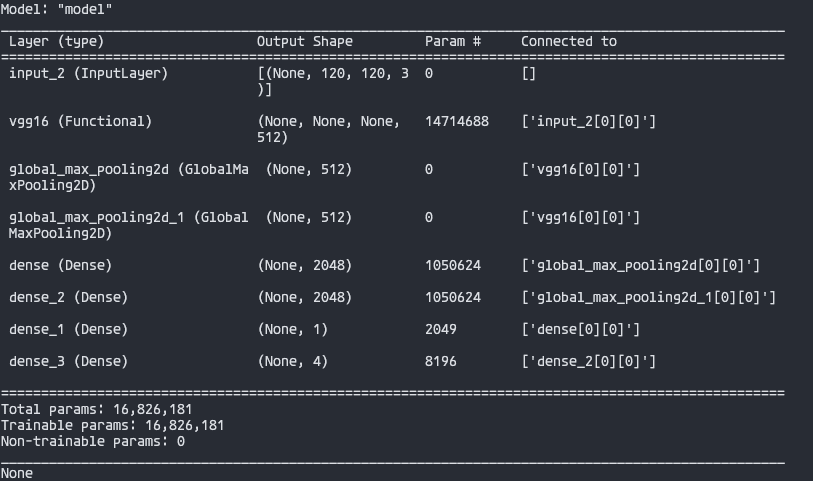
And I'm assuming the script is corret:
train_images = tf.data.Dataset.list_files('images/train/images/*.jpg', shuffle=False)train_images = train_images.map (load_image)train_images = train_images.map (lambda x: tf.image.resize(x, (120,120)))train_images = train_images.map (lambda x: x/255) # normalize# load labelstrain_labels = tf.data.Dataset.list_files ('images/train/labels/*.json', shuffle=False)train_labels = train_labels.map(lambda x: tf.py_function(load_labels, [x], [tf.uint8, tf.float16]))# create datasetcalib_dataset = tf.data.Dataset.zip((train_images,train_labels))model = tf.keras.models.load_model('licenseplate.h5')quantizer = vitis_quantize.VitisQuantizer(model)quantized_model = quantizer.quantize_model(calib_dataset=calib_dataset, calib_steps=100, calib_batch_size=10, input_shape=[None, 120,120,3])
I've had some replies from AMD, but still the same error. There's also a simillar issue on VITIS-AI Github, still unresolved .
Graces from AMD replied with an answer from the forum. Flatten the model. I think I tried and it didn't work, but will have to stay for a later try.
At this point, close, but no cigar.
None of my models worked, and I'm sure they are not special. Regular models. I've used the ones from YOLO - same versions that VITIS-AI supports, but they didn't work. I still need to try that last response from Graces.
So frustrated. But, AMD is trying to reach those that are not FPGAs experts and has a Python project - PYNQ - that runs on the Kria KV260. This is where my model was supposed to work and do something.
Since I was unable to use it, I did grab an example already there, changed it to work with the Webcam and let's talk about it now.
As mentioned, the ultimate goal of my Road Test was to run a custom model in the KV260, using Python. I knew that the KV260 was able to run Ubuntu, and at first, this was were I was going to run the models.
But, I've discovered the PYNQ project, by AMD.

PYNQ is an open-source project from AMD to make it easier to use Adaptive Computing Platforms.
Using the Python Language and libraries we can exploit the benefits of programmable logic and microprocessors to build more exciting programs.
PYNQ can be used with the AMD Xilinx KV260 Vision kit - along others.
It can be used to create high performance applications with:
The PYNQ is used using Jupyter Notebooks.
For those that aren't familiar with them, Jupyter Notebooks are browser based interactive computing environments. Know Google Coolab ? It's the same. In fact, Google Coolab is based on the Jupyter project.
We only need a recent browser.
Although it's supposed to use the browser, we can program Python using the PYNQ environment in the command line. This is how I'm going to do this.
To install the PYNQ libraries in the KV260, we need to use Ubuntu.
I'm not going through the installation of Ubuntu here - check my post AMD Xilinx Kria KV260 Vision AI Starter Kit : Preparing the KV260
After Ubuntu is installed, let's save some resources.
Because I don't need the graphical environment, I'm going to disable it and make Ubuntu boot to the command line instead.
Find the default target (we don't need this, but for the completeness of the commands)
Find the current default boot target
sudo systemctl get-default

Let's set the boot default
sudo systemctl set-default multi-user
NOTE: We don't need to specify the extension. Systemd knows it

After a reboot, it boots to the command line and will allow us to save resources.
Let's install PYNQ
Following the instructions on the Github page is straightforward .
Let's clone the repository
git clone https://github.com/Xilinx/Kria-PYNQ.git
After it finishes, let's enter the directory
cd Kria-PYNQ/
And now let's install it for our board
sudo bash install.sh -b KV260
After it is installed - about 25 minutes, we can access the Jupyter Notebook using the browser
AMD Xilinx Kria KV260 Vision AI Starter Kit : Preparing the KV260
The password is xilinx
How does this works ?
This is straight Python language syntax. I'm assuming that not all the libraries available for Python work here, but since the architecture is aarch64, what is available for it, in theory should be possible to install here.
What does not work out of the box is all the hardware. For example, the KV260 has support for the Raspberry PI CAM though a DSI cable, but PYNQ can't access it - only supports a Diligent Pcam 5C.
To be able to support that, we must used what is called Overlays.
Overlays, or hardware libraries, are programmable/configurable FPGA designs that extend the user application from the Processing System to the Programmable Logic.
They can be used to accelerate a software application or customize the hardware.
They are used the same way one could use a library, by loading them dynamically, as required. If you know how to program FPGAs and work with the VITIS or VIVADO software, you can design an overlay and use it here.
Although PYNQ is meant to be use with Jupyter Nootbooks, it can also be used on the command line.
We just need to access the board using ssh or the console and have a terminal.
After that, we need to activate the PYQN environment.
source /etc/profile.d/pynq_venv.sh

After this, we can use the environment and all the Python libraries associated with it.
Here's an example of opening the webcam
import cv2import timecap = cv2.VideoCapture(0)if not cap.isOpened(): print ("cannot open camera")cap.set(cv2.CAP_PROP_FRAME_WIDTH, 640)cap.set(cv2.CAP_PROP_FRAME_HEIGHT, 480)cap.set(cv2.CAP_PROP_BUFFERSIZE, 1)buf_size = cap.get(cv2.CAP_PROP_BUFFERSIZE)print(f"Buffer size: {buf_size}") # make sure there is no build up of frames from slow processingprev_frame = 0new_frame = 0while True: ret, frame = cap.read() if not ret: print ("empty frame") font = cv2.FONT_HERSHEY_SIMPLEX new_frame = time.time() fps = 1 / (new_frame - prev_frame) prev_frame = new_frame fps = int(fps) #display fps cv2.putText(frame, str(fps), (7, 70), font, 1, (255, 0, 0), 2, cv2.LINE_AA) cv2.imshow("output", frame) if cv2.waitKey(1) & 0xFF == ord('q'): break
And here's the result, forwarded to my computer, using SSH X11 forward, at 18/20 frames per second
To be able to run my model I had to have it compiled and quantize in xmodel format. Unfortunately I haven't accomplished it, yet.
Nonetheless, PYNQ comes with some examples for other models. For the hardware acceleration and to use the DPU of the board, we need to use the DPU overlay.
from pynq_dpu import DpuOverlayoverlay = DpuOverlay("dpu.bit")
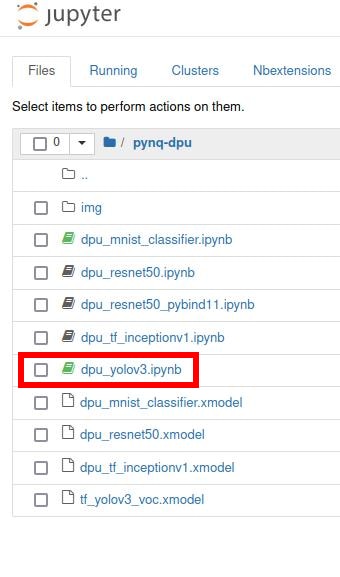
This is the dpu_yolo3 example.
This model will detect the following objects:
aeroplanebicyclebirdboatbottlebuscarcatchaircowdiningtabledoghorsemotorbikepersonpottedplantsheepsofatraintvmonitor
And here's the result wit a picture of myself, running the model in the Jupyter notebook:

I want it to run, not in a Jupyter notebook, but using the webcam and run inference in real time.
I've created a new script (adapting the dpu_yolov3) that will use the Webcam and run inference on the frames using the YOLOv3 model above. It's the closest I could do that could resemble my project.
from pynq_dpu import DpuOverlayimport cv2import timeimport osimport timeimport numpy as npimport cv2import randomimport colorsysfrom matplotlib.patches import Rectangleimport matplotlib.pyplot as pltoverlay = DpuOverlay("dpu.bit")overlay.load_model("tf_yolov3_voc.xmodel")anchor_list = [10,13,16,30,33,23,30,61,62,45,59,119,116,90,156,198,373,326]anchor_float = [float(x) for x in anchor_list]anchors = np.array(anchor_float).reshape(-1, 2)'''Get model classification information''' def get_class(classes_path): with open(classes_path) as f: class_names = f.readlines() class_names = [c.strip() for c in class_names] return class_names classes_path = "voc_classes.txt"class_names = get_class(classes_path)num_classes = len(class_names)hsv_tuples = [(1.0 * x / num_classes, 1., 1.) for x in range(num_classes)]colors = list(map(lambda x: colorsys.hsv_to_rgb(*x), hsv_tuples))colors = list(map(lambda x: (int(x[0] * 255), int(x[1] * 255), int(x[2] * 255)), colors))random.seed(0)random.shuffle(colors)random.seed(None)'''resize image with unchanged aspect ratio using padding'''def letterbox_image(image, size): ih, iw, _ = image.shape w, h = size scale = min(w/iw, h/ih) #print(scale) nw = int(iw*scale) nh = int(ih*scale) #print(nw) #print(nh) image = cv2.resize(image, (nw,nh), interpolation=cv2.INTER_LINEAR) new_image = np.ones((h,w,3), np.uint8) * 128 h_start = (h-nh)//2 w_start = (w-nw)//2 new_image[h_start:h_start+nh, w_start:w_start+nw, :] = image return new_image'''image preprocessing'''def pre_process(image, model_image_size): image = image[...,::-1] image_h, image_w, _ = image.shape if model_image_size != (None, None): assert model_image_size[0]%32 == 0, 'Multiples of 32 required' assert model_image_size[1]%32 == 0, 'Multiples of 32 required' boxed_image = letterbox_image(image, tuple(reversed(model_image_size))) else: new_image_size = (image_w - (image_w % 32), image_h - (image_h % 32)) boxed_image = letterbox_image(image, new_image_size) image_data = np.array(boxed_image, dtype='float32') image_data /= 255. image_data = np.expand_dims(image_data, 0) return image_datadef _get_feats(feats, anchors, num_classes, input_shape): num_anchors = len(anchors) anchors_tensor = np.reshape(np.array(anchors, dtype=np.float32), [1, 1, 1, num_anchors, 2]) grid_size = np.shape(feats)[1:3] nu = num_classes + 5 predictions = np.reshape(feats, [-1, grid_size[0], grid_size[1], num_anchors, nu]) grid_y = np.tile(np.reshape(np.arange(grid_size[0]), [-1, 1, 1, 1]), [1, grid_size[1], 1, 1]) grid_x = np.tile(np.reshape(np.arange(grid_size[1]), [1, -1, 1, 1]), [grid_size[0], 1, 1, 1]) grid = np.concatenate([grid_x, grid_y], axis = -1) grid = np.array(grid, dtype=np.float32) box_xy = (1/(1+np.exp(-predictions[..., :2])) + grid) / np.array(grid_size[::-1], dtype=np.float32) box_wh = np.exp(predictions[..., 2:4]) * anchors_tensor / np.array(input_shape[::-1], dtype=np.float32) box_confidence = 1/(1+np.exp(-predictions[..., 4:5])) box_class_probs = 1/(1+np.exp(-predictions[..., 5:])) return box_xy, box_wh, box_confidence, box_class_probsdef correct_boxes(box_xy, box_wh, input_shape, image_shape): box_yx = box_xy[..., ::-1] box_hw = box_wh[..., ::-1] input_shape = np.array(input_shape, dtype = np.float32) image_shape = np.array(image_shape, dtype = np.float32) new_shape = np.around(image_shape * np.min(input_shape / image_shape)) offset = (input_shape - new_shape) / 2. / input_shape scale = input_shape / new_shape box_yx = (box_yx - offset) * scale box_hw *= scale box_mins = box_yx - (box_hw / 2.) box_maxes = box_yx + (box_hw / 2.) boxes = np.concatenate([ box_mins[..., 0:1], box_mins[..., 1:2], box_maxes[..., 0:1], box_maxes[..., 1:2] ], axis = -1) boxes *= np.concatenate([image_shape, image_shape], axis = -1) return boxesdef boxes_and_scores(feats, anchors, classes_num, input_shape, image_shape): box_xy, box_wh, box_confidence, box_class_probs = _get_feats(feats, anchors, classes_num, input_shape) boxes = correct_boxes(box_xy, box_wh, input_shape, image_shape) boxes = np.reshape(boxes, [-1, 4]) box_scores = box_confidence * box_class_probs box_scores = np.reshape(box_scores, [-1, classes_num]) return boxes, box_scores'''Draw detection frame'''def draw_bbox(image, bboxes, classes): """ bboxes: [x_min, y_min, x_max, y_max, probability, cls_id] format coordinates. """ num_classes = len(classes) image_h, image_w, _ = image.shape hsv_tuples = [(1.0 * x / num_classes, 1., 1.) for x in range(num_classes)] colors = list(map(lambda x: colorsys.hsv_to_rgb(*x), hsv_tuples)) colors = list(map(lambda x: (int(x[0] * 255), int(x[1] * 255), int(x[2] * 255)), colors)) random.seed(0) random.shuffle(colors) random.seed(None) for i, bbox in enumerate(bboxes): coor = np.array(bbox[:4], dtype=np.int32) fontScale = 0.5 score = bbox[4] class_ind = int(bbox[5]) bbox_color = colors[class_ind] bbox_thick = int(0.6 * (image_h + image_w) / 600) c1, c2 = (coor[0], coor[1]), (coor[2], coor[3]) cv2.rectangle(image, c1, c2, bbox_color, bbox_thick) return imagedef nms_boxes(boxes, scores): """Suppress non-maximal boxes. # Arguments boxes: ndarray, boxes of objects. scores: ndarray, scores of objects. # Returns keep: ndarray, index of effective boxes. """ x1 = boxes[:, 0] y1 = boxes[:, 1] x2 = boxes[:, 2] y2 = boxes[:, 3] areas = (x2-x1+1)*(y2-y1+1) order = scores.argsort()[::-1] keep = [] while order.size > 0: i = order[0] keep.append(i) xx1 = np.maximum(x1[i], x1[order[1:]]) yy1 = np.maximum(y1[i], y1[order[1:]]) xx2 = np.minimum(x2[i], x2[order[1:]]) yy2 = np.minimum(y2[i], y2[order[1:]]) w1 = np.maximum(0.0, xx2 - xx1 + 1) h1 = np.maximum(0.0, yy2 - yy1 + 1) inter = w1 * h1 ovr = inter / (areas[i] + areas[order[1:]] - inter) inds = np.where(ovr <= 0.55)[0] # threshold order = order[inds + 1] return keepdef draw_boxes2(image, boxes, scores, classes): image_h, image_w, _ = image.shape for i, bbox in enumerate(boxes): [top, left, bottom, right] = bbox top = int(top) left = int (left) bottom = int (bottom) right = int (right) #width, height = right - left, bottom - top #center_x, center_y = left + width*0.5, top + height*0.5 score, class_index = scores[i], classes[i] label = '{}: {:.4f}'.format(class_names[class_index], score) color = tuple([color/255 for color in colors[class_index]]) # show frame cv2.rectangle(image, (left,top), (right,bottom), (0,255,0), 2) # show class cv2.putText(image, label, (left,top-10), font, 1, (0, 0, 255), 2, cv2.LINE_AA) return imagedef evaluate(yolo_outputs, image_shape, class_names, anchors): score_thresh = 0.2 anchor_mask = [[6, 7, 8], [3, 4, 5], [0, 1, 2]] boxes = [] box_scores = [] input_shape = np.shape(yolo_outputs[0])[1 : 3] input_shape = np.array(input_shape)*32 for i in range(len(yolo_outputs)): _boxes, _box_scores = boxes_and_scores( yolo_outputs[i], anchors[anchor_mask[i]], len(class_names), input_shape, image_shape) boxes.append(_boxes) box_scores.append(_box_scores) boxes = np.concatenate(boxes, axis = 0) box_scores = np.concatenate(box_scores, axis = 0) mask = box_scores >= score_thresh boxes_ = [] scores_ = [] classes_ = [] for c in range(len(class_names)): class_boxes_np = boxes[mask[:, c]] class_box_scores_np = box_scores[:, c] class_box_scores_np = class_box_scores_np[mask[:, c]] nms_index_np = nms_boxes(class_boxes_np, class_box_scores_np) class_boxes_np = class_boxes_np[nms_index_np] class_box_scores_np = class_box_scores_np[nms_index_np] classes_np = np.ones_like(class_box_scores_np, dtype = np.int32) * c boxes_.append(class_boxes_np) scores_.append(class_box_scores_np) classes_.append(classes_np) boxes_ = np.concatenate(boxes_, axis = 0) scores_ = np.concatenate(scores_, axis = 0) classes_ = np.concatenate(classes_, axis = 0) return boxes_, scores_, classes_dpu = overlay.runnerinputTensors = dpu.get_input_tensors()outputTensors = dpu.get_output_tensors()shapeIn = tuple(inputTensors[0].dims)shapeOut0 = (tuple(outputTensors[0].dims)) # (1, 13, 13, 75)shapeOut1 = (tuple(outputTensors[1].dims)) # (1, 26, 26, 75)shapeOut2 = (tuple(outputTensors[2].dims)) # (1, 52, 52, 75)outputSize0 = int(outputTensors[0].get_data_size() / shapeIn[0]) # 12675outputSize1 = int(outputTensors[1].get_data_size() / shapeIn[0]) # 50700outputSize2 = int(outputTensors[2].get_data_size() / shapeIn[0]) # 202800input_data = [np.empty(shapeIn, dtype=np.float32, order="C")]output_data = [np.empty(shapeOut0, dtype=np.float32, order="C"), np.empty(shapeOut1, dtype=np.float32, order="C"), np.empty(shapeOut2, dtype=np.float32, order="C")]image = input_data[0]def run(frame): # Read input image # Pre-processing image_size = frame.shape[:2] image_data = np.array(pre_process(frame, (416, 416)), dtype=np.float32) #print (image_data) #print (shapeIn) #print (shapeIn[1:]) # Fetch data to DPU and trigger it image[0,...] = image_data.reshape(shapeIn[1:]) job_id = dpu.execute_async(input_data, output_data) dpu.wait(job_id) # Retrieve output data conv_out0 = np.reshape(output_data[0], shapeOut0) conv_out1 = np.reshape(output_data[1], shapeOut1) conv_out2 = np.reshape(output_data[2], shapeOut2) yolo_outputs = [conv_out0, conv_out1, conv_out2] # Decode output from YOLOv3 boxes, scores, classes = evaluate(yolo_outputs, image_size, class_names, anchors) #new_image = draw_boxes2(frame, boxes, scores, classes) draw_boxes2(frame, boxes, scores, classes) #print (f"Number of detected objects: {len(boxes)}") #print (f"Class: {(classes)}") #print (f"boxes: {(boxes)}")cap = cv2.VideoCapture(0)if not cap.isOpened(): print ("cannot open camera")# setup proper backend and codec to allow for 1920x1080 frames#fourcc = cv2.VideoWriter_fourcc(*'MJPG')#cap.set(cv2.CAP_PROP_FOURCC, fourcc)cap.set(cv2.CAP_PROP_FRAME_WIDTH, 640)cap.set(cv2.CAP_PROP_FRAME_HEIGHT, 480)cap.set(cv2.CAP_PROP_BUFFERSIZE, 1)buf_size = cap.get(cv2.CAP_PROP_BUFFERSIZE)prev_frame = 0new_frame = 0font = cv2.FONT_HERSHEY_SIMPLEXwhile True: ret, frame = cap.read() if not ret: print ("empty frame") new_frame = time.time() fps = 1 / (new_frame - prev_frame) prev_frame = new_frame fps = int(fps) #display fps cv2.putText(frame, str(fps), (7, 70), font, 1, (255, 0, 0), 2, cv2.LINE_AA) run(frame) cv2.imshow("output", frame) if cv2.waitKey(1) & 0xFF == ord('q'): breakcv2.destroyAllWindows()cap.release()del overlaydel dpu
Here's two examples of the code, running inference from the webcam and detecting objects.
One using a SSH tunnel to my computer.
The other is running on the Ubuntu desktop.
The downside of this approach - running from the CLI - is that we need to be root to run the script. To use the dpu overlay, we need to be root - at least on the CLI.
Remote SSH tunnel (5 frames per second).
KRIA KV260 Ubuntu Desktop
To be able to run the script, I had to login as root - and to do that, I had to enable the root login though GDM
I'm surprised with the terrible performance. I was expecting this to run at a much higher frame rate.
I'm going to try it to run using the DisplayPort output and see if it runs much faster.
After changing a bit the code to use the displayPort, here's the result:
Still a poor performance. Don't really know why. I don't have the Ubuntu desktop running and it is using the dpu overlay to take advantage of the acceleration.
It took me a long time to get to here. I had to read and read and read a lot. If you're not a FPGA experienced user with knowledge of how to program one and how to use the Vivado Software Suite, this can be a bit daunting. The learning curve is very steep.
The Kria KV260 is a nice piece of hardware. I know that nobody usually talks about this, but love the red top and the black fan. It's fancy. Nice one Xilinx (or AMD).
The fact that you can run a full blown Linux desktop (albeit being Ubuntu) is great. It really is. It's a bit slow, but 'm not expecting to play games here. Things can be done to give it a bit more performance.
I've always wanted to do this Road Test because of the Machine Learning capabilities that the Kria KV260 has. Having a dedicated DPU to run inference using Vision could only mean that the process would run very well and fast.
It turns out that was not the case.
Although VITIS-AI supports the popular deep learning frameworks like TensorFlow or PyTorch, I couldn't run any of my models, because they wouldn't compile. I could only quantize and compile models already present in the model zoo of VITIS-AI. It's a problem with my models ? Perhaps, but I haven't given up yet. Will try again soon.
Even if I could create a xmodel file to run in the Kria KV260, how could I ? I don't know how to work with the Vivado Software. All the models and examples present were build there. The funny thing is, I haven't run any of those models. I remember that I did try, but got some error and didn't try again.
I then found the PYNQ project. This is the way that AMD is trying to get more people into FPGAs. Python is a more well known language and is more user friendly than languages like VHDL or Verilog. It simplifies the process of process of programming a FPGA. And it's Open Source.
PYNQ has many tutorials that we can use and learn from it and it has a growing community. I had several doubts and post them on the PYNQ forums and in not time I had replies. And the fact that it integrates well with VITIS-AI (running the xmodels), it is a plus .
Still, if you want to take advantage of the hardware using PYNQ, you need to create an overlay, and for that, you need to know how to work with the VIvado suite. We can't have it all.
But I really got disappointed on the performance. I can only speak for what I've seen and the performance using PYNQ when running inference on a model, at 640x480 resolution is very poor. Could it be the code ? I've used an example already there. The only changes I've made where to read the frames from a webcam. All the rest is the same.
The documentation. Oh, the documentation. At times, I was so overwhelmed with it. It's so much, so many versions that it gets confusing. And it's not up to date. I got lost sometimes and had to do a lot of the steps again because I was getting errors, because I was using some models or some tools that aren't in the new versions or are done in different ways .
AMD needs urgently to update the documents. The quick start section needs corrections, updates.
The VITIS-AI tutorials need updating. The latest version there is 2.5 . From my experience, a lot of things changed from 2.5 to 3.0 and the tutorials don't reflect that. And please, please create a tutorial where the model is a custom one (make the user create one like so many tutorials online) and not one present on the model zoo.
Please support the latest versions of YOLO - YOLOv7 or YOLOv8 . I was going to talk about supporting TensorFlow Object Detection API, but since is deprecated, please think on supporting TF-Vision or Scenic.
I'm grateful for all the help that Quenton Hall and Graces from AMD gave me in the forums. They really tried to help me.
That's it. Thank you for reading.
This are the blog posts that I have written that help me to get here.
AMD Xilinx Kria KV260 Vision AI Starter Kit : First Impressions
AMD Xilinx Kria KV260 Vision AI Starter Kit : Preparing the KV260
AMD Xilinx Kria KV260 Vision AI Starter Kit : License plate detection : YOLOv7
AMD Xilinx Kria KV260 Vision AI Starter Kit : License plate detection using TensorFlow
AMD Xilinx Kria KV260 Vision AI Starter Kit : Using VITIS-AI


