element14 Community
element14 Community
    Register Log In
  • Site
  • Search
  • Log In Register
  • Members
    Members
    • Benefits of Membership
    • Achievement Levels
    • Members Area
    • Personal Blogs
    • Feedback and Support
    • What's New on element14
  • Learn
    Learn
    • Learning Center
    • eBooks
    • STEM Academy
    • Webinars, Training and Events
    • More
  • Technologies
    Technologies
    • 3D Printing
    • FPGA
    • Industrial Automation
    • Internet of Things
    • Power & Energy
    • Sensors
    • More
  • Challenges & Projects
    Challenges & Projects
    • Design Challenges
    • element14 presents
    • Project14
    • Arduino Projects
    • Raspberry Pi Projects
    • More
  • Products
    Products
    • Arduino
    • Dev Tools
    • Manufacturers
    • Raspberry Pi
    • RoadTests & Reviews
    • Avnet Boards Community
    • More
  • Store
    Store
    • Visit Your Store
    • Choose Another Store
      • Europe
      •  Austria (German)
      •  Belgium (Dutch, French)
      •  Bulgaria (Bulgarian)
      •  Czech Republic (Czech)
      •  Denmark (Danish)
      •  Estonia (Estonian)
      •  Finland (Finnish)
      •  France (French)
      •  Germany (German)
      •  Hungary (Hungarian)
      •  Ireland
      •  Israel
      •  Italy (Italian)
      •  Latvia (Latvian)
      •  
      •  Lithuania (Lithuanian)
      •  Netherlands (Dutch)
      •  Norway (Norwegian)
      •  Poland (Polish)
      •  Portugal (Portuguese)
      •  Romania (Romanian)
      •  Russia (Russian)
      •  Slovakia (Slovak)
      •  Slovenia (Slovenian)
      •  Spain (Spanish)
      •  Sweden (Swedish)
      •  Switzerland(German, French)
      •  Turkey (Turkish)
      •  United Kingdom
      • Asia Pacific
      •  Australia
      •  China
      •  Hong Kong
      •  India
      •  Korea (Korean)
      •  Malaysia
      •  New Zealand
      •  Philippines
      •  Singapore
      •  Taiwan
      •  Thailand (Thai)
      • Americas
      •  Brazil (Portuguese)
      •  Canada
      •  Mexico (Spanish)
      •  United States
      Can't find the country/region you're looking for? Visit our export site or find a local distributor.
  • Translate
  • Profile
FPGA
  • Technologies
  • More
FPGA
Blog How to Leverage Board Presets to Accelerate Your Vivado Design
  • Blog
  • Forum
  • Documents
  • Events
  • Members
  • Mentions
  • Sub-Groups
  • Tags
  • More
  • Cancel
  • New
FPGA requires membership for participation - click to join
Blog Post Actions
  • Subscribe by email
  • More
  • Cancel
  • Share
  • Subscribe by email
  • More
  • Cancel
Group Actions
  • Group RSS
  • More
  • Cancel
Engagement
Author: bhfletcher
Date Created: 25 Feb 2021 12:20 AM
Views: 571
Likes: 4
Comments: 4
  • avnet
  • xilinx
  • vivado
  • designed by avnet
Related
Recommended

How to Leverage Board Presets to Accelerate Your Vivado Design

bhfletcher
bhfletcher
25 Feb 2021

Note: This is one alternative for adding board definitions to the Xilinx tools the other option is documented here.

Xilinx BoardStore to Automate Vivado Board Definitions for Avnet Boards


For anyone just getting started with Xilinx Vivado, a good place to start is UG895

Vivado Design Suite User Guide

System-Level Design Entry

https://www.xilinx.com/support/documentation/sw_manuals/xilinx2020_2/ug895-vivado-system-level-design-entry.pdf


It is 128 pages long, and sometimes it's easier to dive in and do something rather than reading the manual. I think one of the easiest ways to get started with a project is to use an existing board along with a preconfigured board definition or preset (often referred to as "Board Definition File" or BDF). I also really like Avnet's GitHub flow, which allows me to create a really complex design from Tcl scripts. However, sometimes I really like using the Vivado GUI to get a better view of what's going on. This blog will show how to start with the Avnet GitHub flow  to retrieve the Avnet BDFs, but then transition to using the Vivado GUI to access the BDFs. If you prefer to use the Xilinx BoardStore, refer to this blog instead: Xilinx BoardStore to Automate Vivado Board Definitions for Avnet Boards


To get on some common ground, I am already utilizing a VirtualBox Ubuntu 18.04.1 Virtual Machine as described in Avnet's VM Install Guide, located at https://avnet.me/zedsupport à 2020.2 à VM_Install_Guide à VirtualBox_Installation_Guide_2020_2_v1p0.pdf. I also have Vivado 2020.2 installed. I have the Xilinx tools' settings scripts set to automatically run in my .bashrc as described in the Install Guide.


Now follow a few steps from narrucmot's blog Avnet HDL git HOWTO (Vivado 2020.1 and earlier) :

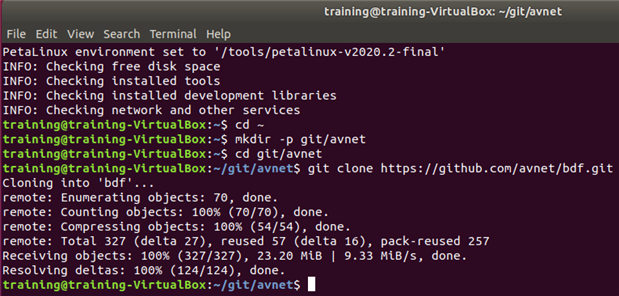
$ cd ~

$ mkdir -p git/avnet

$ cd git/avnet

$ git clone https://github.com/avnet/bdf.git


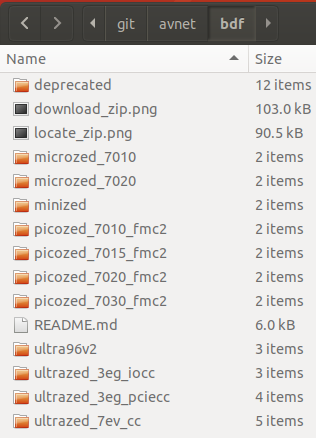
In this BDF archive that was just cloned, you can see folders for each one of the Avnet boards:


If you dig down into one of these folders, you will see different versions, and for each version, you will see a few XML files. It's beyond the scope of this blog to explain what is in those XML files except to summarize that it contains the default definition or "preset" to make the board work. For example, such things as clocking setup and DDR controller parameters to make that specific board work are embedded in those XMLs. There is detailed information about the XMLs in Appendix A of UG895. We've also discussed the possibility of running a training webinar to explain how to create your own BDFs, so if that is something that interests you, please put a comment below!


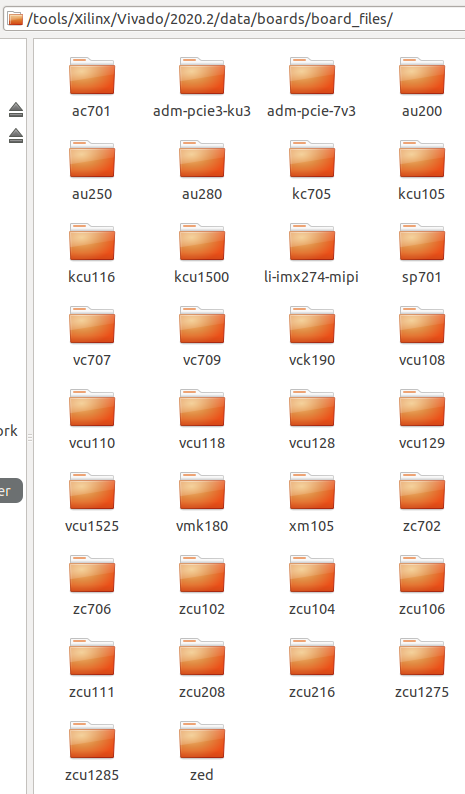
My next job is to make sure that Vivado can "see" my Avnet BDFs. There are multiple ways to do this. The brute force method (which I am NOT going to do) is to copy the BDF archive to the Xilinx tool installation, which for me is located at /tools/Xilinx/Vivado/2020.2/data/boards/board_files/. You can see that the default Xilinx tool installation populates a bunch of Xilinx boards here already.


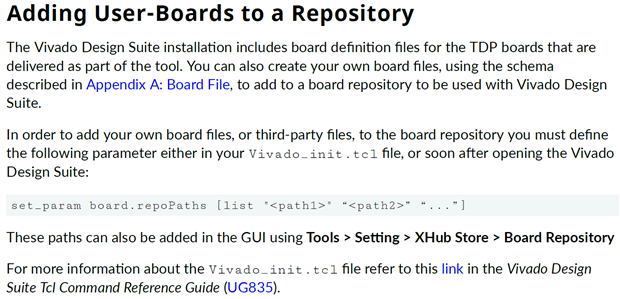
A much more elegant and cleaner way to allow Vivado to see my Avnet BDFs is to set the board.repoPaths parameter in Vivado. UG895 Chapter 2 says:

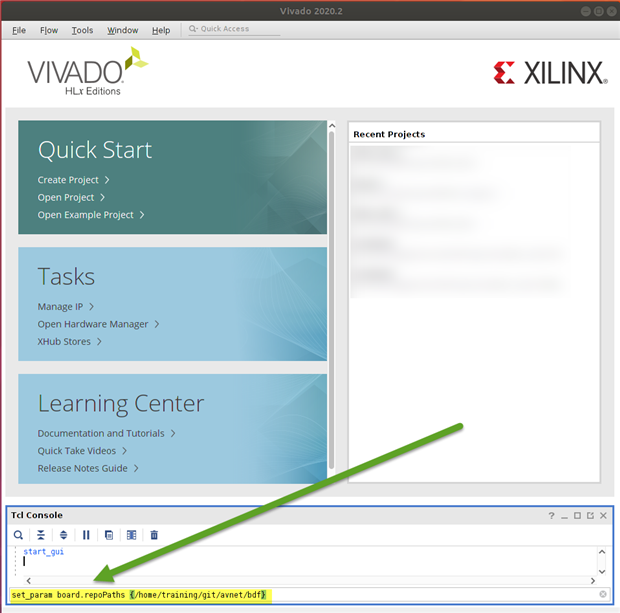
So, long-term, setting this in Vivado_init.tcl is the most efficient way to go, but for now, I will enter the tcl command manually after opening Vivado, remembering that I just cloned all the Avnet BDFs at location /home/training/git/avnet/bdf.


     set_param board.repoPaths {/home/training/git/avnet/bdf}


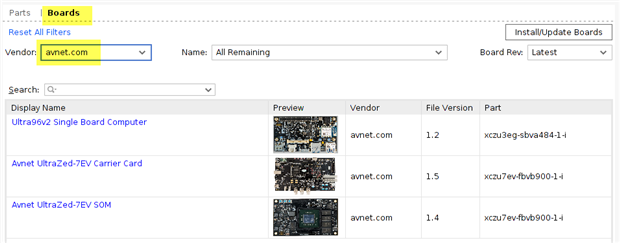
With that parameter now set, I can Create Project, chose Boards from Vendor avnet.com or em.avnet.com, and you'll be able to select an Avnet board. Incidentally, the vendor is based on the company URL. When Avnet started doing BDFs many years ago, our URL was em.avnet.com, which is why you see some of the older boards with that as the vendor. We are in the process of cleaning them all up and making them consistent, so you should only see "avnet.com" as the vendor here in the near future.


At this point, I can now create my project with Vivado understanding some of the base functionality of my board. While this is all very basic, it is essential to getting started with Vivado and an Avnet board. The rest of creating the project and applying the preset is a subject for another blog! Once you have your board definitions in place, move on to this blog:

Developing Simple Applications in Xilinx Vitis for Ultra96-V2

Anonymous
Parents
  • davidfu
    davidfu 7 months ago

    Hello Bryan,


    I'm using Vivado 2021.1, in the installed folder \xilinx\Vivado\2021.1\data\boards I can see no folder named board_files. Do I need to create this folder or go back to Vivado 2020? Or there is a new place to fit BDFs?


    B.R

    David

    • Cancel
    • Up 0 Down
    • Reply
    • More
    • Cancel
  • davidfu
    davidfu 7 months ago in reply to davidfu

    Okey, the new place is Vivado\2021.1\data\xhub\boards\XilinxBoardStore\boards\Avnet

    • Cancel
    • Up 0 Down
    • Reply
    • More
    • Cancel
  • bhfletcher
    bhfletcher 7 months ago in reply to davidfu

    I'm glad you found it. I'll just remind everyone that this brute force method of copying to the installation folder is not recommended, although it definitely works, and it is the way I did it for years. It's highly recommended that you use the Repo method. In addition the TCL method that I detail above, you can also set this in the tools. Go to Tools --> Settings


    Bryan

    • Cancel
    • Up 0 Down
    • Reply
    • More
    • Cancel
Comment
  • bhfletcher
    bhfletcher 7 months ago in reply to davidfu

    I'm glad you found it. I'll just remind everyone that this brute force method of copying to the installation folder is not recommended, although it definitely works, and it is the way I did it for years. It's highly recommended that you use the Repo method. In addition the TCL method that I detail above, you can also set this in the tools. Go to Tools --> Settings


    Bryan

    • Cancel
    • Up 0 Down
    • Reply
    • More
    • Cancel
Children
No Data
Element14

element14 is the first online community specifically for engineers. Connect with your peers and get expert answers to your questions.

  • Members
  • Learn
  • Technologies
  • Challenges & Projects
  • Products
  • Store
  • About Us
  • Feedback & Support
  • FAQs
  • Terms of Use
  • Privacy Policy
  • Legal and Copyright Notices
  • Sitemap
  • Cookies

An Avnet Company © 2022 Premier Farnell Limited. All Rights Reserved.

Premier Farnell Ltd, registered in England and Wales (no 00876412), registered office: Farnell House, Forge Lane, Leeds LS12 2NE.

ICP 备案号 10220084.

Follow element14

  • Facebook
  • Twitter
  • linkedin
  • YouTube