element14 Community
element14 Community
    Register Log In
  • Site
  • Search
  • Log In Register
  • About Us
  • Community Hub
    Community Hub
    • What's New on element14
    • Feedback and Support
    • Benefits of Membership
    • Personal Blogs
    • Members Area
    • Achievement Levels
  • Learn
    Learn
    • Ask an Expert
    • eBooks
    • element14 presents
    • Learning Center
    • Tech Spotlight
    • STEM Academy
    • Webinars, Training and Events
    • Learning Groups
  • Technologies
    Technologies
    • 3D Printing
    • FPGA
    • Industrial Automation
    • Internet of Things
    • Power & Energy
    • Sensors
    • Technology Groups
  • Challenges & Projects
    Challenges & Projects
    • Design Challenges
    • element14 presents Projects
    • Project14
    • Arduino Projects
    • Raspberry Pi Projects
    • Project Groups
  • Products
    Products
    • Arduino
    • Avnet Boards Community
    • Dev Tools
    • Manufacturers
    • Multicomp Pro
    • Product Groups
    • Raspberry Pi
    • RoadTests & Reviews
  • Store
    Store
    • Visit Your Store
    • Choose another store...
      • Europe
      •  Austria (German)
      •  Belgium (Dutch, French)
      •  Bulgaria (Bulgarian)
      •  Czech Republic (Czech)
      •  Denmark (Danish)
      •  Estonia (Estonian)
      •  Finland (Finnish)
      •  France (French)
      •  Germany (German)
      •  Hungary (Hungarian)
      •  Ireland
      •  Israel
      •  Italy (Italian)
      •  Latvia (Latvian)
      •  
      •  Lithuania (Lithuanian)
      •  Netherlands (Dutch)
      •  Norway (Norwegian)
      •  Poland (Polish)
      •  Portugal (Portuguese)
      •  Romania (Romanian)
      •  Russia (Russian)
      •  Slovakia (Slovak)
      •  Slovenia (Slovenian)
      •  Spain (Spanish)
      •  Sweden (Swedish)
      •  Switzerland(German, French)
      •  Turkey (Turkish)
      •  United Kingdom
      • Asia Pacific
      •  Australia
      •  China
      •  Hong Kong
      •  India
      •  Korea (Korean)
      •  Malaysia
      •  New Zealand
      •  Philippines
      •  Singapore
      •  Taiwan
      •  Thailand (Thai)
      • Americas
      •  Brazil (Portuguese)
      •  Canada
      •  Mexico (Spanish)
      •  United States
      Can't find the country/region you're looking for? Visit our export site or find a local distributor.
  • Translate
  • Profile
  • Settings
Industrial Automation
  • Technologies
  • More
Industrial Automation
Blog AVNET SmartEdge IIOT Gateway: Display Industrial I/O on Node-RED Dashboard
  • Blog
  • Forum
  • Documents
  • Quiz
  • Events
  • Polls
  • Files
  • Members
  • Mentions
  • Sub-Groups
  • Tags
  • More
  • Cancel
  • New
Join Industrial Automation to participate - click to join for free!
  • Share
  • More
  • Cancel
Group Actions
  • Group RSS
  • More
  • Cancel
Engagement
  • Author Author: Jan Cumps
  • Date Created: 5 Feb 2021 8:52 PM Date Created
  • Views 1158 views
  • Likes 2 likes
  • Comments 1 comment
  • smartedge
  • node-red
  • edge_computing
  • dashboard
Related
Recommended

AVNET SmartEdge IIOT Gateway: Display Industrial I/O on Node-RED Dashboard

Jan Cumps
Jan Cumps
5 Feb 2021

The SmartEdge IIOT GatewaySmartEdge IIOT Gateway is a Raspberry Pi 3 Compute based industrial Linux box.

It runs Raspbian with some additions. There's a set of industrial hardware extensions. In this 2nd Node-RED blog I show the industrial I/O status on a Node-RED dashboard.

image


In the 1st Node-RED blog, I controlled the SmartEdge's industrial I/Os in a process flow.

Here, I'm extending that same flow, to show an input pin state on a Node-RED dashboard.

image


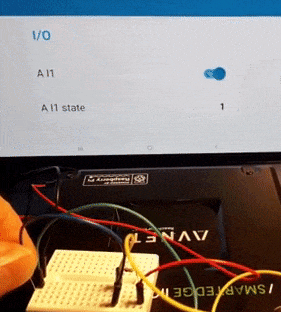
Let's pretend that we have a boiler on/off detector attached to input A I1.

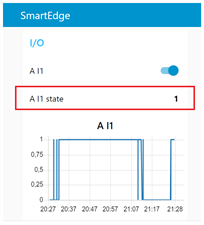
The state is shown on 3 controls:

  • a "button style" indicator
  • a label
  • a history of the last hour


This is easy. I replaced the debug output block of last post with the 3 controls.
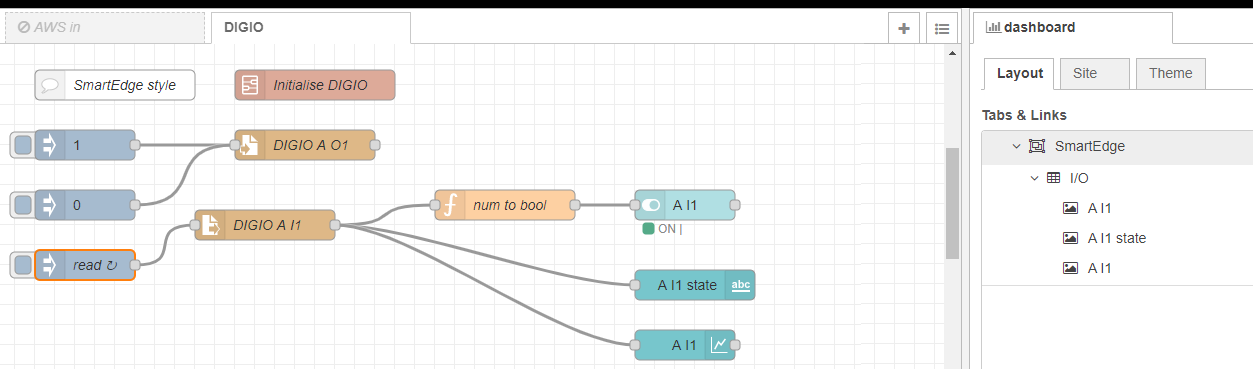
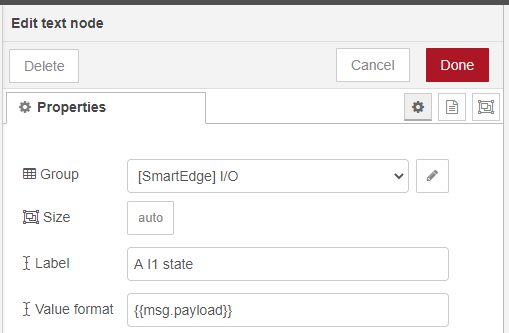
image


Label

image

The state reader block, labeled DIGIO A I1,  gives character 1 or 0, dependent on the state of SmrtEdge's DIGIO A input 1.

I just added a text node, connected the reader output to it. And gave it a name.
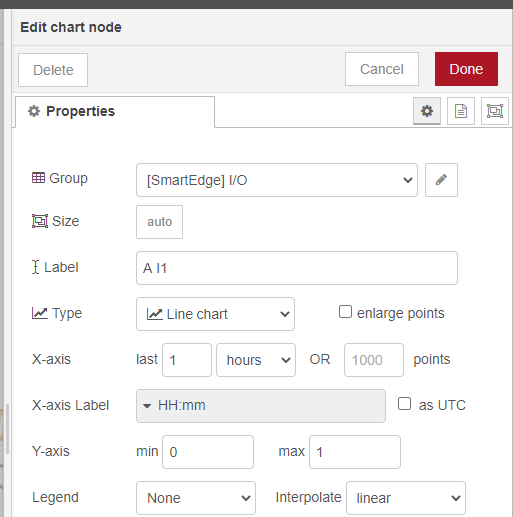
image


History Graph

image


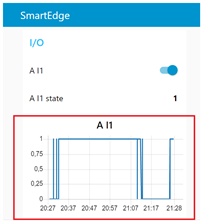
This one is also directly connected. I changed some attributes to make it looks good.

I didn't find a way to just show 0 and 1 on the Y axis, without in-between ticks and labels
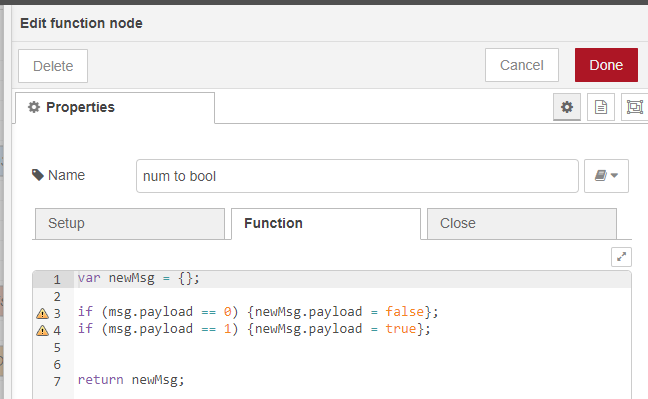
image


Indicator

image


This one expects a boolean input.

I put a conversion function between the reader output and the indicator:

image

Then, I made the switch read-only and told it to show the input status:

image


Keeping the View Up-to-date


The last task was to take care that the status is read regularly.

In the previous post, I used an Inhjection block. Every time it's clicked, the input pin's state is read.

I've kept that same block, but scheduled it:


image

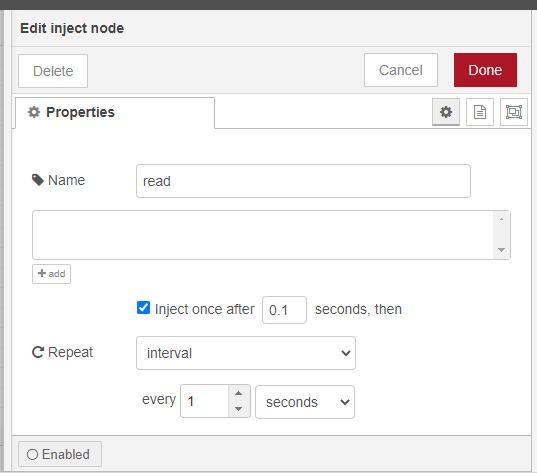
You can choose the interval as you please. If you want a faster refresh than 1 second, you can use decimals.


That's it. These little additions give you a dashboard that you can view from a PC or tablet.


You don't have permission to edit metadata of this video.
Edit media
x
image
Upload Preview
image


Related Blog
Industrial I/O
Use the Industrial I/O
Control Industrial I/O directly from GPIO Pins
C Program for the Industrial I/O
Control Industrial I/O directly from Node-RED
Display Industrial I/O on Node-RED Dashboard
CAN Bus
Use the Isolated CAN
CAN programming in C on Linux: Filter and Mask
2020 Linux Image
The 2020 Linux Image and IoTConnect Scripts
Understand the Custom Scripts and Services (Pt. 1: intro and reset button service)
Understand the Custom Scripts and Services (Pt. 2: led service)
Understand the Custom Scripts and Services (Pt. 3: IoT Connect service)
  • Sign in to reply
Parents
  • Jan Cumps
    Jan Cumps over 4 years ago

    In the blog, I used the default representation of a button.

    But if you prefer a more sober layout (with additional advantage that it isn't animated when you click on it), you can use simpler icons.

    The image below shows the state when the input is engaged (left) and disengaged.


    image


    Here are the settings:


    image

    • Cancel
    • Vote Up 0 Vote Down
    • Sign in to reply
    • More
    • Cancel
Comment
  • Jan Cumps
    Jan Cumps over 4 years ago

    In the blog, I used the default representation of a button.

    But if you prefer a more sober layout (with additional advantage that it isn't animated when you click on it), you can use simpler icons.

    The image below shows the state when the input is engaged (left) and disengaged.


    image


    Here are the settings:


    image

    • Cancel
    • Vote Up 0 Vote Down
    • Sign in to reply
    • More
    • Cancel
Children
No Data
element14 Community

element14 is the first online community specifically for engineers. Connect with your peers and get expert answers to your questions.

  • Members
  • Learn
  • Technologies
  • Challenges & Projects
  • Products
  • Store
  • About Us
  • Feedback & Support
  • FAQs
  • Terms of Use
  • Privacy Policy
  • Legal and Copyright Notices
  • Sitemap
  • Cookies

An Avnet Company © 2025 Premier Farnell Limited. All Rights Reserved.

Premier Farnell Ltd, registered in England and Wales (no 00876412), registered office: Farnell House, Forge Lane, Leeds LS12 2NE.

ICP 备案号 10220084.

Follow element14

  • X
  • Facebook
  • linkedin
  • YouTube