


I'm road testing the Keithley Bench Digital Multimeter DMM6500. In this blog, I presents a script that measures a microcontoller power consumption using an EEVblog µCurrent.
Knowing the amp hours your application consumes, helps to predict battery life. Battery capacity is given in this unit. With modern switching converters, you can squeeze almost all capacity out of a battery. Knowing how much runtime all that capacity gives you is useful. |

Why a µCurrent?
The DMM6500 can read low currents very well. However, the Burden voltage is not low enough for certain measurements.
With the device I'm checking here, a MAX32660 microcontroller, the device does not get enough voltage when I add the DMM6500 in series.
The µCurrent fills this niche. A small lab tool that allows you to measure current with a lower Burden voltage than most meters.
In this case, it makes the difference between the microcontroller working and not.
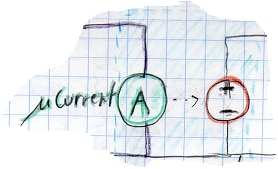
You put the µCurrent in series with the device under test. It translates the current into a voltage. This voltage can be measured by the DMM6500.
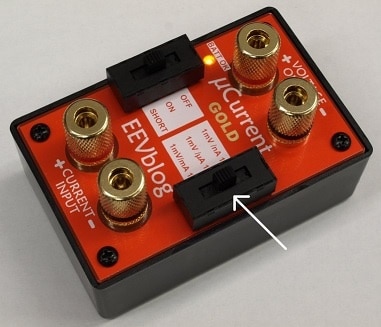
image source: EEVblog product page
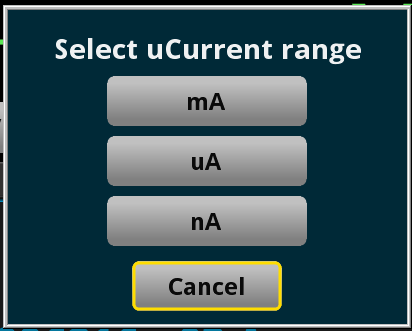
The instrument has 3 ranges that you can set with a sliding switch: 1 mV / nA, 1 mV / µA and 1 mV / mA.
In the script that I'm describing in this post, you can select on-screen what µCurrent setting you are using.
The script then does the calculation for you.
Here's the selection screen :

Measuring Amp Hours
If you want to know how long your device can run on a battery, it's useful to know its power consumption.
Batteries state their capacity in amp hours. They usually have a graph showing the voltage after a certain amount of amp hour delivered.
If you know how much volts your gizmo needs, and how many amp hours it consumes, you can extrapolate the autonomy of your design.
With a good DC converter and a low voltage design, you can also drop voltage when the battery is new and boost the voltage when the battery has dropped below your minimum.
You extend your device's lifespan, and this script + µCurrent can help you predict how long it will stay up.
A second reason for measuring the amp hours is to validate how much you lowered power consumption after a design optimisation.
If you run this script before the exercise, then run it again after you improved the power profile of your design, you have a figure that indicates your saving.
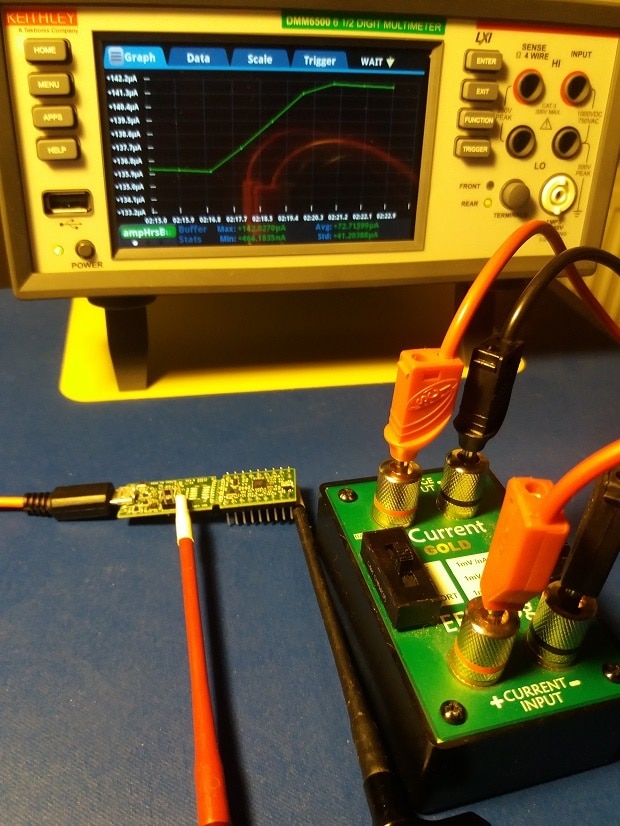
Measurement Setup
The setup is straightforward. The device under test (DUT) is a MAX32660 microcontroller evaluation board.
It's powered by a 1.8 V PSU. The debugger of that device delivers that voltage.
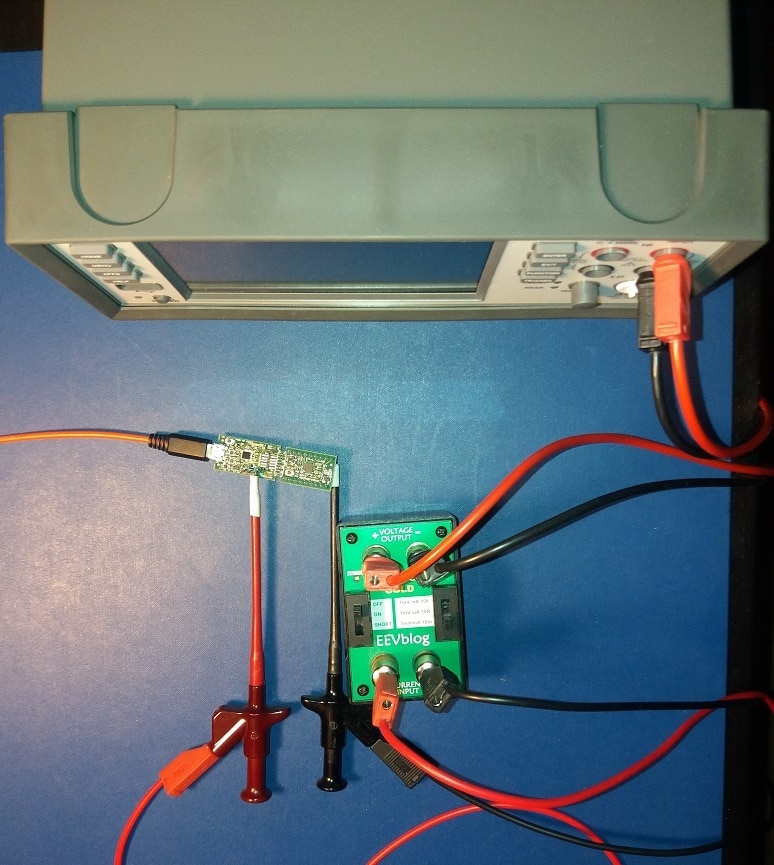
The µCurrent is in series with the microcontroller.
To do that, I removed the voltage jumper JP1, and put the µCurrent's + input to that jumper's 1.8 V pin.
The - input of the µCurrent goes to the right upper breakout pi, named VDDIO.
If you look at the schematic of the MAX32660 evaluation system, you'll see that this effectively puts the µCurrent in series with the microcontroller design.
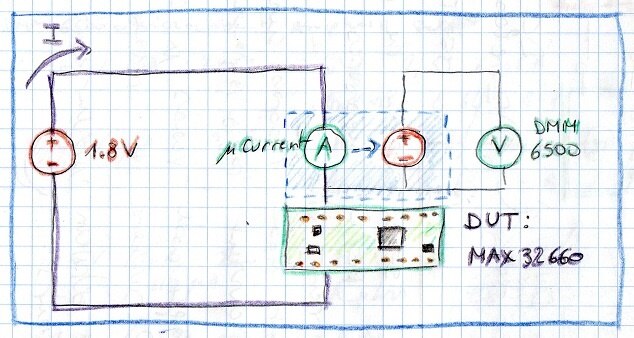
The DMM6500 is connected to the outputs of the µCurrent. It will read the mV coming out of that device. And those mV are a direct function of the current running through DUT.
We'll read that voltage in our script and convert that into the amp hours consumed by the MAX32660, under different power profiles.
How Can You Use the Script?
You can save the script at the end of this blog to a USB stick, with a *tsp extension, then plug that stick into the DMM6500 and run it.
You'll get a series of menu options:
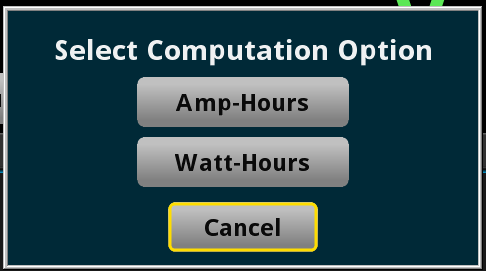
1: do you want to report Amp hours or Watt hours?
(in case of Watt hours, it'll ask for the supplied voltage, in this case 1.8 V)
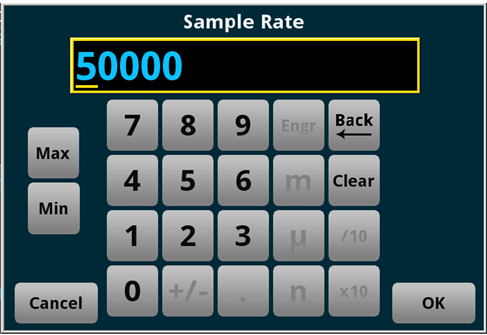
2: What's the sample rate? How many measurements do you want to take per second?
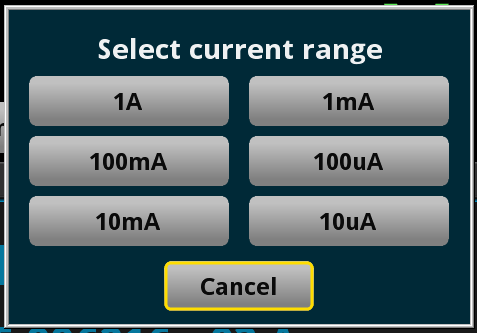
3: What's the expected maximum current pulled by the device under test?
4: To what value have you set the µCurrent? This will be used to calculate the right current.
Immediately after this selection, the script starts to execute.
You can run it as long as you want. You can always get the results by using the rule of 3 to recalculate the measurement time to one hour.
The longer you run it, the preciser your result.
Pushing the Trigger button ends the process.
Example Runs
I'm showing the script with the MAX32660 running two different designs.
The first one is the device in its highest power use.
It's constantly running in active mode and flashes a led 50% of the time.
It's MAX32660 Hello_World example, with the printf() commands removed.
The µCurrent is set to 1 mV / 1 mA and I ran the test for 1 minute.
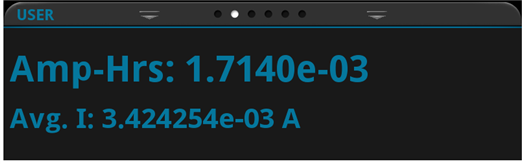
The graph shows the amp hour evolving calculation during the last few seconds of the execution.
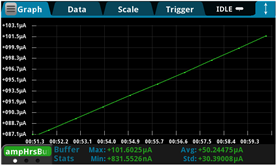
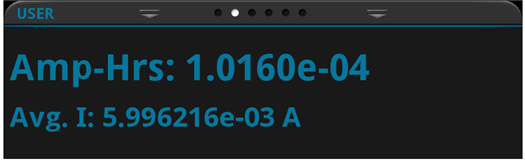
The User screen shows the average current during the run, and the amount of amp hours consumed during the minute.
If I extrapolate the value for one hour, I get 0.00010160 AH * 60 = 6.096 mAH
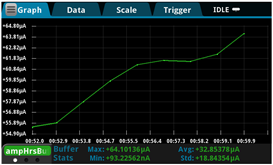
The second example is the device switching between its power modes.
It's the LP demo program. The MAX32660 is 2/5 of its time in high power mode, 3/5 of the time in the lower power modes. No LEDs are flashed.
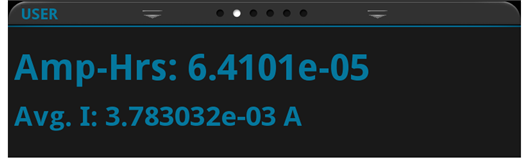
After a minute:
The same design after half an hour:
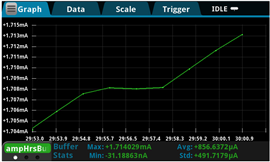
After 1 minute, the consumption extrapolates to 3.84606 mAH. After 30 minutes, we get the advantage of a longer run and we would expect 3.42800 mAH.
For an example like this, where the controller is doing the same loop all the time, you get a fair estimate after a short run.
If you have slow runners, it's best to run long enough to have a real life sample
The Script
It's not mine. I took it from a Keithley application note Data Logging of Power Profiles from Wireless IoT and Other Low-Power Devices.
That script uses the DMM6500 in it's natural habitat, as a current meter.
I adapted it so that it to operate in volt mode (the µCurrent output is a voltage) but log the amp hours as a current anyway.
What I changed:
- instrument mode from DC CURRENT to DC VOLTAGE.
- add a screen to ask the user to input the µCurrent's switch setting.
- a calculation to convert the measured volts to amps, based on the user selection.
You can find the script below. For the original version, check the end of the application note linked in above.
-- create functions
function setup_DMM6500_buffer(BufSize)
dciBuffer = buffer.make(BufSize, buffer.STYLE_STANDARD)
dciBuffer.clear()
buffer.clearstats(dciBuffer)
dciBuffer.capacity = 1 * BufSize
dciBuffer.fillmode = buffer.FILL_CONTINUOUS
end -- function


function setup_DMM6500_measure(sampleRate, measRange)
-- setup our refilling buffer
setup_DMM6500_buffer(sampleRate) -- BufSize = sampleRate = 1 second of buffering
opc()
-- setup measure type, ranges, etc.
dmm.digitize.func = dmm.FUNC_DIGITIZE_VOLTAGE
opc()
dmm.digitize.range = measRange
dmm.digitize.samplerate = sampleRate
dmm.digitize.aperture = dmm.APERTURE_AUTO
--Changing count is optional. The reading buffer capacity is the determining factor
dmm.digitize.count = 1 -- CANNOT be zero; 1 to 55Million
-- control the swipe screen
display.clear()
display.changescreen(display.SCREEN_USER_SWIPE)
-- clear any existing trigger blocks
trigger.clear()
trigger.model.load("Empty")
opc()
--Define a trigger model that will capture until we push front panel trigger button
trigger.model.setblock(1, trigger.BLOCK_BUFFER_CLEAR, dciBuffer)
trigger.model.setblock(2, trigger.BLOCK_DELAY_CONSTANT, 0)
trigger.model.setblock(3, trigger.BLOCK_DIGITIZE, dciBuffer, trigger.COUNT_INFINITE)
trigger.model.setblock(4, trigger.BLOCK_WAIT, trigger.EVENT_DISPLAY)
-- wait until the TRIGGER key is pressed
trigger.model.setblock(5, trigger.BLOCK_DIGITIZE, dciBuffer, trigger.COUNT_STOP)
-- stop making digitized measurements
opc()
end -- function


function my_dmm6500_waitcomplete(useWattHrs, dcvVal, microcurrentrange)
local i = 1
local cbIndex = 1
local tempVal = 0
-- check trigger model state on Amp-Hr meter (DMM6500)
present_state, n = trigger.model.state() -- state, present block number
--STATE_RUNNING, IDLE, WAITING, EMPTY, FAILED, ABORTING, ABORTED, BUILDING
while present_state == (trigger.STATE_WAITING or trigger.STATE_RUNNING) do
reading_stats = buffer.getstats(dciBuffer)
i_avg = reading_stats.mean * microcurrentrange
runtime = dciBuffer.relativetimestamps[dciBuffer.n]
AmpHrs = i_avg * runtime/3600
if useWattHrs == 0 then
display.settext(display.TEXT1, string.format("Amp-Hrs: %.4e", AmpHrs));
display.settext(display.TEXT2, string.format("Avg. I: %.6e A", i_avg));
tempVal = AmpHrs
buffer.write.reading(ampHrsBuffer, tempVal, runtime)
else
WattHrs = AmpHrs * dcvVal
display.settext(display.TEXT1, string.format("Watt-Hrs: %.4e", WattHrs));
display.settext(display.TEXT2, string.format("Avg. I: %.6e A", i_avg));
tempVal = WattHrs
buffer.write.reading(wattHrsBuffer, tempVal, runtime)
end
delay(1)
i = i + 1
present_state, n = trigger.model.state() --update the trigger model state var
end -- while loop
end -- function


function get_amphrs(microcurrentrange)
present_state, n = trigger.model.state()
reading_stats = buffer.getstats(defbuffer1)
runtime = defbuffer1.relativetimestamps[defbuffer1.n]
i_avg = reading_stats.mean * microcurrentrange
AmpHrs = i_avg * runtime/3600
end --function


function set_dci_range()
optionID = display.input.option("Select current range", "1A", "100mA", "10mA", "1mA",
"100uA", "10uA")
if optionID == display.BUTTON_OPTION1 then -- 1A
return 1.0
elseif optionID == display.BUTTON_OPTION2 then -- 100mA
return 100e-3
elseif optionID == display.BUTTON_OPTION3 then -- 10mA
return 10e-3
elseif optionID == display.BUTTON_OPTION4 then -- 1mA
return 1e-3
elseif optionID == display.BUTTON_OPTION5 then -- 100uA
return 100e-6
elseif optionID == display.BUTTON_OPTION6 then -- 10uA
return 10e-6
end
end


function set_output_hrs_format()
optionID = display.input.option("Select Computation Option", "Amp-Hours", "Watt-Hours")
if optionID == display.BUTTON_OPTION1 then -- Amp-Hrs
return 0
elseif optionID == display.BUTTON_OPTION2 then -- Watt-Hrs
return 1
end
end -- function


function set_microcurrent_range()
optionID = display.input.option("Select uCurrent range", "mA", "uA", "nA")
if optionID == display.BUTTON_OPTION1 then -- mA
return 1.0
elseif optionID == display.BUTTON_OPTION2 then -- uA
return 1e-3
elseif optionID == display.BUTTON_OPTION3 then -- nA
return 1e-6
end
end


function get_user_sample_rate()
return display.input.number("Sample Rate", display.NFORMAT_INTEGER, 50000, 1000, 125000)
end -- function


function get_user_dcv_value()
-- for the watt-hours, have the user input the applied voltage to their device
return display.input.number("DCV Level Applied", display.NFORMAT_DECIMAL, 3.25, 0.0, 24.0)
end -- function


-- ************************* MAIN PROGRAM **************************
reset() --reset the DMM6500
eventlog.clear()
-- set default sample_rate and current_range
local sample_rate = 15e3
local DMMcurrentMeasRange = 0.01
local microcurrentrange = 1.0
local dcvVal = 0.0
-- downsize the default buffers to ensure room for the new ones
defbuffer1.capacity = 10
defbuffer2.capacity = 10
-- let us size this for 1 sample per second for up to 30 days: 60*60*24*30 = 2,592,000
local hrsFormat = set_output_hrs_format()
if hrsFormat == 0 then -- provide semi-acceptable units to be visible on the graph and in the reading table
ampHrsBuffer = buffer.make(2592000, buffer.STYLE_WRITABLE)
buffer.write.format(ampHrsBuffer, buffer.UNIT_AMP, buffer.DIGITS_6_5)
else
wattHrsBuffer = buffer.make(2592000, buffer.STYLE_WRITABLE)
buffer.write.format(wattHrsBuffer, buffer.UNIT_WATT, buffer.DIGITS_6_5)
end
if hrsFormat == 1 then
dcvVal = get_user_dcv_value()
end
dmm.digitize.func = dmm.FUNC_DIGITIZE_VOLTAGE
dmm.digitize.range = DMMcurrentMeasRange
sample_rate = get_user_sample_rate()-- let the user select the sample rate to use
DMMcurrentMeasRange = set_dci_range()-- let the user select the current range to use
microcurrentrange = set_microcurrent_range()-- let the user select the microcurrent switch setting
setup_DMM6500_measure(sample_rate, DMMcurrentMeasRange)
-- start our DMM6500 High Speed Digitizing
trigger.model.initiate()
delay(0.5) -- allow some data to accumulate....
-- start the DMM6500 Amp-Hr status reporting loop
-- Press TRIGGER button to exit the loop
my_dmm6500_waitcomplete(hrsFormat, dcvVal, microcurrentrange)
-- clean up DMM6500 (Amp-Hr)
trigger.model.abort()
I hope that this post helps you when dealing with specifying low power designs.
It's my first script change. There may be bugs. Help and testing are welcome.
