element14 Community
element14 Community
    Register Log In
  • Site
  • Search
  • Log In Register
  • About Us
  • Community Hub
    Community Hub
    • What's New on element14
    • Feedback and Support
    • Benefits of Membership
    • Personal Blogs
    • Members Area
    • Achievement Levels
  • Learn
    Learn
    • Ask an Expert
    • eBooks
    • element14 presents
    • Learning Center
    • Tech Spotlight
    • STEM Academy
    • Webinars, Training and Events
    • Learning Groups
  • Technologies
    Technologies
    • 3D Printing
    • FPGA
    • Industrial Automation
    • Internet of Things
    • Power & Energy
    • Sensors
    • Technology Groups
  • Challenges & Projects
    Challenges & Projects
    • Design Challenges
    • element14 presents Projects
    • Project14
    • Arduino Projects
    • Raspberry Pi Projects
    • Project Groups
  • Products
    Products
    • Arduino
    • Avnet Boards Community
    • Dev Tools
    • Manufacturers
    • Multicomp Pro
    • Product Groups
    • Raspberry Pi
    • RoadTests & Reviews
  • Store
    Store
    • Visit Your Store
    • Choose another store...
      • Europe
      •  Austria (German)
      •  Belgium (Dutch, French)
      •  Bulgaria (Bulgarian)
      •  Czech Republic (Czech)
      •  Denmark (Danish)
      •  Estonia (Estonian)
      •  Finland (Finnish)
      •  France (French)
      •  Germany (German)
      •  Hungary (Hungarian)
      •  Ireland
      •  Israel
      •  Italy (Italian)
      •  Latvia (Latvian)
      •  
      •  Lithuania (Lithuanian)
      •  Netherlands (Dutch)
      •  Norway (Norwegian)
      •  Poland (Polish)
      •  Portugal (Portuguese)
      •  Romania (Romanian)
      •  Russia (Russian)
      •  Slovakia (Slovak)
      •  Slovenia (Slovenian)
      •  Spain (Spanish)
      •  Sweden (Swedish)
      •  Switzerland(German, French)
      •  Turkey (Turkish)
      •  United Kingdom
      • Asia Pacific
      •  Australia
      •  China
      •  Hong Kong
      •  India
      •  Korea (Korean)
      •  Malaysia
      •  New Zealand
      •  Philippines
      •  Singapore
      •  Taiwan
      •  Thailand (Thai)
      • Americas
      •  Brazil (Portuguese)
      •  Canada
      •  Mexico (Spanish)
      •  United States
      Can't find the country/region you're looking for? Visit our export site or find a local distributor.
  • Translate
  • Profile
  • Settings
In the Air Design Challenge
  • Challenges & Projects
  • Design Challenges
  • In the Air Design Challenge
  • More
  • Cancel
In the Air Design Challenge
Blog [AirCare] InTheAir - Week 17: Surface Mount Soldering
  • Blog
  • Forum
  • Documents
  • Polls
  • Files
  • Events
  • Mentions
  • Sub-Groups
  • Tags
  • More
  • Cancel
  • New
  • Share
  • More
  • Cancel
Group Actions
  • Group RSS
  • More
  • Cancel
Engagement
  • Author Author: fvan
  • Date Created: 21 Feb 2015 12:16 AM Date Created
  • Views 2067 views
  • Likes 7 likes
  • Comments 11 comments
  • eclipse_iot
  • mqtt
  • openhab
  • beaglebone_black
  • internet_of_things
  • in_the_air
  • texas_instruments
  • iot_sensor_nodes
  • cc3200
  • launchpad
Related
Recommended

[AirCare] InTheAir - Week 17: Surface Mount Soldering

fvan
fvan
21 Feb 2015

Previous posts for this project:

  • [AirCare] InTheAir - Project Description
  • [AirCare] InTheAir - Week 1: Getting a Launchpad to Blink
  • [AirCare] InTheAir - Week 2: Preparing the Beaglebone Black
  • [AirCare] InTheAir - Week 3: Fuel Tank Testing
  • [AirCare] InTheAir - Week 4: Using the CC3200
  • [AirCare] InTheAir - Week 5: openHAB and MQTT
  • [AirCare] InTheAir - Week 6: Accessing Fuel Tank's Data
  • [AirCare] InTheAir - Week 7: Dust sensor
  • [AirCare] InTheAir - Week 8: MSP430FR5969 with Energia14
  • [AirCare] InTheAir - Week 11: CC3200, Energia and analogRead()
  • [AirCare] InTheAir - Week 12: Automatically starting some things
  • [AirCare] InTheAir - Week 13: GP2Y10 BoosterPack
  • [AirCare] InTheAir - Week 14: Ordering Parts and PCBs
  • [AirCare] InTheAir - Week 16: CNC Milling
  • [AirCare] InTheAir - Week 16 bis: Fan Control with MSP430FR5969


  • Introduction
  • Preparation
  • Soldering
    • Cleaning
    • Solder
    • Components
    • Preheat
    • Reflow
  • Conclusion


Introduction


All parts needed to populate the PCB I designed in week 13 have arrived! So this evening, I cleaned my desk and installed the preheater and SMD rework station. This is my first time doing actual surface mount soldering and working with a hot air station. I enjoyed it a lot.


Preparation


To prepare for the soldering, I first cleaned my desk and installed the preheater and rework station. Read the manual on how to use them and briefly turned them on for testing. After that, I picked the components needed to populate the board and put them on the workspace, together with a pair of tweezers. Took the solder paste out of the fridge and was ready to give it a try.


Soldering


I've recorded the different steps taken to get the board populated and soldered. You can view the video montage below. Otherwise, you can just keep on reading for the written version
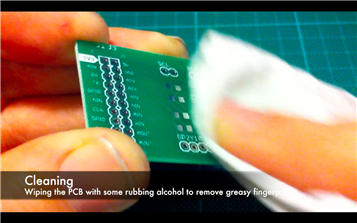
 image


You don't have permission to edit metadata of this video.
Edit media
x
image
Upload Preview
image


Cleaning


The first step was to clean the PCB. i used some rubbing alcohol to get rid of greasy finger prints on the pads.
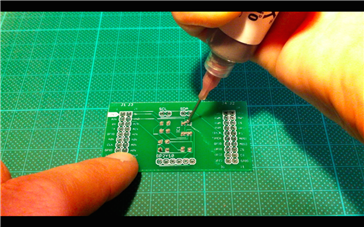


image


Solder


Next, I applied the solder paster to the pads. I had some difficulty getting the syringe to dispense solder at first, as I wasn't sure how hard I needed to push. Once I figured that out, I started to apply a little bit of solder onto every pad. The solder wouldn't stick on the first one, but after some fiddling, I managed to get it on there. Applying solder to the other pads went a lot easier.


I used Chip Quick SMD291AX10Chip Quick SMD291AX10 solder paste.
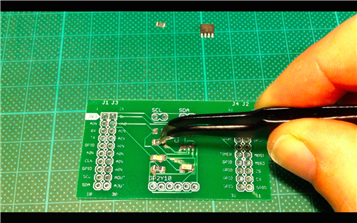


imageimage


Components


With the solder applied to the pads, I started putting the components I had prepared where they belonged. I almost made a mistake with one of the capacitors, but realised it in time. Using a pair of tweezers I was able to easily put all components in place.


image


Preheat


I mounted the PCB using some magnetic brackets on the pre-heater (Tenma 21-10135Tenma 21-10135), which I purchased from the budget, just above the hot air outlet.


image


Reflow


Finally, using hot air (Tenma 21-10130Tenma 21-10130), I reflowed the solder and the components were soldered on. At first, the flow rate was too high and the components were being pushed away. After lowering the flow rate, things went better, but I still managed to get a resistor off the pads. I successfully managed to "push" it back on though image I'm thinking that I should have used a bigger nozzle.

imageimage


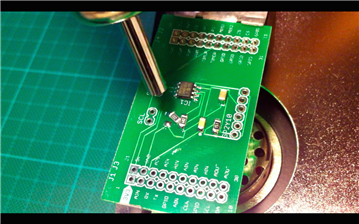
Once all components were soldered in place, I powered off the rework station and pre-heater and let the board cool down.


Conclusion


This was fun! And I didn't burn down the house! image


Next step is to test the board and then hook it up to the Launchpad for final testing.


  • Sign in to reply

Top Comments

  • michaelwylie
    michaelwylie over 10 years ago +1
    Quick question: Did you take the solder paste directly out of the fridge or let it come to room temperature first? I'm just curious why you had the trouble with the first pad.
  • Jan Cumps
    Jan Cumps over 10 years ago +1
    The pre-heater seems to do miracles. Your paste reflows immediately.
  • xever
    xever over 10 years ago in reply to fvan +1
    This is quite similar to how I do surface mounts. Also, I always keep the paste inside the fridge all the time and only take it out as needed. When applying it to the pad, I put my syringe at an angle…
  • fvan
    fvan over 10 years ago in reply to DAB

    Thanks DAB.


    I made sure I used the bigger types of surface mount resistors and capacitors. I was feeling adventurous for this first surface mount soldering, but I'm not (totally) crazy as to try the extremely tiny stuff the very first time. As I master the process, I'll gradually decrease the size of the components and move on to more complex types like QFN, etc ...

    • Cancel
    • Vote Up 0 Vote Down
    • Sign in to reply
    • More
    • Cancel
  • fvan
    fvan over 10 years ago in reply to mcb1

    That does look useful (have those in big for glue/silicone things), I might try to get one! Thanks for the tip.

    • Cancel
    • Vote Up +1 Vote Down
    • Sign in to reply
    • More
    • Cancel
  • mcb1
    mcb1 over 10 years ago

    Nice writeup.


    I haven't tried mine yet, so I'm looking at your examples to ensure you sort out the bugs first....image


    You might be interested in these.

    I brought one and lent it out ...apparently its great.

    http://digistump.com/products/107


    Mark

    • Cancel
    • Vote Up +1 Vote Down
    • Sign in to reply
    • More
    • Cancel
  • DAB
    DAB over 10 years ago

    Great tutorial.


    I just have to marvel at how small the components are today.

    When I started electronics it was tubes, resisters and big capacitors on a metal chassis.


    DAB

    • Cancel
    • Vote Up +1 Vote Down
    • Sign in to reply
    • More
    • Cancel
  • fvan
    fvan over 10 years ago in reply to xever

    Initial testing of the board seems to indicate it is working, so we can't be completely off image


    Great extra tips, thanks again!

    • Cancel
    • Vote Up 0 Vote Down
    • Sign in to reply
    • More
    • Cancel
>
element14 Community

element14 is the first online community specifically for engineers. Connect with your peers and get expert answers to your questions.

  • Members
  • Learn
  • Technologies
  • Challenges & Projects
  • Products
  • Store
  • About Us
  • Feedback & Support
  • FAQs
  • Terms of Use
  • Privacy Policy
  • Legal and Copyright Notices
  • Sitemap
  • Cookies

An Avnet Company © 2025 Premier Farnell Limited. All Rights Reserved.

Premier Farnell Ltd, registered in England and Wales (no 00876412), registered office: Farnell House, Forge Lane, Leeds LS12 2NE.

ICP 备案号 10220084.

Follow element14

  • X
  • Facebook
  • linkedin
  • YouTube