


BLOG - I
Smart Bike Smart Rider (SbSr)
GS Gill - 24 September 2017
NOTE : For a better formatted version please check the attachment.
Click the Youtube Button for IoTonWheels Design Challenge SbSr Project Playlist
https://www.youtube.com/playlist?list=PLnp4Q6KlcA9lsg305T_LPAd7MFnrqGo5f

Table of Contents
1. Introduction to the project
2. Plan of the project
2. Physical Device Concept
3. Overall System
a. Display Subsystem
b. Sensors SubSystem
c. BLE Subsystem
d. Battery subsystem
4. Blogs ( will update subsequently )
Introduction
Welcome to Smart Bike Smart Rider (SbSr) Project. This is the first out of many more blogs yet to come.
Sneek Peak Of what is to come 
Firstly, Let me introduce you to SbSr.
Ok, so SbSr is not just a IoT project but a assistant or a personal touch that you own bicycle will give you. The concept is to make you bike more than just bike, more like a friend.
The genesis of the project comes from a overall shift in trend towards motorised vehicles rather than riding bicycles. Bicycles are now a small community of riders who enjoy riding or a a professional community who train for excellence.
There is a overall shift in fitness trend with introduction to Smart Wearables like FitBit, pebble, Xi Band, etc. But still, If you want to go to gym, you most probably would go on a motorbike or a car, even if its just half a mile away. 
This project aims to take the best of technology, gel it together and make a product which would help start a trend of biking (as another fitness measure) just as the Wearables Electronics did, Fitness trend.
With the brief introductions lets dive deep into how am I planning to achieve this.
“The Secret Plan”
So, Here is the plan,
SORRY : But, due to less time available, as I have to move urgently off station to a remote location where its difficult to carry my modules and bike, I will try and finish the project by Mid next month.
I am planning to complete the project in the following parts - THE MANTRA
Part 1 - Getting ready with the GUI for the display
Part 2 - Getting the Battery subsystem working
Part 3 - Getting to learn and work with MBed :0
Part 4 - Getting to learn about BLE and MBed_BLE API
Part 5 - Writing sensor modules defn and logic
Part 6 - Interfacing the Sensor subsystem
Part 7 - Interfacing BLE and Testing
Part 8 - Interfacing Power subsystem
Part 9 - Interfacing Display Subsystem
Part 10 - Overall testing
Part 11 - Final Demo 
I will be changing the colours of the parts I am currently working on and which are completed as per following
<Secret Colour Codes> COMPLETED
ALMOST_COMPLETED
IN_PROGRESS
STARTED_WORKING
NOT_EVEN_TOUCHED
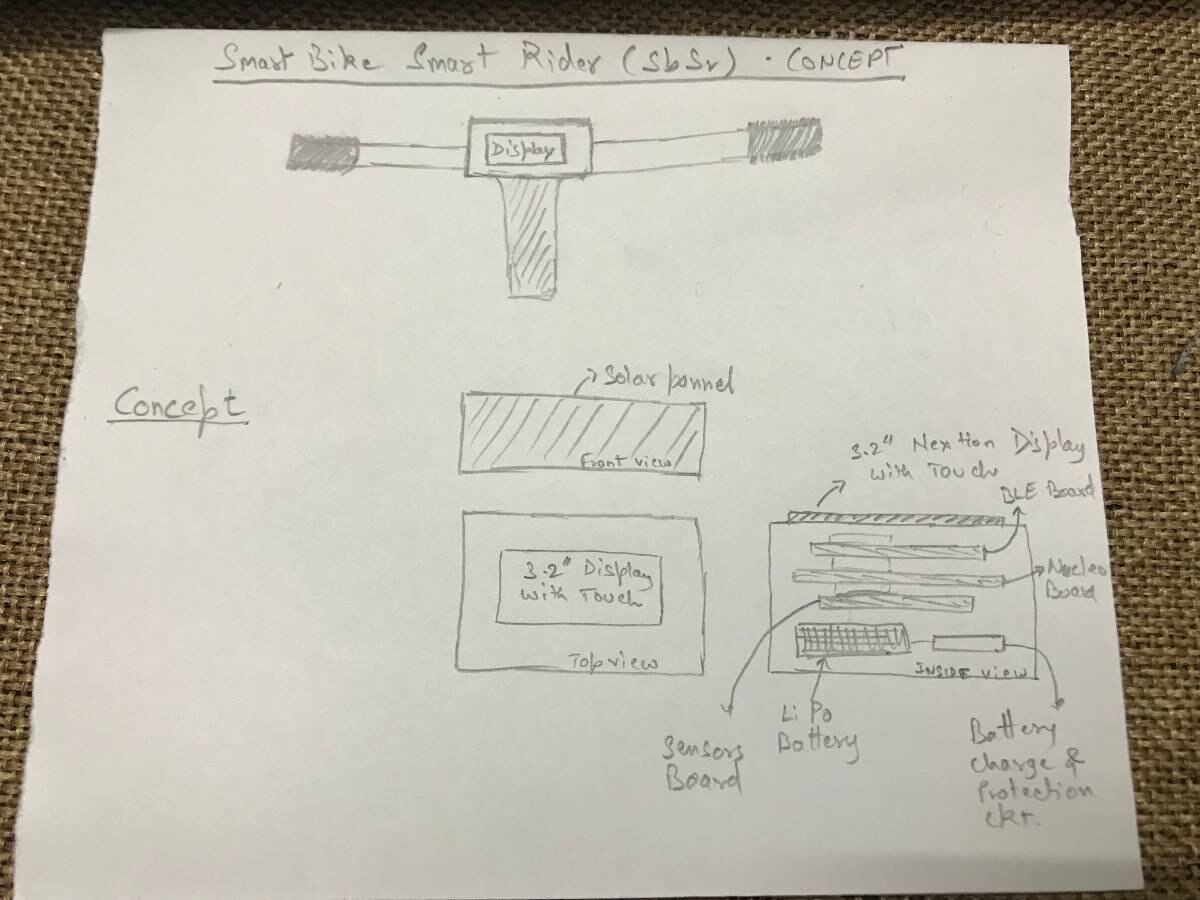
Physical Device Concept
Please refer to the image below for concept of the device.
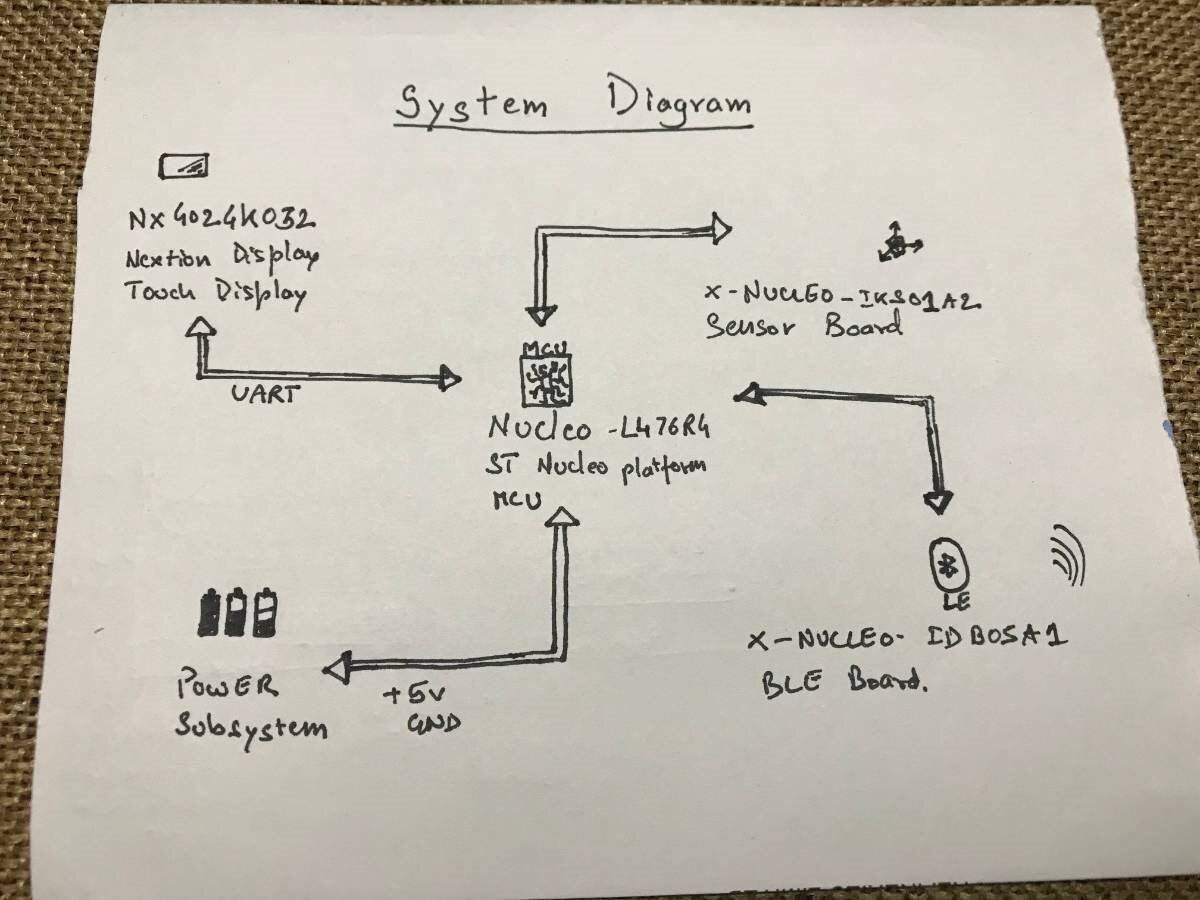
Overall System
Please refer to the image below for Overall System diagram.
Display Subsystem
As already mentioned I am planning to use a NEXTION Enhanced NX4024K032 3.2” Resistive Touch screen Module
- If you want to buy the display Click HERE
- For Nextion GUI Editor Click HERE
NOTE : Link for Display Subsystem Blog will be updated once I publish it
Sensor Subsystem
The Sensor Subsystem Blog Link
BLE Subsystem
BLE Subsystem Blog Link
Battery Subsystem
Powering the Beast Blog Link
Power Savings with NEXTION DISPLAY Blog Link
Blogs
BLOG 1 : Introduction to SbSr (Smart Bike Smart Rider)
BLOG 2 : NexTion - Enhanced Heven SbSrBLOG 2 : NexTion - Enhanced Heven SbSr
BLOG 4 : Want a Homemade Smart Cycle Computer ? [ PART 1 ]
BLOG 5 : From BreadBoard prototype To Homemade PCB :: The Fastest Way
BLOG 6 : Want a Homemade Smart Cycle Computer ? [ PART 2 ]
BLOG 7 : NexTion STM32 Interfacing Issues and Demonstration
BLOG 9 : Power Savings with NEXTION DISPLAY
BLOG 10 : Hall sensor working Fine with interrupts 
BLOG 11 : Nextion Display Interface with STM32 NUCLEO [Completed]
BLOG 12 : Assembling the Setup on My Bike

BLOG 14 : The Sensor Subsystem
YOUTUBE PLAYLIST LINK for IoTonWheels Design Challenge by ST & Element 14 Community
I conclude my official submission for SbSr project HERE. I will update TWO more Blog on BLE and Sensor Subsystem and ONE complimentary Blog on introduction to ARM mBed platform. I would like to thank the Judges, Readers for going through my content any feedback would be appreciated. I would also like to thank Element14 and ST for giving me a chance to project and pitch my IDEA and to participate in an full on manner
I am also regretful of the fact the due to time constraints I was not able to complete the project, But I have definitely put up the best I could have done .
Once again thanks and see you guys in another Design challenge .
Thanks for reading,
GS Gill
| blog1_SbSr.pdf |

Top Comments