element14 Community
element14 Community
    Register Log In
  • Site
  • Search
  • Log In Register
  • About Us
  • Community Hub
    Community Hub
    • What's New on element14
    • Feedback and Support
    • Benefits of Membership
    • Personal Blogs
    • Members Area
    • Achievement Levels
  • Learn
    Learn
    • Ask an Expert
    • eBooks
    • element14 presents
    • Learning Center
    • Tech Spotlight
    • STEM Academy
    • Webinars, Training and Events
    • Learning Groups
  • Technologies
    Technologies
    • 3D Printing
    • FPGA
    • Industrial Automation
    • Internet of Things
    • Power & Energy
    • Sensors
    • Technology Groups
  • Challenges & Projects
    Challenges & Projects
    • Design Challenges
    • element14 presents Projects
    • Project14
    • Arduino Projects
    • Raspberry Pi Projects
    • Project Groups
  • Products
    Products
    • Arduino
    • Avnet Boards Community
    • Dev Tools
    • Manufacturers
    • Multicomp Pro
    • Product Groups
    • Raspberry Pi
    • RoadTests & Reviews
  • Store
    Store
    • Visit Your Store
    • Choose another store...
      • Europe
      •  Austria (German)
      •  Belgium (Dutch, French)
      •  Bulgaria (Bulgarian)
      •  Czech Republic (Czech)
      •  Denmark (Danish)
      •  Estonia (Estonian)
      •  Finland (Finnish)
      •  France (French)
      •  Germany (German)
      •  Hungary (Hungarian)
      •  Ireland
      •  Israel
      •  Italy (Italian)
      •  Latvia (Latvian)
      •  
      •  Lithuania (Lithuanian)
      •  Netherlands (Dutch)
      •  Norway (Norwegian)
      •  Poland (Polish)
      •  Portugal (Portuguese)
      •  Romania (Romanian)
      •  Russia (Russian)
      •  Slovakia (Slovak)
      •  Slovenia (Slovenian)
      •  Spain (Spanish)
      •  Sweden (Swedish)
      •  Switzerland(German, French)
      •  Turkey (Turkish)
      •  United Kingdom
      • Asia Pacific
      •  Australia
      •  China
      •  Hong Kong
      •  India
      •  Korea (Korean)
      •  Malaysia
      •  New Zealand
      •  Philippines
      •  Singapore
      •  Taiwan
      •  Thailand (Thai)
      • Americas
      •  Brazil (Portuguese)
      •  Canada
      •  Mexico (Spanish)
      •  United States
      Can't find the country/region you're looking for? Visit our export site or find a local distributor.
  • Translate
  • Profile
  • Settings
PiCasso Design Challenge
  • Challenges & Projects
  • Design Challenges
  • PiCasso Design Challenge
  • More
  • Cancel
PiCasso Design Challenge
Blog Hologram Pi-ramid - 3D printed parts and initial assembly
  • Blog
  • Forum
  • Documents
  • Polls
  • Files
  • Events
  • Mentions
  • Sub-Groups
  • Tags
  • More
  • Cancel
  • New
  • Share
  • More
  • Cancel
Group Actions
  • Group RSS
  • More
  • Cancel
Engagement
  • Author Author: luislabmo
  • Date Created: 8 Apr 2019 2:44 AM Date Created
  • Views 2911 views
  • Likes 9 likes
  • Comments 16 comments
  • pla
  • picasso
  • luislab
  • 3d printed
Related
Recommended

Hologram Pi-ramid - 3D printed parts and initial assembly

luislabmo
luislabmo
8 Apr 2019

Once I was happy with all necessary the details in my project design, I started 3d-printing all the parts required to begin testing the assembly which overall is looking really good!.

image


3-D Print settings

Below the settings used:

  • Printer: Creality CR-10S -a big thanks to Element14 for this awesome price!
  • Material: PLA Blue-denim
  • Infill: 15%, triangles
  • Adhesion: Brim
  • Supports: No
  • Layer height: 0.2mm

image


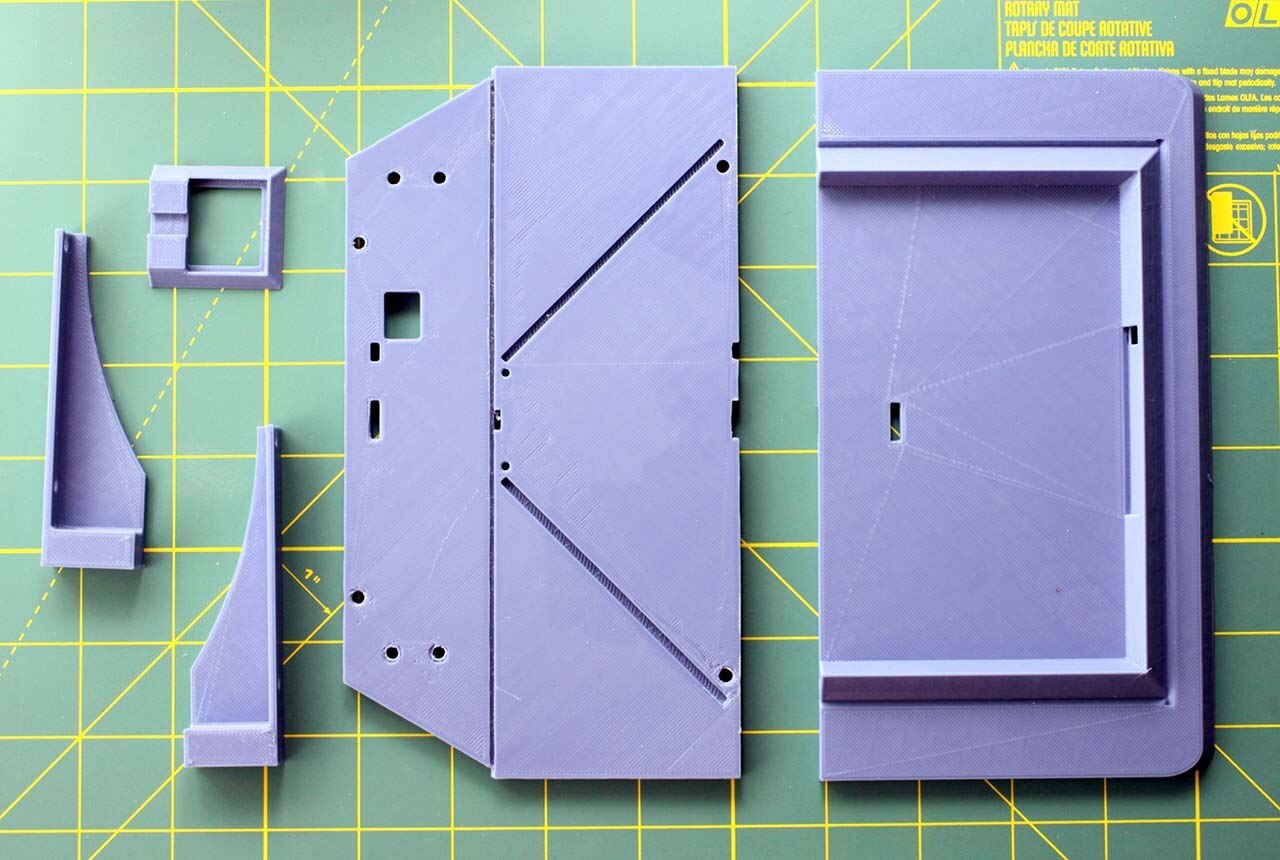
Assembly and materials required

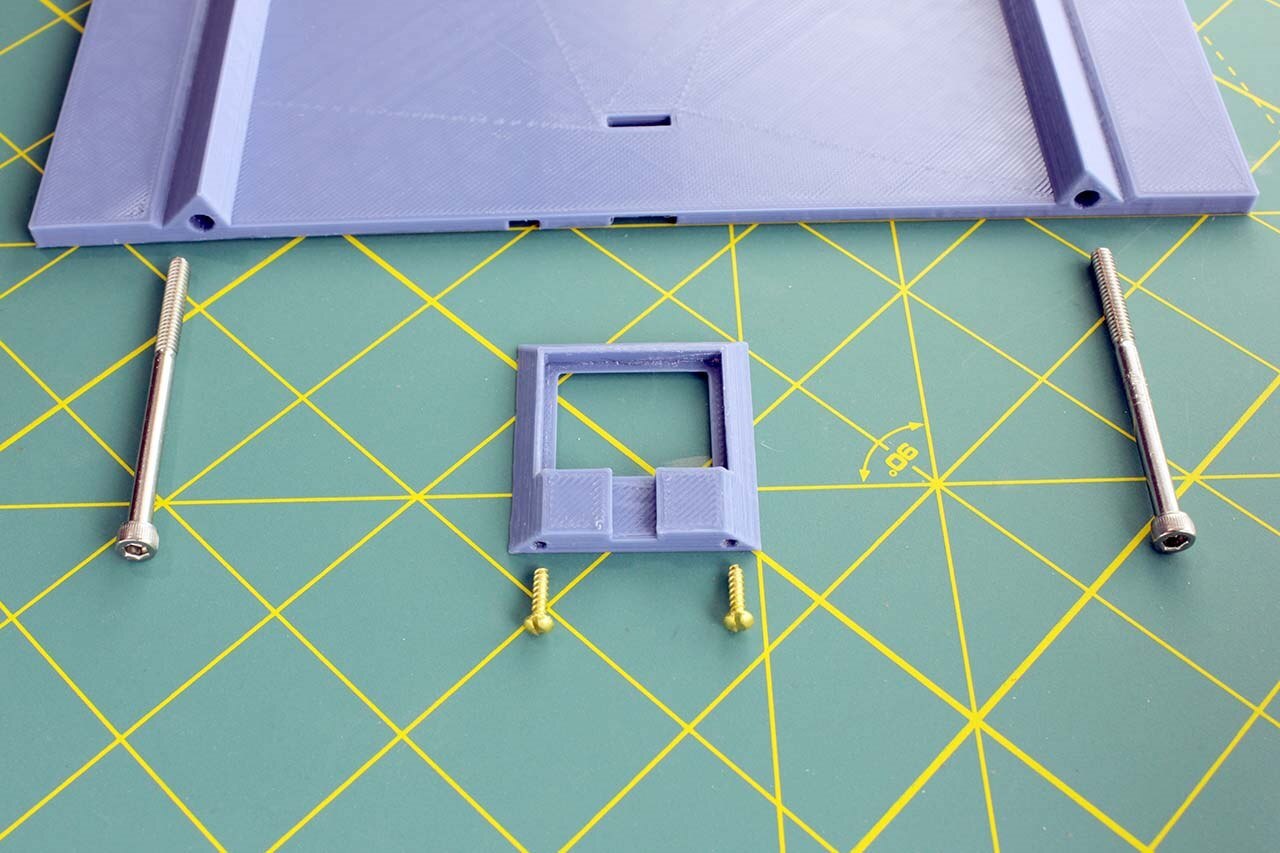
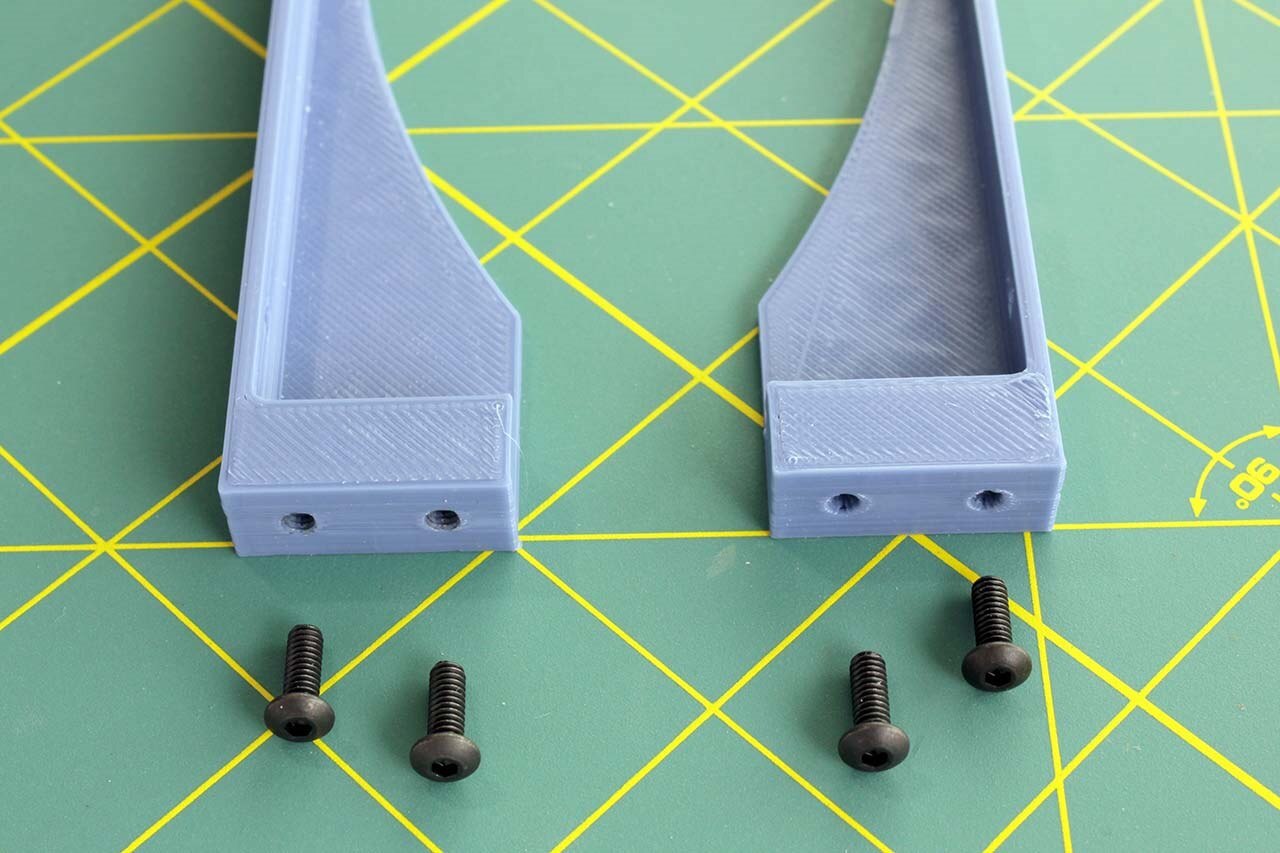
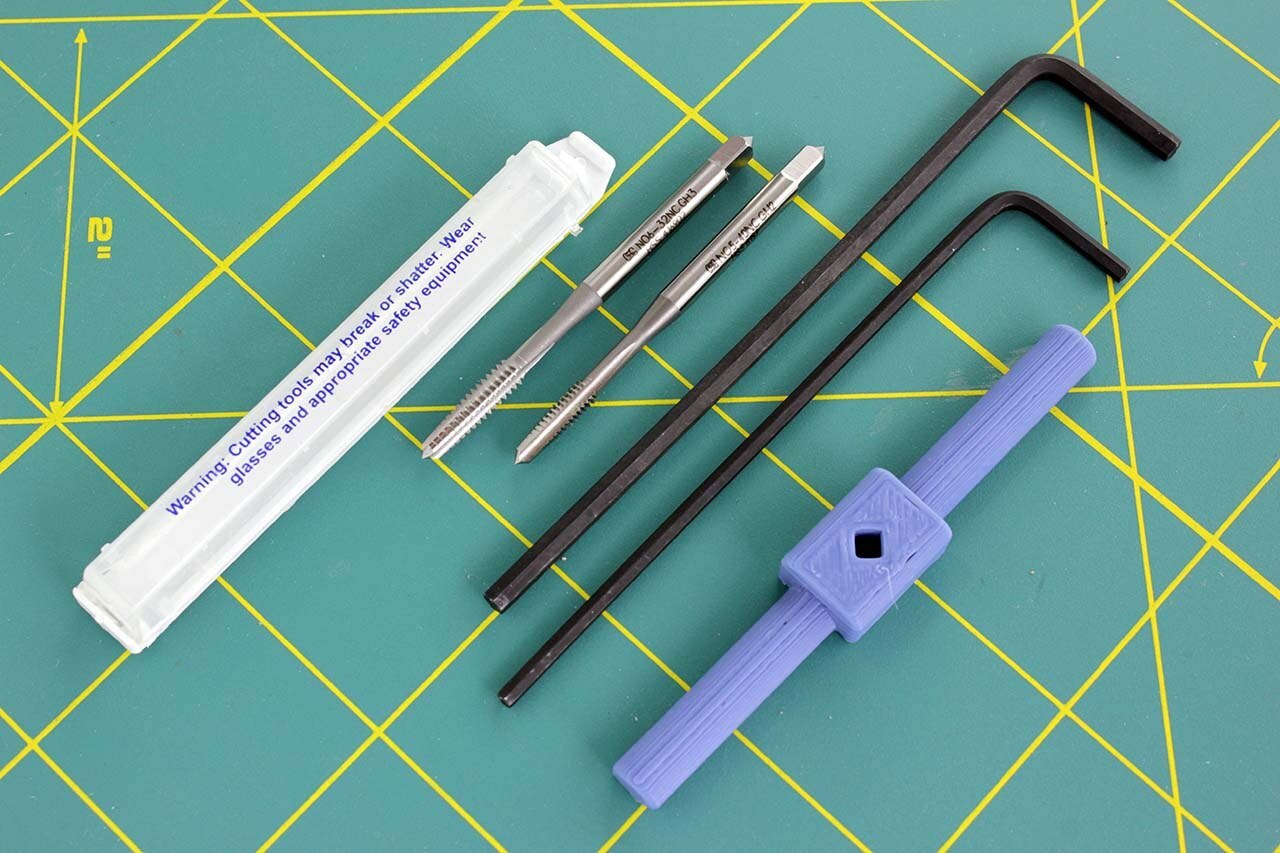
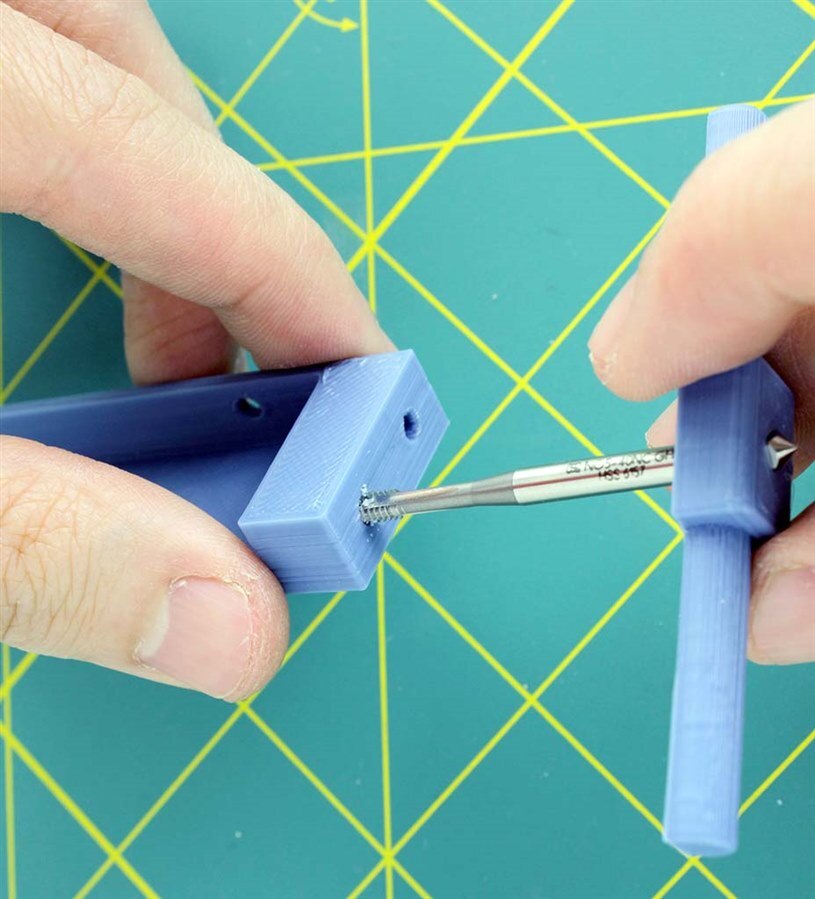
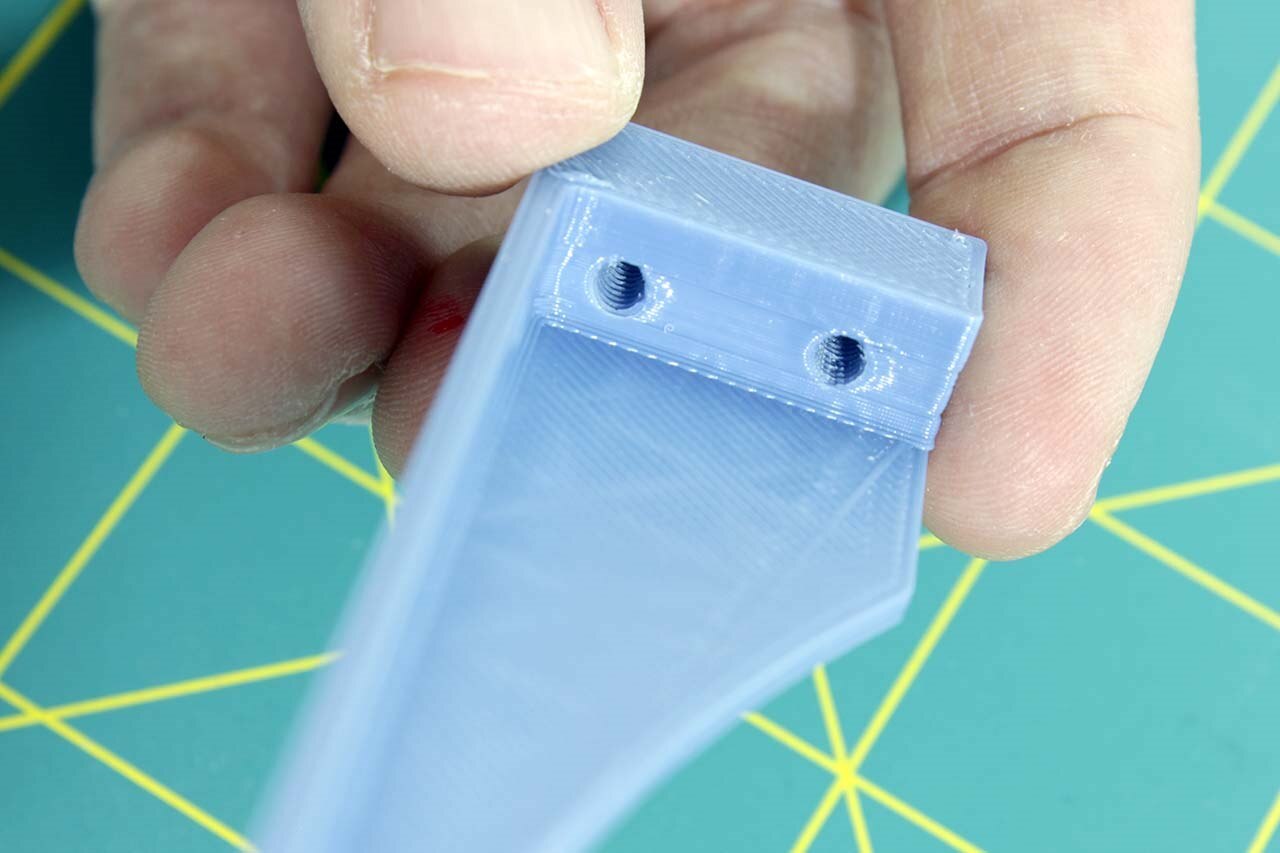
It didn't make much sense to me to incorporate snap-fit features to the general assembly since the overall structure will have to support the weight of the RPi + Touchscreen mainly. Also I would most likely be assembling/disassembling several times the project while it evolves. With all of the above in mind, it made sense to add holes for screws to the project -which require to be tapped as threads that small are hard to replicate in a 3d printed part. Below the list of screws I will be using to assemble the project:


  • 2 x #2 x 3/8" Slotted Round Head Screws
  • 6 x #5-40 x 3/8" Socket Head Cap Screws
  • 2 x #6-32 x 2" Socket Head Cap Screws


{gallery:width=960,height=768,autoplay=false} Hologram Pi-ramid - Initial assembly

image

Hologram Pi-ramid hardware: #2 x 3/8" and #6-32 x 2" screws

image

Hologram Pi-ramid hardware: #5-40 x 3/8" screws

image

Hologram Pi-ramid: Some tools needed for the 3d printed parts assembly

image

Hologram Pi-ramid: Tapping #5-40 holes with a 3d printed tap wrench

image

Hologram Pi-ramid: Tapped holes #5-40


Blogs in this series


  1. Hologram Pi-ramid - Intro and initial design
  2. Hologram Pi-ramid - 3D CAD/CAM design
  3. Hologram Pi-ramid - 3D printed parts and initial assembly
  4. Hologram Pi-ramid - Plexiglass Pyramid
  5. Hologram Pi-ramid - My name is Automan
  6. Hologram Pi-ramid - PCB Design
  7. Hologram Pi-ramid - Painting the 3D printed parts
  8. Hologram Pi-ramid - Electronic Parts
  9. Hologram Pi-ramid - Displaying Holograms
  10. Hologram Pi-ramid - Project complete!


  • My Picasso Design Challenge entries


image
3D CAD/CAM design

image
Plexiglass Pyramid

  • Sign in to reply

Top Comments

  • genebren
    genebren over 6 years ago +4
    Solid looking work there. I see that you are using 15% infill, do you have any issues when it comes to tapping the threads? Good luck on your future developments on this design challenge. Gene
  • luislabmo
    luislabmo over 6 years ago in reply to dubbie +4
    Hello Dubbie, I think 85% infill is high as a default/for average parts, usually you will need something around 15% to 20% just to give some internal volume to the parts and also to help features of the…
  • balearicdynamics
    balearicdynamics over 6 years ago in reply to luislabmo +4
    Hi, despite the fact that the shell thickness should be a multiple of the nozzle diameter - for an obvious reason - I use a higher thickness just for the parts that need some post-production like sanding…
Parents
  • dubbie
    dubbie over 6 years ago

    Luis,


    That is some impressive 3D printing. I may have to think about changing mine as I don't think it could do that.


    I'm also impressed that you are using only 15% infill. I use 85% usually and it still isn't all that good and often cracks or snaps when parts are being 'eased' together. The last time I used 100% but that didn't seem to come out correct as it was very rough.


    Dubbie

    l

    • Cancel
    • Vote Up +3 Vote Down
    • Sign in to reply
    • More
    • Cancel
Comment
  • dubbie
    dubbie over 6 years ago

    Luis,


    That is some impressive 3D printing. I may have to think about changing mine as I don't think it could do that.


    I'm also impressed that you are using only 15% infill. I use 85% usually and it still isn't all that good and often cracks or snaps when parts are being 'eased' together. The last time I used 100% but that didn't seem to come out correct as it was very rough.


    Dubbie

    l

    • Cancel
    • Vote Up +3 Vote Down
    • Sign in to reply
    • More
    • Cancel
Children
  • balearicdynamics
    balearicdynamics over 6 years ago in reply to dubbie

    Dubbie, the problems maybe just your too high percentage of infill...


    Write me an email, maybe I can send you something useful, to try before changing the 3D printer image


    Enrico

    • Cancel
    • Vote Up +2 Vote Down
    • Sign in to reply
    • More
    • Cancel
  • luislabmo
    luislabmo over 6 years ago in reply to dubbie

    Hello Dubbie,


    I think 85% infill is high as a default/for average parts, usually you will need something around 15% to 20% just to give some internal volume to the parts and also to help features of the object that are not vertical -or tend to be horizontal- to have something to hold on to when printing. Usually an infill that high is needed in very specific cases like when parts will be under heavy tension/pressure, etc.


    If your parts are cracking that most likely is poor layer adhesion, I had the same issue with my Creality CR-10S -brand new and with factory default setting- which is the printer I'm using for this project. try checking the following in that order:

    • Printing temperature: may be too low for the material you are using. Google "temp calibration tower" useful to find the right temperature for your material. It's better to have the temp on the high side a little bit.
      image
    • Underextrusion: This video will help you calibrate extrusion amount. You can try correcting it with gcode M92 to avoid doing it with a firmware change
    • Check the Z-axis: again calibration... are objects as tall as they should be?. A calibration cube works well here
    • Bed temperature: try increasing it a little (maybe 5 degrees)
    • First layer: Making sure your first layer bonds well to the printing is the key for good bed-to-part temperature transfer (if you have a heated bed) and also will help other layers bond better. What I personally do here is I level the print bed as good as I can then I print  just the first layer of a mid to big part, then I take that layer and visually check if every line extruded is bonded well to the next in every spot, If not, then I try to the move bed closer to the nozzle -only the corners that need it in little amounts-. Calibration has to be done regularly and when done, heated bed and nozzle must be hot.
      image

    I tried all of the above with good success -picture below for results-, layers have now a very strong bond and parts won't break easy.
    image

    Hope this helps


    Luis

    • Cancel
    • Vote Up +4 Vote Down
    • Sign in to reply
    • More
    • Cancel
  • dubbie
    dubbie over 6 years ago in reply to luislabmo

    Luis,


    These are some good ideas. I will have to try them out. I did reduce the infill on some of the more recent parts, as you suggested and it seems to have printed much better. Or it may be that the bed was heated properly as the printer was on for a long time.


    Dubbie

    • Cancel
    • Vote Up +2 Vote Down
    • Sign in to reply
    • More
    • Cancel
element14 Community

element14 is the first online community specifically for engineers. Connect with your peers and get expert answers to your questions.

  • Members
  • Learn
  • Technologies
  • Challenges & Projects
  • Products
  • Store
  • About Us
  • Feedback & Support
  • FAQs
  • Terms of Use
  • Privacy Policy
  • Legal and Copyright Notices
  • Sitemap
  • Cookies

An Avnet Company © 2025 Premier Farnell Limited. All Rights Reserved.

Premier Farnell Ltd, registered in England and Wales (no 00876412), registered office: Farnell House, Forge Lane, Leeds LS12 2NE.

ICP 备案号 10220084.

Follow element14

  • X
  • Facebook
  • linkedin
  • YouTube