


In my previous look at the software I looked at connecting up a web client to an MQTT server.
Picking a broker
Thanks to Jason I realised that the Mosquitto Broker that's provided is an old version (1.3.4) that does not support WebSockets. I tried to update using "opkg install mosquitto" but that told me I was on the latest. So instead I removed it and it's the packages that depended on it.
# opkg remove mosquitto --force-removal-of-dependent-packages

Removing package iotkit-comm-c-dev from root...
Removing package iotkit-comm-c from root...
Removing package iotkit-comm-js from root...
Removing package mosquitto-dev from root...
Removing package mosquitto from root...
rm '/etc/systemd/system/multi-user.target.wants/mosquitto.service'
I then installed the Mosca broker using npm, that had worked well for me on Windows for testing so I might as well use that for the car.
npm install mosca
There were some errors about not being able to compile Kerberos due to missing missing gssapi/gssapi.h. I realised that kerberos was just for cross domain authentication so would not be an issue for my configuration.
So that we can easily start mosca, a link can be added as follows:
ln ./node_modules/mosca/bin/mosca /usr/bin/mosca
I'll also add in a boot up option so that it starts automatically.
I also installed the npm modules mqtt and queue.
Creating a certificate
I'm developing on windows so I used a simple powershell cmdlett to create the certificate in my local store.
New-SelfSignedCertificate -DnsName "workshopshed.com", "www.workshopshed.com" -KeyFriendlyName "Workshopshed"
I then extracted the certificate and private key as a .pfx file with a simple password. This needs the format converting before you can use it with an MQTT broker so I did that with ssl-converter and ended up with a .PEM file.
Note, that you can also do these steps using the OpenSSL toolkit or you can create a real certificate with something like LetsEncrypt
Configuring the MQTT Broker
To run Mosca with a certificate you can add a couple of command line parameters.
./mosca -v --https-port 1884 --only-http --cert TestCertificate.pem --key TestCertificate.pem
Configuring the client
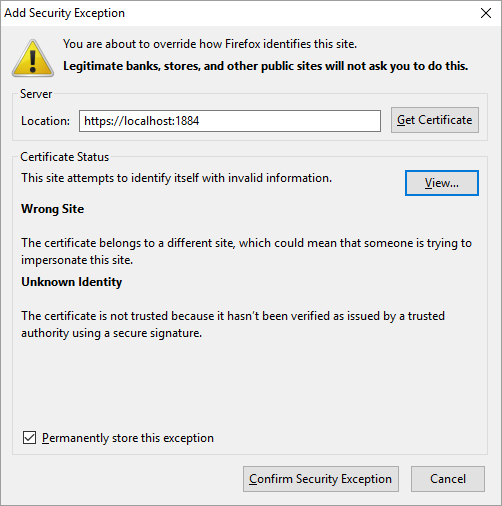
The client uses the Web Browser to determine the certificates so we can add the test certificate viewing the certificate manager, adding an exception by browsing to the location of the mqbroker and getting the certificate (Firefox). It will likely report that this is the wrong site and is not trusted. You can view the certificate to confirm that it's the one you added to the broker.

The code also needs to change slightly to tell Paho to use TLS encryption.
var client = new Paho.MQTT.Client("localhost",1884, "MyClientID");
client.connect({useSSL:true,onSuccess:onConnect, onFailure:onConnectFail});}
Configuring the listener
On the server side, our command listener also needs to be configured to use TLS. This is done using some options when we connect. I've chosen to ignore the unsigned certificate but it is also possible to set options to load up the certificates so that we can validate them.
var options = {
  port:1884,
  rejectUnauthorized: false,
  protocol: 'wss'
}

var client = mqtt.connect('mqtts://localhost', options);
Change to use JSON
I've also changed my code to use JSON rather than simple messages.
On the client I create my messages as follows:
       var message = new Paho.MQTT.Message(JSON.stringify({ action: "DOWN", timeOut: 1000}));
       message.destinationName = 'E14_UCDC/MyClientID/Commands';
       client.send(message);
And on the server, the listener converts this back and passed them over to the controller for processing.
client.on('message', function (topic, message) {
    var command = JSON.parse(message.toString());
    controller.addMovement(command);
    console.log(message.toString());
})
This decouples the listener from the commands so that I can add new commands into the controller in future without worrying about the transport.
My controller queues up the messages and can play them back when it receives a "Run" command.
var queue = require('queue');

var controller = function() {

  this.q = queue();
  this.q.concurrency = 1;

  //Expect a movement object formed of a command and timer to be passed { action: action, timeOut: timeout}
  this.addMovement = function(move) {

     if (move.action == "RUN") {
        this.run();
        return;
     }

     if (move.action == "HALT") {
        this.halt();
        return;
     }

     if (typeof move.timeOut == 'undefined') {
        move.timeout = 10; //Default to 10ms
     }

     var c = this;

     this.q.push(function(done) {
                setTimeout(function() {
                    c.doMovement(move.action,move.timeOut);
                    done();
                }, move.timeOut);
     });
    }

    this.halt = function() {
        this.q.stop();
    }

    this.run = function() {
       this.q.start(function(err) {
          if (err != null) {
            console.log(err);
          }
        });
    }

    this.doMovement = function(action,timeout) {
        //Todo: this is where we'd talk to the hardware
        console.log(action);
        console.log(timeout);
   }

    this.shutdown = function() {
        //Todo: If we need to shutdown any hardware handles etc.
    }
}

module.exports = new controller();
You can see all of the code at https://github.com/Workshopshed/UpcyclingDesignChallenge/
Reference
https://devcenter.heroku.com/articles/ssl-certificate-self
https://technet.microsoft.com/itpro/powershell/windows/pkiclient/new-selfsignedcertificate
https://github.com/mcollina/mosca/wiki/TLS-SSL-Configuration
JsDoc Reference - Paho.MQTT.Client
Run a Script on Edison Boot | Shawn Hymel
Previous Posts
[Upcycle It] Interactive Race Car Driver - Plan of action
[Upcycle It] Interactive Race Car Driver - Software
[Upcycle It] Interactive Race Car Driver - Lights
[Upcycle It] Interactive Race Car Driver - Detailed Plan
[Upcycle It] Interactive Race Car Driver - Edison
[Upcycle It] Interactive Race Car Driver - Drive Motor Testing
[Upcycle It] Interactive Race Car Driver - Car modification
[Upcycle It] Interactive Race Car Driver - Furby Hacking
[Upcycle It] Interactive Race Car Driver - Powering Motors
[Upcycle It] Interactive Race Car Driver - Bumper switches and wiring loom
Top Comments