


|
The Pico has a set of PIO co-processors. They are real-time controllers that can execute logic with deterministic timing. Ideal to run strict-timed sequences and state machines. And to implement extra peripherals.
|
Follow up of Stepper Motor Control with Raspberry Pico PIO and DRV8711 driver- Part 6: autonomous PIO with speed control.
It can be useful to know when the PIO has finished a stepper command. For the program logic, or maybe to buzz a beeper. This blog adds that - optional - functionality to react on the completion of each command sent to the PIO.
Example scenario: in the previous blog, I used sleep() to pause between executions of a set of commands. Each set had 6 commands, and was run at different speeds. Although it's doable to calculate the time the PIO takes to complete the steps, it's a bit involved.
I want to get a notification when the PIO has done. So that I can set a reliable pause before it starts executing the next set of commands.
summary: In my demo, the PIO runs 6 commands in a batch. And I want to know when it has done that, so I can introduce the pause.
Add the IRQ logic to the PIO design
|
The IRQ logic has since been moved to a generic and reusable library: OO Library to handle Pico PIO relative interrupts: library design . |
I want to raise interrupt 0 (there are 4 available in RP2040, 8 in the Pico2.), when the state machine has finished. I jsut have to add a line to the end of the PIO design
; ...
.define public PIO_IRQ_DONE 0

; ...

count_low:
    jmp y-- count_low           side 0 [DELAY] ; keep high for tocks
    jmp x-- tocks_h             side 0 ; not done, keep loopins
    irq PIO_IRQ_DONE rel        side 0 ; flag that the job's done
.wrap
The state machine will fire the interrupt - whether you want to have it or not. If you don't provide a handler, it 'll just get ignored.
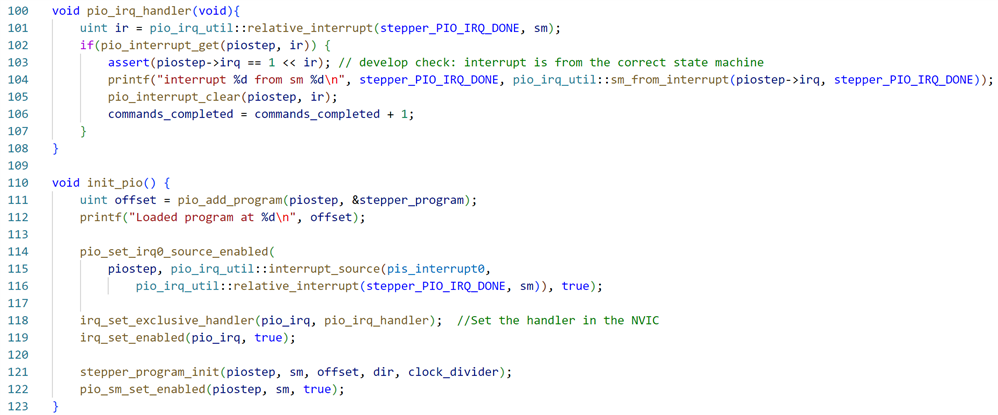
Create a handler, and register it
// ...
const auto piostep = pio1;
const uint pio_irq = PIO1_IRQ_0;
const uint sm = 0U;

volatile uint commands_completed = 0U;

// ...

void pio_irq_handler(void){
    uint ir = pio_irq_util::relative_interrupt(stepper_PIO_IRQ_DONE, sm);
    if(pio_interrupt_get(piostep, ir)) {
        assert(piostep->irq == 1 << ir); // develop check: interrupt is from the correct state machine
        printf("interrupt from sm %d\n", pio_irq_util::sm_from_interrupt(piostep->irq, stepper_PIO_IRQ_DONE));
        pio_interrupt_clear(piostep, ir);
        commands_completed = commands_completed + 1;
    }
}

void init_pio() {
    uint offset = pio_add_program(piostep, &stepper_program);
    printf("Loaded program at %d\n", offset);

    pio_set_irq0_source_enabled(
        piostep, pio_irq_util::interrupt_source(pis_interrupt0,
            pio_irq_util::relative_interrupt(stepper_PIO_IRQ_DONE, sm)), true);

    irq_set_exclusive_handler(pio_irq, pio_irq_handler);  //Set the handler in the NVIC
    irq_set_enabled(pio_irq, true);

    stepper_program_init(piostep, sm, offset, dir, clock_divider);
    pio_sm_set_enabled(piostep, sm, true);
}
At this moment, we have the mechanism. Each time the PIO is finished rotating the stepper, the interrupt will increment commands_completed. We can use that in our logic:
Use interrupt in main logic
In the main program, I know that the PIO has completed the commands, based on the number of interrupts received.
    std::array<command, 6> cmd{{
        {200 * microstep_multiplier, true},
        {200 * microstep_multiplier, false},
        {200 * microstep_multiplier, false},
        {400 * microstep_multiplier, false},
        {250 * microstep_multiplier, true},
        {350 * microstep_multiplier, true}}
    };
    int command_count = cmd.size();

    {
        wakeup_drv8711 w; // wake up the stepper driver
        sleep_ms(1); // see datasheet

        demo_with_delay(cmd, 4300);
        while(commands_completed < command_count) {}
        printf("interrupts expected: %d, received %d\n", command_count, commands_completed);
        commands_completed = 0U;
        sleep_ms(500); // give enough time to complete the action

        demo_with_delay(cmd, 7000);
        while(commands_completed < command_count) {}
        printf("interrupts expected: %d, received %d\n", command_count, commands_completed);
        commands_completed = 0U;
        sleep_ms(500); // give enough time to complete the action

        demo_with_delay(cmd, 9000);
        while(commands_completed < command_count) {}
        printf("interrupts expected: %d, received %d\n", command_count, commands_completed);
        commands_completed = 0U;
    }
I can just wait until that condition is true. (If this was not a demo, I'd do some interesting stuff instead of waiting). And then pause before the next batch is executed. That was the goal of this exercise.
watchout 1: each PIO can run 4 motors. I haven't added the logic yet to know which motor is finished. (edit: I have found a solution. That's for a next blog. GitHub has code that handles this)
watchout 2: the interrupt arrives on the core that has registered it. This may matter on a Pico.
Dealing with PIO relative interrupts
Because the interrupt mechanism is somewhat confusing, I 've created helper functions that make me deal with that:
    // sm	irq	int	MOD SFT	sm	    irq	    int     MOD     SFT
    // 0	0	1	0	1	0000	0000	0001	0000	0001
    // 0	1	2	1	2	0000	0001	0010	0001	0010
    // 0	2	4	2	4	0000	0010	0100	0010	0100
    // 0	3	8	3	8	0000	0011	1000	0011	1000
    // 1	0	2	1	2	0001	0000	0010	0001	0010
    // 1	1	4	2	4	0001	0001	0100	0010	0100
    // 1	2	8	3	8	0001	0010	1000	0011	1000
    // 1	3	1	0	1	0001	0011	0001	0000	0001
    // 2	0	4	2	4	0010	0000	0100	0010	0100
    // 2	1	8	3	8	0010	0001	1000	0011	1000
    // 2	2	1	0	1	0010	0010	0001	0000	0001
    // 2	3	2	1	2	0010	0011	0010	0001	0010
    // 3	0	8	3	8	0011	0000	1000	0011	1000
    // 3	1	1	0	1	0011	0001	0001	0000	0001
    // 3	2	2	1	2	0011	0010	0010	0001	0010
    // 3	3	4	2	4	0011	0011	0100	0010	0100


// 10 (REL): the state machine ID (0…3) is added to the IRQ flag index, by way of
// modulo-4 addition on the two LSBs
inline uint relative_interrupt(const uint32_t ir, const uint sm) {
    uint32_t retval = ir & 0x03; // last 2 bits
    retval += sm; // add relative value (is sm)
    retval = retval % 4; // mod 4
    return retval;
}

inline pio_interrupt_source interrupt_source(const pio_interrupt_source is, const uint32_t ir) {
    return static_cast<pio_interrupt_source>(std::to_underlying(is) + ir);
}

uint sm_from_interrupt(const uint32_t irq_val, const uint32_t ir) {
    uint i;
    for (i = 0; i < 4; i++) {
        if (irq_val == 1 << relative_interrupt(ir, i)) {
            break;
        }
    }
    return i;
}
Execution log, with info on what interrupts are fired, and what state machine did it.
running on sm 3, with interrupt 1
delay: 4300
interrupt 1 from sm 3
interrupt 1 from sm 3
interrupt 1 from sm 3
interrupt 1 from sm 3
interrupt 1 from sm 3
interrupt 1 from sm 3
interrupts expected: 6, received 6
delay: 7000
interrupt 1 from sm 3
interrupt 1 from sm 3
interrupt 1 from sm 3
interrupt 1 from sm 3
interrupt 1 from sm 3
interrupt 1 from sm 3
interrupts expected: 6, received 6
delay: 9000
interrupt 1 from sm 3
interrupt 1 from sm 3
interrupt 1 from sm 3
interrupt 1 from sm 3
interrupt 1 from sm 3
interrupt 1 from sm 3
interrupts expected: 6, received 6
The red line shows what I've configured. I'm expecting that the code runs on state machine 3, and that interrupt 1 is fired when a PIO job has completed.
The green lines validate that this is actually what happens. Do we get the expected interrupt, and did it originate from that state machine?
The blue lines validate that exactly the expected number of interrupts arrived. 1 per command.
Struggling with relative IRQs like I do? I tried to explain it to myself: Handle Raspberry Pico PIO "relative interrupts" in C
GitHub pio_irq lib repository.
GitHub drv8711 project repository.
GitHub PIO stepper lib repository.
Thank you for reading


