


Intro
This is one more little demonstration of how powerful the combination of an Arduino Giga and its touch LCD is.
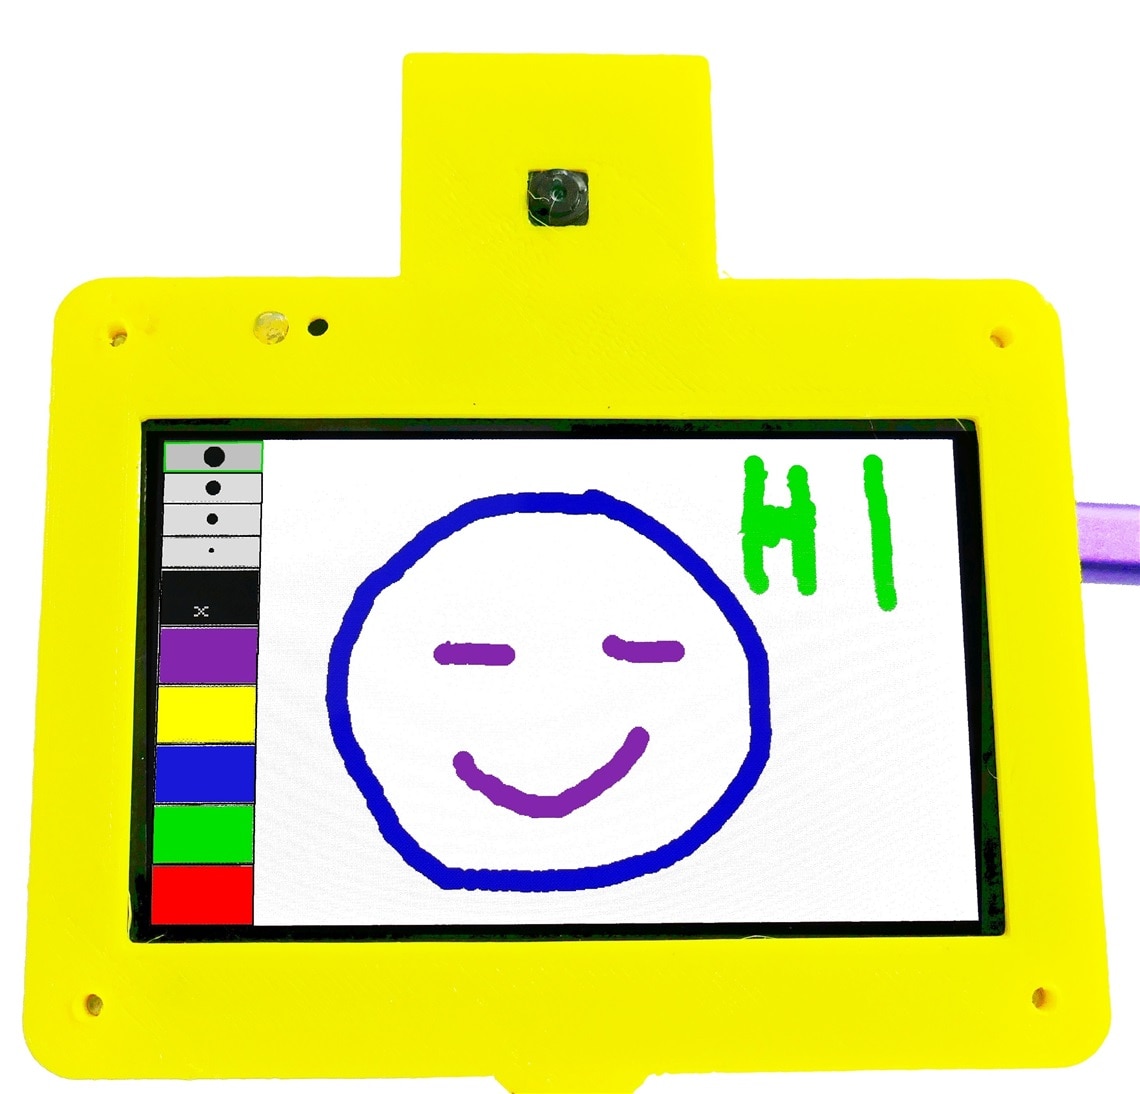
A very simple finger paint program can be implemented using only the hardware included in the road test kit.
Here is a brief video demonstrating the paint program in action.
GIGA Paint Video
The paint program has an erase color if needed. I didn't spend time practicing, but with a little patience, some interesting art could be produced.
Here is the code to implement this paint application:
Giga Paint Sketch
// Giga Paint
//uses Arduino Giga and Giga Touch Display
// by Doug Wong 2025

#include "Arduino_GigaDisplay_GFX.h"
#include "Arduino_GigaDisplayTouch.h"

// --- Global Objects ---
// Create the GFX object for drawing
GigaDisplay_GFX display;
// Create the Touch object for reading touch input
Arduino_GigaDisplayTouch touch;

// --- Configuration Constants ---
// Use the display object to get dimensions
#define SCREEN_WIDTH  480  // GFX width is 480 (portrait by default)
#define SCREEN_HEIGHT 800  // GFX height is 800

// --- Palette and Control Bar Layout ---
const int CONTROL_BAR_HEIGHT = 100;
const int DRAWING_AREA_START_Y = CONTROL_BAR_HEIGHT;
const int PALETTE_COUNT = 5;
const int NIB_SIZES_COUNT = 4;
const int ERASER_INDEX = PALETTE_COUNT; // Index for the Eraser button
const int NIB_SELECTOR_START_X = 350;

// --- Colors and State ---
// Colors are defined in 16-bit RGB565 format (used by GFX)
#define RED     0xF800
#define GREEN   0x07E0
#define BLUE    0x001F
#define YELLOW  0xFFE0
#define MAGENTA 0xF81F
#define BLACK   0x0000
#define WHITE   0xFFFF
#define GREY    0x8410 // For control bar background

uint16_t colors[PALETTE_COUNT] = {RED, GREEN, BLUE, YELLOW, MAGENTA};
uint16_t currentColor = colors[0]; // Start with Red
uint16_t currentNibSize = 5;       // Start with a small size
int nibSizes[NIB_SIZES_COUNT] = {5, 10, 15, 20}; // Available nib sizes
bool isDrawing = false;
int lastX = -1;
int lastY = -1;

// --- Palette/Control Button Structure ---
const int PALETTE_BUTTON_WIDTH = (NIB_SELECTOR_START_X) / (PALETTE_COUNT + 1); // +1 for the eraser
struct ControlButton {
    int x;
    int y;
    int w;
    int h;
    uint16_t color;
    const char* label;
};
ControlButton paletteButtons[PALETTE_COUNT + 1]; // 5 colors + 1 eraser

void setup() {
    // Initialize Display and Touch
    display.begin();
    touch.begin();

    // Set default rotation (0 = portrait)
    display.setRotation(0);

    // Fill the screen with white to be the 'canvas'
    display.fillScreen(WHITE);

    // Initialize the control buttons array
    for (int i = 0; i < PALETTE_COUNT; i++) {
        paletteButtons[i] = {
            i * PALETTE_BUTTON_WIDTH,
            0,
            PALETTE_BUTTON_WIDTH,
            CONTROL_BAR_HEIGHT,
            colors[i],
            ""
        };
    }
    // Add the Eraser button
    paletteButtons[ERASER_INDEX] = {
        PALETTE_COUNT * PALETTE_BUTTON_WIDTH,
        0,
        PALETTE_BUTTON_WIDTH,
        CONTROL_BAR_HEIGHT,
        BLACK,
        "X"
    };

    drawControlBar();
}

// --- Drawing Functions ---

void drawControlBar() {
    // Draw the background of the control bar
    display.fillRect(0, 0, SCREEN_WIDTH, CONTROL_BAR_HEIGHT, GREY);

    // Draw Palette Buttons
    for (int i = 0; i <= PALETTE_COUNT; i++) {
        ControlButton btn = paletteButtons[i];

        // Draw the main button area
        display.fillRect(btn.x + 2, btn.y + 2, btn.w - 4, btn.h - 4, btn.color);

        // Draw the label for the eraser
        if (i == ERASER_INDEX) {
            display.setTextColor(WHITE);
            display.setTextSize(2);
            // Move cursor to center the text
            display.setCursor(btn.x + 10, btn.y + 35);
            display.print(btn.label);
        }
    }

    // Draw Nib Selector area
    drawNibSelector();
}

void drawNibSelector() {
    display.fillRect(NIB_SELECTOR_START_X, 0, SCREEN_WIDTH - NIB_SELECTOR_START_X, CONTROL_BAR_HEIGHT, GREY);

    int nibAreaWidth = SCREEN_WIDTH - NIB_SELECTOR_START_X;
    int nibButtonWidth = nibAreaWidth / NIB_SIZES_COUNT;

    for (int i = 0; i < NIB_SIZES_COUNT; i++) {
        int x_pos = NIB_SELECTOR_START_X + i * nibButtonWidth;
        int y_center = CONTROL_BAR_HEIGHT / 2;
        int radius = nibSizes[i] / 2;
        int btn_margin = 1;

        // Draw button border
        display.drawRect(x_pos + btn_margin, btn_margin, nibButtonWidth - 2*btn_margin, CONTROL_BAR_HEIGHT - 2*btn_margin, WHITE);

        // Draw the nib sample circle
        display.fillCircle(x_pos + nibButtonWidth / 2, y_center, radius, BLACK);

        // Highlight the currently selected size
        if (currentNibSize == nibSizes[i]) {
            // Draw a selection indicator (e.g., a thick green border around the button)
            display.drawRect(x_pos, 0, nibButtonWidth, CONTROL_BAR_HEIGHT, GREEN);
            display.drawRect(x_pos + 1, 1, nibButtonWidth - 2, CONTROL_BAR_HEIGHT - 2, GREEN);
        }
    }
}

// --- Touch Handling ---

void handleTouch(int x, int y) {
    // 1. Check if touch is in the Control Bar area
    if (y < CONTROL_BAR_HEIGHT) {
        // --- Palette and Eraser Selection ---
        for (int i = 0; i <= PALETTE_COUNT; i++) {
            ControlButton btn = paletteButtons[i];
            if (x >= btn.x && x < (btn.x + btn.w)) {
                if (i < PALETTE_COUNT) {
                    // Color selection
                    currentColor = colors[i];
                    currentNibSize = 5; // Reset nib size to default
                } else {
                    // Eraser selection: Set color to the canvas color (White)
                    currentColor = WHITE;
                    currentNibSize = nibSizes[NIB_SIZES_COUNT - 1]; // Max size for eraser
                }
                drawControlBar(); // Redraw to update selection highlights
                return;
            }
        }

        // --- Nib Size Selection ---
        if (x >= NIB_SELECTOR_START_X) {
            int nibAreaWidth = SCREEN_WIDTH - NIB_SELECTOR_START_X;
            int nibButtonWidth = nibAreaWidth / NIB_SIZES_COUNT;

            for (int i = 0; i < NIB_SIZES_COUNT; i++) {
                int x_pos = NIB_SELECTOR_START_X + i * nibButtonWidth;
                if (x >= x_pos && x < (x_pos + nibButtonWidth)) {
                    // Prevent changing nib size when eraser is selected
                    if (currentColor != WHITE) {
                         currentNibSize = nibSizes[i];
                    }
                    drawNibSelector(); // Redraw only the nib section
                    return;
                }
            }
        }
    }
    // 2. Touch is in the Drawing Area
    else {
        // We're drawing, update the canvas
        int radius = currentNibSize / 2;

        display.fillCircle(x, y, radius, currentColor); // Draw a dot at the current point

        // Draw a line connecting the last point to the current point for smooth drawing
        if (isDrawing && lastX != -1 && lastY != -1) {
            display.drawLine(lastX, lastY, x, y, currentColor);
            // Draw a second, slightly offset line to increase thickness (since GFX's drawLine is only 1 pixel wide by default)
            // For a true thick line, you would need a more advanced algorithm, but this is a simple approximation.
            if (currentNibSize > 5) {
                // Approximate thick line: draw 2-3 lines next to each other
                display.drawLine(lastX + 1, lastY, x + 1, y, currentColor);
                display.drawLine(lastX - 1, lastY, x - 1, y, currentColor);
            }
        }

        // Update the last position
        lastX = x;
        lastY = y;
        isDrawing = true;
    }
}

void loop() {
    // Check if the screen is touched
    uint8_t contacts;
    GDTpoint_t points[5];
    contacts = touch.getTouchPoints(points);      //read the touch screen
    int touch_x = points[0].x;
    int touch_y = points[0].y;
    handleTouch(touch_x, touch_y);
    // Touch is released, reset drawing state
    isDrawing = false;


    // Small delay to prevent reading the touch sensor too quickly
    delay(5);
}
Discussion
I had almost forgotten that I wanted to implement a paint program as part of my road test, but it is back on the radar and now completed.
Although this sketch is a bit rudimentary, the display has enough resolution to make a pretty useful drawing application.
It should be clear by now that this Giga display is gorgeous and very capable, and it is fun coming up with new uses for it.
Links:
Touch Screen and USB memory demo
GIGA display of an Arducam video camera


