


I'm road testing the Harting MICA Complete IIoT Starter Kit. In the previous post, I reviewed the setup of a development Linux container on the MICA. In this post, I'll show how to set up and configure Eclipse on a Windows 10 computer and how you can build and debug an application.
I'll start with a simple C++ "Hello, world!" example. When that works, we can concentrate on the last step and talk to a hardware I/O pin. |

Install ARM Eclipse DS-5 Community Edition
ARM offers a free community edition of their Eclipse variant, DS-5.
This is an impressive environment (together with Silicon Labs IDE and TI's CCS one of the best Eclipse ports I've worked with).
It comes without a C tool chain, but we'll install that in the next section.
To install, press the Download button on the page linked above and enter your contact details.
You will receive a mail with the download link.
Once downloaded, execute the installer. If that's successful, start DS-5 and check for updates.
One of the nice bonuses is that when you finish this setup, you have an environment that also works for the BeagleBone and Raspberry PI.
Install a C Cross-Platform Toolchain for ARM Linux
The second part is also easy, but you have to be a bit careful.
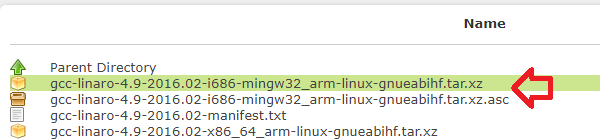
Download one of Linaro's cross-compile toolchains. HARTING proposes to use the same version as used to compile their Linux containers.
Place this file on your computer. We'll have to unzip it.
It's best to place it in a permanent location where you want to keep the tool chain on your computer.
The easiest way is to use 7-ZIP. You have to start 7-ZIP as ADMINISTRATOR. Failing to do so will give you a non-working tool chain.
7-ZIP has to make symbolic links during the extract and that requires administrator rights.
in 7-ZIP, navigate to the .tar.xz file and open it.
Then select the .tar file that's shown in the list. Press the Extract button. Don't exit 7-ZIP.
When this is finished, navigate to where you extracted the .tar file in 7-ZIP and open it.
Select the line in the list (it starts with gcc-linaro...). Press the Extract button.
When you get a prompt for existing files, select Replace All.
Done! You can exit 7-ZIP now.
If you accidentally extracted without elevated Admin rights, you'll get error messages. In that case, delete everything that's extracted, run 7-ZIP as admin and start over.
Next action is to register the tool chain in Eclipse.
Go to the menu Windows -> Preferences, and add the tool chain you just installed.
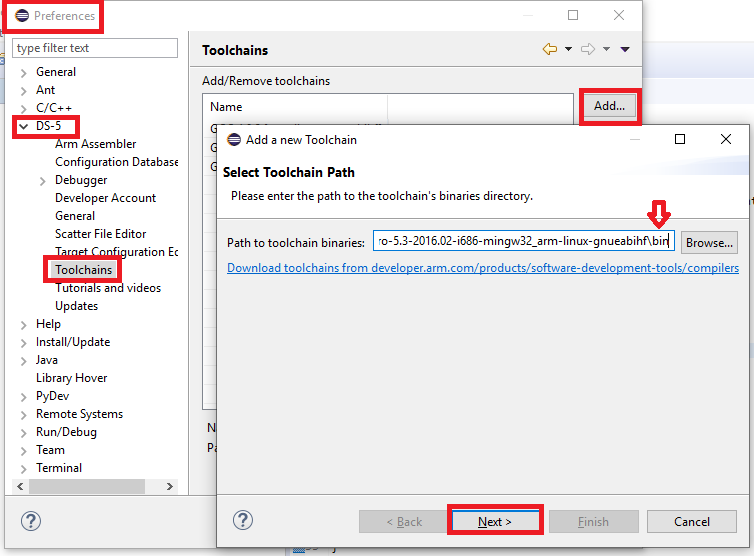
You have to navigate to the bin path under the install folder.
You now have a cross-platform build environment.
Configure a Remote System for the MICA
We have to register the MICA system as a remote system.
Eclipse will use this to deploy our binary to the MICA , start the remote debug server on the MICA and communicate with it when we're ready to test.
It's neat that all of this is done for us by the development environment.
Open the Remote Systems view via Windows -> Show Window -> Other -> Remote Systems -> Remote Systems
In that new window, click on the Define a Connection button.

Select SSH Only.
In the Host Name field, enter the network name of your container.
This is exactly the same name you used in the previous post to connect with PuTTY (for me: DebianStretchRoadtest-mica-grvnb).
You can use the same name as connection name. That will be displayed in the Remote Systems window later on.
Your user is root. If you listened well to Gough Lui, you have changed the password of the container. Enter that password. (if you didn't listen to him, use the password root).
Keep on clicking Next until the Finish button is active. Keep all suggested settings. Then click Finish.
You can now right-click on the Remote System and select Connect.
If you click the "Save Password" checkbox, you will not be prompted for logon info later on. Up to you.
Build an ARM Linux "Hello, world!" C++ Executable
It's time to create and build our first C++ program.
Go to File -> New -> C++ Project.
Name it mica_hello_world.
Select Hello World C++ Project. In the tool chains box, select the one you just registered.
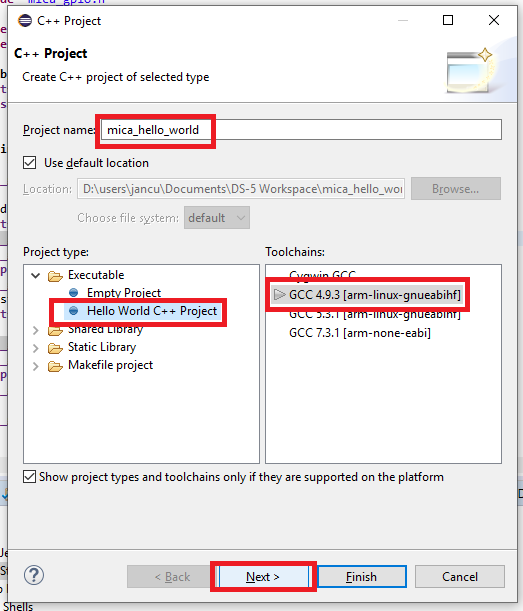
Click Next, (you can change the settings on the next page if you want), then Finish.
Your new project is created.
Open the src folder and double-click on mica_hello_world.cpp.
You will see the code in the editor. No need to change it.
Select your project. Then right click on it and select Build Project.
If all is OK, you should see something like this in the Console window:
23:55:54 **** Build of configuration Debug for project mica_hello_world ****
make all
'Building file: ../src/mica_hello_world.cpp'
'Invoking: GCC C++ Compiler 4.9.3 [arm-linux-gnueabihf]'
arm-linux-gnueabihf-g++.exe -O0 -g -Wall -c -fmessage-length=0 -MMD -MP -MF"src/mica_hello_world.d" -MT"src/mica_hello_world.o" -o "src/mica_hello_world.o" "../src/mica_hello_world.cpp"
'Finished building: ../src/mica_hello_world.cpp'
' '
'Building target: mica_hello_world'
'Invoking: GCC C++ Linker 4.9.3 [arm-linux-gnueabihf]'
arm-linux-gnueabihf-g++.exe  -o "mica_hello_world"  ./src/mica_hello_world.o
'Finished building target: mica_hello_world'
' '

23:56:04 Build Finished (took 9s.806ms)
Congratulations! Your first cross-built binary can be seen here:
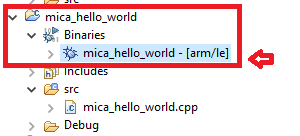
We're ready for the big step now. Deploy to the MICA and step through the code.
Deploy and Debug
We'll now tell Eclipse how to deploy the binary and how to start the debugger on the MICA.
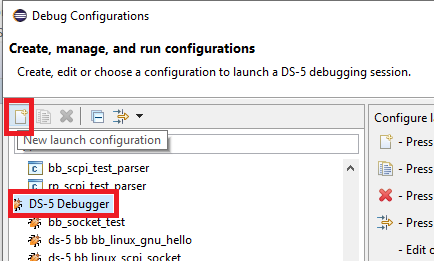
Go to Run -> Debug Configurations.
Select the DS-5 Debugger entry and click the New button.
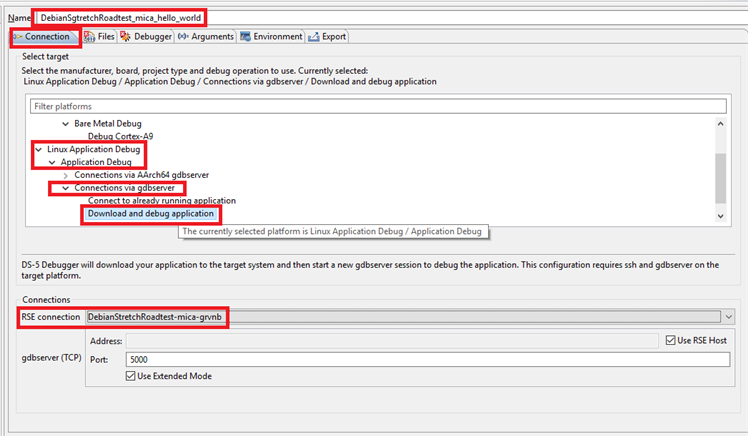
In the first dialog we get, enter the following info on the Connection tab.:
Name: DebianStretchRoadtest_mica_hello_world
(because a debug configuration contains the connection to our device, I prefer to put the target container in the debug name).
Select the Linux Application debugger shown below:
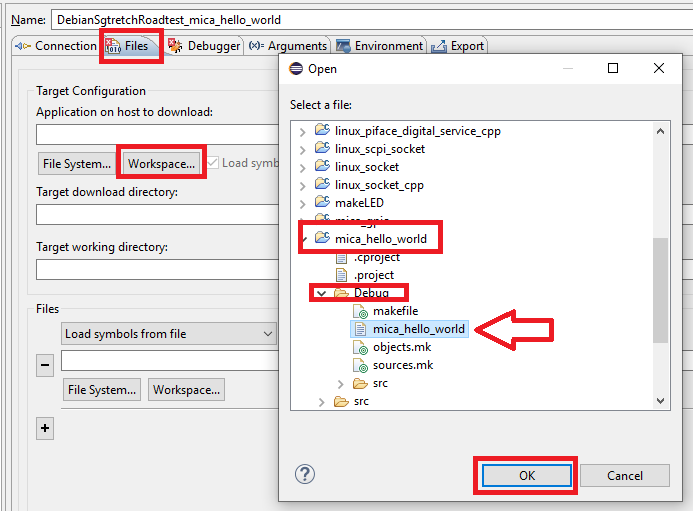
Click on the Files tab and enter these values:
Target download directory and working directory: /root/bin (we created that in the previous post while configuring the Debian Stretch container).
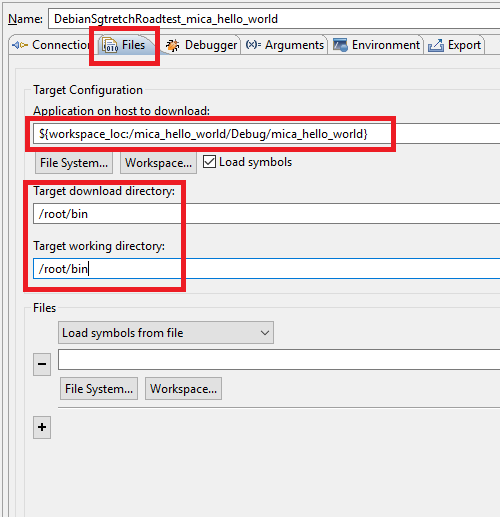
Click Apply.
Click Debug (It's happening !!!)
If all is OK, you will end up with a situation like below:
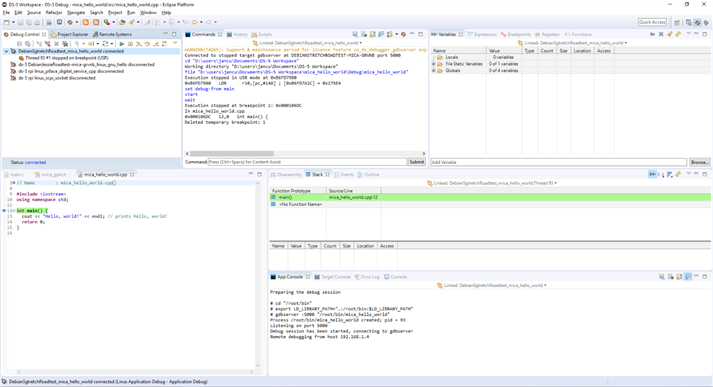
Eclipse opens the Debug perspective.
Your binary is uploaded to the MICA, the debug server on the MICA is started and the Eclipse debugger halts execution on the main() function.
You can now step through the code and look at the various consoles and debug windows.
When you step over the line that starts with cout, you will see the message logged in the App console window.
The debugger does that for you. It routes the standard output to Eclipse so that you can see it while debugging.
Major achievement unlocked.
When this works, the complete tool chain is ready for the real thing: program the hardware.
The next post handles getting the necessary libraries on your Windows PC and finally making that I/O example.
Top Comments