element14 Community
element14 Community
    Register Log In
  • Site
  • Search
  • Log In Register
  • About Us
  • Community Hub
    Community Hub
    • What's New on element14
    • Feedback and Support
    • Benefits of Membership
    • Personal Blogs
    • Members Area
    • Achievement Levels
  • Learn
    Learn
    • Ask an Expert
    • eBooks
    • element14 presents
    • Learning Center
    • Tech Spotlight
    • STEM Academy
    • Webinars, Training and Events
    • Learning Groups
  • Technologies
    Technologies
    • 3D Printing
    • FPGA
    • Industrial Automation
    • Internet of Things
    • Power & Energy
    • Sensors
    • Technology Groups
  • Challenges & Projects
    Challenges & Projects
    • Design Challenges
    • element14 presents Projects
    • Project14
    • Arduino Projects
    • Raspberry Pi Projects
    • Project Groups
  • Products
    Products
    • Arduino
    • Avnet Boards Community
    • Dev Tools
    • Manufacturers
    • Multicomp Pro
    • Product Groups
    • Raspberry Pi
    • RoadTests & Reviews
  • Store
    Store
    • Visit Your Store
    • Choose another store...
      • Europe
      •  Austria (German)
      •  Belgium (Dutch, French)
      •  Bulgaria (Bulgarian)
      •  Czech Republic (Czech)
      •  Denmark (Danish)
      •  Estonia (Estonian)
      •  Finland (Finnish)
      •  France (French)
      •  Germany (German)
      •  Hungary (Hungarian)
      •  Ireland
      •  Israel
      •  Italy (Italian)
      •  Latvia (Latvian)
      •  
      •  Lithuania (Lithuanian)
      •  Netherlands (Dutch)
      •  Norway (Norwegian)
      •  Poland (Polish)
      •  Portugal (Portuguese)
      •  Romania (Romanian)
      •  Russia (Russian)
      •  Slovakia (Slovak)
      •  Slovenia (Slovenian)
      •  Spain (Spanish)
      •  Sweden (Swedish)
      •  Switzerland(German, French)
      •  Turkey (Turkish)
      •  United Kingdom
      • Asia Pacific
      •  Australia
      •  China
      •  Hong Kong
      •  India
      •  Korea (Korean)
      •  Malaysia
      •  New Zealand
      •  Philippines
      •  Singapore
      •  Taiwan
      •  Thailand (Thai)
      • Americas
      •  Brazil (Portuguese)
      •  Canada
      •  Mexico (Spanish)
      •  United States
      Can't find the country/region you're looking for? Visit our export site or find a local distributor.
  • Translate
  • Profile
  • Settings
RoadTests & Reviews
  • Products
  • More
RoadTests & Reviews
Blog HARTING MICA: Develop and Debug a C GPIO Example in Eclipse - Part 4: Build and Debug the GPIO Example
  • Blog
  • RoadTest Forum
  • Documents
  • RoadTests
  • Reviews
  • Polls
  • Files
  • Members
  • Mentions
  • Sub-Groups
  • Tags
  • More
  • Cancel
  • New
Join RoadTests & Reviews to participate - click to join for free!
  • Share
  • More
  • Cancel
  • Author Author: Jan Cumps
  • Date Created: 27 Apr 2019 2:47 PM Date Created
  • Views 1728 views
  • Likes 7 likes
  • Comments 6 comments
Related
Recommended
  • iiot
  • cross-compiling
  • mica
  • harting
  • eclipse
  • iot
  • iiot4
  • arm

HARTING MICA: Develop and Debug a C GPIO Example in Eclipse - Part 4: Build and Debug the GPIO Example

Jan Cumps
Jan Cumps
27 Apr 2019

I'm road testing the Harting MICA Complete IIoT Starter Kit.

In the previous post, I set up the Eclipse IDE and the tool set, and built and debugged the first example.

Now - finally - let's create a C program that talks to the I/O lines of the MICA.

image

image source: HAIIC MICA Hardware Development Guide

This is the end goal of this blog series (hang on, there's an extra one that shows a solution that uses much less memory and disk space): How to set up an interactive environment where you can write code, deploy, test and debug.


In this post, it's expected that you did the steps described in post 2 (to prepare the MICA) and post 3 (to prepare the cross-development environment on Windows).

There are only two additional steps to do:

  • make the GPIO dependencies (we need 3 Linux libraries and an API header file) available on Windows
  • make a program that talks to the I/O lines, build it and run it on the MICA.


Set Up GPIO Library and Header Files in Windows


The program will use shared libraries - the libraries we depend on are referenced but aren't linked in the executable.

At run time, Linux will take care that our program can access these libraries and can execute the functions provided by them.

But the linker needs to know these libraries, so we have to make them available on Windows at build-time.


There are two groups we have to provide:

  • the mica gpio library and the header file that describes its API: libmica-gpio and mica_gpio.h
  • three libraries the gpio library depends on: libudev, libhidapi-libusb and libusb-1.0


All these files are installed in the Debian Stretch container during the setup done in part 2.

To get them downloaded to windows, you can use an sFTP client (such as winSCP).

For this moment, I have copied all the files to a single directory on my Windows computer.


Here are the locations of the files you have to get (for those with a version number in their name - no worries, get the one that you find. We create a symbolic link later on):

/usr/include/mica-gpio.h

/usr/lib/libmica-gpio.so


/lib/arm-linux-gnueabihf/libudev.so.1.6.5

/lib/arm-linux-gnueabihf/libusb-1.0.so.0.1.0

/usr/lib/arm-linux-gnueabihf/libhidapi-libusb.so.0.0.0


While you are on the sFTP server, you might as well get the example file we'll use in our project:

/usr/share/doc/libmica-gpio/main.c

You can copy it to the same directory for now. We'll move it into the Eclipse project later.


Once the files are moved over, we want to make symbolic links to the ones that have a version number at the end of their name.

That takes care that our code is not dependent on a specific release of the libraries.

I'm expecting that you run a Windows version that supports it ( Vista, 7, 8 and 10 - you'd know by now, because the installation of the tool chain of post 3 would have failed if your system doesn't support it).

Open a Windows command prompt as ADMINISTRATOR and navigate to the directory where you downloaded the libraries.

Then execute these commands:


mklink libhidapi-libusb.so libhidapi-libusb.so.0.0.0
mklink libudev.so libudev.so.1.6.5
mklink libusb-1.0.so libusb-1.0.so.0.1.0


That's it for the dependency installation. Let's start developing.


Create a GPIO Eclipse Project


Open DS-5, and create a new C project, mica_gpio.

Choose empty project, select your tool chain and click finish.

In the root, create a new folder named src.

Copy the main.c that you downloaded earlier on to the src folder in Eclipse.

You can copy it with Windows explorer, then right-click on the src folder in Eclipse and select paste.

After that, you can delete the file from your lib folder - it's not needed there.


Next, add the location of the headerfile to the Eclipse include path.

image


Then, add that same folder to the library search path, and add the libraries to the list below the path.
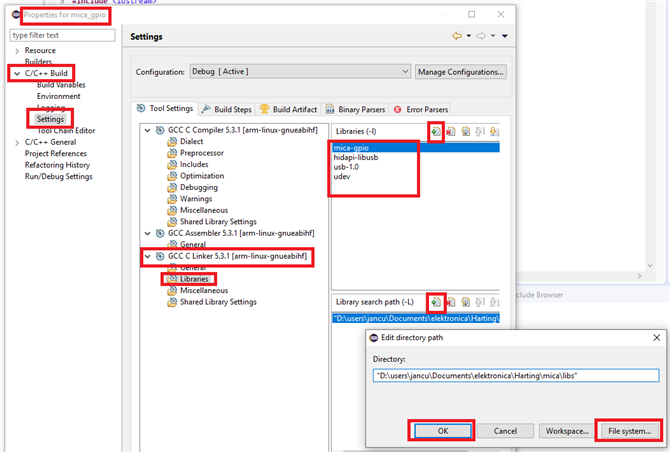
image


Libraries to add:

mica-gpio

hidapi-libusb

usb-1.0

udev

Type this exactly as above, without lib at the beginning or .so at the end. The tool chain will take care of that.

It will look in your path folder for the libs at link time.


Open the main.c file in the src folder and have a look at the code. This will help you to understand what's happening when you execute the program later.

Now try to build the project by right-clicking on it and selecting Build Project.

This should finish without any errors.


16:29:08 **** Build of configuration Debug for project mica_gpio ****
make all 
'Building file: ../src/main.c'
'Invoking: GCC C Compiler 5.3.1 [arm-linux-gnueabihf]'
arm-linux-gnueabihf-gcc.exe -ID:\users\jancu\Documents\elektronica\Harting\mica\libs -O0 -g -Wall -c -fmessage-length=0 -MMD -MP -MF"src/main.d" -MT"src/main.o" -o "src/main.o" "../src/main.c"
'Finished building: ../src/main.c'
' '
'Building target: mica_gpio'
'Invoking: GCC C Linker 5.3.1 [arm-linux-gnueabihf]'
arm-linux-gnueabihf-gcc.exe -L"D:\users\jancu\Documents\elektronica\Harting\mica\libs" -o "mica_gpio"  ./src/main.o   -lmica-gpio -lhidapi-libusb -lusb-1.0 -ludev
'Finished building target: mica_gpio'
' '
16:29:11 Build Finished (took 2s.780ms)


Execute from the Debugger and Directly from the MICA


Just like when we tried the Hello, world! C++ program, we have to create a Debug configuration.

We can copy the one made in post 3 (right-click on it and select Duplicate), and adapt it:


image

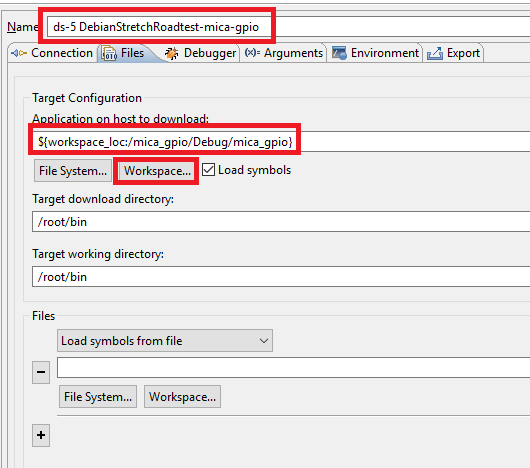
The only two things you need to change is the name and the location of the binary file.


Then click Apply.

Then Debug.

You are now running and stepping through your first GPIO C program.


Take your time to step through the code, watch the variables change, look at the App console output while doing that.

Put a voltmeter on the I/O wire to get that real feeling for what's happening.


As a last step, let's run the executable direct on the MICA, without using Eclipse to launch it.

First, take care that the program you were debugging has exited. Run it to the end, until the debug buttons are grayed out and the Debug Console tells the application is terminated.


Then, use a terminal (e.g.: PuTTY) to SSH into the Debian Stretch container (we've done that a few times before in the previous posts).

go to /root/bin

cd ~/bin


Execute your program and look at the output.

./mica_gpio


You should see this in your console:

image


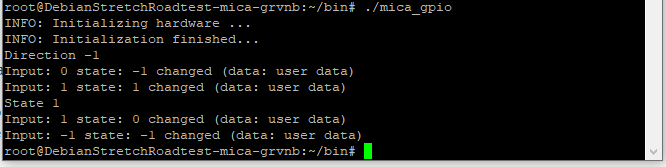
That was the whole thing. I hope the explanation is clear and you're able to repeat it without issues.

I'll prepare the bonus post where a lighter weight container is used to host this program.


Related Blog
HARTING MICA: Develop and Debug a C GPIO Example in Eclipse - Part 1: User Experience
HARTING MICA: Develop and Debug a C GPIO Example in Eclipse - Part 2: MICA Debian Stretch Setup
HARTING MICA: Develop and Debug a C GPIO Example in Eclipse - Part 3: Eclipse Configuration on Windows
HARTING MICA: Develop and Debug a C GPIO Example in Eclipse - Part 4: Build and Debug the GPIO Example
HARTING MICA: Make a Safe(r) MQTT Container with Certificate and TLS/SSL
HARTING MICA: Manage Access to USB and other Devices
HARTING MICA: SD Card as Shared Storage
HARTING MICA: Alpine Linux and another MQTT Container with Certificate and TLS/SSL
HARTING MICA: Connect to Amazon Web Services
HARTING MICA: Install Java 8 VM in a Debian Stretch Container
HARTING MICA: Read BOSCH CISS Sensor with Java - part 1: USB Connect and Listen
  • Sign in to reply

Top Comments

  • stevesmythe
    stevesmythe over 6 years ago +1
    You've done a lot in just a few days! I'm still mostly reading stuff.
  • Jan Cumps
    Jan Cumps over 6 years ago in reply to stevesmythe +1
    stevesmythe wrote: You've done a lot in just a few days! I'm still mostly reading stuff. I'm often away for work so I have to do the hands-on parts when I'm at home. The blogs are more for my own documentation…
  • DAB
    DAB over 6 years ago +1
    Another good update Jan. DAB
  • Jan Cumps
    Jan Cumps over 6 years ago in reply to micsup

    micsup  wrote:


    Hi,

    I just checked the tutorial today and found out (at least on my Win7 machine) that the link commands are incorrect. I used:


    mklink libhidapi-libusb.so libhidapi-libusb.so.0.0.0

    mklink libudev.so libudev.so.1.6.5

    mklink libusb-1.0.so libusb-1.0.so.0.1.0


    and that worked.


    Fixed. Thank you micsup

    • Cancel
    • Vote Up 0 Vote Down
    • Sign in to reply
    • More
    • Cancel
  • Jan Cumps
    Jan Cumps over 6 years ago in reply to micsup

    I will check and update the blog. Thank you.

    • Cancel
    • Vote Up 0 Vote Down
    • Sign in to reply
    • More
    • Cancel
  • micsup
    micsup over 6 years ago

    Hi,

    I just checked the tutorial today and found out (at least on my Win7 machine) that the link commands are incorrect. I used:


    mklink libhidapi-libusb.so libhidapi-libusb.so.0.0.0

    mklink libudev.so libudev.so.1.6.5

    mklink libusb-1.0.so libusb-1.0.so.0.1.0


    and that worked.

    • Cancel
    • Vote Up +1 Vote Down
    • Sign in to reply
    • More
    • Cancel
  • DAB
    DAB over 6 years ago

    Another good update Jan.


    DAB

    • Cancel
    • Vote Up +1 Vote Down
    • Sign in to reply
    • More
    • Cancel
  • Jan Cumps
    Jan Cumps over 6 years ago in reply to stevesmythe

    stevesmythe  wrote:


    You've done a lot in just a few days! I'm still mostly reading stuff.

    I'm often away for work so I have to do the hands-on parts when I'm at home.

    The blogs are more for my own documentation on how to develop for the device than a real review of the capabilities.

    (most of the blogs I do are like that: try something and write down how I did it - so that I can visit them later)

    • Cancel
    • Vote Up +1 Vote Down
    • Sign in to reply
    • More
    • Cancel
>
element14 Community

element14 is the first online community specifically for engineers. Connect with your peers and get expert answers to your questions.

  • Members
  • Learn
  • Technologies
  • Challenges & Projects
  • Products
  • Store
  • About Us
  • Feedback & Support
  • FAQs
  • Terms of Use
  • Privacy Policy
  • Legal and Copyright Notices
  • Sitemap
  • Cookies

An Avnet Company © 2025 Premier Farnell Limited. All Rights Reserved.

Premier Farnell Ltd, registered in England and Wales (no 00876412), registered office: Farnell House, Forge Lane, Leeds LS12 2NE.

ICP 备案号 10220084.

Follow element14

  • X
  • Facebook
  • linkedin
  • YouTube