element14 Community
element14 Community
    Register Log In
  • Site
  • Search
  • Log In Register
  • Community Hub
    Community Hub
    • What's New on element14
    • Feedback and Support
    • Benefits of Membership
    • Personal Blogs
    • Members Area
    • Achievement Levels
  • Learn
    Learn
    • Ask an Expert
    • eBooks
    • element14 presents
    • Learning Center
    • Tech Spotlight
    • STEM Academy
    • Webinars, Training and Events
    • Learning Groups
  • Technologies
    Technologies
    • 3D Printing
    • FPGA
    • Industrial Automation
    • Internet of Things
    • Power & Energy
    • Sensors
    • Technology Groups
  • Challenges & Projects
    Challenges & Projects
    • Design Challenges
    • element14 presents Projects
    • Project14
    • Arduino Projects
    • Raspberry Pi Projects
    • Project Groups
  • Products
    Products
    • Arduino
    • Avnet Boards Community
    • Dev Tools
    • Manufacturers
    • Multicomp Pro
    • Product Groups
    • Raspberry Pi
    • RoadTests & Reviews
  • Store
    Store
    • Visit Your Store
    • Choose another store...
      • Europe
      •  Austria (German)
      •  Belgium (Dutch, French)
      •  Bulgaria (Bulgarian)
      •  Czech Republic (Czech)
      •  Denmark (Danish)
      •  Estonia (Estonian)
      •  Finland (Finnish)
      •  France (French)
      •  Germany (German)
      •  Hungary (Hungarian)
      •  Ireland
      •  Israel
      •  Italy (Italian)
      •  Latvia (Latvian)
      •  
      •  Lithuania (Lithuanian)
      •  Netherlands (Dutch)
      •  Norway (Norwegian)
      •  Poland (Polish)
      •  Portugal (Portuguese)
      •  Romania (Romanian)
      •  Russia (Russian)
      •  Slovakia (Slovak)
      •  Slovenia (Slovenian)
      •  Spain (Spanish)
      •  Sweden (Swedish)
      •  Switzerland(German, French)
      •  Turkey (Turkish)
      •  United Kingdom
      • Asia Pacific
      •  Australia
      •  China
      •  Hong Kong
      •  India
      •  Korea (Korean)
      •  Malaysia
      •  New Zealand
      •  Philippines
      •  Singapore
      •  Taiwan
      •  Thailand (Thai)
      • Americas
      •  Brazil (Portuguese)
      •  Canada
      •  Mexico (Spanish)
      •  United States
      Can't find the country/region you're looking for? Visit our export site or find a local distributor.
  • Translate
  • Profile
  • Settings
RoadTests & Reviews
  • Products
  • More
RoadTests & Reviews
Blog SimpleLink™︎ Sub-1 GHz Wireless Microcontroller - Debug 2 LaunchPads at the Same Time
  • Blog
  • RoadTest Forum
  • Documents
  • RoadTests
  • Reviews
  • Polls
  • Files
  • Members
  • Mentions
  • Sub-Groups
  • Tags
  • More
  • Cancel
  • New
Join RoadTests & Reviews to participate - click to join for free!
  • Share
  • More
  • Cancel
  • Author Author: Jan Cumps
  • Date Created: 24 Jun 2016 8:02 PM Date Created
  • Views 1828 views
  • Likes 3 likes
  • Comments 4 comments
Related
Recommended
  • cc1310
  • radio
  • texas_instruments
  • uniflash
  • simplelink
  • sub_1ghz
  • launchpad
  • feature_tutorial

SimpleLink™︎ Sub-1 GHz Wireless Microcontroller - Debug 2 LaunchPads at the Same Time

Jan Cumps
Jan Cumps
24 Jun 2016

Complexity: medium

What do you need:

  • two CC1310 LaunchPads Out of Box
  • Code Composer Studio
  • TI RTOS


This blog explains how you can debug two LaunchPads at the same time, on one computer.

This is particularly useful for the CC1310, where you try out radio conversations between two controllers.


image


You'll learn how to address the LaunchPads individually.

You'll learn how to run two debug sessions on the same computer


Make one  LaunchPad the Sender, the other Receiver


Label one Launchpad as sender and the other as receiver. Just put a label on with the text TX and RX.

image

From that moment on, you have a visual indicator that tells who is who.

To make the computer know who is who, you need to retrieve the serial number of the on-board debugger.

There is a command line tool in CCS to query that code.


Plug in the TX launchPad only, and run the following command from the OS prompt:


cd C:\ti\ccsv6\ccs_base\common\uscif\xds110  
xdsdfu /e


You will get the Serial Num back of your TX Launchpad. Write this code on that label that you just taped on the board.

image


Unplug TX and plug in the RX board.

Run the xdsdfu /e command again.

You will get a different number. Write that on the RX board.


Our first step is done. You and the computer can identify the individual LaunchPads.

You can now connect both LaunchPads at the same time to your computer. In the next section you 'll see how CCS will talk to each one in isolation.


Two Code Composer Studio Workspaces for TX and RX


CCS can only run one instance of itself in a workspace.

If we want to run two debuggers at the same time, we 'll need two separate workspaces. Let's create one workspace for the RX projects and one for the TX ones.

Let's tell CCS it has to prompt for a workspace when starting up:


Window -> Preferences


image

Confirm your settings and close the dialog and also CCS. You can now start it again, and it will prompt for a workspace.


You don't have permission to edit metadata of this video.
Edit media
x
image
Upload Preview
image


Create a workspace. I've placed mine in the same folder as the original workspace (your OS home folder) and called it workspace_v6_tx.

You can immediately load one of the TX examples.

Click on the Browse Examples button on the startup screen (if this doesn't show at startup, open it via View -> Getting started).

image


Load a TX example.

image


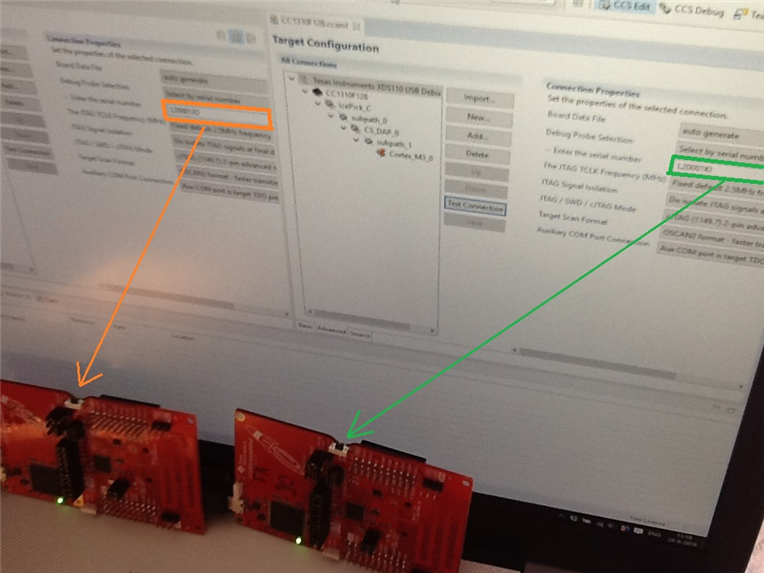
Once the example is loaded, navigate to targetConfigs -> CC1310F128.ccxml

image

Change Debug Probe Selection to: Select by serial number.

Enter the serial number of your TX launchPad (the one you wrote on the TX label in the previous step).

Press Save and press Test. Look at the TX and RX LaunchPad during the test.

Only the debug LED of the TX one should blink during the test cycle.


TX is done. You can now start a brand new CCS session and do the same exercise for the RX LaunchPad when CCS prompts for the workspace.

I called the workspace workspace_v6_rx.

I imported the corresponding RX project and changed its target configuration file to use the serial number written on the RX LaunchPad's label.

During the test, this time the debug LED of the RX LaunchPad should blink. The TX one shouldn't activate at all during this exercise.


All the hard work is done. We have two CCS sessions running, each with a project that talks to one specific LaunchPad.


Debug two LaunchPads at the Same Time


Yes, That's possible from now on.

image


We have the two sessions active. We just need to push the Debug button in each CCS session to load the firmware to the right controller and start stepping trough both sender and receiver.

All settings are persistent. Each time you start CCS, it will show a list of available workspaces, and you can select the one(s) you want to work with.


Side note 1: The fact that you have multiple workspaces doesn't mean that your source code has to reside on different locations on your computer.

The only requirement of CCS is that your project structure is in that workspace.

You can freely use Eclipse's Link Folder functionality to place your source files wherever you like.

This will come in handy when you are using version control systems, or if your RX and TX firmware share common files.


Side note 2: You can use the same target configuration files in UniFlash. The flash tool will take over all sessions of your debugger configuration.

This is handy if you want to program a whole stack of launchpads :<) and also if you just want to reprogram one.

Plug in the LaunchPad, open the target config file in UniFlash, press Program and rest assured that the code is flashed to the correct LaunchPad, not just a random LaunchPad.


Happy Debugging.


SimpleLinkTm Sub-1 GHz Wireless Microcontroller - Check  Received Signal Strength
SimpleLinkTm Sub-1 GHz Wireless Microcontroller - Use SmartRF to Try Radio Configs
SimpleLinkTm Sub-1 GHz Wireless Microcontroller - Debug 2 LaunchPads at the Same Time
SimpleLinkTm Sub-1 GHz Wireless Microcontroller - Side Note: Recognise your PuTTY Sessions
SimpleLinkTm Sub-1 GHz Wireless Microcontroller - Side Note: Recognise your Code Composer Studio Sessions
SimpleLinkTm Sub-1 GHz Wireless Microcontroller - Debug a Sender to Receiver Conversation
SimpleLinkTm Sub-1 GHz Wireless Microcontroller - Side Note: Start a Fresh Project
SimpleLinkTm Sub-1 GHz Wireless Microcontroller - Create a Transmitter with SmartRF Studio Part 1
SimpleLinkTm Sub-1 GHz Wireless Microcontroller - Create a Transmitter with SmartRF Studio Part 2
SimpleLinkTm Sub-1 GHz Wireless Microcontroller - Sensor Controller Engine Part 1: Dry Run
SimpleLinkTm Sub-1 GHz Wireless Microcontroller - Sensor Controller Engine Part 2: RTOS Integration
SimpleLinkTm Sub-1 GHz Wireless Microcontroller - Sensor Controller Engine Part 3: Wake Up Options
SimpleLinkTm Sub-1 GHz Wireless Microcontroller - Side Note : Measure Power Use of Sensor Controller Engine
SimpleLinkTm Sub-1 GHz Wireless Microcontroller - ToolKit for Range Testing

on TI E2E community: How to connect a CC1310 LaunchPad to the SIGFOX network

  • Sign in to reply

Top Comments

  • unix_guru
    unix_guru over 8 years ago +1
    Very good article. Thank you. I was not aware that you could simultaneously debug two boards. Appreciated.
  • Jan Cumps
    Jan Cumps over 8 years ago in reply to clem57 +1
    UniFlash is the separate loader utility of TI. It allows you to load / 'flash' your binary firmware code to the microcontroller flash memory. it uses the same target configuration file as CCS. That means…
  • Fred27
    Fred27 over 8 years ago +1
    Very helpful. I decided to use the -s option to change the serial number to something more representative whilst I'm working with them. e.g. xdsdfu -m xdsdfu -s Fred01RX -r
  • Fred27
    Fred27 over 8 years ago

    Very helpful. I decided to use the -s option to change the serial number to something more representative whilst I'm working with them. e.g.


    xdsdfu -m

    xdsdfu -s Fred01RX -r

    • Cancel
    • Vote Up +1 Vote Down
    • Sign in to reply
    • More
    • Cancel
  • Jan Cumps
    Jan Cumps over 8 years ago in reply to clem57

    UniFlash is the separate loader utility of TI.

    It allows you to load / 'flash' your binary firmware code to the microcontroller flash memory.

    it uses the same target configuration file as CCS. That means that you just can open your CCS project's config file in uniflash, tell the tool where the compiled and linked firmware binary sits, and press 'program'


    it uploads that binary to your controller, using the connection config (debugger setup) of your project.


    you can script UniFlash and use it in a production environment to program many controllers.


    it's available for download from TI.

    • Cancel
    • Vote Up +1 Vote Down
    • Sign in to reply
    • More
    • Cancel
  • clem57
    clem57 over 8 years ago

    What is uniflash in tag line?

    Clem

    • Cancel
    • Vote Up 0 Vote Down
    • Sign in to reply
    • More
    • Cancel
  • unix_guru
    unix_guru over 8 years ago

    Very good article.  Thank you.  I was not aware that you could simultaneously debug two boards. 


    Appreciated.

    • Cancel
    • Vote Up +1 Vote Down
    • Sign in to reply
    • More
    • Cancel
element14 Community

element14 is the first online community specifically for engineers. Connect with your peers and get expert answers to your questions.

  • Members
  • Learn
  • Technologies
  • Challenges & Projects
  • Products
  • Store
  • About Us
  • Feedback & Support
  • FAQs
  • Terms of Use
  • Privacy Policy
  • Legal and Copyright Notices
  • Sitemap
  • Cookies

An Avnet Company © 2025 Premier Farnell Limited. All Rights Reserved.

Premier Farnell Ltd, registered in England and Wales (no 00876412), registered office: Farnell House, Forge Lane, Leeds LS12 2NE.

ICP 备案号 10220084.

Follow element14

  • X
  • Facebook
  • linkedin
  • YouTube