


We want our Artybot to be autonomous. Until now every time we turned off the Arty S7 50 board we lost the program loaded in the board's RAM. This guide will show you how to store a Microblaze program in the SPI Flash on your Arty S7 50 device. Storing a program in Flash allows you to preserve the project program through power cycles.
This tutorial post is part 6 of my contribution to the "7 Ways to Leave Your Spartan-6" program, learning about the Xilinx Spartan-7 FPGA on the Digilent Arty S7 50 board.
Tutorial Environment
For this tutorial you'll need, Windows 10, AMD Xilinx Vivado ML 2021.1
This tutorial assumes that you already have a Vivado Project using the Microblaze IP and a Vitis C software project using that hardware configuration.
Look at these two projects as example: Arty S7 50 Rapid Prototyping - Environmental Monitor or Arty S7 50 First Baremetal Software Project
Hardware needed:
| Product Name | Manufacturer | Datasheet |
| Arty S7 50 | Digilent | Buy Now |
About the Arty S7 50 Quad-SPI Flash
The Arty S7 50 board features 16 MB Quad-SPI Flash memory.
Since the FPGA's memory on the Arty S7 is volatile, it relies on the Quad-SPI flash memory to store the configuration between power cycles. This configuration mode is called Master SPI. The blank FPGA takes the role of master and reads the configuration file out of the flash device upon power-up. To that effect, a configuration file needs to be downloaded first to the flash.
FPGA configuration files can be written to the Quad-SPI Flash, and setting the mode jumper will cause the FPGA to automatically read a configuration from this device at power on. A Spartan-7 50T configuration file requires 17,536,096 bits of memory, leaving about 87% of the flash device (or ~13.92 MB) available for user data.
Flash Memory Indirect Programming
When programming a non-volatile flash device, a bitstream file is transferred to the flash in a two-step process:
- First, the FPGA is programmed with a circuit that can program flash devices,
- and then data is transferred to the flash device via the FPGA circuit (this complexity is hidden from the user by the Xilinx tools).
This is called indirect programming. After the flash device has been programmed, it can automatically configure the FPGA at a subsequent power-on or reset event as determined by the mode jumper setting JP1. Programming files stored in the flash device will remain until they are overwritten, regardless of power-cycle events.
Programming the flash can take as long as four to five minutes, which is mostly due to the lengthy erase process inherent to the memory technology. Once written however, FPGA configuration can be very fast—less than a second.
We will configure Bitstream compression, SPI bus width, and configuration rate from the Xilinx tools that will affect configuration speed.
The Arty S7 supports x1, x2, and x4 bus widths and data rates of up to 50 MHz for Quad-SPI programming.
Quad-SPI programming can be done using the hardware manager in Vivado and also from Vitis IDE. For this tutorial we will use the Vivado path.
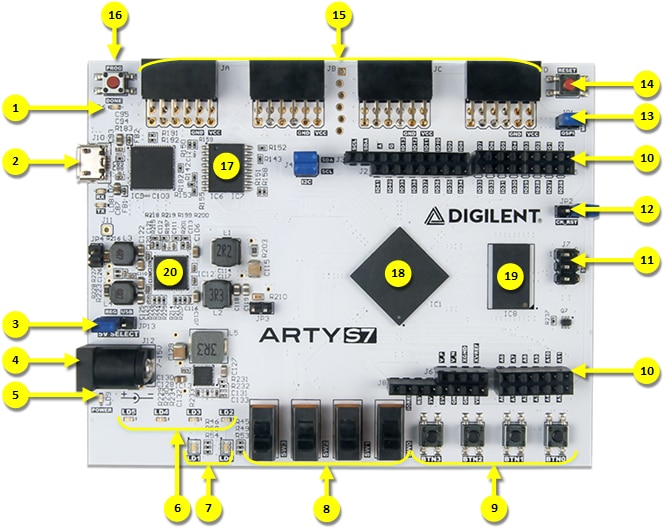
Flash Memory is callout 17 in the figure.
To find out the exact memory part loaded, check the PCB revision and any stickers placed on the PCB with the flash part number printed on it. The table below lists the possible load options.
| Manufacturer | P/N | PCB Revision | Package Marking |
|---|---|---|---|
| Spansion/Infineon | S25FL128SAG[M|N]FI00 | <= E w/o sticker OR >= E w/ sticker | FL128SAIF00 |
| Spansion/Infineon | S25FL127SABMFx00 | >= E w/ sticker | FL127SxF00 |
The two part numbers are highly compatible and the “s25fl128s-3.3v-qspi-x4-single” part configuration can be used in Vivado Hardware Manager for both.

S25FL128S/S25FL256S, 128 Mb (16 MB)/256 Mb (32 MB), 3.0V SPI Flash Memory (infineon.com)

Tutorial: How to Store MicroBlaze Program in the Quad-SPI Flash from Xilinx Vivado
Steps
- Prepare a new bitstream with -bin file generation from Vivado Synthetized Design
- Generating a new elf file from Xilinx Vitis IDE
- Attaching the ELF file to the MicroBlaze IP Bock from Vivado Block Design
- Programming the Quad-SPI Flash from Vivado Hardware Manager
- Test
Prepare a new bitstream with -bin file generation
- From your MicroBlaze based VIvado Project go to Project Settings / Bitstream: Check -bin-file.
This tells Vivado that it also has to generate the bin file in addition to the bit file with the bitstream.

We have to make other modifications to the bitstream build, but the setting is not enabled until Vivado builds the synthesis.

- Run the Synthesis
- and open the synthesized design.
Now you can configure the additional bitstream settings
- Enable bitstream compression

- Under configuration select a supported Configuration Rate.
The Arty S7 supports x1, x2, and x4 bus widths and data rates of up to 50 MHz for Quad-SPI programming.
- I selected 33 MHz

- Go to Configuration Modes
- Check if Master SPI x4 is selected if not select it
You can have up to two selected configurations.
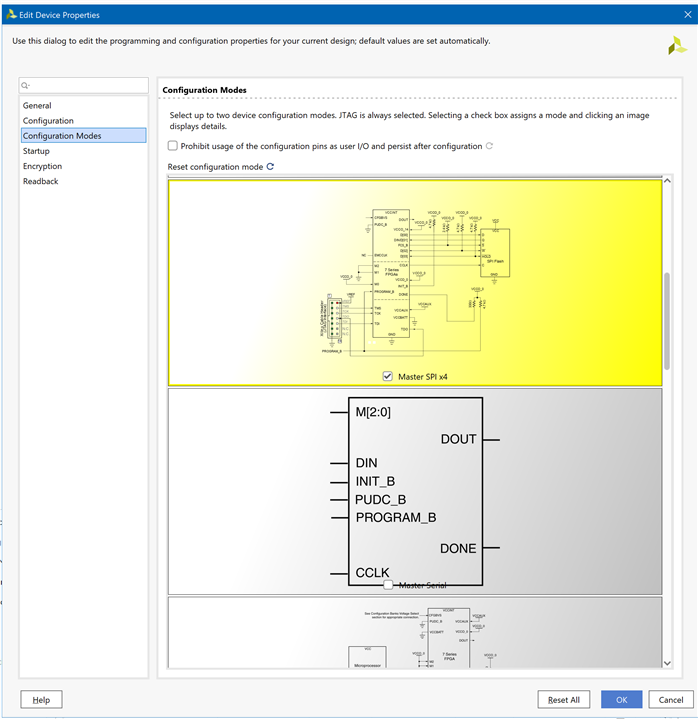
- Click OK and save the design.
Save the new constrains to the projects constrains file.
It will add some new lines
## Configuration options, can be used for all designs
set_property BITSTREAM.CONFIG.CONFIGRATE 33 [current_design]
set_property CONFIG_VOLTAGE 3.3 [current_design]
set_property CFGBVS VCCO [current_design]
set_property BITSTREAM.CONFIG.SPI_BUSWIDTH 4 [current_design]
set_property CONFIG_MODE SPIx4 [current_design]
Generating a new elf file
- Go to Vitis
- and update the hardware specification.

- Clean and build the wrapper
- Clean and build the software project.
- annotate the path to the elf file under Debug folder.
You will need later the path to the elf file.

Attaching the ELF file to the MicroBlaze IP
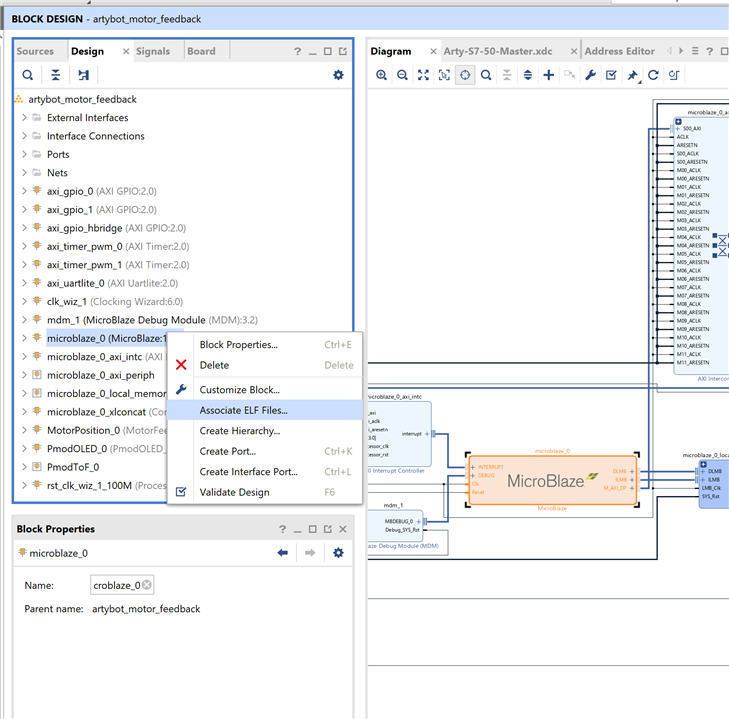
Back to Vivado we need to associate the .elf file with our MicroBlaze IP instance
- Open the Block Design,
- select the MicroBlaze IP
- right click
- and select Associate ELF files...
- Find the .elf file created by Vitis
- and add the .elf file

- Regenerate the bitstream.
Vivado will add the bin file generated from the .elf file.
Flashing the program
- Verify that the JP1 mode jumper is populated on its headers for Quad SPI programming mode.
- Open the Hardware manager in VIvado
- and auto-connect
- once connected "Add Configuration Memory Device"
For the Arty S7 the Configuration Memory Device is the Quad SPI Flash Memory

- Look for the s25fl128sxxxxxx0-spi-x1_x2_x4

- Click OK

- Tell Vivado to program the configuration memory.

Or you can program later from the Program Configuration Memory Device...

- Look for the generated .bin file under PROJECT_NAME.runs/impl_1 directory
Mine is C:/Xilinx/work/artys7/artybot_motor_feedback/artybot_motor_feedback.runs/impl_1/artybot_motor_feedback_wrapper.bin

- Click OK
Vivado will now erase and reprogram the QSPI Flash memory on the board.
Test
- To run the project, power cycle the board or press PROG button.
Video demonstration
The application program loaded for the demo
Github repository: E14SpartanMigrationProgram/mainTestButtons.c
/*
 * test_leds_driver.c: simple test application for the Bot Leds Driver
 *
 * Author: Enrique Albertos
 * Date: 2022/07/03
 */

#include <stdio.h>
#include "platform.h"
#include "xil_printf.h"
#include "xgpio.h"
#include "xil_types.h"
#include "drivers/leds_driver.h"
#include "drivers/rgb_leds_driver.h"
#include "drivers/buttons_driver.h"
#include "drivers/switches_driver.h"
#include "sleep.h"

#define LEDS_RGBLEDS_DEVICE_ID      XPAR_AXI_GPIO_0_DEVICE_ID
#define BUTTONS_SWITCHES_DEVICE_ID  XPAR_AXI_GPIO_1_DEVICE_ID
#define HBRIDGE_CONTROL_DEVICE_ID   XPAR_AXI_GPIO_HBRIDGE_DEVICE_ID


// Get device IDs from xparameters.h

#define RGB_LED_CHANNEL 1
#define LED_CHANNEL 2

#define BUTTONS_CHANNEL 1
#define SWITCHES_CHANNEL 2


void test_leds_and_buttons();

int main() {
	init_platform();
	test_leds_and_buttons();
	cleanup_platform();
	return 0;
}

void test_leds_and_buttons() {
	LedsDriver ledsDriver;
	RgbLedsDriver rgbLedsDriver;
	ButtonsDriver buttonsDriver;
	SwitchesDriver switchesDriver;

	XGpio GpioLedsAndRgbLeds; /* Dual GPIO Driver for LEDs and RGB LEDS*/
	XGpio GpioSwitchsAndButtons; /* Dual GPIO Driver for Switchs and Push Buttons */

	LEDS_DRIVER_init(&ledsDriver, &GpioLedsAndRgbLeds, LEDS_RGBLEDS_DEVICE_ID,
			LED_CHANNEL, 0b0000);


	RGB_LEDS_DRIVER_init(&rgbLedsDriver, &GpioLedsAndRgbLeds, LEDS_RGBLEDS_DEVICE_ID,
			RGB_LED_CHANNEL, 0b000000);

	BUTTONS_DRIVER_init(&buttonsDriver, &GpioSwitchsAndButtons,
			BUTTONS_SWITCHES_DEVICE_ID, BUTTONS_CHANNEL);

	SWITCHES_DRIVER_init(&switchesDriver, &GpioSwitchsAndButtons,
			BUTTONS_SWITCHES_DEVICE_ID, SWITCHES_CHANNEL);

	unsigned long semiperiod = 250000;
	xil_printf("LED TEST Started\n\r");

	LEDS_DRIVER_set_led1_toggle(&ledsDriver);
	usleep(semiperiod);
	LEDS_DRIVER_set_led1_toggle(&ledsDriver);
	usleep(semiperiod);
	LEDS_DRIVER_set_led2_toggle(&ledsDriver);
	usleep(semiperiod);
	LEDS_DRIVER_set_led2_toggle(&ledsDriver);
	usleep(semiperiod);
	LEDS_DRIVER_set_led3_toggle(&ledsDriver);
	usleep(semiperiod);
	LEDS_DRIVER_set_led3_toggle(&ledsDriver);
	usleep(semiperiod);
	LEDS_DRIVER_set_led4_toggle(&ledsDriver);
	usleep(semiperiod);
	LEDS_DRIVER_set_led4_toggle(&ledsDriver);
	usleep(semiperiod);

	RGB_LEDS_DRIVER_set_rgb_led1_set_color(&rgbLedsDriver, COLOR_RED);
	usleep(semiperiod);
	RGB_LEDS_DRIVER_set_rgb_led1_set_color(&rgbLedsDriver, COLOR_GREEN);
	usleep(semiperiod);
	RGB_LEDS_DRIVER_set_rgb_led1_set_color(&rgbLedsDriver, COLOR_BLUE);
	usleep(semiperiod);
	RGB_LEDS_DRIVER_set_rgb_led1_set_color(&rgbLedsDriver, COLOR_CYAN);
	usleep(semiperiod);
	RGB_LEDS_DRIVER_set_rgb_led1_set_color(&rgbLedsDriver, COLOR_MAGENTA);
	usleep(semiperiod);
	RGB_LEDS_DRIVER_set_rgb_led1_set_color(&rgbLedsDriver, COLOR_MAGENTA);
	usleep(semiperiod);
	RGB_LEDS_DRIVER_set_rgb_led1_set_color(&rgbLedsDriver, COLOR_YELLOW);
	usleep(semiperiod);
	RGB_LEDS_DRIVER_set_rgb_led1_set_color(&rgbLedsDriver, COLOR_WHITE);
	usleep(semiperiod);
	RGB_LEDS_DRIVER_set_rgb_led1_set_color(&rgbLedsDriver, COLOR_BLACK);
	usleep(semiperiod);

	RGB_LEDS_DRIVER_set_rgb_led2_set_color(&rgbLedsDriver, COLOR_RED);
	usleep(semiperiod);
	RGB_LEDS_DRIVER_set_rgb_led2_set_color(&rgbLedsDriver, COLOR_GREEN);
	usleep(semiperiod);
	RGB_LEDS_DRIVER_set_rgb_led2_set_color(&rgbLedsDriver, COLOR_BLUE);
	usleep(semiperiod);
	RGB_LEDS_DRIVER_set_rgb_led2_set_color(&rgbLedsDriver, COLOR_CYAN);
	usleep(semiperiod);
	RGB_LEDS_DRIVER_set_rgb_led2_set_color(&rgbLedsDriver, COLOR_MAGENTA);
	usleep(semiperiod);
	RGB_LEDS_DRIVER_set_rgb_led2_set_color(&rgbLedsDriver, COLOR_MAGENTA);
	usleep(semiperiod);
	RGB_LEDS_DRIVER_set_rgb_led2_set_color(&rgbLedsDriver, COLOR_YELLOW);
	usleep(semiperiod);
	RGB_LEDS_DRIVER_set_rgb_led2_set_color(&rgbLedsDriver, COLOR_WHITE);
	usleep(semiperiod);
	RGB_LEDS_DRIVER_set_rgb_led2_set_color(&rgbLedsDriver, COLOR_BLACK);
	usleep(semiperiod);
	while (!BUTTONS_DRIVER_poll_button4(&buttonsDriver)) {
		LEDS_DRIVER_set_leds_state(&ledsDriver, BUTTONS_DRIVER_poll(&buttonsDriver));
        RGB_LEDS_DRIVER_set_rgb_leds_state(&rgbLedsDriver, SWITCHES_DRIVER_poll(&switchesDriver)<<2 | SWITCHES_DRIVER_poll(&switchesDriver));
	}

	xil_printf("LED TEST Finished\n\r");
}
References
- Flashing a MicroBlaze Program : 5 Steps - Instructables
- GitHub - javagoza/E14SpartanMigrationProgram
- S25FL128S/S25FL256S, 128 Mb (16 MB)/256 Mb (32 MB), 3.0V SPI Flash Memory (infineon.com)
- Arty S7 Reference Manual - Digilent Reference
- Arty Programming Guide - Digilent Reference
- How To Store Your SDK Project in SPI Flash - Digilent Reference
- ug470_7Series_Config.pdf • Viewer • Documentation Portal (xilinx.com)

