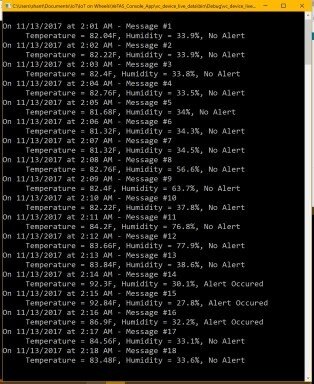
CIn this blog post I will describe the program that shows live data after formatting it to general user readable form as shown in the following screenshot. Each data received is shown in two rows. The top row shows the Date & Time the sensor...
IOT on Wheels Design Challenge - Smart Drive - Project IndexBye Bye BreadboardAs I achieve a lot of progress in the last two weeks I've started preparation to move outside from my lab. But all components (Nucleo board, expansion boards, GPS receiver)...
Hello everyone, This is my second to last post on this challenge. Everything is now complete except for the vlog on the project working in the vehicle. Below are pictures of the project on my computer desk and the code for the Nucleo. I programm...
In previous blog post #5 I have shown the Setup New Device page in Mobile App. But unfortunately I found that Azure services are not easily available from Xamarin Forms. There are many Xamarin, the tech that I want to use for cross-platform apps, exa...
Hey guys, Here is an another update on sending dummy sensor value and outputting the data to the Nextion Display. www.youtube.com/watchSEE THE VIDEO SENDING DATA TO NEXTION DISPLAY So, How do one send data to sexton display using STM32,&nbs...
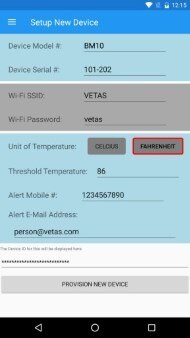
In previous blogs, I have shown the Main Menu of the Mobile App. In this blog I will explain the "Setup New Device" option in that menu. Below is the screenshot of this page on Android Emulator running Marshmallow image. The various components a...
This update shows the Nucleo L476RG displaying GPS clock and position data on a pair of Nokia 5110 LCDs. Both the GPS and the LCDs are connected to the Nucleo module by a custom PCB which also incorporates a 3-axis accelerometer (which has not arrive...
Week 10 - Nov 6 - 12 This will be last week in the design phase of the IoT on Wheels Design Challenge and for my trafficpredictor project. This blog will be a walkthrough of the entire project. The blogs posted over the ...
Week 10 - Nov 6 - 12 This will be last week in the design phase of the IoT on Wheels Design Challenge and for my trafficpredictor project. This blog will be a walkthrough of the completed module 1. Check out Part 1 of th...
Hey Guys Welcome to yet another Very Short UPDATE Blog Post on Smart Bike Smart Rider Project for IoTonWheels Design Challenge. In this Blog Post I will Go through testing and setting up the Hall effect Sensor With the STM32 Board using mBed Toolchai...
First of All, Another pic of my photography skills Ok, after admiring the golden sand, lets come to the point. In my previous Blog I had mentioned about Hall effect sensor and how I have tested the design and finalised it for my project. In t...
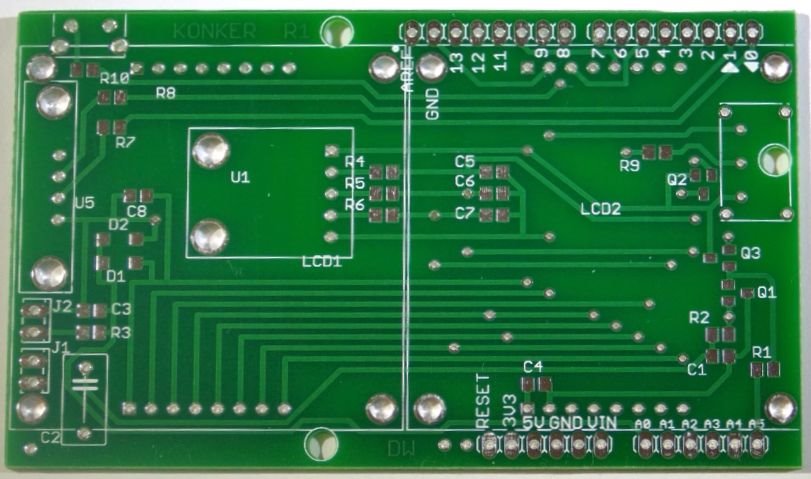
My custom interface PCB finally arrived after flying around the planet for a month.It is very late in the project to be just starting to build interfaces, with lots of software development still required, but you have to play the cards you are dealt,...
Hello Guys Another pic of my Photography Skills Ok, So coming on to the topic. Homemade Smart Cycle Computer - Finalising Sensor's and INTERFACESo, A Part of the project was to get a System of measuring the Speed, Distance travelle...
PREVIOUS BLOGNEXT BLOGWEATHER API TECHNICAL DETAILSMy previous post showed the weather for your specific location (it was currently hard coded in, but will be updated to use the Geolocation module). This was using the wunderground API to get these de...
1. With all the effort in 11 weeks, there is little surprise for the completion of this design by Nov. 13,2017.The software and hardware have passed test. Only need some platform to carry all the electronic parts and driving the wheels.Getting close ...
Well, we are getting close to the end of this challenge. This has been a great learning experience and I have really enjoyed it. For my project to be finished up I only have a bit of programming to complete as well as the road test to make the ...
PREVIOUS BLOGNEXT BLOG Unfortunately I have been behind in my blogging and updates on this project due to midterms, however I have been making progress and will be blasting through updates this weekend (starting now!), so let's begin! APP D...
PREVIOUS BLOG NEXT BLOG Hello everyone, Sorry for delay in blogs, I was in transit and I am currently located HERE So It Kinna difficult to stay connected to the world.Moving on, as the part of the Challengers Kit we received the...
The past few weeks have been a grueling exercise of long hours trying to achieve some tangible progress. I spent days scouring the internet for information and software that might help get the LoRa expansion card working, and then more days trying to...
Week 10 - Nov 6 - 12 This will be last week in the design phase of the IoT on Wheels Design Challenge and for my trafficpredictor project. This blog will be a walkthrough of the completed modules 2 & 3. Please have a...
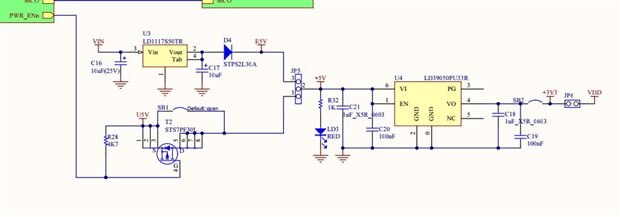
1. Although the software has been completed there are still some problems with power supply.I supply power with battery via USB. The st-link part works and the main part with STM32L476 chip does not.It appears that only PWR_EN is needed to enab...
IOT on Wheels Design Challenge - Smart Drive - Project IndexUsing STM32CubeMX to configure USART3My GPS module only supports serial communication. So I've again used STM32CubeMX to configure serial ports. I've configured STM32L476RG pins PC11 and PC1...
This project is still experiencing lots of software issues and some parts have not arrived yet, but time is running short and the project needs to move ahead. My custom PCB interface card is taking a very long time to arrive. It shipped by air 20 day...