element14 Community
element14 Community
    Register Log In
  • Site
  • Search
  • Log In Register
  • About Us
  • Community Hub
    Community Hub
    • What's New on element14
    • Feedback and Support
    • Benefits of Membership
    • Personal Blogs
    • Members Area
    • Achievement Levels
  • Learn
    Learn
    • Ask an Expert
    • eBooks
    • element14 presents
    • Learning Center
    • Tech Spotlight
    • STEM Academy
    • Webinars, Training and Events
    • Learning Groups
  • Technologies
    Technologies
    • 3D Printing
    • FPGA
    • Industrial Automation
    • Internet of Things
    • Power & Energy
    • Sensors
    • Technology Groups
  • Challenges & Projects
    Challenges & Projects
    • Design Challenges
    • element14 presents Projects
    • Project14
    • Arduino Projects
    • Raspberry Pi Projects
    • Project Groups
  • Products
    Products
    • Arduino
    • Avnet Boards Community
    • Dev Tools
    • Manufacturers
    • Multicomp Pro
    • Product Groups
    • Raspberry Pi
    • RoadTests & Reviews
  • Store
    Store
    • Visit Your Store
    • Choose another store...
      • Europe
      •  Austria (German)
      •  Belgium (Dutch, French)
      •  Bulgaria (Bulgarian)
      •  Czech Republic (Czech)
      •  Denmark (Danish)
      •  Estonia (Estonian)
      •  Finland (Finnish)
      •  France (French)
      •  Germany (German)
      •  Hungary (Hungarian)
      •  Ireland
      •  Israel
      •  Italy (Italian)
      •  Latvia (Latvian)
      •  
      •  Lithuania (Lithuanian)
      •  Netherlands (Dutch)
      •  Norway (Norwegian)
      •  Poland (Polish)
      •  Portugal (Portuguese)
      •  Romania (Romanian)
      •  Russia (Russian)
      •  Slovakia (Slovak)
      •  Slovenia (Slovenian)
      •  Spain (Spanish)
      •  Sweden (Swedish)
      •  Switzerland(German, French)
      •  Turkey (Turkish)
      •  United Kingdom
      • Asia Pacific
      •  Australia
      •  China
      •  Hong Kong
      •  India
      •  Korea (Korean)
      •  Malaysia
      •  New Zealand
      •  Philippines
      •  Singapore
      •  Taiwan
      •  Thailand (Thai)
      • Americas
      •  Brazil (Portuguese)
      •  Canada
      •  Mexico (Spanish)
      •  United States
      Can't find the country/region you're looking for? Visit our export site or find a local distributor.
  • Translate
  • Profile
  • Settings
Sci Fi Your Pi
  • Challenges & Projects
  • Design Challenges
  • Sci Fi Your Pi
  • More
  • Cancel
Sci Fi Your Pi
Blog Sci Fi Your Pi: PiDesk - Project Update #13
  • Blog
  • Forum
  • Documents
  • Files
  • Mentions
  • Sub-Groups
  • Tags
  • More
  • Cancel
  • New
  • Share
  • More
  • Cancel
Group Actions
  • Group RSS
  • More
  • Cancel
Engagement
  • Author Author: fvan
  • Date Created: 5 Jul 2015 11:11 AM Date Created
  • Views 732 views
  • Likes 4 likes
  • Comments 4 comments
  • design_challenge
  • touch_motion_controls
  • touch_motion_control
  • sci_fi_your_pi
Related
Recommended

Sci Fi Your Pi: PiDesk - Project Update #13

fvan
fvan
5 Jul 2015

Previous posts for this project:

  • Sci Fi Your Pi: PiDesk - Project Description
  • Sci Fi Your Pi: PiDesk - Project Update #1
  • Sci Fi Your Pi: PiDesk - Guide: Setting Up the Raspberry Pi 2
  • Sci Fi Your Pi: PiDesk - Project Update #2
  • Sci Fi Your Pi: PiDesk - Review: Bare Conductive Touch Board
  • Sci Fi Your Pi: PiDesk - Project Update #3
  • Sci Fi Your Pi: PiDesk - Guide: Stepper Motors with Gertbot
  • Sci Fi Your Pi: PiDesk - Project Update #4
  • Sci Fi Your Pi: PiDesk - Project Update #5
  • Sci Fi Your Pi: PiDesk - Guide: Controlling NeoPixels with the Raspberry Pi A+/B+
  • Sci Fi Your Pi: PiDesk - Project Update #6
  • Sci Fi Your Pi: PiDesk - Project Update #7
  • Sci Fi Your Pi: PiDesk - Project Update #8
  • Sci Fi Your Pi: PiDesk - Project Update #9
  • Sci Fi Your Pi: PiDesk - Guide: Capacitive Touch with Atmel's AT42QT1070 Touch Sensor IC
  • Sci Fi Your Pi: PiDesk - Project Update #10
  • Sci Fi Your Pi: PiDesk - Guide: Magic Lamp with wireless charger, Adafruit Trinket & NeoPixels
  • Sci Fi Your Pi: PiDesk - Project Update #11
  • Sci Fi Your Pi: PiDesk - Project Update #12


  • Project Update


Project Update

image


Part of the kit we received is the Cirrus Logic Audio Card. It is an expansion board for the Raspberry Pi, that adds audio output and input with various types of connectors. I will however not end up using it in my project for the following reasons:


1) I originally planned to use it for the Pi2, used as a desktop computer. From what I understood from this discussion though, is that it is not yet supported on the Pi2 due to incompatible kernel versions. Users have come up with a minimalistic software image capable of using the card on the Pi 2, but it is not suited to be used as a desktop image.


2) The second Pi I'm using, the A+ to manage the desk controls, is compatible with the card and the software is available. The card would however be overkill, as the only audio function required is to play sounds when certain buttons are pressed. Taking into account the low cost requirements of the project, the audio card has been deemed unsuitable.


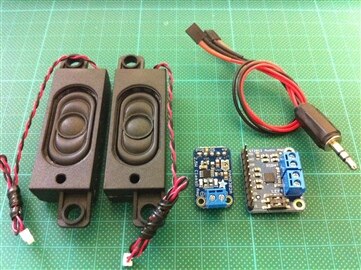
I searched for a cheap alternative to get amplified audio output from both Pis and came across the Adafruit breakout boards. There are two boards that seemed affordable and suitable for my project:

  • Adafruit Mono 2.5W Class D Audio Amplifier - PAM8302 ID: 2130 - $3.95 : Adafruit Industries, Unique & fun DIY electronic…
  • Stereo 2.8W Class D Audio Amplifier - TS2012 ID: 1552 - $9.95 : Adafruit Industries, Unique & fun DIY electronics and ki…


The mono amplifier would be used for the desk's special effects sounds, the stereo one for the Pi2 desktop computer.


image

To hook everything together, I made a custom stereo cable with female headers capable of connecting to the breakout board's male headers. Power for the breakout board is taken from the Pi's GPIO pins. And finally, the connectors for the speakers were stripped off, and the wires connected in the breakout board's screw terminals. The same process is valid for the mono and stereo breakout boards, except for the fact the the mono breakout board only supports one speakers (obviously ...).


As a test, I put one of the sound effect MP3s on the Pi and played it out with following command:


pi@PiDesk ~ $ omxplayer -o local example.mp3
Audio codec mp3 channels 1 samplerate 22050 bitspersample 16
Subtitle count: 0, state: off, index: 1, delay: 0
have a nice day


The solution for both Pis combined is still cheaper than one audio card, and is compatible with any model or revision Pi.

  • Sign in to reply

Top Comments

  • fvan
    fvan over 10 years ago in reply to balearicdynamics +2
    Hi Enrico, thanks for sharing, I'll check it out I haven't tried digging deeper for reasons of time as well. Also the fact that the card would be overkill for what I plan to do with audio in my project…
  • DAB
    DAB over 10 years ago +1
    Great post, You just reminded me that I have two 10W speakers I salvaged from a destroyed flat screen TV. Now all I need to do is pick up or build an amplifier and I can make my RPi speak. DAB
  • DAB
    DAB over 10 years ago

    Great post,


    You just reminded me that I have two 10W speakers I salvaged from a destroyed flat screen TV.


    Now all I need to do is pick up or build an amplifier and I can make my RPi speak.


    DAB

    • Cancel
    • Vote Up +1 Vote Down
    • Sign in to reply
    • More
    • Cancel
  • balearicdynamics
    balearicdynamics over 10 years ago in reply to fvan

    Ok, fine. When you need to start let me know, maybe in the meantime I have done something more in this direction.

    • Cancel
    • Vote Up 0 Vote Down
    • Sign in to reply
    • More
    • Cancel
  • fvan
    fvan over 10 years ago in reply to balearicdynamics

    Hi Enrico, thanks for sharing, I'll check it out image


    I haven't tried digging deeper for reasons of time as well. Also the fact that the card would be overkill for what I plan to do with audio in my project. I do plan however to use the audio card in a second version of my IoT Alarm Clock, using a Raspberry Pi A+. The next version will be more compact as you can see from the picture below, so it isn't useless image:

    image

    • Cancel
    • Vote Up +2 Vote Down
    • Sign in to reply
    • More
    • Cancel
  • balearicdynamics
    balearicdynamics over 10 years ago

    Frederick, it sounds as a good solution for the cards. I have done experiments with the CL on the PI B+ (not 2) and the output is really great but there is the problem to manage the audio card as the only device. Good idea to avoid tries with the PI 2 compatible kernel as it is very limited. And can't be updated/upgraded just due this realtime kernel.


    All these considerations were correct until I have not read the post of amgalbu Ambrogio for his flying object had to install a real time kernel and - I have not yet tried it for reasons of time - it seems that it works fine with almost all the functions. If you have time to make another check I suggest you to try it, the hardware performances between the two devices are very different and it is the worth to make at least a check. The link to the post is Training sphere 4 - Installing realtime raspian.


    Enrico

    • Cancel
    • Vote Up 0 Vote Down
    • Sign in to reply
    • More
    • Cancel
element14 Community

element14 is the first online community specifically for engineers. Connect with your peers and get expert answers to your questions.

  • Members
  • Learn
  • Technologies
  • Challenges & Projects
  • Products
  • Store
  • About Us
  • Feedback & Support
  • FAQs
  • Terms of Use
  • Privacy Policy
  • Legal and Copyright Notices
  • Sitemap
  • Cookies

An Avnet Company © 2025 Premier Farnell Limited. All Rights Reserved.

Premier Farnell Ltd, registered in England and Wales (no 00876412), registered office: Farnell House, Forge Lane, Leeds LS12 2NE.

ICP 备案号 10220084.

Follow element14

  • X
  • Facebook
  • linkedin
  • YouTube