element14 Community
element14 Community
    Register Log In
  • Site
  • Search
  • Log In Register
  • About Us
  • Community Hub
    Community Hub
    • What's New on element14
    • Feedback and Support
    • Benefits of Membership
    • Personal Blogs
    • Members Area
    • Achievement Levels
  • Learn
    Learn
    • Ask an Expert
    • eBooks
    • element14 presents
    • Learning Center
    • Tech Spotlight
    • STEM Academy
    • Webinars, Training and Events
    • Learning Groups
  • Technologies
    Technologies
    • 3D Printing
    • FPGA
    • Industrial Automation
    • Internet of Things
    • Power & Energy
    • Sensors
    • Technology Groups
  • Challenges & Projects
    Challenges & Projects
    • Design Challenges
    • element14 presents Projects
    • Project14
    • Arduino Projects
    • Raspberry Pi Projects
    • Project Groups
  • Products
    Products
    • Arduino
    • Avnet Boards Community
    • Dev Tools
    • Manufacturers
    • Multicomp Pro
    • Product Groups
    • Raspberry Pi
    • RoadTests & Reviews
  • Store
    Store
    • Visit Your Store
    • Choose another store...
      • Europe
      •  Austria (German)
      •  Belgium (Dutch, French)
      •  Bulgaria (Bulgarian)
      •  Czech Republic (Czech)
      •  Denmark (Danish)
      •  Estonia (Estonian)
      •  Finland (Finnish)
      •  France (French)
      •  Germany (German)
      •  Hungary (Hungarian)
      •  Ireland
      •  Israel
      •  Italy (Italian)
      •  Latvia (Latvian)
      •  
      •  Lithuania (Lithuanian)
      •  Netherlands (Dutch)
      •  Norway (Norwegian)
      •  Poland (Polish)
      •  Portugal (Portuguese)
      •  Romania (Romanian)
      •  Russia (Russian)
      •  Slovakia (Slovak)
      •  Slovenia (Slovenian)
      •  Spain (Spanish)
      •  Sweden (Swedish)
      •  Switzerland(German, French)
      •  Turkey (Turkish)
      •  United Kingdom
      • Asia Pacific
      •  Australia
      •  China
      •  Hong Kong
      •  India
      •  Korea (Korean)
      •  Malaysia
      •  New Zealand
      •  Philippines
      •  Singapore
      •  Taiwan
      •  Thailand (Thai)
      • Americas
      •  Brazil (Portuguese)
      •  Canada
      •  Mexico (Spanish)
      •  United States
      Can't find the country/region you're looking for? Visit our export site or find a local distributor.
  • Translate
  • Profile
  • Settings
Safe and Sound
  • Challenges & Projects
  • Design Challenges
  • Safe and Sound
  • More
  • Cancel
Safe and Sound
Blog MSP432 and TI-RTOS: Sharp LCD BoosterPack
  • Blog
  • Forum
  • Documents
  • Polls
  • Files
  • Events
  • Mentions
  • Sub-Groups
  • Tags
  • More
  • Cancel
  • New
  • Share
  • More
  • Cancel
Group Actions
  • Group RSS
  • More
  • Cancel
Engagement
  • Author Author: Jan Cumps
  • Date Created: 11 Jan 2017 7:32 PM Date Created
  • Views 2334 views
  • Likes 9 likes
  • Comments 16 comments
  • safe and sound
  • 430boost-sharp96
  • memory_lcd
  • boosterpack
  • msp432
  • ti-rtos
  • launchpad
  • feature_tutorial
  • ti_rt
  • sharp_lcd_booster_pack
Related
Recommended

MSP432 and TI-RTOS: Sharp LCD BoosterPack

Jan Cumps
Jan Cumps
11 Jan 2017

How to work with the Sharp LCD BoosterPack,  MSP432 LaunchPad and TI-RTOS.


You don't have permission to edit metadata of this video.
Edit media
x
image
Upload Preview
image

There's (currently) no TI-RTOS driver or example for the Sharp LCD BoosterPack with the MSP432 LaunchPad. But someone fixed that for us...


What you need:

  • MSP432 LaunchPad
  • 1 micro-USB cable
  • Code Composer Studio
  • TI-RTOS for MSP43X
  • 430BOOST-SHARP96430BOOST-SHARP96 LCD BoosterPack


At the time of writing, the TI-RTOS release for MSP43x doesn't ship with a driver for the Sharp 96*96 LCD BoosterPack.

Other flavours of the TI-RTOS (e.g.: CC1310 and 2650) have both driver and examples. My first idea was to port that implementation to the MSP432.

But then I stumbled on a forum post of a Mr. Pocreva on the TI E2E forum that contained a port. A working one!


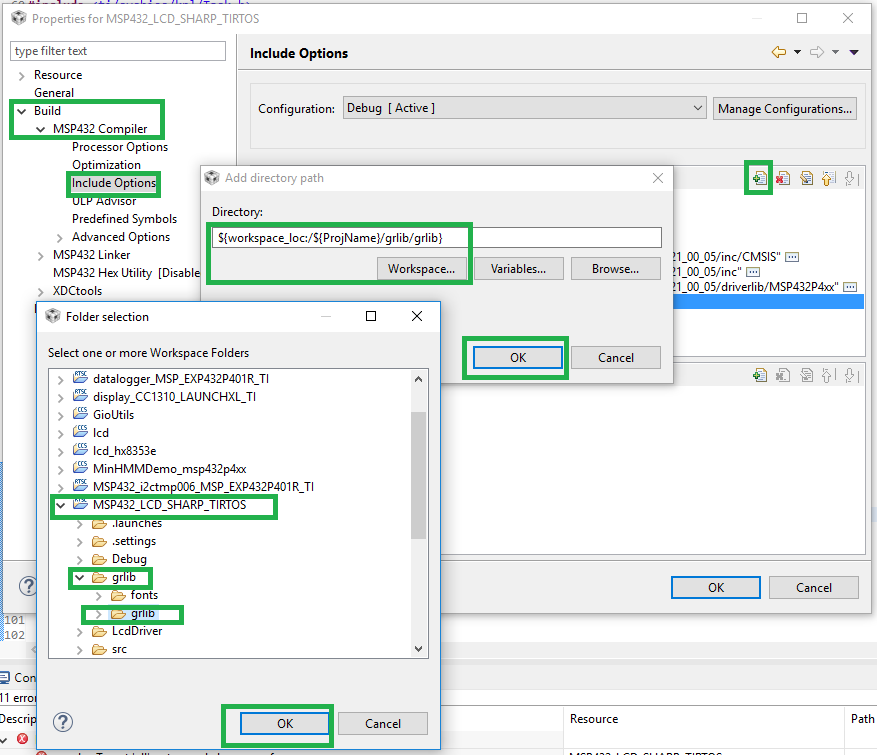
The start of that forum post contains a zip file. You'll find grlib and LcdDriver folders in BluHale path of that archive.

Copy these two to your project and add a new include entry that points to grlib/grlib.


image


And then add this include and rtos task (or just replace the existing heartBeatFxn() task of the empty example) to your project. Check my links below to learn how to start a TI-RTOS project if you don't have one ready.


#include <lcddriver/sharp96x96.h>

Graphics_Context g_sContext;

#define TASKSTACKSIZE   512

Task_Struct task0Struct;
Char task0Stack[TASKSTACKSIZE];

/*
 *  ======== heartBeatFxn ========
 *  Toggle the Board_LED0. The Task_sleep is determined by arg0 which
 *  is configured for the heartBeat Task instance.
 */
Void heartBeatFxn(UArg arg0, UArg arg1)
{
    Sharp96x96_LCDInit();
    GrContextInit(&g_sContext, &g_sharp96x96LCD);
    GrContextForegroundSet(&g_sContext, ClrBlack);
    GrContextBackgroundSet(&g_sContext, ClrWhite);

    GrClearDisplay(&g_sContext);
    GrContextFontSet(&g_sContext, &g_sFontCm20b);

    GPIO_toggle(Board_LED0);

    GrStringDraw(&g_sContext, "Hello,", -1, 10, 15, 0);
    GrStringDraw(&g_sContext, "world!", -1, 22, 60, 0);

    GrFlush(&g_sContext);

    while (1) {
        Task_sleep((UInt)arg0);
        GPIO_toggle(Board_LED0);
    }
}


The header of the rtos task initialises the LCD driver. The task's loop just flashes an LED to show that the RTOS lives.


image


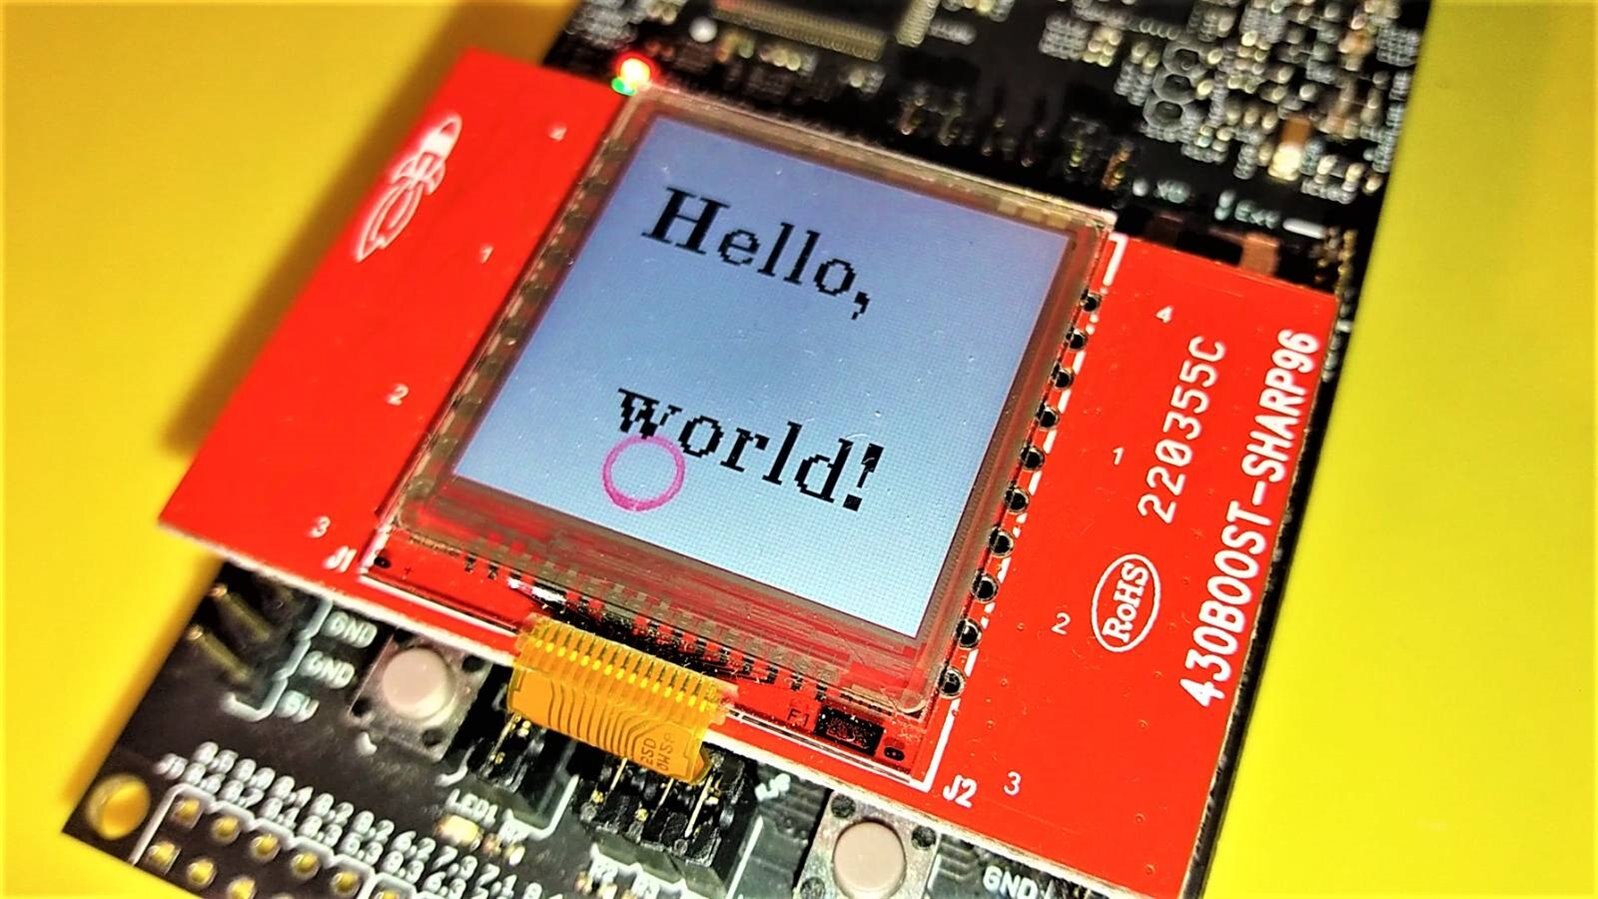
There are 153 fonts available. Enjoy! Make something nice.

(there's a sample project attached)


TI-RTOS Series
MSP432 and TI-RTOS: Getting Started Pt. 1 - Set Up and 1st RTOS Task
MSP432 and TI-RTOS: Getting Started Pt. 2 - Add an ADC Sample Task
MSP432 and TI-RTOS: Getting Started Pt. 3 - USB with Minimal CPU Use
MSP432 and TI-RTOS: PWM
MSP432 and TI-RTOS: I2C Configuration for Sensors BoosterPack
MSP432 and TI-RTOS: another I2C example - talk to a DAC
MSP432 and TI-RTOS: Sharp LCD BoosterPack
MSP432 and TI-RTOS: PID Library Part 1 - Intro
MSP432 and TI-RTOS: PID Library Part 2 - Real World Example
Attachments:
empty_MSP_EXP432P401R_TI.zip
  • Sign in to reply

Top Comments

  • jomoenginer
    jomoenginer over 8 years ago in reply to jomoenginer +2
    Jan, Okay, I believe I have found the issue. I was comparing the failing projects with the good projects I have and noticed the GrLib folder in the failing projects where shown as "GrLib" rather than …
  • DAB
    DAB over 8 years ago +1
    Great example of how perseverance can save a lot of development time. DAB
  • jomoenginer
    jomoenginer over 8 years ago +1
    Jan, Thanks for finding this and for posting your solution. I've created an empty TI-RTOS project in Code Compose Studio 7 and have added the GrLib and LcdDriver folders to the project as well as set the…
Parents
  • jomoenginer
    jomoenginer over 8 years ago

    Jan,

    Thanks for finding this and for posting your solution.  I've created an empty TI-RTOS project in Code Compose Studio 7 and have added the GrLib and LcdDriver folders to the project as well as set the Include path to GrLib/grlib but I am getting unresolved symbols for g_sContext and g_sFontCm20b.  I've corrected this by adding a definitions for both in the main project file (empty.c for me), and it looks like you did the same for g_sContext from what I see in your .zip files, however I am still not able to see any output on the LCD. Also, I noticed in your  lcdtest.c file has "Board_initI2C();" uncommented but I thought the Sharp ICD Booster was a SPI device.     I've tried both the SPI and i2C but neither results in anything being displayed on the LCD.  The red LED does blink so I know the program is running.  Also, I can run the MSPWARE project 430BOOST-SHARP96_CapTouch_MSP432P401R on the board with the Sharp LCD and it works just fine.


    Any suggestions?


    Thanks,

    Jon

    • Cancel
    • Vote Up +1 Vote Down
    • Sign in to reply
    • More
    • Cancel
Comment
  • jomoenginer
    jomoenginer over 8 years ago

    Jan,

    Thanks for finding this and for posting your solution.  I've created an empty TI-RTOS project in Code Compose Studio 7 and have added the GrLib and LcdDriver folders to the project as well as set the Include path to GrLib/grlib but I am getting unresolved symbols for g_sContext and g_sFontCm20b.  I've corrected this by adding a definitions for both in the main project file (empty.c for me), and it looks like you did the same for g_sContext from what I see in your .zip files, however I am still not able to see any output on the LCD. Also, I noticed in your  lcdtest.c file has "Board_initI2C();" uncommented but I thought the Sharp ICD Booster was a SPI device.     I've tried both the SPI and i2C but neither results in anything being displayed on the LCD.  The red LED does blink so I know the program is running.  Also, I can run the MSPWARE project 430BOOST-SHARP96_CapTouch_MSP432P401R on the board with the Sharp LCD and it works just fine.


    Any suggestions?


    Thanks,

    Jon

    • Cancel
    • Vote Up +1 Vote Down
    • Sign in to reply
    • More
    • Cancel
Children
  • Jan Cumps
    Jan Cumps over 8 years ago in reply to jomoenginer

    Thanks for trying it out, Jon. I'll check.


    For the SPI initialisation, I have an answer because that was a worry for me too.

    The SPI peripheral is initialised within the Display code.

    • Cancel
    • Vote Up 0 Vote Down
    • Sign in to reply
    • More
    • Cancel
  • Jan Cumps
    Jan Cumps over 8 years ago in reply to jomoenginer

    I've just tried it again and it compiles. I did comment out the I2C init just to be sure and the display shows info.

    I'm going to retry from the empty project again...

    • Cancel
    • Vote Up 0 Vote Down
    • Sign in to reply
    • More
    • Cancel
  • Jan Cumps
    Jan Cumps over 8 years ago in reply to jomoenginer

    I had forgotten this in my code snippet on the blog:

    Graphics_Context g_sContext;


    What can also be misleading is that the zip file contains a grlib within a grlib.

    You have to copy the parent, including the child grlib.

    I've done the exercise again and filmed it. I'll upload the end-to-end when it's finished rendering so you can check out where the explanation and reality are different.

    • Cancel
    • Vote Up 0 Vote Down
    • Sign in to reply
    • More
    • Cancel
  • Jan Cumps
    Jan Cumps over 8 years ago in reply to jomoenginer

    jomoenginer, can you please check if it works when you follow the video steps?

    It's a single take so a little rough image


    You don't have permission to edit metadata of this video.
    Edit media
    x
    image
    Upload Preview
    image

    • Cancel
    • Vote Up +1 Vote Down
    • Sign in to reply
    • More
    • Cancel
  • Jan Cumps
    Jan Cumps over 8 years ago in reply to jomoenginer

    I've also replaced the attached zip file with the new one I made in the video.

    • Cancel
    • Vote Up +1 Vote Down
    • Sign in to reply
    • More
    • Cancel
element14 Community

element14 is the first online community specifically for engineers. Connect with your peers and get expert answers to your questions.

  • Members
  • Learn
  • Technologies
  • Challenges & Projects
  • Products
  • Store
  • About Us
  • Feedback & Support
  • FAQs
  • Terms of Use
  • Privacy Policy
  • Legal and Copyright Notices
  • Sitemap
  • Cookies

An Avnet Company © 2025 Premier Farnell Limited. All Rights Reserved.

Premier Farnell Ltd, registered in England and Wales (no 00876412), registered office: Farnell House, Forge Lane, Leeds LS12 2NE.

ICP 备案号 10220084.

Follow element14

  • X
  • Facebook
  • linkedin
  • YouTube