Intro
The Arduino Giga R1 has a camera connector, so of course I want check it out, so I purchased the highest resolution color camera I could find that had the correct connector. This is the Arducam B0462 which uses a 2 megapixel GC2145 camera sensor (1616V x 1232H). There is an example sketch that captures Arducam camera images and displays them on the Giga Display, although it is not well suited to this camera.
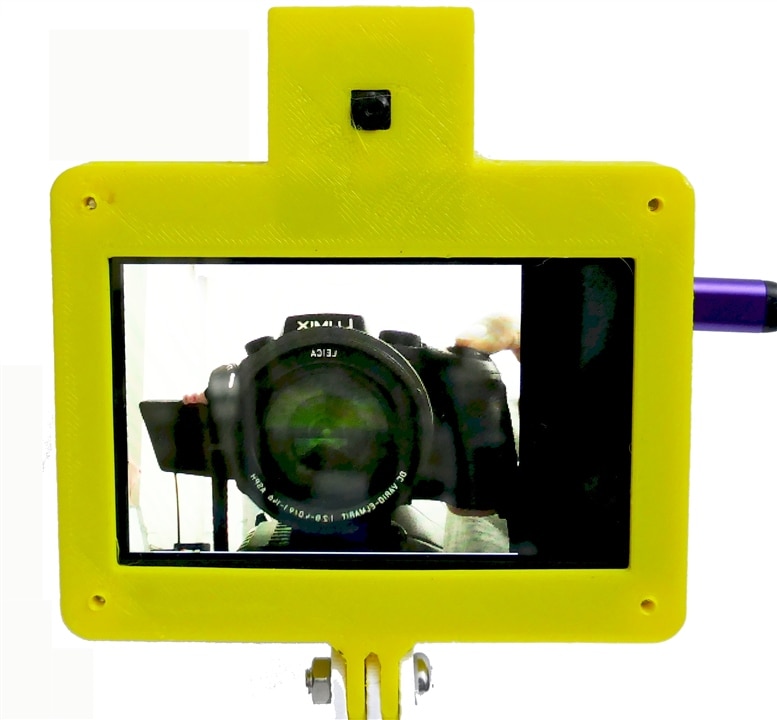
 Giga displaying an Arducam image of the camera taking this picture
Giga R1 Demo of the Giga Display with an Arducam B0462 Camera
The example sketch displays the camera image upside down and backwards. Because the camera is connected to the display, it doesn't matter if you turn the camera upside down, the image on the display is always upside down. So I had to modify the code to transpose the image.
Here is the modified code:
Camera Display Sketch
//Arduino GIGA R1 displaying an Arducam B0462 (GC2145) on the GIGA Display
// Doug Wong 2025
// The GC2145 image has been transposed properly so it dsplays right side up

#include "arducam_dvp.h"
#include "Arduino_H7_Video.h"
#include "dsi.h"
#include "SDRAM.h"

// This example only works with Greyscale cameras (due to the palette + resize&rotate algo)
#define ARDUCAM_CAMERA_GC2145

#ifdef ARDUCAM_CAMERA_HM01B0
#include "Himax_HM01B0/himax.h"
HM01B0 himax;
Camera cam(himax);
#define IMAGE_MODE CAMERA_GRAYSCALE
#elif defined(ARDUCAM_CAMERA_HM0360)
#include "Himax_HM0360/hm0360.h"
HM0360 himax;
Camera cam(himax);
#define IMAGE_MODE CAMERA_GRAYSCALE
#elif defined(ARDUCAM_CAMERA_OV767X)
#include "OV7670/ov767x.h"
// OV7670 ov767x;
OV7675 ov767x;
Camera cam(ov767x);
#define IMAGE_MODE CAMERA_RGB565
#elif defined(ARDUCAM_CAMERA_GC2145)
#include "GC2145/gc2145.h"
GC2145 galaxyCore;
Camera cam(galaxyCore);
#define IMAGE_MODE CAMERA_RGB565
#endif

// The buffer used to capture the frame
FrameBuffer fb;
// The buffer used to rotate and resize the frame
FrameBuffer outfb;
// The buffer used to rotate and resize the frame
Arduino_H7_Video Display(800, 480, GigaDisplayShield);

void blinkLED(uint32_t count = 0xFFFFFFFF)
{
  pinMode(LED_BUILTIN, OUTPUT);
  while (count--) {
    digitalWrite(LED_BUILTIN, LOW);  // turn the LED on (HIGH is the voltage level)
    delay(50);                       // wait for a second
    digitalWrite(LED_BUILTIN, HIGH); // turn the LED off by making the voltage LOW
    delay(50);                       // wait for a second
  }
}

uint32_t palette[256];

void setup() {
  // Init the cam QVGA, 30FPS
  if (!cam.begin(CAMERA_R320x240, IMAGE_MODE, 30)) {
    blinkLED();
  }

  // Setup the palette to convert 8 bit greyscale to 32bit greyscale
  for (int i = 0; i < 256; i++) {
    palette[i] = 0xFF000000 | (i << 16) | (i << 8) | i;
  }

  Display.begin();

  if (IMAGE_MODE == CAMERA_GRAYSCALE) {
    dsi_configueCLUT((uint32_t*)palette);
  }
  outfb.setBuffer((uint8_t*)SDRAM.malloc(1024 * 1024));

  // clear the display (gives a nice black background)
  dsi_lcdClear(0);
  dsi_drawCurrentFrameBuffer();
  dsi_lcdClear(0);
  dsi_drawCurrentFrameBuffer();
}

#define HTONS(x)    (((x >> 8) & 0x00FF) | ((x << 8) & 0xFF00))

void loop() {

  // Grab frame and write to another framebuffer
  if (cam.grabFrame(fb, 3000) == 0) {

    // double the resolution and transpose (rotate by 90 degrees) in the same step
    // this only works if the camera feed is 320x240 and the area where we want to display is 640x480
    for (int i = 0; i < 320; i++) {
      int k = 320 - i;                    // this coordinate reversal swaps the image horizontally
      for (int j = 0; j < 240; j++) {
        int l = 240 - j;                  // this coordinate reversal swaps the image vertically
        if (IMAGE_MODE == CAMERA_GRAYSCALE) {
          ((uint8_t*)outfb.getBuffer())[j * 2 + (i * 2) * 480] = ((uint8_t*)fb.getBuffer())[i + j * 320];
          ((uint8_t*)outfb.getBuffer())[j * 2 + (i * 2) * 480 + 1] = ((uint8_t*)fb.getBuffer())[i + j * 320];
          ((uint8_t*)outfb.getBuffer())[j * 2 + (i * 2 + 1) * 480] = ((uint8_t*)fb.getBuffer())[i + j * 320];
          ((uint8_t*)outfb.getBuffer())[j * 2 + (i * 2 + 1) * 480 + 1] = ((uint8_t*)fb.getBuffer())[i + j * 320];
        } else {
          ((uint16_t*)outfb.getBuffer())[l * 2 + (k * 2) * 480] = HTONS(((uint16_t*)fb.getBuffer())[i + j * 320]);
          ((uint16_t*)outfb.getBuffer())[l * 2 + (k * 2) * 480 + 1] = HTONS(((uint16_t*)fb.getBuffer())[i + j * 320]);
          ((uint16_t*)outfb.getBuffer())[l * 2 + (k * 2 + 1) * 480] = HTONS(((uint16_t*)fb.getBuffer())[i + j * 320]);
          ((uint16_t*)outfb.getBuffer())[l * 2 + (k * 2 + 1) * 480 + 1] = HTONS(((uint16_t*)fb.getBuffer())[i + j * 320]);
        }
      }
    }
    dsi_lcdDrawImage((void*)outfb.getBuffer(), (void*)dsi_getCurrentFrameBuffer(), 480, 640, IMAGE_MODE == CAMERA_GRAYSCALE ? DMA2D_INPUT_L8 : DMA2D_INPUT_RGB565);
    dsi_drawCurrentFrameBuffer();
  } else {
    blinkLED(20);
  }
}
Discussion
It is very cool that the GiGa has a built in camera interface, It is a simple plug-and-play exercise to set it up. However, the example software is not taking maximum advantage of the hardware capability. It seems to be limiting the image capture to 320 x 240 pixels and the display to 640 x 480 pixels. Additionally, the image displayed by the example sketch is reversed both horizontally and vertically, which makes everything look upside down and backwards.. Fortunately the transposition is easy to accomplish in software as shown above. The camera hardware is useable as is, but I hope the Arducam library gets updated to allow camera images to properly fill the 800 x 480 display without upscalling. Incidentally, the camera video and images displayed on the GIGA Display look much better in person than what my camera can show.
Links:
Touch Screen and USB memory demo
GIGA display of an Arducam video camera
