element14 Community
element14 Community
    Register Log In
  • Site
  • Search
  • Log In Register
  • About Us
  • Community Hub
    Community Hub
    • What's New on element14
    • Feedback and Support
    • Benefits of Membership
    • Personal Blogs
    • Members Area
    • Achievement Levels
  • Learn
    Learn
    • Ask an Expert
    • eBooks
    • element14 presents
    • Learning Center
    • Tech Spotlight
    • STEM Academy
    • Webinars, Training and Events
    • Learning Groups
  • Technologies
    Technologies
    • 3D Printing
    • FPGA
    • Industrial Automation
    • Internet of Things
    • Power & Energy
    • Sensors
    • Technology Groups
  • Challenges & Projects
    Challenges & Projects
    • Design Challenges
    • element14 presents Projects
    • Project14
    • Arduino Projects
    • Raspberry Pi Projects
    • Project Groups
  • Products
    Products
    • Arduino
    • Avnet Boards Community
    • Dev Tools
    • Manufacturers
    • Multicomp Pro
    • Product Groups
    • Raspberry Pi
    • RoadTests & Reviews
  • Store
    Store
    • Visit Your Store
    • Choose another store...
      • Europe
      •  Austria (German)
      •  Belgium (Dutch, French)
      •  Bulgaria (Bulgarian)
      •  Czech Republic (Czech)
      •  Denmark (Danish)
      •  Estonia (Estonian)
      •  Finland (Finnish)
      •  France (French)
      •  Germany (German)
      •  Hungary (Hungarian)
      •  Ireland
      •  Israel
      •  Italy (Italian)
      •  Latvia (Latvian)
      •  
      •  Lithuania (Lithuanian)
      •  Netherlands (Dutch)
      •  Norway (Norwegian)
      •  Poland (Polish)
      •  Portugal (Portuguese)
      •  Romania (Romanian)
      •  Russia (Russian)
      •  Slovakia (Slovak)
      •  Slovenia (Slovenian)
      •  Spain (Spanish)
      •  Sweden (Swedish)
      •  Switzerland(German, French)
      •  Turkey (Turkish)
      •  United Kingdom
      • Asia Pacific
      •  Australia
      •  China
      •  Hong Kong
      •  India
      •  Korea (Korean)
      •  Malaysia
      •  New Zealand
      •  Philippines
      •  Singapore
      •  Taiwan
      •  Thailand (Thai)
      • Americas
      •  Brazil (Portuguese)
      •  Canada
      •  Mexico (Spanish)
      •  United States
      Can't find the country/region you're looking for? Visit our export site or find a local distributor.
  • Translate
  • Profile
  • Settings
FPGA
  • Technologies
  • More
FPGA
Blog Mini Elevator Arty S7 #3 - Build and Wiring
  • Blog
  • Forum
  • Documents
  • Quiz
  • Events
  • Polls
  • Files
  • Members
  • Mentions
  • Sub-Groups
  • Tags
  • More
  • Cancel
  • New
Join FPGA to participate - click to join for free!
  • Share
  • More
  • Cancel
Group Actions
  • Group RSS
  • More
  • Cancel
Engagement
  • Author Author: guillengap
  • Date Created: 10 Jun 2022 1:03 AM Date Created
  • Views 3129 views
  • Likes 9 likes
  • Comments 2 comments
  • arty-s7
  • RTL migration
  • MicroBlaze migration
  • xilinx
  • fpga
  • vivado
  • spartan-7
  • Spartan_Migration
Related
Recommended

Mini Elevator Arty S7 #3 - Build and Wiring

guillengap
guillengap
10 Jun 2022

Table of Contents

  • Introduction
  • Getting Started
  • Build and Wiring
  • Programming with Vivado Design Suite
  • Adding the PIR Motion Sensor
  • Experimenting with Automatic Sliding Door
  • Summary

**********************************************************************************************************************

It's time to build the new Mini Elevator Arty S7, I'll start by reusing an old scanner, especially the stepper motor. Finally we will build the prototype with recyclable wood and wire the prototype.

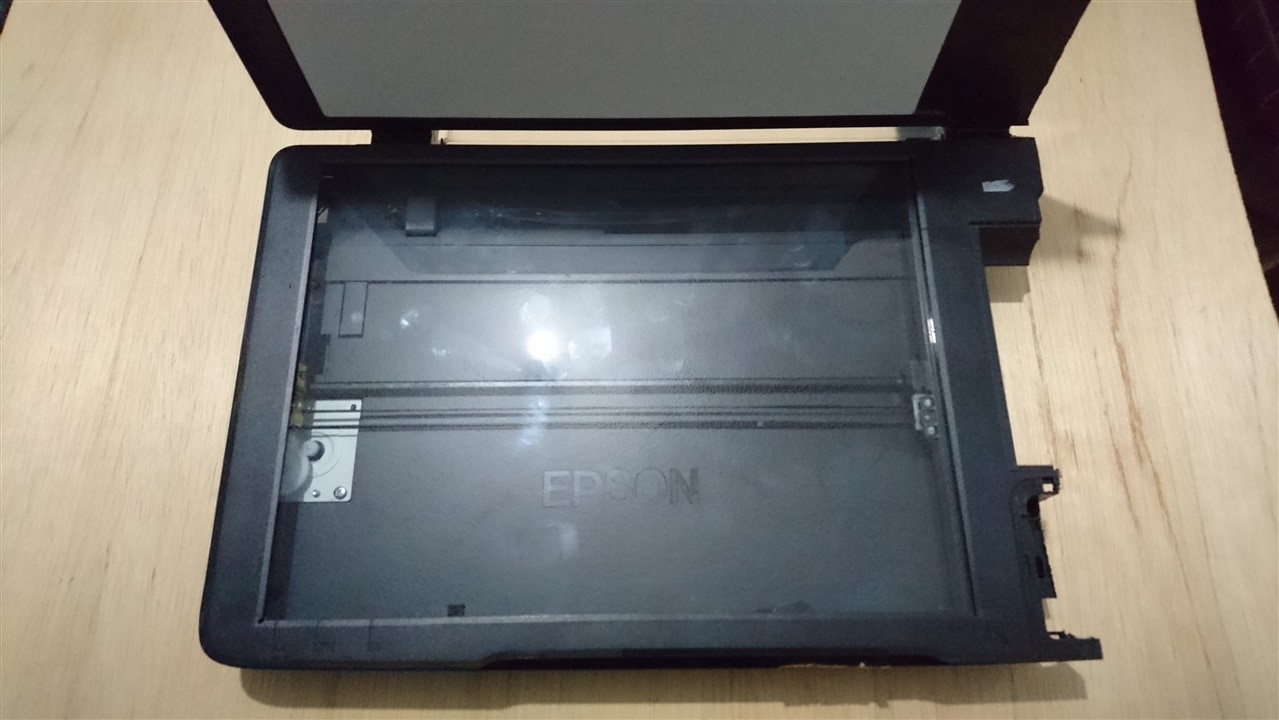
Hacking an Old Scanner

First, I disassembled the scanner from an old printer. I show you this device in the image below.

image

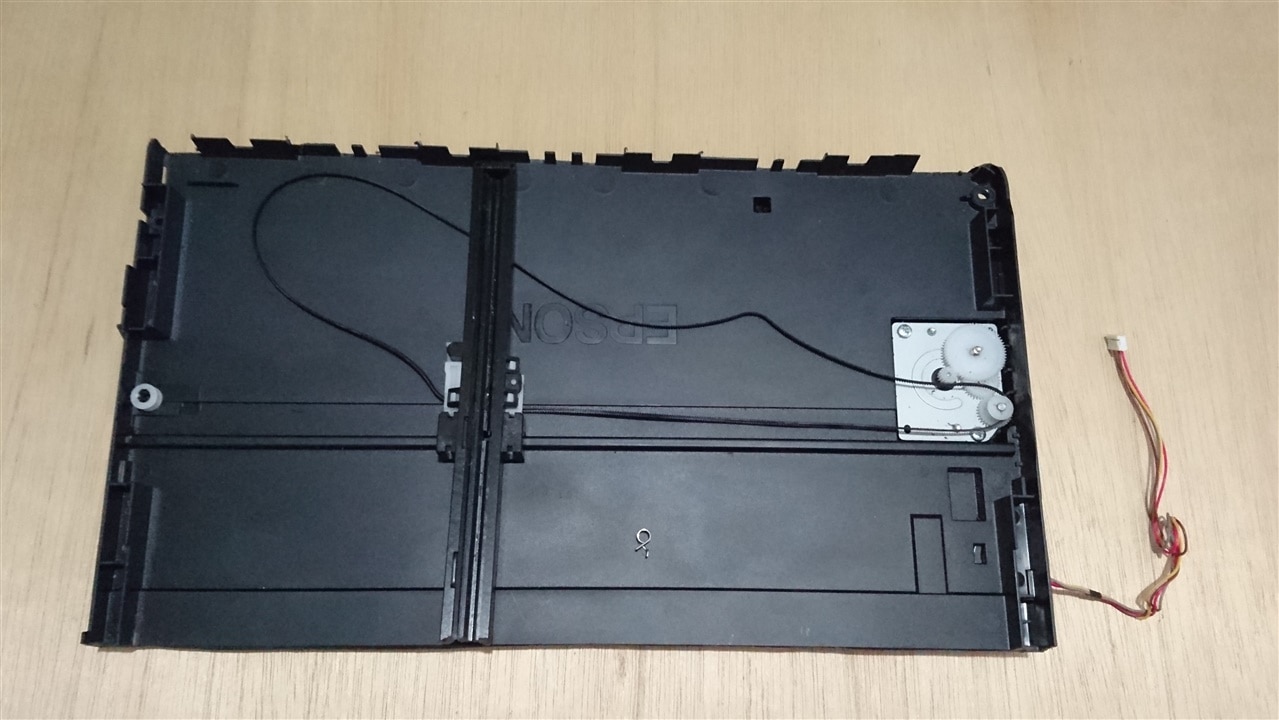
Now, I took advantage of the entire mechanism, cut its, and adapted it to a wooden box that I built from recycled wood.

image

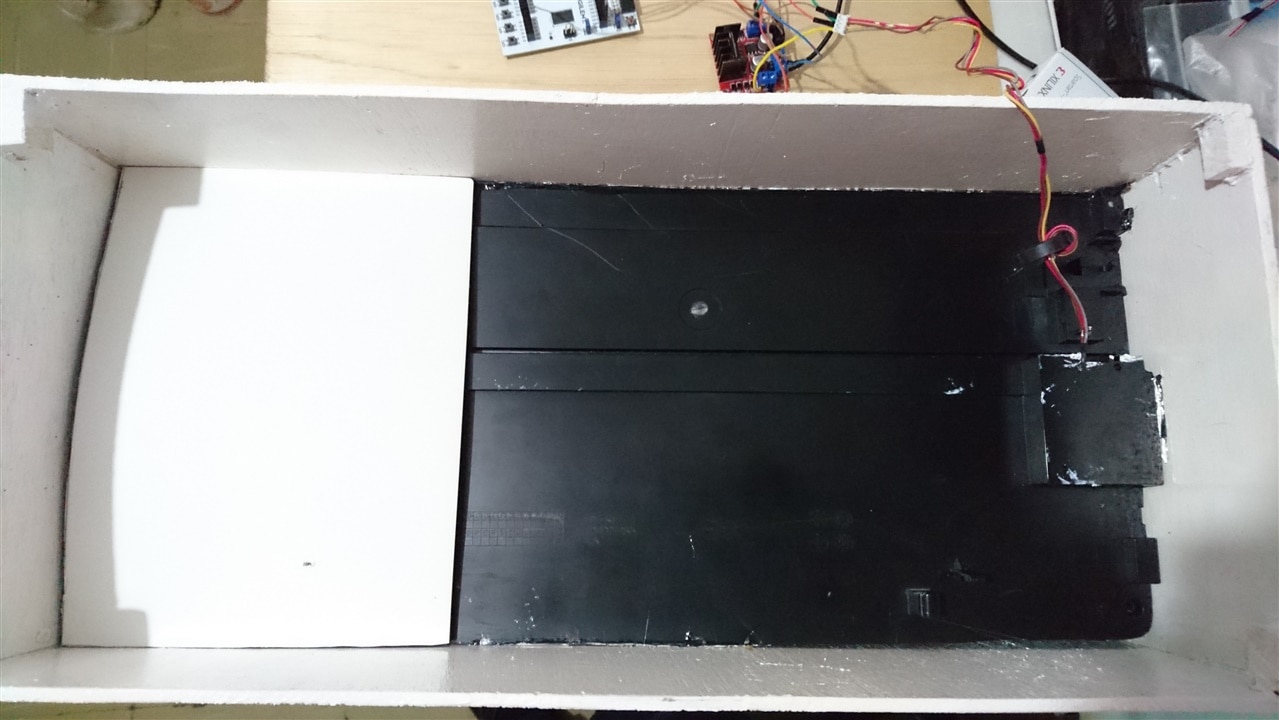
The wooden box has the following dimensions: 20 cm (width) x 20 cm (depth) x 45 cm (height). In the image below you can see the scanner mechanism adapted to a the box (back view).

image

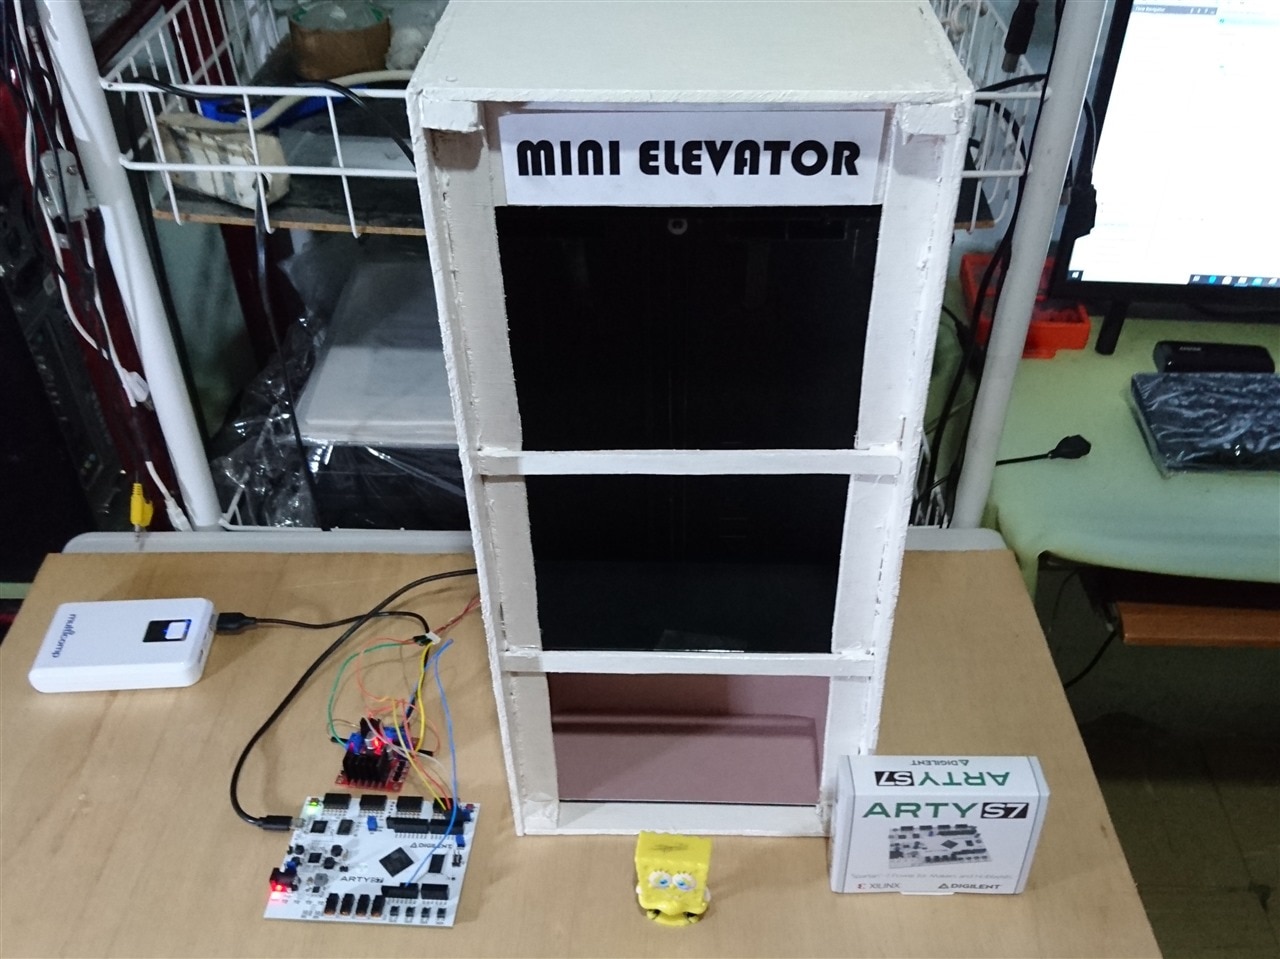
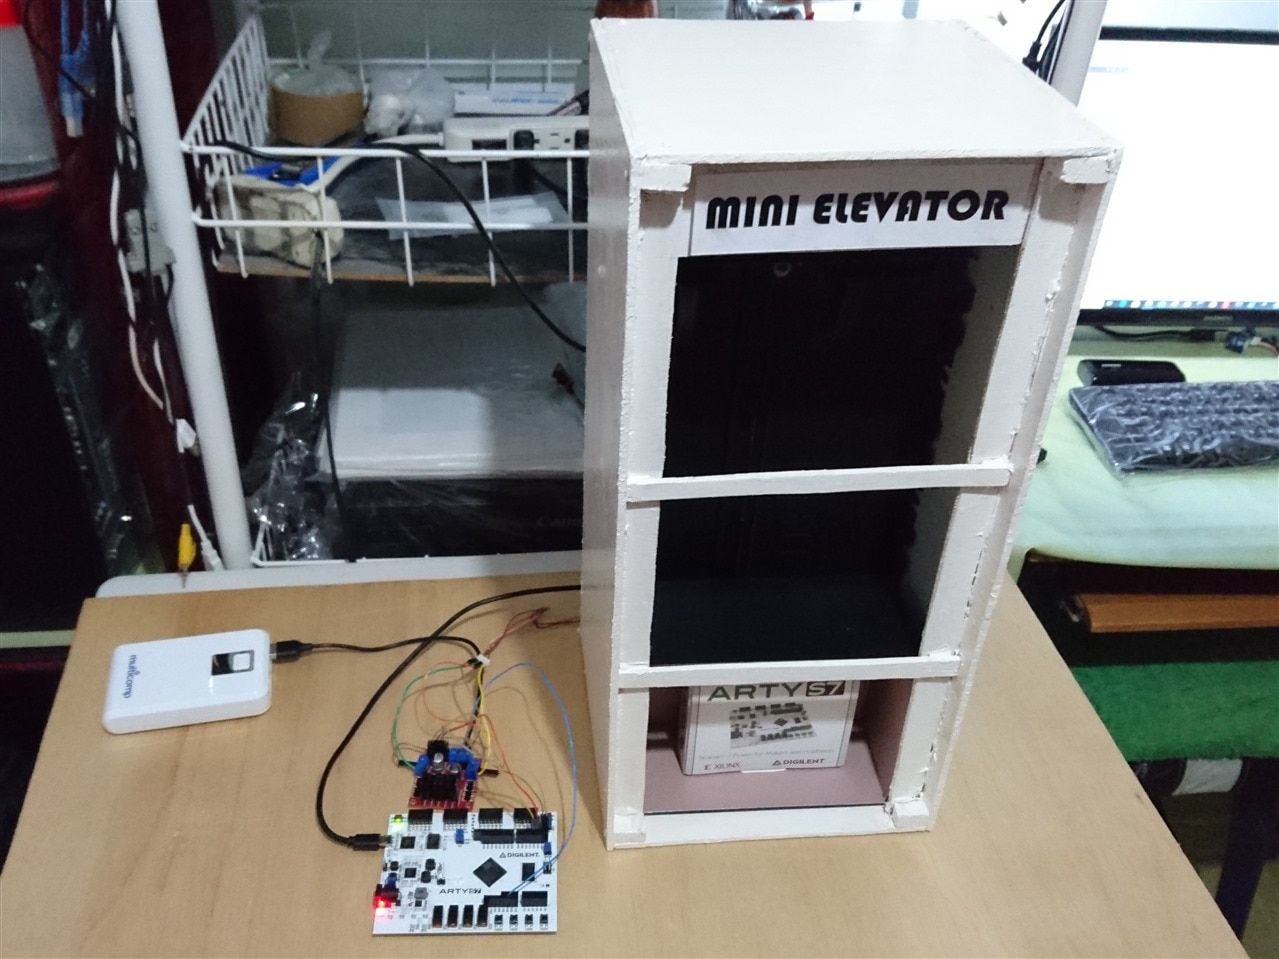
The front view of the mini elevator is shown in the figure below. I assembled this prototype with screws in its corners, then added white glue and silicone. The elevator cabinet is made of thick cardboard to reduce weight and give it strength, and it has next dimensions: 17 cm (width) x 8 cm (depth) x 14 cm (height).. In all this I spent two days because the prototype had to be painted.

image

Bipolar Stepper Motor

To rotate a bipolar stepper motor, pulses are applied in sequence to the windings, the sequence of these pulses, are applied externally with an electronic controller. Said controllers are designed in such a way that the motor can be kept in a fixed position and also so that it can be rotated in both directions.

image

There are three characteristics that are common in stepper motors:

  • Voltage: Stepper motors have a working electrical voltage. This value is printed on its case or is at least specified on its datasheet.
  • Electric resistance: This resistance will determine the current that the motor will consume and its value affects the torque curve of the motor and its maximum operating speed.
  • Degrees per step: This factor defines the number of degrees the axis will rotate for each full step.

Here is a quick guide for Stepper Motor Wire Color And Coil Pairs.

However, color codes are not always respected by manufacturers. So a test allowed me to find that my stepper motor works at 5 volts. I also found by means of an ohmmeter the two coils and the order of the pins as follows:

  • pin 1 - gray
  • pin 2 - yellow
  • pin 3 - brown
  • pin 4 - red

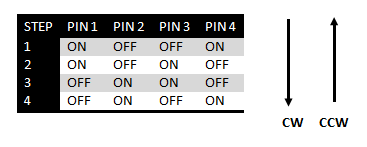
These motors have several windings that, to produce the advance of a step, must be fed in a suitable sequence. By reversing the order of this sequence, the motor turns in the opposite direction. The next table shows the sequence to generate the CW (Clockwise) and CCW (Counterclockwise) movements of a bipolar motor.
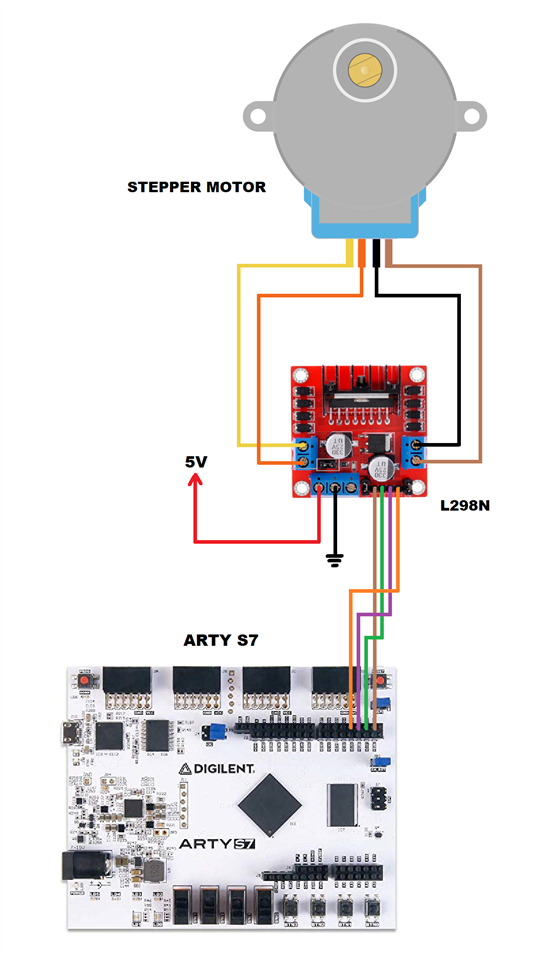
image

Wiring

Now I show you the electrical diagram of the circuit that I assembled below.

image

Once our device is wired, we are ready for the programming of the Arty S7 board. We will see this matter in the next chapter.

image

  • Sign in to reply

Top Comments

  • robogary
    robogary over 3 years ago +1
    Good tip on scavenging dc motors and steppers for project inventory.
  • guillengap
    guillengap over 3 years ago in reply to robogary

    Thanks for your comment. Reusing and recycling old devices is a good idea. The next chapters I will demonstrate my project. Cheers

    • Cancel
    • Vote Up 0 Vote Down
    • Sign in to reply
    • More
    • Cancel
  • robogary
    robogary over 3 years ago

    Good tip on scavenging dc motors and steppers for project inventory.  

    • Cancel
    • Vote Up +1 Vote Down
    • Sign in to reply
    • More
    • Cancel
element14 Community

element14 is the first online community specifically for engineers. Connect with your peers and get expert answers to your questions.

  • Members
  • Learn
  • Technologies
  • Challenges & Projects
  • Products
  • Store
  • About Us
  • Feedback & Support
  • FAQs
  • Terms of Use
  • Privacy Policy
  • Legal and Copyright Notices
  • Sitemap
  • Cookies

An Avnet Company © 2025 Premier Farnell Limited. All Rights Reserved.

Premier Farnell Ltd, registered in England and Wales (no 00876412), registered office: Farnell House, Forge Lane, Leeds LS12 2NE.

ICP 备案号 10220084.

Follow element14

  • X
  • Facebook
  • linkedin
  • YouTube