element14 Community
element14 Community
    Register Log In
  • Site
  • Search
  • Log In Register
  • About Us
  • Community Hub
    Community Hub
    • What's New on element14
    • Feedback and Support
    • Benefits of Membership
    • Personal Blogs
    • Members Area
    • Achievement Levels
  • Learn
    Learn
    • Ask an Expert
    • eBooks
    • element14 presents
    • Learning Center
    • Tech Spotlight
    • STEM Academy
    • Webinars, Training and Events
    • Learning Groups
  • Technologies
    Technologies
    • 3D Printing
    • FPGA
    • Industrial Automation
    • Internet of Things
    • Power & Energy
    • Sensors
    • Technology Groups
  • Challenges & Projects
    Challenges & Projects
    • Design Challenges
    • element14 presents Projects
    • Project14
    • Arduino Projects
    • Raspberry Pi Projects
    • Project Groups
  • Products
    Products
    • Arduino
    • Avnet Boards Community
    • Dev Tools
    • Manufacturers
    • Multicomp Pro
    • Product Groups
    • Raspberry Pi
    • RoadTests & Reviews
  • Store
    Store
    • Visit Your Store
    • Choose another store...
      • Europe
      •  Austria (German)
      •  Belgium (Dutch, French)
      •  Bulgaria (Bulgarian)
      •  Czech Republic (Czech)
      •  Denmark (Danish)
      •  Estonia (Estonian)
      •  Finland (Finnish)
      •  France (French)
      •  Germany (German)
      •  Hungary (Hungarian)
      •  Ireland
      •  Israel
      •  Italy (Italian)
      •  Latvia (Latvian)
      •  
      •  Lithuania (Lithuanian)
      •  Netherlands (Dutch)
      •  Norway (Norwegian)
      •  Poland (Polish)
      •  Portugal (Portuguese)
      •  Romania (Romanian)
      •  Russia (Russian)
      •  Slovakia (Slovak)
      •  Slovenia (Slovenian)
      •  Spain (Spanish)
      •  Sweden (Swedish)
      •  Switzerland(German, French)
      •  Turkey (Turkish)
      •  United Kingdom
      • Asia Pacific
      •  Australia
      •  China
      •  Hong Kong
      •  India
      •  Korea (Korean)
      •  Malaysia
      •  New Zealand
      •  Philippines
      •  Singapore
      •  Taiwan
      •  Thailand (Thai)
      • Americas
      •  Brazil (Portuguese)
      •  Canada
      •  Mexico (Spanish)
      •  United States
      Can't find the country/region you're looking for? Visit our export site or find a local distributor.
  • Translate
  • Profile
  • Settings
Industrial Automation
  • Technologies
  • More
Industrial Automation
Blog AVNET SmartEdge IIOT Gateway: Use the Industrial I/O
  • Blog
  • Forum
  • Documents
  • Quiz
  • Events
  • Polls
  • Files
  • Members
  • Mentions
  • Sub-Groups
  • Tags
  • More
  • Cancel
  • New
Join Industrial Automation to participate - click to join for free!
  • Share
  • More
  • Cancel
Group Actions
  • Group RSS
  • More
  • Cancel
Engagement
  • Author Author: Jan Cumps
  • Date Created: 4 Nov 2019 6:31 PM Date Created
  • Views 1743 views
  • Likes 7 likes
  • Comments 4 comments
  • iiot
  • raspberry
  • industrial
  • smartedge
  • raspberry_pi
  • gateway
  • raspbian
  • linux
Related
Recommended

AVNET SmartEdge IIOT Gateway: Use the Industrial I/O

Jan Cumps
Jan Cumps
4 Nov 2019

The SmartEdge IIOT GatewaySmartEdge IIOT Gateway is a Raspberry Pi 3 Compute based industrial Linux box.

It runs Raspbian with some additions.

There's a set of industrial hardware extensions. In this blog I review the isolated industrial I/O.

image


GPIO Hardware


The SmartEdge IIOT Gateway (from now on: gateway) has two banks of isolated I/O - named DIGIO A and B.

All signals are isolated from the Raspberry part via optocouplers.

Each bank has 2 inputs and outputs that share a common ground*.

The input is high impedance and drives an optocoupler's input. The coupler's output is connected to a Raspberry GPIO pin.

The output is an open collector transistor, driven from a Raspberry GPIO pin via an optocoupler.

Bank A and B are isolated from each other.

Isolation is up to 2 kV.


image

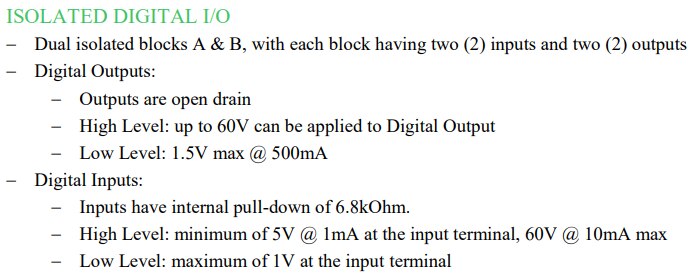
image: I/O specifications from the datasheet


The schematic shows the first input and output of bank A. Note that output is on the left, input on the right, and the external connector is shown in the middle.

The User Guide shows the full setup for both banks.

image

image: output and input of Bank A, I/O 1


While the Raspberry GPIO pins are I/O, the DIGIO pins are dedicated input or output.

Here's an example test circuit for both input and output side.

image

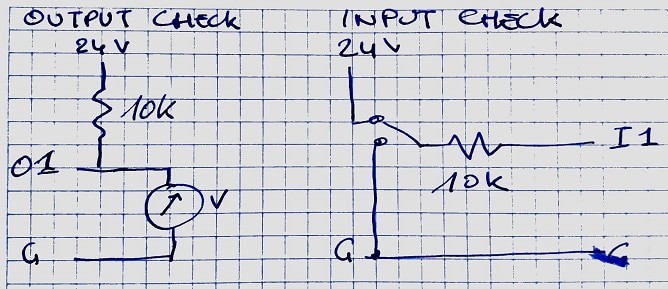
image: simple output (left) and input test circuit


GPIO Firmware


Raspberry Pi users will be happy to see that the pins can be used just like the 3.3 V I/O pins.

They are supported by Linux character devices. You control and check their status by reading and writing to Linux files**.

This table shows the mapping between the DIGIO pins and the corresponding Linux devices.


DIGIO Linux device Direction
A I1 200 input
A O1 201 output
A I2 202 input
A O2 203 output
B I1 204 input
B O1 205 output
B I2 206 input
B O2 207 output


In this blog, I'm talking to the pins from Linux. There are plenty examples that show how to talk to Raspberry I/O from your favourite programming language.

Before you can use a pin, you have to export it.


# enable DIGIO A I1 and O1
echo 200 >/sys/class/gpio/export
echo 201 >/sys/class/gpio/export


The output pins have to be configured as outputs.


# make O1 an output pin
sudo echo out > /sys/class/gpio/gpio201/direction


You can drive an output by executing:


#switch O1
sudo echo 1 > /sys/class/gpio/gpio201/value
sudo echo 0 > /sys/class/gpio/gpio201/value


Checking an input pin's status is done like this:


#read I1
cat /sys/class/gpio/gpio201/value


As you can see, all is very similar to talking to the common Pi pins. But your lines can be up to 60 V.

When you want to use the typical Raspberry Pi GPIO pins, they are available too. The traditional Pi header is accessible inside the box.


* it's not really a ground but a shared reference point.

** they are indeed character devices. The Linux facing interface to set direction and work with the statuses seem to be files, e.g.: /sys/class/gpio/gpio201/value. In the background, there's a driver that translates that into hardware signals to the Broadcom chip.


Related Blog
Industrial I/O
Use the Industrial I/O
Control Industrial I/O directly from GPIO Pins
C Program for the Industrial I/O
Control Industrial I/O directly from Node-RED
Display Industrial I/O on Node-RED Dashboard
CAN Bus
Use the Isolated CAN
CAN programming in C on Linux: Filter and Mask
RS-485 Bus
AVNET SmartEdge IIOT Gateway: Use RS-485
MODBUS
AVNET SmartEdge IIOT Gateway: MODBUS over RS-485
2020 Linux Image
The 2020 Linux Image and IoTConnect Scripts
Understand the Custom Scripts and Services (Pt. 1: intro and reset button service)
Understand the Custom Scripts and Services (Pt. 2: led service)
Understand the Custom Scripts and Services (Pt. 3: IoT Connect service)
  • Sign in to reply

Top Comments

  • clem57
    clem57 over 5 years ago +1
    Thanks Jan Cumps for the review of the new SmartEdge IIOT Gateway . It is great to know programming these new Pi's is like before. Are you back home?
Parents
  • clem57
    clem57 over 5 years ago

    Thanks Jan Cumps for the review of the new SmartEdge IIOT Gateway . It is great to know programming these new Pi's is like before. Are you back home?

    • Cancel
    • Vote Up +1 Vote Down
    • Sign in to reply
    • More
    • Cancel
  • Jan Cumps
    Jan Cumps over 5 years ago in reply to clem57

    yes, home image

    • Cancel
    • Vote Up 0 Vote Down
    • Sign in to reply
    • More
    • Cancel
Comment
  • Jan Cumps
    Jan Cumps over 5 years ago in reply to clem57

    yes, home image

    • Cancel
    • Vote Up 0 Vote Down
    • Sign in to reply
    • More
    • Cancel
Children
No Data
element14 Community

element14 is the first online community specifically for engineers. Connect with your peers and get expert answers to your questions.

  • Members
  • Learn
  • Technologies
  • Challenges & Projects
  • Products
  • Store
  • About Us
  • Feedback & Support
  • FAQs
  • Terms of Use
  • Privacy Policy
  • Legal and Copyright Notices
  • Sitemap
  • Cookies

An Avnet Company © 2025 Premier Farnell Limited. All Rights Reserved.

Premier Farnell Ltd, registered in England and Wales (no 00876412), registered office: Farnell House, Forge Lane, Leeds LS12 2NE.

ICP 备案号 10220084.

Follow element14

  • X
  • Facebook
  • linkedin
  • YouTube