element14 Community
element14 Community
    Register Log In
  • Site
  • Search
  • Log In Register
  • About Us
  • Community Hub
    Community Hub
    • What's New on element14
    • Feedback and Support
    • Benefits of Membership
    • Personal Blogs
    • Members Area
    • Achievement Levels
  • Learn
    Learn
    • Ask an Expert
    • eBooks
    • element14 presents
    • Learning Center
    • Tech Spotlight
    • STEM Academy
    • Webinars, Training and Events
    • Learning Groups
  • Technologies
    Technologies
    • 3D Printing
    • FPGA
    • Industrial Automation
    • Internet of Things
    • Power & Energy
    • Sensors
    • Technology Groups
  • Challenges & Projects
    Challenges & Projects
    • Design Challenges
    • element14 presents Projects
    • Project14
    • Arduino Projects
    • Raspberry Pi Projects
    • Project Groups
  • Products
    Products
    • Arduino
    • Avnet Boards Community
    • Dev Tools
    • Manufacturers
    • Multicomp Pro
    • Product Groups
    • Raspberry Pi
    • RoadTests & Reviews
  • Store
    Store
    • Visit Your Store
    • Choose another store...
      • Europe
      •  Austria (German)
      •  Belgium (Dutch, French)
      •  Bulgaria (Bulgarian)
      •  Czech Republic (Czech)
      •  Denmark (Danish)
      •  Estonia (Estonian)
      •  Finland (Finnish)
      •  France (French)
      •  Germany (German)
      •  Hungary (Hungarian)
      •  Ireland
      •  Israel
      •  Italy (Italian)
      •  Latvia (Latvian)
      •  
      •  Lithuania (Lithuanian)
      •  Netherlands (Dutch)
      •  Norway (Norwegian)
      •  Poland (Polish)
      •  Portugal (Portuguese)
      •  Romania (Romanian)
      •  Russia (Russian)
      •  Slovakia (Slovak)
      •  Slovenia (Slovenian)
      •  Spain (Spanish)
      •  Sweden (Swedish)
      •  Switzerland(German, French)
      •  Turkey (Turkish)
      •  United Kingdom
      • Asia Pacific
      •  Australia
      •  China
      •  Hong Kong
      •  India
      •  Korea (Korean)
      •  Malaysia
      •  New Zealand
      •  Philippines
      •  Singapore
      •  Taiwan
      •  Thailand (Thai)
      • Americas
      •  Brazil (Portuguese)
      •  Canada
      •  Mexico (Spanish)
      •  United States
      Can't find the country/region you're looking for? Visit our export site or find a local distributor.
  • Translate
  • Profile
  • Settings
Sixth Sense Design Challenge
  • Challenges & Projects
  • Design Challenges
  • Sixth Sense Design Challenge
  • More
  • Cancel
Sixth Sense Design Challenge
Blog Sixth Sense GraffitiBot - System Interconnect - blog 5
  • Blog
  • Forum
  • Documents
  • Polls
  • Files
  • Events
  • Mentions
  • Sub-Groups
  • Tags
  • More
  • Cancel
  • New
  • Share
  • More
  • Cancel
Group Actions
  • Group RSS
  • More
  • Cancel
Engagement
  • Author Author: dougw
  • Date Created: 26 Jan 2019 10:19 PM Date Created
  • Views 1546 views
  • Likes 10 likes
  • Comments 8 comments
  • graffitibot
  • doug wong
  • sixth sense design challenge
Related
Recommended

Sixth Sense GraffitiBot - System Interconnect - blog 5

dougw
dougw
26 Jan 2019

image

I finally have all four custom PCBs designed and on order so I can spend some time describing the system a bit better.

The diagram below shows how all the electrical subsystems are connected in the GraffitiBot.

Although this is a busy diagram with lots of subsystems, there are just as many sensors on the Sensor Tile itself which are not broken out on the diagram.

image

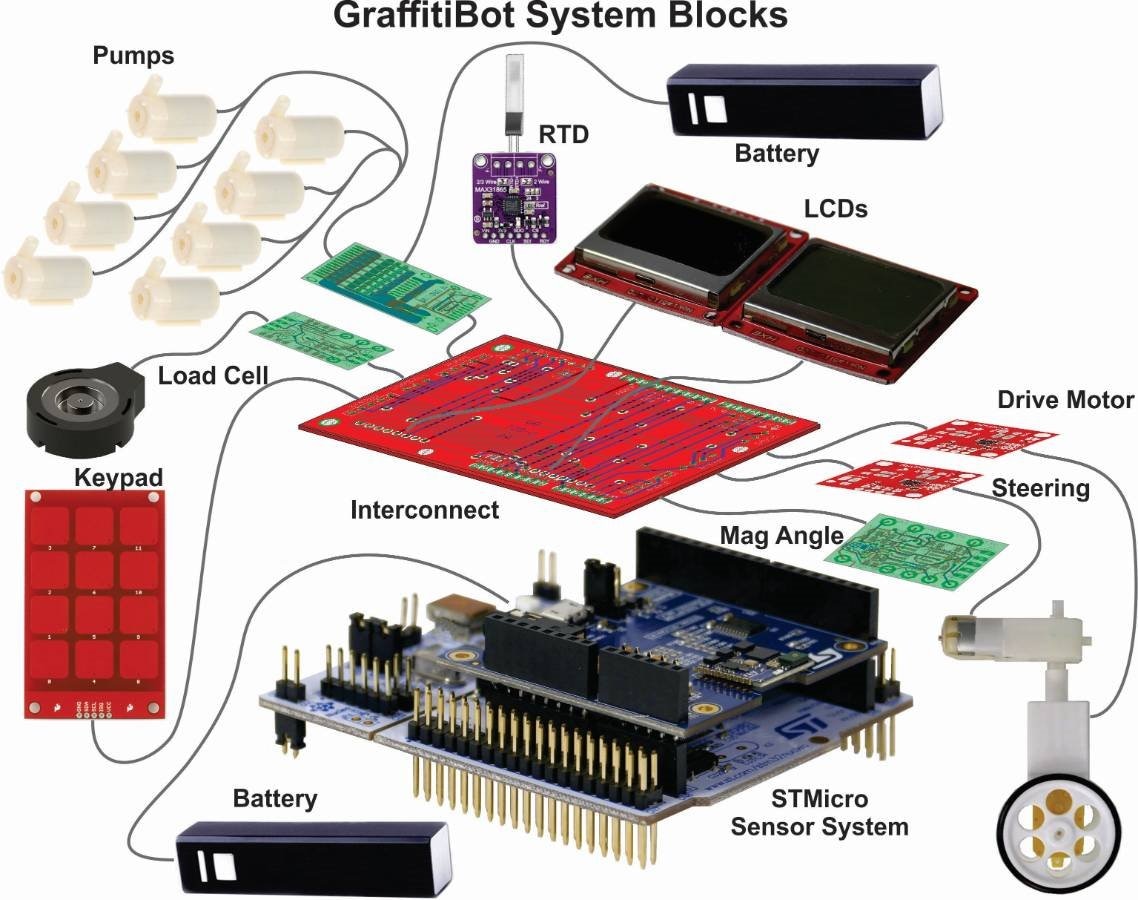
There are 2 batteries - one will power the pumps and drive motors, the other one will power the rest of the electronics.

The keypad and dual LCDs will form the user interface, although the STMicroelectronics Sensor Tile has BLE on it, so Bluetooth remote control is also a possibility.

The big interconnect card doesn't have a lot of circuitry on it , but in addition to connecting all the subsystems, it serves as a platform for the LCDs. Its size makes it much more expensive than the other custom cards.


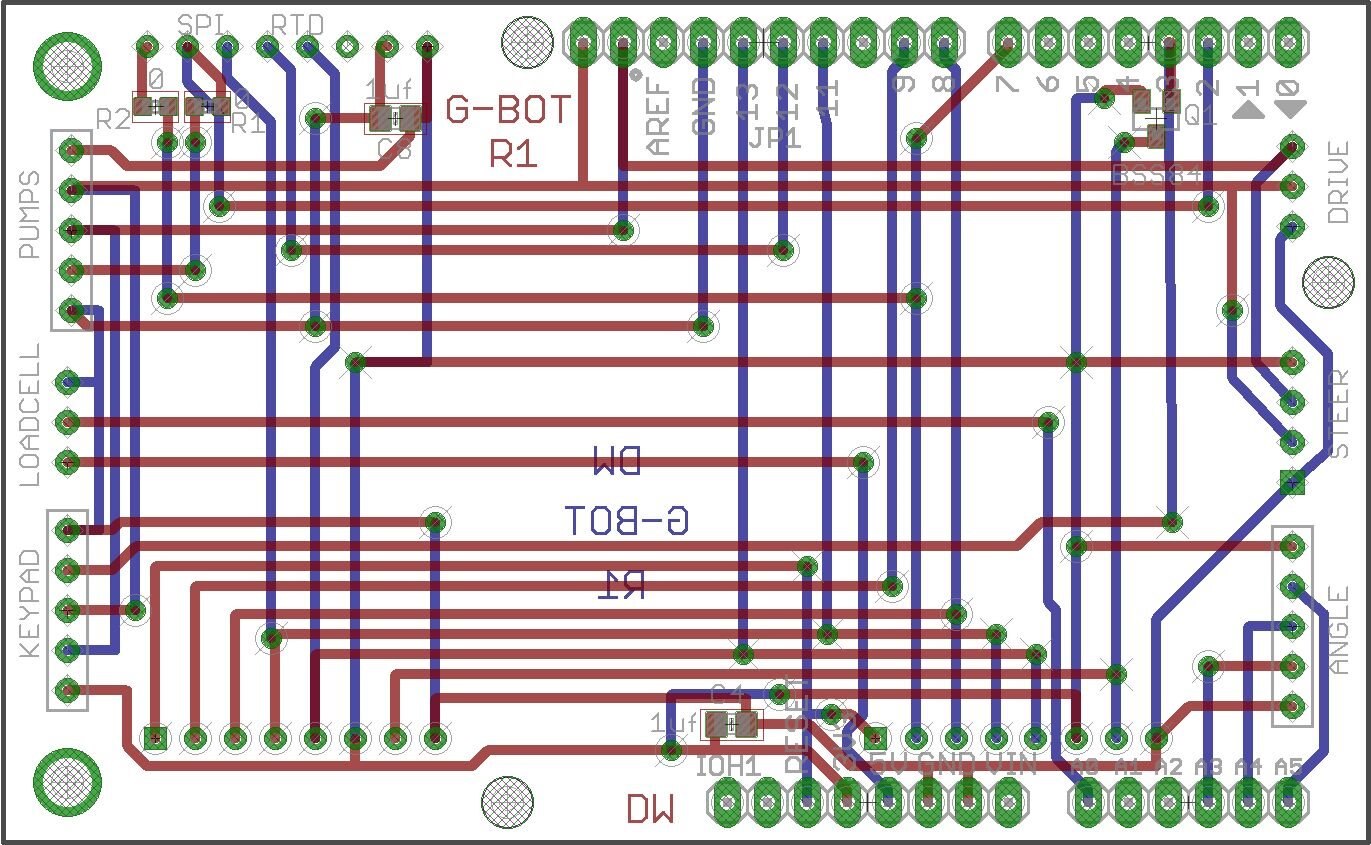
Here is a schematic showing how the interconnect card works:

image

Here is the corresponding PCB layout:

image

Now that all the electronic subsystems and components are on order I will start working through the mechanical design.

I have already done quite a bit of thinking through of the mechanical design to try and get the long lead components on order.

I think I have most of the mechanical components on order but the detailed design may spawn new component requirements.

Most of the remaining mechanical design will be parts that need to be 3D printed.

I'm not quite sure how many 3D parts will end up in the machine, but I expect around 10.

As expected, this is a complex project with a lot of moving parts, a lot of subsystems, a lot of software and a lot of blogging.

I would like to to doing some software, but getting hardware on order is the priority.

I just hope the Chinese New Year holidays don't impact deliveries too badly. I'm hoping I got the last PCB in under the wire.

Now to get the 3D printer cranked up.....


Relevant Links

Sixth Sense Design Challenge: About This Challenge

Sixth Sense Design Challenge: Technical Documents

Sixth Sense Design Challenge


GraffitiBot Project Blogs

Sixth Sense GraffitiBot - blog 1

Sixth Sense - Kit Unboxing and Other Parts - GraffitiBot blog 2

Sixth Sense - Sensor Circuits - GraffitiBot blog 3

Sixth Sense - Interfaces - GraffitiBot blog 4

Sixth Sense GraffitiBot - System Interconnect - blog 5

Sixth Sense GraffitiBot - Wheels & Motors - blog 6

Sixth Sense GraffitiBot - ST Sensor Tile App - blog 7 

Sixth Sense - Load Cell PCB - GraffitiBot blog 8

Sixth Sense - Magnetic Angle Sensor - GraffitiBot - Blog 9

Sixth Sense - LCD Interface - GraffitiBot - blog 10 

Sixth Sense - Pump Controller - GraffitiBot Blog 11

Sixth Sense Main Drive Motor - GraffitiBot - blog 12

Sixth Sense Motor Controller Mods - GraffitiBot blog 13

Sixth Sense - RTD - GraffitiBot Blog 14

Sixth Sense Mechanical Design - GraffitiBot Blog 15

Sixth Sense GraffitiBot Motor Wiring - Blog 16

Sixthe Sense GarffitiBot - First Dry Run - Blog17

Sixth Sense GraffitiBot Hydraulics - Blog 18

Sixth Sense GraffitiBot Printing Graffiti - Blog 19 

Sixth Sense GraffitiBot - Summary - Blog 20


  • Sign in to reply

Top Comments

  • genebren
    genebren over 6 years ago +3
    Doug, Nice job on the system interconnect drawing. I really like the 3D views of all the parts, floating in space. Nice and clear! Gene
  • kulky64
    kulky64 over 6 years ago +3
    So if I understand it correctly you are going to supply both DC motor driver boards with 5V from one of your power banks (I guess you will run cable from J10 connector on aquarim pumps driver board to…
  • dougw
    dougw over 6 years ago in reply to kulky64 +1
    You are correct, that is roughly the plan, but there are contingency plans if issues arise. The pump controller is also 3.3V although the pump FETs will supply 5 V to the pumps.
  • DAB
    DAB over 6 years ago

    I like where you are going with this design.


    DAB

    • Cancel
    • Vote Up +1 Vote Down
    • Sign in to reply
    • More
    • Cancel
  • dougw
    dougw over 6 years ago in reply to kulky64

    The backlights will not be used on these displays - they would only be needed at night when the graffiti wouldn't be visible anyway. These displays are similar (software compatible) to the displays from SparkFun, but use a different pinout. Without the backlight, they are very low power displays - like what you would find in a dumb watch.

    Why 2 displays? - There are a large number of sensors to display, plus I want to display the graphics to be printed by the bot.

    • Cancel
    • Vote Up +1 Vote Down
    • Sign in to reply
    • More
    • Cancel
  • kulky64
    kulky64 over 6 years ago in reply to dougw

    Just the backlights on both displays will probably consume big chunk of your current budget. At SparkFun site they claim that backlight on those displays can consume as much as 100 mA:

    https://learn.sparkfun.com/tutorials/graphic-lcd-hookup-guide

    Although your diplays look a bit different, so the figures may not apply. What for do you need two displays anyway?

    • Cancel
    • Vote Up +1 Vote Down
    • Sign in to reply
    • More
    • Cancel
  • dougw
    dougw over 6 years ago in reply to kulky64

    Good question. I expect them to require much less than 500 mA, but I will measure to make sure.

    • Cancel
    • Vote Up +1 Vote Down
    • Sign in to reply
    • More
    • Cancel
  • kulky64
    kulky64 over 6 years ago in reply to dougw

    And second power bank will go to USB connector on Nucleo board? Will 500 mA be enough for all devices on 3.3V bus?

    • Cancel
    • Vote Up +1 Vote Down
    • Sign in to reply
    • More
    • Cancel
>
element14 Community

element14 is the first online community specifically for engineers. Connect with your peers and get expert answers to your questions.

  • Members
  • Learn
  • Technologies
  • Challenges & Projects
  • Products
  • Store
  • About Us
  • Feedback & Support
  • FAQs
  • Terms of Use
  • Privacy Policy
  • Legal and Copyright Notices
  • Sitemap
  • Cookies

An Avnet Company © 2025 Premier Farnell Limited. All Rights Reserved.

Premier Farnell Ltd, registered in England and Wales (no 00876412), registered office: Farnell House, Forge Lane, Leeds LS12 2NE.

ICP 备案号 10220084.

Follow element14

  • X
  • Facebook
  • linkedin
  • YouTube