element14 Community
element14 Community
    Register Log In
  • Site
  • Search
  • Log In Register
  • Members
    Members
    • Benefits of Membership
    • Achievement Levels
    • Members Area
    • Personal Blogs
    • Feedback and Support
    • What's New on element14
  • Learn
    Learn
    • Learning Center
    • eBooks
    • STEM Academy
    • Webinars, Training and Events
    • More
  • Technologies
    Technologies
    • 3D Printing
    • FPGA
    • Industrial Automation
    • Internet of Things
    • Power & Energy
    • Sensors
    • More
  • Challenges & Projects
    Challenges & Projects
    • Design Challenges
    • element14 presents
    • Project14
    • Arduino Projects
    • Raspberry Pi Projects
    • More
  • Products
    Products
    • Arduino
    • Dev Tools
    • Manufacturers
    • Raspberry Pi
    • RoadTests & Reviews
    • Avnet Boards Community
    • More
  • Store
    Store
    • Visit Your Store
    • Choose Another Store
      • Europe
      •  Austria (German)
      •  Belgium (Dutch, French)
      •  Bulgaria (Bulgarian)
      •  Czech Republic (Czech)
      •  Denmark (Danish)
      •  Estonia (Estonian)
      •  Finland (Finnish)
      •  France (French)
      •  Germany (German)
      •  Hungary (Hungarian)
      •  Ireland
      •  Israel
      •  Italy (Italian)
      •  Latvia (Latvian)
      •  
      •  Lithuania (Lithuanian)
      •  Netherlands (Dutch)
      •  Norway (Norwegian)
      •  Poland (Polish)
      •  Portugal (Portuguese)
      •  Romania (Romanian)
      •  Russia (Russian)
      •  Slovakia (Slovak)
      •  Slovenia (Slovenian)
      •  Spain (Spanish)
      •  Sweden (Swedish)
      •  Switzerland(German, French)
      •  Turkey (Turkish)
      •  United Kingdom
      • Asia Pacific
      •  Australia
      •  China
      •  Hong Kong
      •  India
      •  Korea (Korean)
      •  Malaysia
      •  New Zealand
      •  Philippines
      •  Singapore
      •  Taiwan
      •  Thailand (Thai)
      • Americas
      •  Brazil (Portuguese)
      •  Canada
      •  Mexico (Spanish)
      •  United States
      Can't find the country/region you're looking for? Visit our export site or find a local distributor.
  • Translate
  • Profile
Sixth Sense Design Challenge
  • Challenges & Projects
  • Design Challenges
  • Sixth Sense Design Challenge
  • More
  • Cancel
Sixth Sense Design Challenge
Blog Sixth Sense Mechanical Design - GraffitiBot Blog 15
  • Blog
  • Forum
  • Documents
  • Events
  • Mentions
  • Sub-Groups
  • Tags
  • More
  • Cancel
  • New
Blog Post Actions
  • Subscribe by email
  • More
  • Cancel
  • Share
  • Subscribe by email
  • More
  • Cancel
Group Actions
  • Group RSS
  • More
  • Cancel
Engagement
  • Author Author: dougw
  • Date Created: 18 Mar 2019 12:09 AM Date Created
  • Views 353 views
  • Likes 13 likes
  • Comments 12 comments
  • graffitibot
  • doug wong
  • sixth sense design challenge
Related
Recommended

Sixth Sense Mechanical Design - GraffitiBot Blog 15

dougw
dougw
18 Mar 2019

Another eventful week - most of it spent in Washington, has made the rest of the week ultra busy. The challenge deadline is looming and the mechanical design really needs to get done so I can start wiring everything up. The design of the front end and the chassis turned out to be quite complex, partly because there are limits to what a 3D printer can do and I always try to print without any support structure.

Here is a video of the CAD models:

You don't have permission to edit metadata of this video.
Edit media
x
Upload Preview

Unfortunately my CAD software cannot animate the whole assembly, so I can only show how it goes together with real parts - see below:

Fortunately all the parts printed well and I didn't have to re-do any time-consuming printing tasks.

It remains to be seen how well the printed bearing (bushing) in the steering mechanism will perform under load. I had to leave enough play for it to rotate freely, which makes it quite a bit sloppier than a proper pillow block bearing. The rest of the parts are all nice and tight.

I was looking around for an alternate (local) supplier for the pillow block bearing and discovered to my surprise - Walmart has it in their on-line catalog, however it would still entail shipping from China.

Here is a video of the chassis being assembled:

You don't have permission to edit metadata of this video.
Edit media
x
Upload Preview

It may look like the project is sailing along with no issues, but that is just because I don't have time to stop and document all the crazy shenanigans I get into even though they might make for some juicy copy.

The mechanics are mostly complete now - just a couple more brackets left to design to hold the electronics.

I will try to find time to design a cover for the fluid reservoir - to minimize splashing.

I also have one more electronics test to do on the keypad before tackling the full wiring job.

And then it will be a race to see if I can get enough software working for a full system demo.

Trying to Iron out the software for a fully autonomous robot in one or two days is not normally a formula for success, but that is where we are.

With only one week left in the challenge, success is possible but is going to depend on having no unexpected tasks crop up, no family or work emergencies and immaculate performance on the remaining tasks. I am in the middle of softball playoffs, and I still have hockey every week, so I can't devote all my spare time to electronics. I had another trip scheduled to Washington this week, but I think it will be cancelled. That would have made 6 trips during the course of this project - they definitely made an already hard project significantly harder, but it is fun to stretch the limits.


Update 1:

The steering pillow block bearing finally came in - of course it had to happen after I had designed a substitute 3D printed part and videoed the assembly, but it fits snugly and I am happy it arrived. This image shows it installed as well as a second bearing (upside down) beside the front wheels. I also connected one of the tubes to show how they will look.

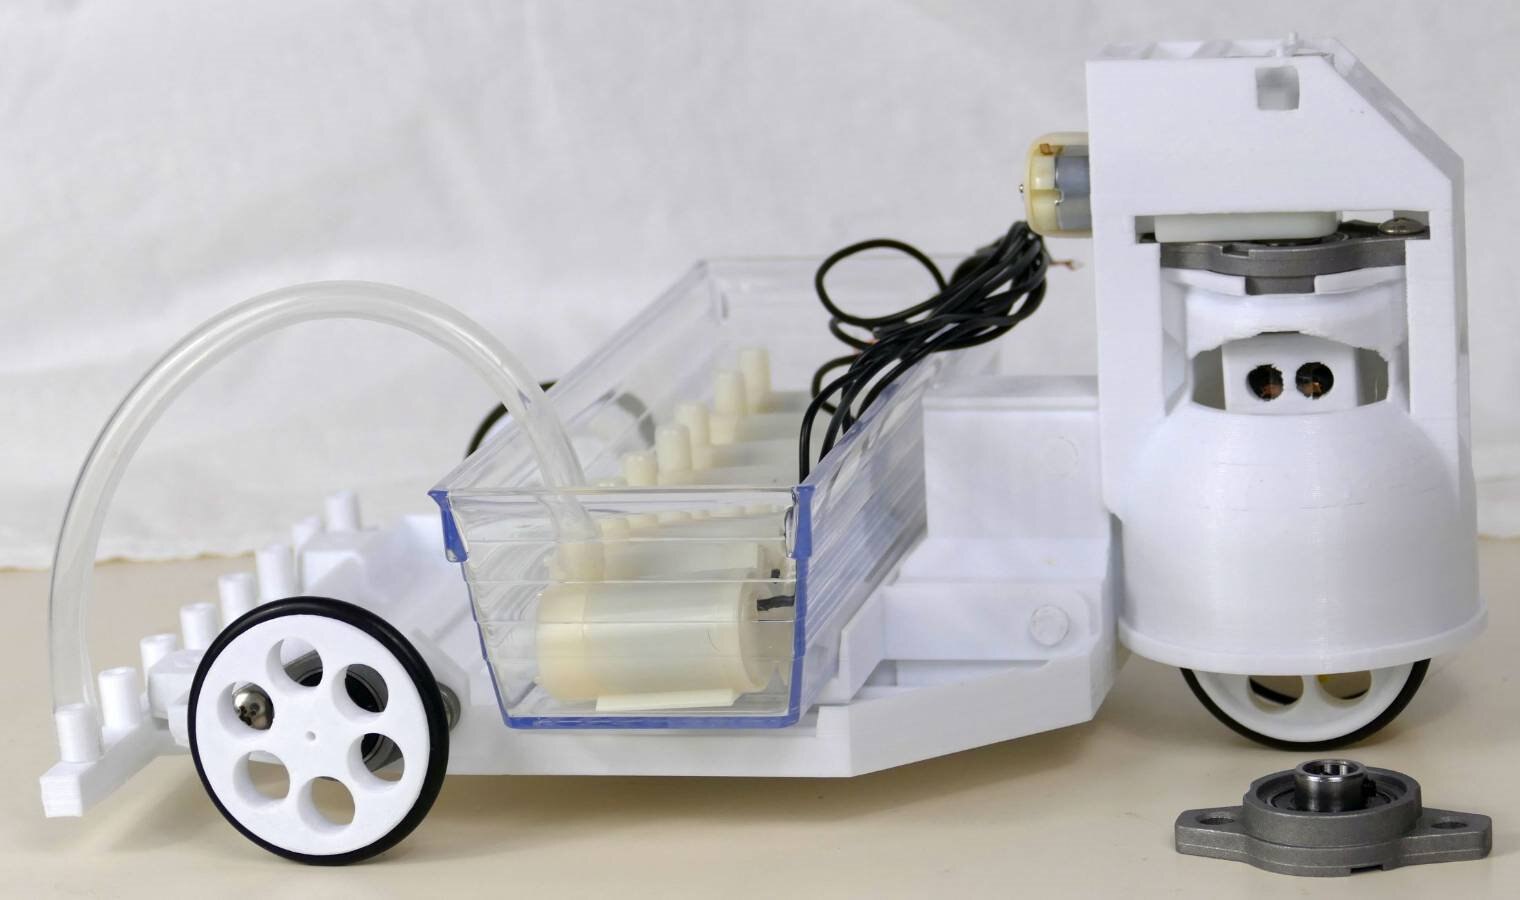
I couldn't resist hooking the main drive motor up to a power supply just to make sure it could handle the load (I added weights to the reservoir to make it realistic). This is actually a nice milestone - the robot platform moved well under its own steam.


Update 2:

I won't always have time to produce a full blog for each step from here to the close of the challenge, but I will try to add updates as I go.

Basically I need to complete about a week's work in each day that remains.

In this update I designed and printed the mezzanine structure to hold the electronics. There are now about 28 printed plastic parts in the assembly.

I don't have enough time to enclose the electronics in a GT fairing, but at least they are mostly above the water  level.

There is more that could be done to cover the reservoir and the electronics and improve the aesthetics, but the mechanics are complete enough to be fully operational.

The assembled platform is shown below:

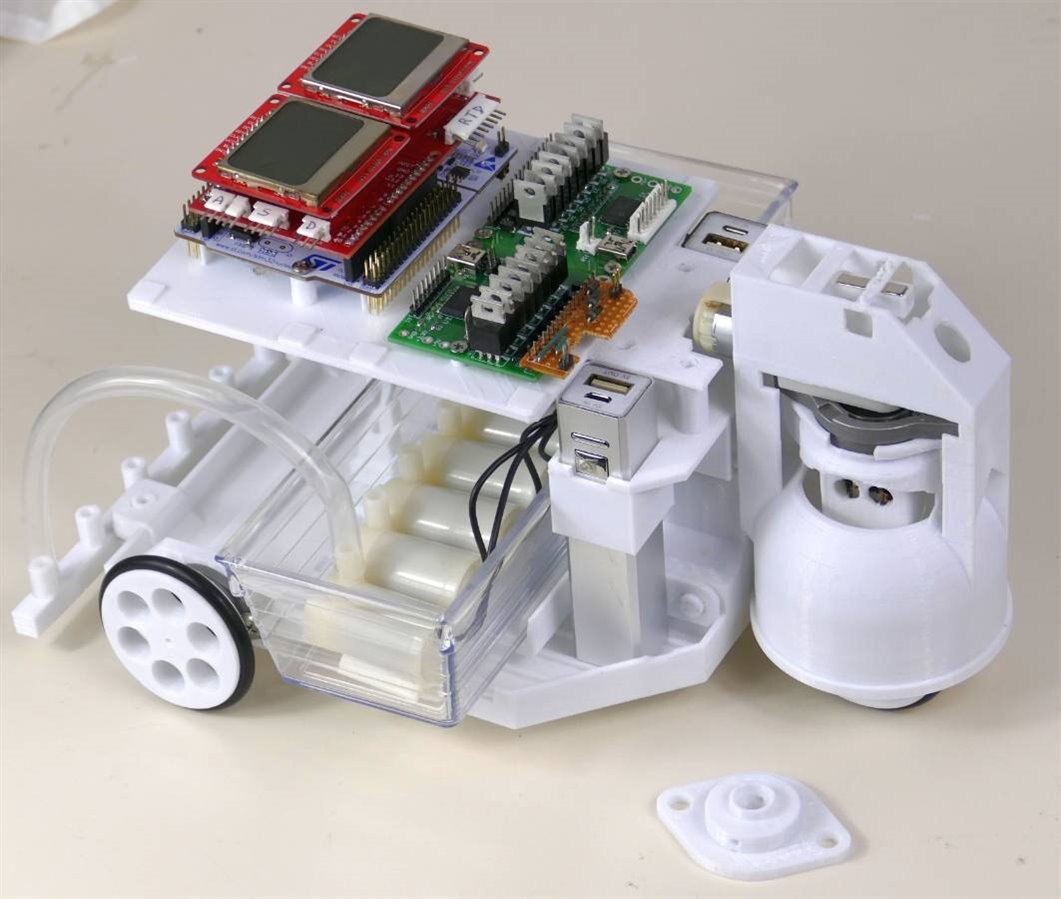
Note the two batteries - one for the electronics and one for the motors.

I have also been dabbling a bit with the software but tomorrow I need to wire everything up so I can test software as it gets written.

It could be another late night as I have to play hockey as well.

I probably won't have enough time to dress the wiring neatly, so it could end up looking a bit like the proverbial spaghetti factory.


Relevant Links

Sixth Sense Design Challenge: About This Challenge

Sixth Sense Design Challenge: Technical Documents

Sixth Sense Design Challenge

KMT32B Magnetic Angle Sensor


GraffitiBot Project Blogs

Sixth Sense GraffitiBot - blog 1

Sixth Sense - Kit Unboxing and Other Parts - GraffitiBot blog 2

Sixth Sense - Sensor Circuits - GraffitiBot blog 3

Sixth Sense - Interfaces - GraffitiBot blog 4

Sixth Sense GraffitiBot - System Interconnect - blog 5

Sixth Sense GraffitiBot - Wheels & Motors - blog 6

Sixth Sense GraffitiBot - ST Sensor Tile App - blog 7

Sixth Sense - Load Cell PCB - GraffitiBot blog 8

Sixth Sense - Magnetic Angle Sensor - GraffitiBot - Blog 9

Sixth Sense - LCD Interface - GraffitiBot - blog 10

Sixth Sense - Pump Controller - GraffitiBot Blog 11

Sixth Sense Main Drive Motor - GraffitiBot - blog 12

Sixth Sense Motor Controller Mods - GraffitiBot blog 13

Sixth Sense - RTD - GraffitiBot Blog 14

Sixth Sense Mechanical Design - GraffitiBot Blog 15

Sixth Sense GraffitiBot Motor Wiring - Blog 16

Sixthe Sense GarffitiBot - First Dry Run - Blog17

Sixth Sense GraffitiBot Hydraulics - Blog 18

Sixth Sense GraffitiBot Printing Graffiti - Blog 19

Sixth Sense GraffitiBot - Summary - Blog 20

Anonymous

Top Comments

  • fmilburn
    fmilburn over 3 years ago +4

    Crazy good :-)

  • genebren
    genebren over 3 years ago +3

    Very clean mechanical designs and also the 3D printed plastics.  Very nice!


    Gene

  • three-phase
    three-phase over 3 years ago +3

    Ahh nothing like a bit of off camera persuasion to get the bits to fit!


    Excellent project update and parts design.


    Kind regards.

  • dougw
    dougw over 3 years ago in reply to 14rhb

    I just updated the assembly above with 11 more printed parts. Now I just need to wire everything up and get some software running.....I really want to see it in action too.

    • Cancel
    • Up +3 Down
    • Reply
    • More
    • Cancel
  • 14rhb
    14rhb over 3 years ago

    Hi Douglas,


    I cannot even imagine how you would envisage these various pieces interacting let alone drawing them in CAD and then printing them, and on that point they look really well finished. Great work and I look forward to it in action.


    Rod

    • Cancel
    • Up +3 Down
    • Reply
    • More
    • Cancel
  • ntewinkel
    ntewinkel over 3 years ago in reply to dougw

    Douglas wrote:

    >You must be right on the ball.


    Or maybe the opposite, haha, but thank you for the vote of confidence!

    I see your videos because I follow you on YouTube, and I watch a few clips (on a regular TV) at breakfast to start the day. Yours show up in the recommendations

    And I tend to not read e14 updates until later


    -Nico

    • Cancel
    • Up +2 Down
    • Reply
    • More
    • Cancel
  • dougw
    dougw over 3 years ago in reply to ntewinkel

    I was mindful not to get too colorful with the language being recorded, but I was probably thinking it....

    • Cancel
    • Up +2 Down
    • Reply
    • More
    • Cancel
  • dougw
    dougw over 3 years ago in reply to ntewinkel

    You must be right on the ball. I publish the videos on YouTube about 1 minute before I insert them into the element14 blog and then publish the blog. This method allows the blog to have the videos show up immediately upon publishing.

    • Cancel
    • Up +2 Down
    • Reply
    • More
    • Cancel
>
Element14

element14 is the first online community specifically for engineers. Connect with your peers and get expert answers to your questions.

  • Members
  • Learn
  • Technologies
  • Challenges & Projects
  • Products
  • Store
  • About Us
  • Feedback & Support
  • FAQs
  • Terms of Use
  • Privacy Policy
  • Legal and Copyright Notices
  • Sitemap
  • Cookies

An Avnet Company © 2022 Premier Farnell Limited. All Rights Reserved.

Premier Farnell Ltd, registered in England and Wales (no 00876412), registered office: Farnell House, Forge Lane, Leeds LS12 2NE.

ICP 备案号 10220084.

Follow element14

  • Facebook
  • Twitter
  • linkedin
  • YouTube