

 | Monthly Design Competitions, Earn a Reward, Decide Project Themes, Your Ideas, Your Projects, Turn Ideas into Projects. | About Project14 |
| Monthly Themes | ||
| Monthly Theme Poll |

Congratulations to shabaz for Cyclops-1000: An Electronic Eye for Rotational Speed Measurement , jw0752 for Process Duration Timer , rsc for Mini Air Jet , and ipv1 for DIY Constant Current Load.
You are the winners of the DIY Test Equipment project competition from Project14!
You win a $100 shopping cart for any element14 transactional site!
Project14 is a relatively new project competition platform from element14. If there ever was a competition to showcase what this program is about, it's hard to top DIY Test Equipment. It really illustrates what makes this program special, and what makes it different from other Electronics & Design competitions. Every month element14 community members exchange ideas and vote for upcoming project competitions in a monthly poll. One of the ideas came from a suggestion from dougw and it was the inspiration behind the DIY Test Equipment competition that was voted on by the community as the projects the community members wished to compete in. The response by the community for this idea has been incredible and there were a lot of awesome projects but there could only be 3 winners. Because the last competition only had two winners, we are awarding 4 first place winners this time around so that one more worthy winner could win first place!
There's a little bit of something for everyone in this monthly theme. If you're getting started, it's a fun way to explore design & electronics projects while making something useful. You'll find examples on this page to encourage you to get your hands dirty with microprocessors, development boards, soldering, and tinkering. DIY test equipment projects will further your understanding of how electronics work. If you are a design & electronics enthusiast, this is an opportunity to make homemade tools & instruments that fits your needs, at a fraction of the price of more expensive equipment.
Examples of DIY test equipment include oscilloscopes, function generators, audio impedance meters, capacitance meters, AC/DC LED Indicators, 555 Timer IC Tester, digital frequency counters, digital pressure guage, MOSFET tester, wire tracers, tachnometers, mains power line sniffer, and digital voltmeters.
Judging between these entries wasn't easy but lucky for us we had help from other community members on deciding on a final four. You can view the winners below and hear what our anonymous judges had to say.
The Winners
Cyclops-1000: An Electronic Eye for Rotational Speed Measurement

"A very well designed product that borders on being commercial. The target use is broad, lending itself to various applications." - Anonymous Judge
This month we tried something different and a discussion with some of our top members led to some interesting ideas. It was clear that there was a lot of interest from the start for DIY Test Equipment from some of our most loyal community members, aka the top members. Eager to lend a helping hand, shabaz got this competition started with a bang with his Cyclops-1000: An Electronic Eye for Rotational Speed Measurement . The Cyclops-1000 was a near flawless entry and for less than $25 it shows you how you can make your own tachometer. This handy device can be used for vehicle diagnostics, to check how fast the drill is spinning, and math/physics experiments to see how fast wheels or other parts are spinning.
It also makes a good introduction to understanding the basics of electronics and learning how to solder. The steps and parts you would need to recreate this build are listed. A Project14 branded (that was super awesome!) was used for the video proof and there are even links to parts you would need to replicate this build. Following along would give you the chance to work with a microcontroller, a development board, build a circuit, and and the PCB ensures that it can be done by someone with no prior experience with electronics & design projects. You'll gain hands on experience programming a microcontroller and modifying code, a big part of many electronics projects. The end result is an RPM device (tachometer) for measuring the rotational speed of all sorts of machines.
Process Duration Timer (Final Chapter) Assembly and Testing
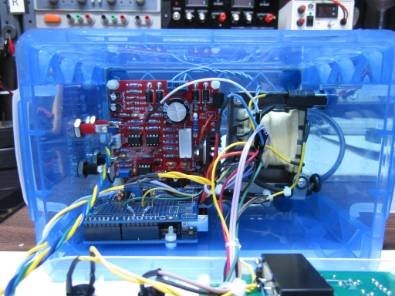
"A well defined project that met all the objectives. It used cheap and readily available parts which were repurposed to suit the project." - Anonymous Judge
"Timing events can be really important in a lab, and this project was unique in that it took a low-cost circuit (a clock) and transformed it into a timer in a very unique way. Then John extended it further by using an Arduino to control it based on voltage thresholds. It would be very useful for anyone wishing to characterise a battery or capacitor." - Anonymous Judge
"If I had to vote for just one, it would be the Process Duration Timer, because it is something I've always wanted to make for myself too, a timer for measuring things in the lab." - Anonymous Judge
This was a universal pick from all the community members that were asked to help pick a piece of DIY Test Equipment as you can see from the comments above. Its part of a 4-part blog series from jw0752 and it was a favorite of the judges because they could appreciate the importance of a timer for measuring things in the lab. The final entry is highlighted here but you can view the entire series on the DIY Test Equipment page:
- Process Duration Timer Blog 1 (The Timer)
- Process Duration Timer Part 2 (Power Supply)
- Process Duration Timer Part 3 (Interfaces)
- Process Duration Timer Part (4) The Brain and Proof of Concept
- Process Duration Timer (Final Chapter) Assembly and Testing
To complete the project he adds the interface circuits, previously located on bread boards, onto an Arduino shield board. The shield is used to make all of the necessary connections to the Arduino. The connections from the interface board to the rest of the circuit have been assembled to allow him to easily disconnect and remove the interface board for modification or service if necessary.
DIY Test Equipment: Mini Air Jet

"A very simple solution to a unique problem. The design concept lends itself to other uses. The finished project was tidy and fit for purpose." - Anonymous Judge
"This was awesome because it was a simple thing yet really useful and something that ought to be a purchaseable product. Also it looked really good with the custom enclosure." - Anonymous Judge
Mini Air Jet was chosen because it got some serious respect from our community member judges because its a simple solution that solves a unique project, and looks good in its custom enclosure! rsc works with some small thermocouples and Hot-Wire/Hot-Film devices in his labs and relies on some "crazy equipment" to test and calibrate these devices. Hot-films are very sensitive to the air flow direction, and it's difficult to move a big fan around keeping the air flow at accurate angles. So, after trying straws taped to little fans and other sometimes successful ideas, he designed a small hand-held air jet for this purpose. The case was designed using AutoCAD, and printed on a SeeMeCNC H2 Delta 3D printer.
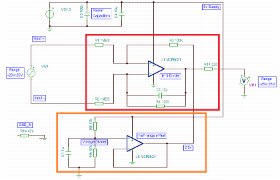
Project14's DIY Test Equipment: DIY Constant Current Load

"A simple approach to an issue when adapting and testing power sources. The maths matched the reality, showing good design." - Anonymous Judge
This one is special because it touches on what makes the element14 community special, the community members doing cool things together in collaboration or inspiring individual projects based on what other members are doing. Jan Cumps got the noise started when he posted USB Programmable (electronic DC load) Test Equipment to shine some light on a prototype for a Programmable Electronic Load he's been working on with Robert Peter Oakes , jc2048 , and himself. While the date he gives for the finished prototype is listed as the Year 2525 (unless that's a typo) and he acknowledges they'll never make it in time for the end of the DIY Test Equipment initiatives he invites anyone that wants to help to help.
Isn't that what community is all about?
Answering the call was ipv1 whose version of a DIY Constant Current Load was picked by our community member judges. His experimentation with recycled batteries, voltage regulators, and line control circuits required a programmable DC load to test the output under various conditions. Because commercial solutions were quite expensive, in addition to being big and bulky, he set out to find a DIY solution to the problem. The result was a simple yet elegant project that can be assembled in a manner of hours and is useful for all electronic hobbyists and professionals alike. Due to a reduction in size and very low BOM cost, the device can be used for field testing of a number of equipment as well.
While the extensive project that Robert Peter Oakes , jw0752 , and Jan Cumps are working on has serious cred with the more serious user, ipv1 , gives the procrastinating maker and electronics enthusiast a quick and dirty solution that does the job.
Illustrating the impact of the original programmable electronic load post, jc2048 , who's done a number of really cool DIY Test Equipment projects on the community (including the one mentioned later in this post under Honorable Mention), answered Jan Cumps call for help on the Programmable Electronic Load with a series of blog posts of his own:
- Programmable Electronic Load: Dynamic Behaviour: Part 1 Overview
- Programmable Electronic Load: Dynamic Behaviour: Part 2 The Servo Loop
- Programmable Electronic Load: Dynamic Behaviour: Part 3 Effect of Output Inductance
- Programmable Electronic Load: Dynamic Behaviour: Part 4 Effect of Output Voltage Change
- Programmable Electronic Load: Dynamic Behaviour: Part 5 Stability
Honorable Mentions
3D Printer Filament Automatic Dispenser for Arduino - #1 Design and Hardware
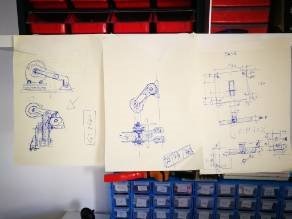
Here's a personal favorite from balearicdynamics that uses Arduino, some hand sketched drawings, and some seriously awesome music to go along with a great video. balearicdynamics been an active member on the Project14 program and has been eager to help others on his projects. This was his first submission as a participant, he's been active in mentoring and judging, but hopefully we'll see some more projects from him on here because he's great with video, loves teaching, and is just a really cool dude.
DIY Test Equipment: The ByEar 2000 - A Logic Probe
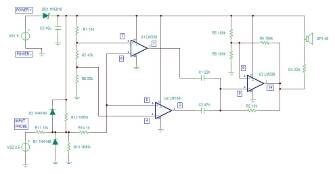
jc2048 also made some outstanding DIY Test Equipment contributions beginning with the above post. The ByEar 2000 is a logic probe who unique selling point is sounds from a loud speaker instead of an LED. It's a nice simple circuit that won't cost much to build. It can be the basis for experimenting with comparators even if you don't have boards full of logic to test. It's pure hardware so there's no processor or programming required.
Arduino oscilloscope - DIY entry device
In this post idanre1 assembles a DIY Arduino Oscilloscope. An oscilloscope is an essential piece of test equipment for your lab and if you are just getting started with electronics projects then it makes a great beginner DIY Test Equipment. This project submission was very detailed and walks you through the steps you would need to take to make your own scope.
DIY Test Equipment: Ears and Tears 2020 (A Logic Probe)

The inspiration for this project comes from jc2048's ByEar 2000 Logic Probe and a Cypress video showing a construction of an analog alarm. koudelad took both ideas and built a Logic Probe device using a PSoC 5LP development kit PSoC 5LP development kit . PSoC is very versatile and the circuit can be modified in a countless ways (adding a button to start measurement, one or more LEDs, display, provide some output for testing other circuits ...)
What's Happening Now
Finally, a heartfelt thank you to everyone who submitted DIY Test Equipment projects either here or on there community blogs. It was a lot of fun watching these projects come in and it was based on a really great idea from dougw. What makes a community, a community and not simply a content site with projects on it, is participation and the element14 community is incomparable to any site anywhere in the universe.
From coming up with the ideas for the project competition, voting for the project competition you wanted to do, helping your fellow community members with their projects, detailing the steps you did to do your projects to inspire others to do projects, inspiring others with your creativity, the only word that comes to mind to describe people on this community, is pretty freakin' amazing!
It's been an honor to serve you as your humble moderator. Remember, there are always project competitions happening on Project14 !
Check out Wacky Automation Devices and Solar Powered Yard Gadget or participate in our Monthly Poll .
Keep the projects coming and keep inspiring others with your awesome work!
Top Comments