



element14 Community
element14 Community
    Register Log In
  • Site
  • Search
  • Log In Register
  • Community Hub
    Community Hub
    • What's New on element14
    • Feedback and Support
    • Benefits of Membership
    • Personal Blogs
    • Members Area
    • Achievement Levels
  • Learn
    Learn
    • Ask an Expert
    • eBooks
    • element14 presents
    • Learning Center
    • Tech Spotlight
    • STEM Academy
    • Webinars, Training and Events
    • Learning Groups
  • Technologies
    Technologies
    • 3D Printing
    • FPGA
    • Industrial Automation
    • Internet of Things
    • Power & Energy
    • Sensors
    • Technology Groups
  • Challenges & Projects
    Challenges & Projects
    • Design Challenges
    • element14 presents Projects
    • Project14
    • Arduino Projects
    • Raspberry Pi Projects
    • Project Groups
  • Products
    Products
    • Arduino
    • Avnet & Tria Boards Community
    • Dev Tools
    • Manufacturers
    • Multicomp Pro
    • Product Groups
    • Raspberry Pi
    • RoadTests & Reviews
  • About Us
    About the element14 Community
  • Store
    Store
    • Visit Your Store
    • Choose another store...
      • Europe
      •  Austria (German)
      •  Belgium (Dutch, French)
      •  Bulgaria (Bulgarian)
      •  Czech Republic (Czech)
      •  Denmark (Danish)
      •  Estonia (Estonian)
      •  Finland (Finnish)
      •  France (French)
      •  Germany (German)
      •  Hungary (Hungarian)
      •  Ireland
      •  Israel
      •  Italy (Italian)
      •  Latvia (Latvian)
      •  
      •  Lithuania (Lithuanian)
      •  Netherlands (Dutch)
      •  Norway (Norwegian)
      •  Poland (Polish)
      •  Portugal (Portuguese)
      •  Romania (Romanian)
      •  Russia (Russian)
      •  Slovakia (Slovak)
      •  Slovenia (Slovenian)
      •  Spain (Spanish)
      •  Sweden (Swedish)
      •  Switzerland(German, French)
      •  Turkey (Turkish)
      •  United Kingdom
      • Asia Pacific
      •  Australia
      •  China
      •  Hong Kong
      •  India
      •  Japan
      •  Korea (Korean)
      •  Malaysia
      •  New Zealand
      •  Philippines
      •  Singapore
      •  Taiwan
      •  Thailand (Thai)
      •  Vietnam
      • Americas
      •  Brazil (Portuguese)
      •  Canada
      •  Mexico (Spanish)
      •  United States
      Can't find the country/region you're looking for? Visit our export site or find a local distributor.
  • Translate
  • Profile
  • Settings
Raspberry Pi
  • Products
  • More
Raspberry Pi
Blog SCPI on a Linux Board - Part 5a: LabVIEW Driver for LAB Switch: Open, Close and Switch functions
  • Blog
  • Forum
  • Documents
  • Quiz
  • Events
  • Polls
  • Files
  • Members
  • Mentions
  • Sub-Groups
  • Tags
  • More
  • Cancel
  • New
Join Raspberry Pi to participate - click to join for free!
Featured Articles
Announcing Pi
Technical Specifications
Raspberry Pi FAQs
Win a Pi
GPIO Pinout
Raspberry Pi Wishlist
Comparison Chart
Quiz
  • Share
  • More
  • Cancel
Group Actions
  • Group RSS
  • More
  • Cancel
Engagement
  • Author Author: Jan Cumps
  • Date Created: 7 Aug 2018 11:31 AM Date Created
  • Views 7780 views
  • Likes 9 likes
  • Comments 21 comments
Related
Recommended
  • piface digital
  • raspberry pi
  • labview
  • scpi
  • diytestinstruch
  • piface

SCPI on a Linux Board - Part 5a: LabVIEW Driver for LAB Switch: Open, Close and Switch functions

Jan Cumps
Jan Cumps
7 Aug 2018

I'm building a SCPI programmable Lab switch with a Raspberry Pi and PiFace Digital.

Communication is over TCP/IP.

In this post: the LabVIEW drivers

image


What is this Lab Switch?


This is a lab instrument. A switch that can be controlled via commands, over the network.

The switch hardware is a combination of two off-the-shelf components: a Raspberry PiRaspberry Pi and a PiFace DigitalPiFace Digital.

All inputs and outputs of the PiFace Digital are accessable via commands. You can read the inputs and set the outputs. All on the 3V3 logic level.

Two of the outputs are connected to a relay. You can use them to switch in and out signals or devices in your automated lab setup.


What is this LabVIEW Driver?


The driver is a library of controls that help you to talk to the Lab Switch.

You use these controls in your LabVIEW process flows. They allow you to make a connection, control the hardware, then close the used resources.

The LabVIEW blocks that are finished are the Open and Close block to start and finish communication with the Pi, and the Switch control.

The Read component to retrieve the status of both inputs and outputs is on the todo list.


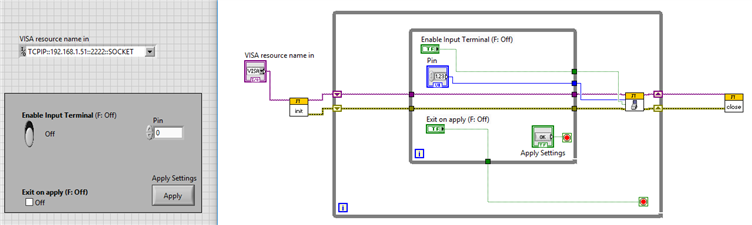
Here's an example that shows how these blocks can fit in a process.

I'm using a GUI here to talk to the instrument, because it's helpful to show visibly that the drivers work.

In an automated flow the inputs will very likely be some logic.
 

image


This video shows the example in action:


You don't have permission to edit metadata of this video.
Edit media
x
image
Upload Preview
image


The article builds upon the previous posts. They explain what software needs to run.

You'll need to run the SCPI and Instrument service on your Pi. You can find the sources in previous posts.

(they are not attached I see. I'll do that if there's interest in this subject)

Here are the commands to execute them. No sudo needed on ubuntu.


./linux_piface_digital_service_cpp 2223 &
./linux_scpi_socket 2222 2223 &


Init block


image


image


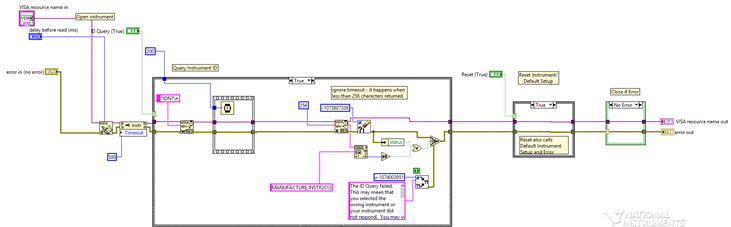
In this block you set the connection parameters. At runtime, LabVIEW will use these to initiate the communication with your instrument.

It will verify that the ID of the instrument is what's expected (if you switch on the ID Query button).

On exit, you have an active instrument connection (VISA resource in LabVIEW lingo) that can be used to send commands and get info.
 

image


The three blocks that are surrounded by a structure have different subflows based on the conditions.

The first block queries the instrument ID if the ID Query is set to true, as shown above.

When you switch  ID Query off, the structure does nothing:

image

The other two conditional blocks perform a reset if requested (not implemented image  because it's todo) and close the instrument connection if any error was thrown while connecting or querying the id.


image


If you make a GUI for your automation, you typically copy the Visa Name in control and paste it on your flow's screen. Then connect that control to the init block.

For a flow without a GUI, you would put the connection string in a constant or property, then pass it on.

It's not recommended to change the setting in the Init block's GUI itself, because that can be shared across projects and flows.


Close block


image

This block, typically the last one in a process, nicely closes the instrument resources. It releases the connection.


image

I'm not showing the GUI for this one because all inputs are expected to come from the process flow.


Switch Control block


image

image

This block controls the outputs of the PiFace.

There are controls for Enable and Pin. In your flow, you either copy them to your GUI orfeed them the info from other flow elements.

Like in the other blocks, please do not alter these elements in the Switch Control GUI themselves. It's a shared object.


This block will send the requested state and pin number to the Pi. It forms a SCPI command string and shoots that over the network.

A typical string would be like this:

:DIGITAL:OUTPUT0 ON


image


You can use this block anytime you need to control one of the instrument's outputs.

The outputs 0 and 1 on the PiFace are linked to the two relays on that hat. Very useful to switch in and out some components or circuits in your setup.


Example


Let's have a look at the example from the begin again.

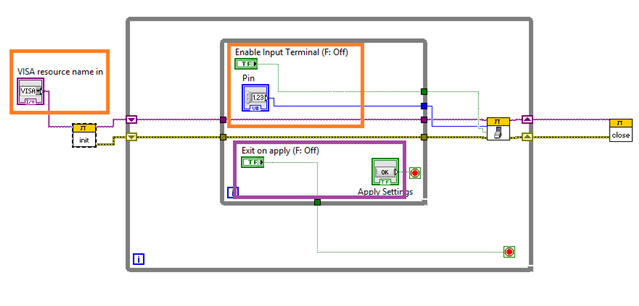
I've coloured the controls that are copied from the library building blocks orange. The ones added for this flow are in a purple rectangle.
image


image

In the beginning of the flow, there's an init block that gets the connection parameters from the GUI element we copied from that init's block GUI.

We then enter a set of while loops that allow us to keep on controlling the process until you check the Exit button.

The values for Enable and Pin are retrieved, and sent to the Switch Control when you press Apply.

If you have the exit check button on, this will also cause the flow to go to the Close block and stop.

As long as you keep that checkbox off, you can keep on controlling the instrument.

Check the video above to see how it works.


The LabVIEW library is attached to this post.


related blog
SCPI on a Linux Board - Letter of Intent

SCPI on a Linux Board - Part 1: Proof of Concept

SCPI on a Linux Board - Part 2a: PiFace Digital C programming

SCPI on a Linux Board - Part 2b: PiFace Digital C++ programming
SCPI on a Linux Board - Part 3: TCP/IP Socket C++ programming
SCPI on a Linux Board - Part 4: TCP/IP SCPI and Instrument Service
SCPI on a Linux Board - Part 4b: TCP/IP SCPI and Instrument Service 100% Working
SCPI on a Linux Board - Part 4c: TCP/IP SCPI and Instrument Service - Run as a Daemon
SCPI on a Linux Board - Part 5a: LabVIEW Driver for LAB Switch: Open, Close and Switch functions
Attachments:
PiFace.zip
3463.linux_piface_digital_service_cpp.zip
  • Sign in to reply

Top Comments

  • 14rhb
    14rhb over 8 years ago +3
    Hi Jan, You can't beat a good bit of Labview automation and remote interfacing . I'm realling enjoying your series of blogs and am learning along the way also - thank you. I used Labwindows CVI in the…
  • shabaz
    shabaz over 8 years ago +2
    Hi Jan, Awesome project : ) That's a unique demo too! I like how your computer desktop actually becomes a desktop
  • genebren
    genebren over 8 years ago +2
    Hi Jan, Very nicely done. You have developed some great tools and great LabVIEW skills! Gene
  • jack.chaney56
    jack.chaney56 over 8 years ago in reply to Jan Cumps

    ...add two more sections of code for making it a SCPI tree.

    enum { /* list of table offsets (spells out the command) */
      __
     ,__C,__CL,__CLS
     ,__E,__ES,__ESE,__ESEs
                    ,__ESEq
              ,__ESR,__ESRq
     ,__I,__ID,__IDN,__IDNq
     ,__O,__OP,__OPC,__OPCs
                    ,__OPCq
     ,__R,__RS,__RST
     ,__S,__SR,__SRE,__SREs
                    ,__SREq
         ,__ST,__STB,__STBq
     ,__T,__TS,__TST,__TSTq
     ,__W,__WA,__WAI
    }
    enum {   // list of function offsets (tasks to run)
      cb_CLS  ,cb_ESEs ,cb_ESEq ,cb_ESRq ,cb_IDNq
     ,cb_OPCs ,cb_OPCq ,cb_RST  ,cb_SREs ,cb_SREq
     ,cb_STBq ,cb_TSTq ,cb_WAI
    }

    and to fill in the two tables.

    static struct parseNode pTbl[] = {  /* search tree */
      {'*', _C,__C,-1}
     ,{'C',__E,__CL,-1},{'L',  -1,__CLS,-1},{'S',   -1,    -1,cb_CLS}
     ,{'E',__I,__ES,-1},{'S',  -1,__ESE,-1},{'E',__ESR,__ESEs,    -1},{' ',__ESEq, -1,cb_ESEs}
                                                                     ,{'?',    -1, -1,cb_ESEq}
                                           ,{'R',   -1,__ESRq,    -1},{'?',    -1, -1,cb_ESRq}
     ,{'I',__O,__ID,-1},{'D',  -1,__IDN,-1},{'N',   -1,__IDNq,    -1},{'?',    -1, -1,cb_IDNq}
     ,{'O',__R,__OP,-1},{'P',  -1,__OPC,-1},{'C',   -1,__OPCs,    -1},{' ',__OPCq, -1,cb_OPCs}
                                                                     ,{'?',    -1, -1,cb_OPCq}
     ,{'R',__S,__RS,-1},{'S',  -1,__RST,-1},{'T',   -1,    -1,cb_RST}
     ,{'S',__T,__SR,-1},{'R',__ST,__SRE,-1},{'E',   -1,__SREs,    -1},{' ',__SREq, -1,cb_SREs}
                                                                     ,{'?',    -1, -1,cb_SREq}
                       ,{'T',  -1,__STB,-1},{'B',   -1,__STBq,    -1},{'?',    -1, -1,cb_STBq}
     ,{'T',__W,__TS,-1},{'S',  -1,__TST,-1},{'T',   -1,__TSTq,    -1},{'?',    -1, -1,cb_TSTq}
     ,{'W', -1,__WA,-1},{'A',  -1,__WAI,-1},{'I',   -1,    -1,cb_WAI}
    };
    static callBack cTbl[] = {  /* function links (vector table) */
      ieee_CLS  ,ieee_ESEs ,ieee_ESEq ,ieee_ESRq ,ieee_IDNq
     ,ieee_OPCs ,ieee_OPCq ,ieee_RST  ,ieee_SREs ,ieee_SREq
     ,ieee_STBq ,ieee_TSTq ,ieee_WAI
    };

    If you follow the logic, the function calls at each node end, will either set a flag, or return the data string.

    • Cancel
    • Vote Up +1 Vote Down
    • Sign in to reply
    • More
    • Cancel
  • jack.chaney56
    jack.chaney56 over 8 years ago in reply to Jan Cumps

    Hi Jan,

    Thanks for responding. The code I have is rather simple (small) in order to be portable and able to reside on small platforms. It starts with a simple parsing component:

    struct parseNode {
     UByte c;
     SWord nx;
     SWord fn;
     SWord cb;
    };
    
    typedef UByte (*callBack)(UByte c);
    
    static struct parseNode pTbl[] = {  /* search tree */
    };
    static callBack cTbl[] = {  /* function links (vector table) */
    };
    /**************************************************************************************************
    * Serial Parser - a creation by Jack Chaney, created long ago when the earth was cooling.
    *   Instead of waiting for the entire string to be entered, before parsing the instructions,
    *   a state tree is used to parse the string on a per character basis as the string comes in
    *   Optionally, at each node (recognized character) it is possible to route the incomming data
    *   to a procedure. If the procedure returns 0 the search continues along the "found" stream.
    *   If the procedure returns a 1 the search restarts at the head of the tree.
    **************************************************************************************************/
    void parse(UByte c) {
     UByte p;
     static SByte b = 0; 
     static SWord t = 0;
     if (isSysEchoOn()) { putCom(c); }                 /* Send the character back if echo is on */
     if (t == -1) { t = 0; b = 0; }                    /* Last pass was an end of branch, so reset to top of tree */
     p = ('a' <= c) && (c <= 'z') ? c & ~bit5 : c;     /* (optional) upper case instructions */
     if (b == 0) {                                     /* Clear flag = no more processing & last character found */
      while ((t != -1) && (pTbl[t].c != p)) { t = pTbl[t].nx; } /* Search the list for a match */
      if (t != -1) {                                  /* not end of branch, so we have found a match */
       if (pTbl[t].cb == -1) { t = pTbl[t].fn; }      /* if no process then point to next level search */
       else { b = 1; }                                /* if existing process, set flag so characters are sent there */
      }
     } else {                                         /* b is non zero, send incomming charater to linked process */
      b = cTbl[pTbl[t].cb](c);                        /* b returns: 0=complete, 1=reset, other=continue to process */
      t = b == 0 ? pTbl[t].fn : b == 1 ? -1 : t;      /* 0, point to next level search. 1, point to tree top */
     }
    }


    its all done in C (not C++) so it is very portable. I have source for status and measure components as well. I do not parse parameter strings and just use numeric values instead (again for size).  I can provide the pTbl tree and cTbl callout contents if you are interested.  The implementation was with a simple USB serial non blocking interface.

    • Cancel
    • Vote Up +1 Vote Down
    • Sign in to reply
    • More
    • Cancel
  • Jan Cumps
    Jan Cumps over 8 years ago in reply to jack.chaney56

    Jack, I've recently done a project with a SCPI parser on an Arduino UNO: Arduino in Test Instrumentation - Intro: SCPI Programmable Switch

    It would be nice if you show your development here too. Heads-up: I don't do off-line exchanges.

    • Cancel
    • Vote Up +1 Vote Down
    • Sign in to reply
    • More
    • Cancel
  • jack.chaney56
    jack.chaney56 over 8 years ago

    Hokie smokes!!!  I might have some relevant information on this topic.  I have written a SCPI parser that actually runs on an Arduino Nano (reprogrammed).  I was using it for a small engine controller that I am playing with. I would love to get a chance to work with someone that is operating on the LabView side of things.  The system uses a serial parser, so there is no need for a message buffer (it parses the command a character at a time). If you are interested, let me know, and we can take the exchange off line.


    Jack.

    • Cancel
    • Vote Up +2 Vote Down
    • Sign in to reply
    • More
    • Cancel
  • 14rhb
    14rhb over 8 years ago

    Hi Jan,


    You can't beat a good bit of Labview automation and remote interfacing image. I'm realling enjoying your series of blogs and am learning along the way also - thank you.


    I used Labwindows CVI in the past (effectively a C version of Labview ) and managed to speed up many turgid and error prone measurement tasks plus, it never failed to impress the boss, when he visited the lab.


    Rod

    • Cancel
    • Vote Up +3 Vote Down
    • Sign in to reply
    • More
    • Cancel
<>
element14 Community

element14 is the first online community specifically for engineers. Connect with your peers and get expert answers to your questions.

  • Members
  • Learn
  • Technologies
  • Challenges & Projects
  • Products
  • Store
  • About Us
  • Feedback & Support
  • FAQs
  • Terms of Use
  • Privacy Policy
  • Legal and Copyright Notices
  • Sitemap
  • Cookies

An Avnet Company © 2026 Premier Farnell Limited. All Rights Reserved.

Premier Farnell Ltd, registered in England and Wales (no 00876412), registered office: Farnell House, Forge Lane, Leeds LS12 2NE.

Follow element14

  • X
  • Facebook
  • linkedin
  • YouTube