


I road-tested the Harting MICA Complete IIoT Starter Kit. In this follow up blog, I'm connecting the Node-RED container of the Mica to AWS (Amazon Web Services).
The goal if this blog is to exchange data with AWS via Node-RED flows. A follow up of the previous one where we registered the device and tested a message from and to the AWS IoT service with AWS' toolkit.
The process described here also works for Node-RED installations on a BeagleBone, Raspberry Pi, Windows or Linux computer. |

The Node-RED container installed on the Harting Mica is ready for AWS connections. It has three nodes that interact with Amazon:
 | The two first blocks interact with the AWS IoT Core MQTT service. They are very similar to the Node-RED MQTT blocks. The input node subscribes to an MQTT topic, the output node publishes to a topic. These two nodes are covered in this blog post.
The third node, "aws thing" is a block that allows you to talk to an AWS thing shadow. This allows you to get / set status of a device even when it's offline. I'm not covering that block here.
If you have experience with Node-RED and MQTT, the only hurdle you have to jump for AWS integration is the IoT Core configuration: registering the device and defining a security policy that allows your device to connect, publish and subscribe.
If you managed to complete HARTING MICA: Connect to Amazon Web Services, you will be up and running fast. |
Set up the Node-RED Container as an AWS Thing
Follow the steps of the previous blog, except for these differences:
- Name your Thing harting_mica_nodered.
- Use the Mica Node Red Container to execute the Linux steps where you see Alpine in the other blog.
- You don't need to install the dependencies listed in the other blog. They are available out of box in the Node Red container.
- When copying the development kit, place it in a directory named /root/.agent/certs (to stay in line with some tutorials).
- If, after executing the dev kit steps, you get a certificate error and exceptions, check the size of the file rootCA.crt.
If it is zero bytes, replace its contents by the root certificate "RSA 2048 bit key: Amazon Root CA 1" referenced in the previous blog.
Adapt the Security Policy
When you connected to AWS with the test kit above, a policy (harting_mica_nodered-Policy) was created that restricts access rigidly:
- It allows you to public and subscribe to a limited set of topics.
- It restricts the clients that can connect to those provided in the test kit.
I'm a big fan of this. AWS' approach teaches you to start from a very secure situation. You are made accountable to open additional access.
The Node-RED AWS MQTT blocks require that you use a fixed client name (it looks up the certificates on your file system based on that).
Because that client name is not listed in the iot:Connect:Resource:Allow section of the policy, any attempt to connect to AWS IoT Core is unsuccessful.
Edit the policy and add your Thing name (harting_mica_nodered) as an additional resource. See line 10 in the policy snippet below:
{
  "Effect": "Allow",
  "Action": [
  "iot:Connect"
  ],
  "Resource": [
  "arn:aws:iot:[XXXXXXXXXX]:client/sdk-java",
  "arn:aws:iot:[XXXXXXXXXX]:client/basicPubSub",
  "arn:aws:iot:[XXXXXXXXXX]:client/sdk-nodejs-*",
  "arn:aws:iot:[XXXXXXXXXX]:client/harting_mica_nodered*"
  ]
  }
Test a Node-RED Flow from Mica to AWS
Open the Node-RED editor on your Mica, and create a new flow.
Place these 2 blocks and link them together:
- an input inject node
- an output aws mqtt node

Double-click on the inject node, and
- set payload to {}JSON
select the ... button to open the JSON editor and enter
{
"name": "Hello, world!"
}
- leave Topic empty
- Set the Name to Hello, world!..
Confirm by clicking the Done button
Double-click on the aws mqtt node, and
- select add a new aws iot device and click the edit button.
- Set the name to AWS Harting Mica Nodered.
- Type is MQTT Broker
- Client id (it is important to use your Thing name as you registered it on IoT Core!): harting_mica_nodered.
- End point is your Thing's end point that you can find on IoT Core. Can be found by selecting your thing and clicking on Interact.

- Set AWS Certs to the directory where you copied the AWS Test kit.: /root/.agent/certs.
- Confirm, then set Topic to topic_1.

Confirm by clicking the Done button
Don't deploy yet. First open IoT Core's MQTT test page.

Keep this window open. The message from the Mica will be shown here (if you have done everything right  ).
).
Then deploy your Node-RED flow. Check back on the IoT Core test page:
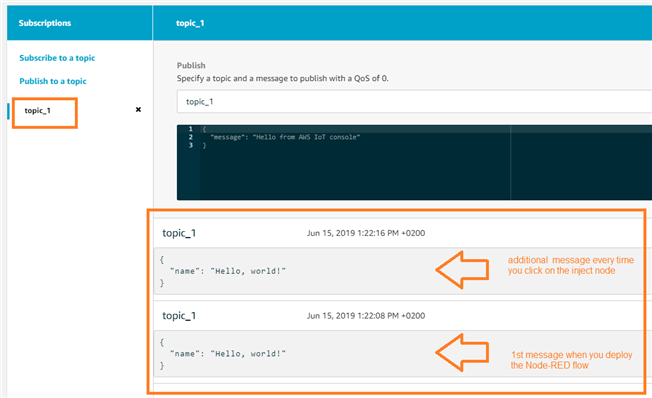
You did it! Click on the inject node, and the Node-RED flow will send another message.
Test a Node-RED Flow from AWS to Mica
Now let's make a flow that runs the other way. IoT Cloud will generate a JSON message and the Mica will receive it.
Open the Node-RED editor on your Mica, and create a new flow.
Place these 2 blocks and link them together:
- an input aws mqtt node
- a debug node.

Double-click on the aws mqtt node, and
- select the same Device you created in the outbound flow. We're using the same certificates and endpoint.
You will be reusing this configuration each time you use an AWS node in your projects.
- Set Topic to topic_2.
Confirm by clicking the Done button
No need to configure the debug node.
Deploy, then open the debug view:

The message coming from the IoT Cloud will be show in this debug window when we perform the next step.
Go to that IoT Core's MQTT test page again. It should still be open from testing the outbound flow.
Enter topic_2, and press the Publish button:
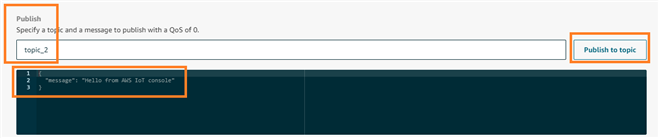
Go back to your Node-RED flow and check the debug view:

Celebrate.
What you don't see in this blog are my failed attempts. In particular the policy that restricts client names took me some time to analyse.
If there's something in this blog post that you are struggling with, please comment below. I try to make the experience as smooth as I can.
info: if you use the AWS Free Tier, I advice that you disable the Node-RED flows that use the AWS blocks.
You disable a flow by double-clicking on its tab, then set the status to Disabled.
Then click the Done button and - after you did this for all AWS related flows - click Deploy.

This will prevent that there's interaction between your Mica and AWS whenever the Mica is powered on.
In particular if you have processes that run frequently, you defined rules in AWS IoT for the MQTT topics used in your flows, or you made a flow that uses AWS reporting services, you should carefully switch these functions off when not needed.
Top Comments