element14 Community
element14 Community
    Register Log In
  • Site
  • Search
  • Log In Register
  • Community Hub
    Community Hub
    • What's New on element14
    • Feedback and Support
    • Benefits of Membership
    • Personal Blogs
    • Members Area
    • Achievement Levels
  • Learn
    Learn
    • Ask an Expert
    • eBooks
    • element14 presents
    • Learning Center
    • Tech Spotlight
    • STEM Academy
    • Webinars, Training and Events
    • Learning Groups
  • Technologies
    Technologies
    • 3D Printing
    • FPGA
    • Industrial Automation
    • Internet of Things
    • Power & Energy
    • Sensors
    • Technology Groups
  • Challenges & Projects
    Challenges & Projects
    • Design Challenges
    • element14 presents Projects
    • Project14
    • Arduino Projects
    • Raspberry Pi Projects
    • Project Groups
  • Products
    Products
    • Arduino
    • Avnet Boards Community
    • Dev Tools
    • Manufacturers
    • Multicomp Pro
    • Product Groups
    • Raspberry Pi
    • RoadTests & Reviews
  • Store
    Store
    • Visit Your Store
    • Choose another store...
      • Europe
      •  Austria (German)
      •  Belgium (Dutch, French)
      •  Bulgaria (Bulgarian)
      •  Czech Republic (Czech)
      •  Denmark (Danish)
      •  Estonia (Estonian)
      •  Finland (Finnish)
      •  France (French)
      •  Germany (German)
      •  Hungary (Hungarian)
      •  Ireland
      •  Israel
      •  Italy (Italian)
      •  Latvia (Latvian)
      •  
      •  Lithuania (Lithuanian)
      •  Netherlands (Dutch)
      •  Norway (Norwegian)
      •  Poland (Polish)
      •  Portugal (Portuguese)
      •  Romania (Romanian)
      •  Russia (Russian)
      •  Slovakia (Slovak)
      •  Slovenia (Slovenian)
      •  Spain (Spanish)
      •  Sweden (Swedish)
      •  Switzerland(German, French)
      •  Turkey (Turkish)
      •  United Kingdom
      • Asia Pacific
      •  Australia
      •  China
      •  Hong Kong
      •  India
      •  Korea (Korean)
      •  Malaysia
      •  New Zealand
      •  Philippines
      •  Singapore
      •  Taiwan
      •  Thailand (Thai)
      • Americas
      •  Brazil (Portuguese)
      •  Canada
      •  Mexico (Spanish)
      •  United States
      Can't find the country/region you're looking for? Visit our export site or find a local distributor.
  • Translate
  • Profile
  • Settings
Embedded and Microcontrollers
  • Technologies
  • More
Embedded and Microcontrollers
Blog Renesas RX65 Envision Kit - part 4a: Low Power - Sleep
  • Blog
  • Forum
  • Documents
  • Quiz
  • Polls
  • Files
  • Members
  • Mentions
  • Sub-Groups
  • Tags
  • More
  • Cancel
  • New
Join Embedded and Microcontrollers to participate - click to join for free!
  • Share
  • More
  • Cancel
Group Actions
  • Group RSS
  • More
  • Cancel
Engagement
  • Author Author: Jan Cumps
  • Date Created: 27 Nov 2019 9:28 PM Date Created
  • Views 998 views
  • Likes 4 likes
  • Comments 1 comment
  • RoadTest
  • rx65n
  • rt
  • renesas
  • e2studio
Related
Recommended

Renesas RX65 Envision Kit - part 4a: Low Power - Sleep

Jan Cumps
Jan Cumps
27 Nov 2019

I'm evaluating the Renesas RX65N MCU EV Kit.

In this post,  I'm reviewing the Sleep power save mode

image

source: application note R01AN4347EJ011: Examples of Transitioning to RX651 Groups Low Power Consumption Modes


Evaluation Kit Power Domains


This kit has a good design for measuring microcontroller power consumption. The supply to the CPU can be isolated from any other consumer - such as LEDs, pullup resistors, etc ....

The net for all 3.3V consumers is called VCC_3V3. The net for the microcontroller supplies is named VCC_MCU.

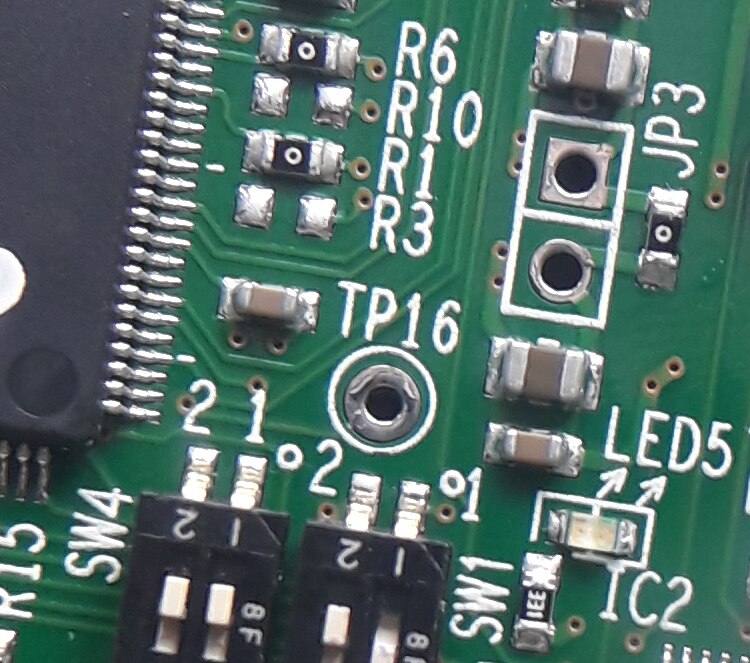
The 0Ω resistor R13 connects the two nets by default. There's a position on the board (JP3) to place a jumper.


image

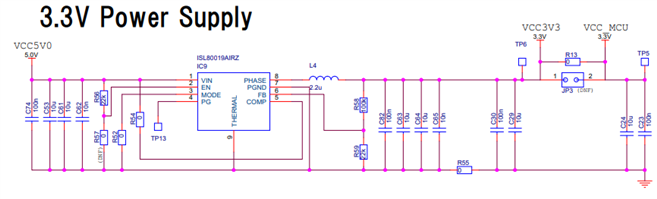
source: Envision Kit schematic from Renesas


To prepare the board for current measurement, you have to remove R13 and place a two-pin header in the JP3 position. First remove the LCD.

attention: when you place the LCD back, put an isolation shield between the PCB and LCD.

The LCD back plane is conductive and can short out any trough-hole components.

When you're not measuring the current, place a jumper over JP3. The board will work as before.

image

source:element.14 online store


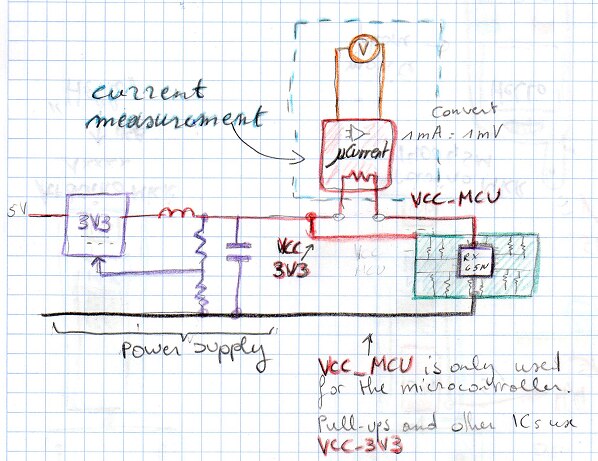
If you want to measure current, then remove the jumper and put a current meter over the JP3 pins.

This has to be a low-Burden-voltage meter, because the supplied voltage should not drop significantly below 3.3V.

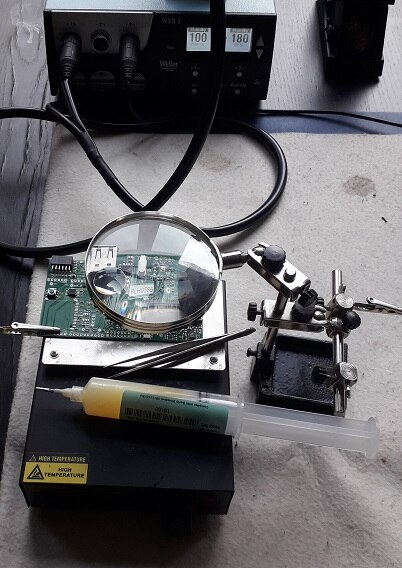
I use an EEVblog µCurrent, as shown in the drawing below:


image


In this gallery, you can see the steps to remove R13 and place JP3.

Take care to not heat up the flatflex connector when removing  R13.


{gallery} Prepare the evaluation board for current measurement

image

Preparation:R13 has to be removed, JP3 populated

image

Preparation:Bench set-up

image

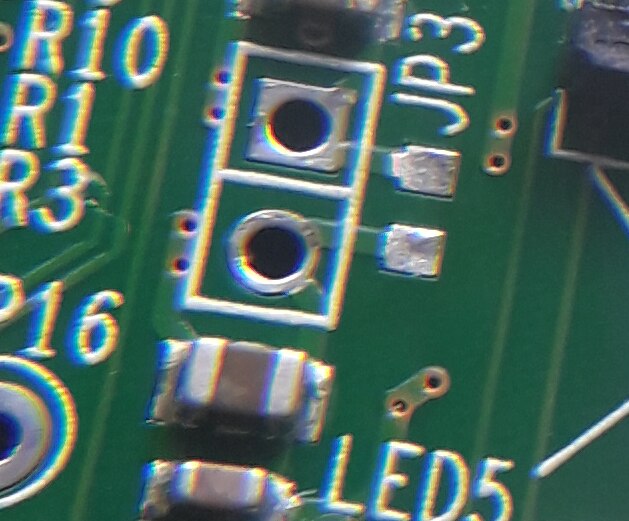
Rework: R13 is desoldered
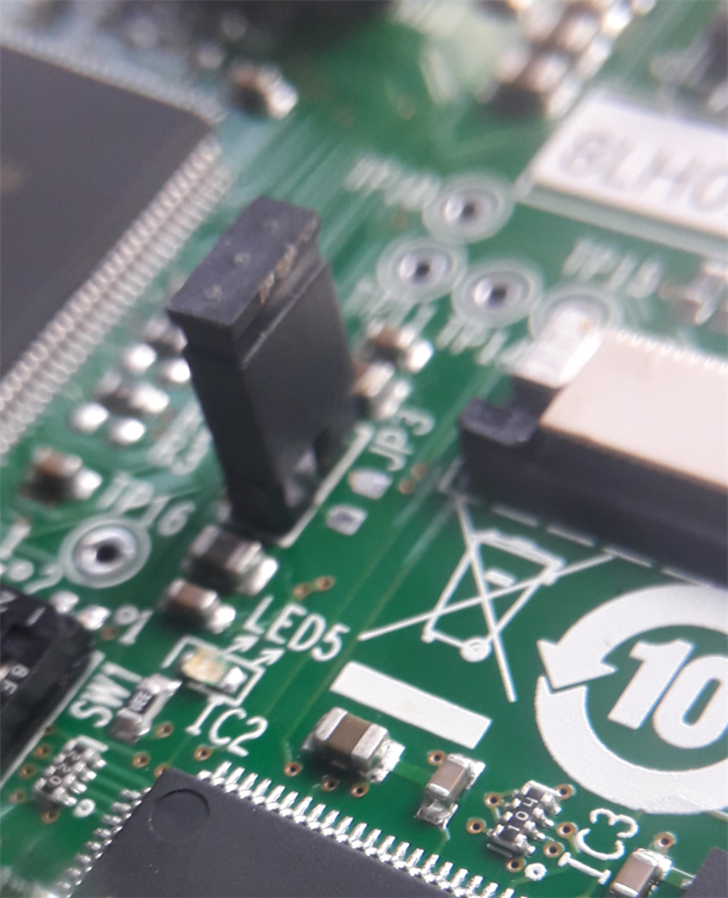
image

Rework: JP3 Placed

image

Finished:Test bed ready for current measurement
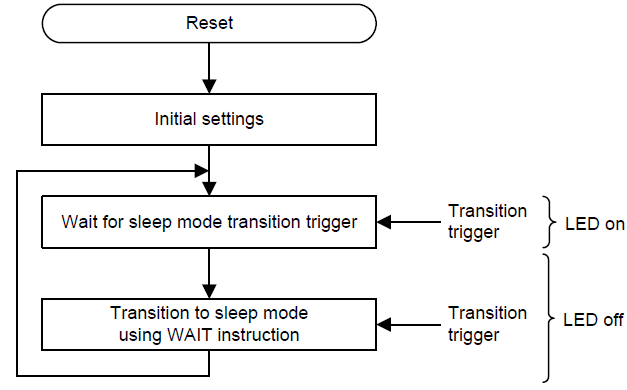
 

Firmware


That part is very easy. The application note R01AN4347EJ0110 comes with example programs for several low power modes.

The one I'm using here is the Power Save Sleep design.

There are only a few simple changes to make to adapt it to the Envision kit (I've attached the project as a zip file t this post):

  • In the Smart Configurator, change the board type to the Envision kit (see blog#1 for instructions)
  • In the main code, change the LED code to work with the user led on our kit (the SW does not need to be changed, by luck it uses the same pin as the one used in the kit):

#define LED2                        (PORT7.PODR.BIT.B0) /* Port Output Data Register for LED */
// ...
    while (1)
    {
        /* ---- When the low power consumption mode is ready, turn on the LED ---- */
        LED2 = LED_ON;

        /* ---- When the switch is pressed, change to low power consumption mode ---- */
        save_power_wait_trigger ();

        /* ---- When the trigger occurs, turn off the LED ---- */
        LED2 = LED_OFF;

        /* ---- Enter low power consumption mode ---- */
        R_Config_LPC_Sleep ();
    }

} /* End of function main() */


Compile and run.

You can see the power mode in the status bar of the e2 studio. Each push of the button, the design switches between default and sleep mode.

image

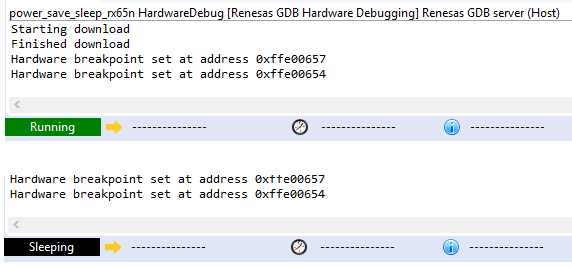
You'll also see that the LED is on in normal mode and off in sleep mode. Don't worry about power consumption. The power for the LED does not flow through JP3.


Measure the Power


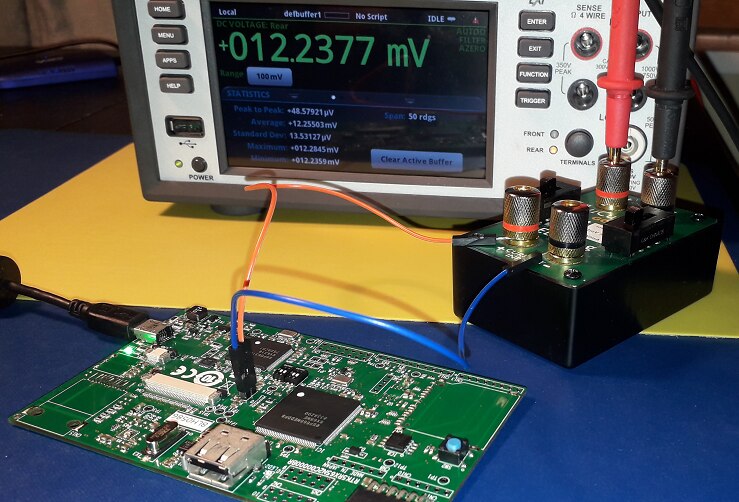
I've put the current measure circuit over JP3. That means that it's in series with VCC-MCU.

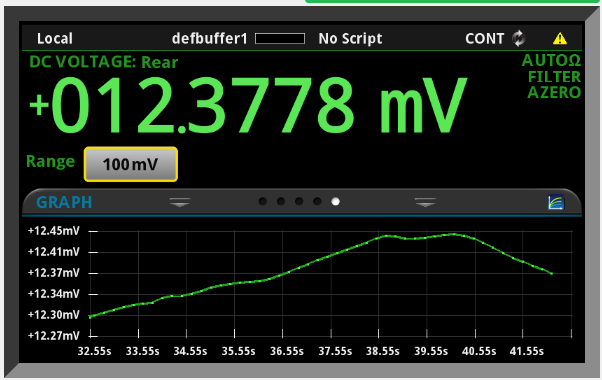
I've usd a µCurrent in 1mA == 1mV mode, so the measurements below have to be interpreted as mA measures instead of mV.
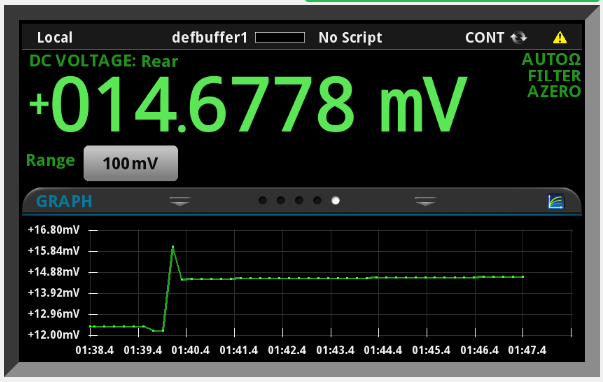
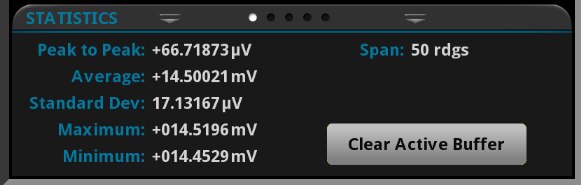
 

Normal mode:

The current in normal mode is (average over 50 samples) 14.50021 mA. Voltage at test point 5 (VCC_MCU) is 3.3067 V. Power  is approx. 47.95 mW

image


image


In sleep mode, the current is 12.25503 mA. VCC_MCU is 3.3081. Power consumption 40.54 mW.

image


image


I'll measure the other power save modes in the next posts.


Related blog
part 1: Create an Empty Project
part 2a: Blinky with GCC Toolchain
part 2b: Blinky with Timer and Interrupt
part 3: Port an example from Renesas toolchain to GCC
part 4a: Low Power - Sleep
part 4b: Low Power - Software Standby
4c todo: power mode 3
4d todo: power mode 4
part 5: DAC
part 6: Software SHA
part 7: Blinky with FreeRTOS
part 8: DMA
part 9: UART
part 10: Reserve LCD Frame Buffer in Expansion RAM with GCC
part 11: port emWIN to GCC and run an LCD Widget
Renesas RX65N MCU EV Kit - Review
Andrew Johnson's blog series
Renesas Envision Kit RPBRX65N Roadtest
Attachments:
power_save_sleep_rx65n.zip
  • Sign in to reply

Top Comments

  • Dudley
    Dudley over 5 years ago +1
    Yay!
  • Dudley
    Dudley over 5 years ago

    Yay!

    • Cancel
    • Vote Up +1 Vote Down
    • Sign in to reply
    • More
    • Cancel
element14 Community

element14 is the first online community specifically for engineers. Connect with your peers and get expert answers to your questions.

  • Members
  • Learn
  • Technologies
  • Challenges & Projects
  • Products
  • Store
  • About Us
  • Feedback & Support
  • FAQs
  • Terms of Use
  • Privacy Policy
  • Legal and Copyright Notices
  • Sitemap
  • Cookies

An Avnet Company © 2025 Premier Farnell Limited. All Rights Reserved.

Premier Farnell Ltd, registered in England and Wales (no 00876412), registered office: Farnell House, Forge Lane, Leeds LS12 2NE.

ICP 备案号 10220084.

Follow element14

  • X
  • Facebook
  • linkedin
  • YouTube