element14 Community
element14 Community
    Register Log In
  • Site
  • Search
  • Log In Register
  • Community Hub
    Community Hub
    • What's New on element14
    • Feedback and Support
    • Benefits of Membership
    • Personal Blogs
    • Members Area
    • Achievement Levels
  • Learn
    Learn
    • Ask an Expert
    • eBooks
    • element14 presents
    • Learning Center
    • Tech Spotlight
    • STEM Academy
    • Webinars, Training and Events
    • Learning Groups
  • Technologies
    Technologies
    • 3D Printing
    • FPGA
    • Industrial Automation
    • Internet of Things
    • Power & Energy
    • Sensors
    • Technology Groups
  • Challenges & Projects
    Challenges & Projects
    • Design Challenges
    • element14 presents Projects
    • Project14
    • Arduino Projects
    • Raspberry Pi Projects
    • Project Groups
  • Products
    Products
    • Arduino
    • Avnet Boards Community
    • Dev Tools
    • Manufacturers
    • Multicomp Pro
    • Product Groups
    • Raspberry Pi
    • RoadTests & Reviews
  • Store
    Store
    • Visit Your Store
    • Choose another store...
      • Europe
      •  Austria (German)
      •  Belgium (Dutch, French)
      •  Bulgaria (Bulgarian)
      •  Czech Republic (Czech)
      •  Denmark (Danish)
      •  Estonia (Estonian)
      •  Finland (Finnish)
      •  France (French)
      •  Germany (German)
      •  Hungary (Hungarian)
      •  Ireland
      •  Israel
      •  Italy (Italian)
      •  Latvia (Latvian)
      •  
      •  Lithuania (Lithuanian)
      •  Netherlands (Dutch)
      •  Norway (Norwegian)
      •  Poland (Polish)
      •  Portugal (Portuguese)
      •  Romania (Romanian)
      •  Russia (Russian)
      •  Slovakia (Slovak)
      •  Slovenia (Slovenian)
      •  Spain (Spanish)
      •  Sweden (Swedish)
      •  Switzerland(German, French)
      •  Turkey (Turkish)
      •  United Kingdom
      • Asia Pacific
      •  Australia
      •  China
      •  Hong Kong
      •  India
      •  Korea (Korean)
      •  Malaysia
      •  New Zealand
      •  Philippines
      •  Singapore
      •  Taiwan
      •  Thailand (Thai)
      • Americas
      •  Brazil (Portuguese)
      •  Canada
      •  Mexico (Spanish)
      •  United States
      Can't find the country/region you're looking for? Visit our export site or find a local distributor.
  • Translate
  • Profile
  • Settings
Embedded and Microcontrollers
  • Technologies
  • More
Embedded and Microcontrollers
Blog Renesas RX65 Envision Kit - part 2a: Blinky with GCC Toolchain
  • Blog
  • Forum
  • Documents
  • Quiz
  • Polls
  • Files
  • Members
  • Mentions
  • Sub-Groups
  • Tags
  • More
  • Cancel
  • New
Join Embedded and Microcontrollers to participate - click to join for free!
  • Share
  • More
  • Cancel
Group Actions
  • Group RSS
  • More
  • Cancel
Engagement
  • Author Author: Jan Cumps
  • Date Created: 23 Nov 2019 2:20 PM Date Created
  • Views 1934 views
  • Likes 5 likes
  • Comments 1 comment
  • rx65n
  • gcc
  • renesas
  • e2studio
Related
Recommended

Renesas RX65 Envision Kit - part 2a: Blinky with GCC Toolchain

Jan Cumps
Jan Cumps
23 Nov 2019

I'm evaluating the Renesas RX65N MCU EV Kit.

In this post: A Blinky, with the GCC toolchain.

image

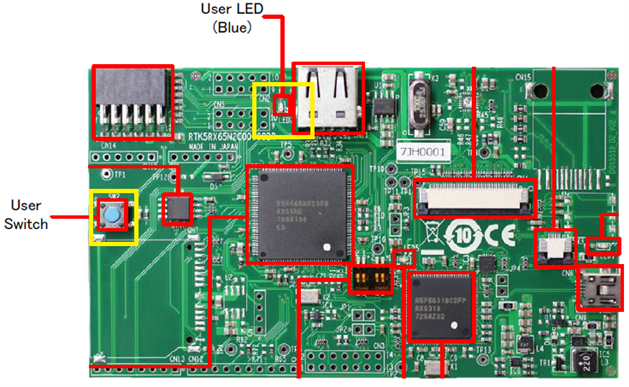
It's not a real blinky - it's a switchy. The User LED is on when the User Button is pressed.

A Morse code trainer image.


Create the Project


In the previous post, I used the Renesas CCRX toolchain to create a project in e2 Studio. Many things are similar when using the GCC tools.

This post expects that you did the activities in the previous blog (e.g.: that you downloaded the evaluation board definition in the configurator's board tab).


File -> New C/C++ Project -> Renesas RX -> GCC for Renesas RC C/C++ Executable Project -> Next

image


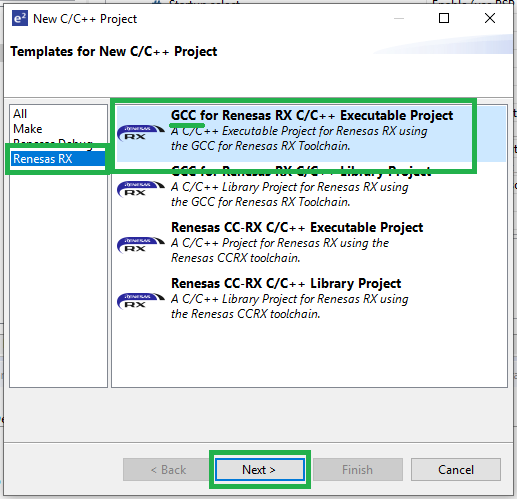
Name your project -> Next.

Toolchain: GCC for Renesas RX, latest installed version

Select the correct tatget for this board (for navigation, see the previous post).

Set the E2 Lite (RX) debugger and create a release configuration too. -> Next


image


Enable Use Smart Configurator -> Finish.


Configure the Project


In the configurator window that opens, set the board to the Envision kit. Then open the Components tab.

The New Project wizard has created one compinent.

That's the upbringing module that brings you from power-up to main() with a correctly configured controller.


Now we add two modules. One to configure the GPIO pins, and one that gives us the pin definitions anf GPIO API.


On the Components tab, press the + button.

This brings up a list of available components.

The first time, we have to do two steps (Renesas gurus may chime in here to refine what needs to be selected/configured).


Change the IDE configuration to allow that blocked modules are shown.

Configure General Settings -> Enable Allow blocked FIT modules to be displayed -> Apply and Close

image


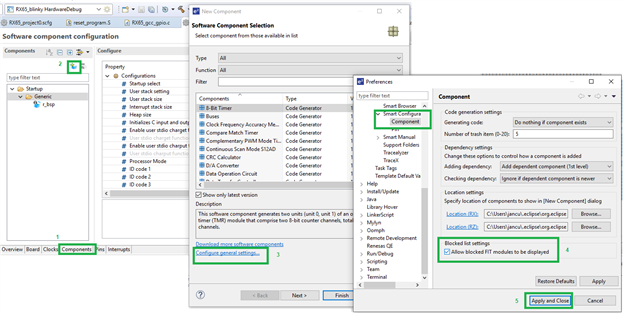
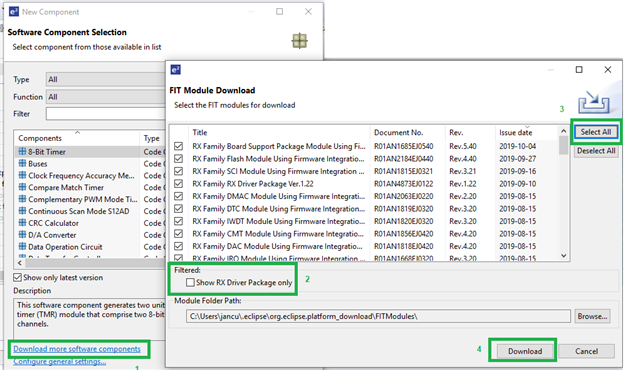
Then add all components . This takes a long time.

Download more software components -> Disable Show RX Driver Package only -> Select All -> Download.

Go for a coffee.

image


Once they are added, select these two:

  • Ports: to enable the ports and pins, and set the direction
  • r_gpio_rx: to add the pin header file and gpio APIs.
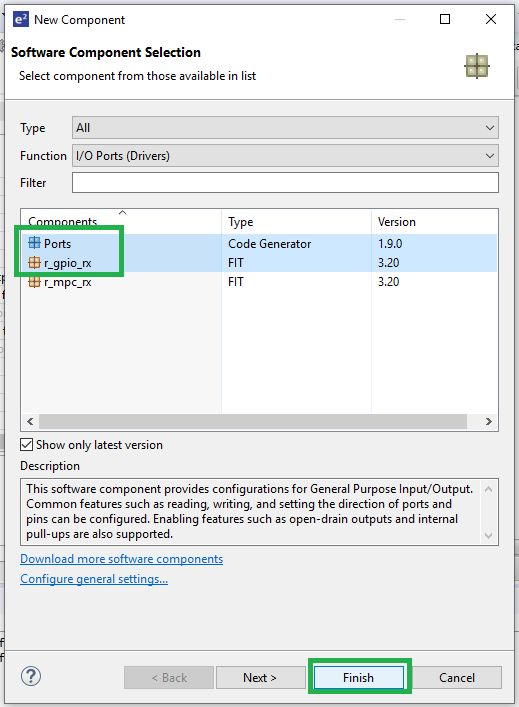
image


Cick Finish.


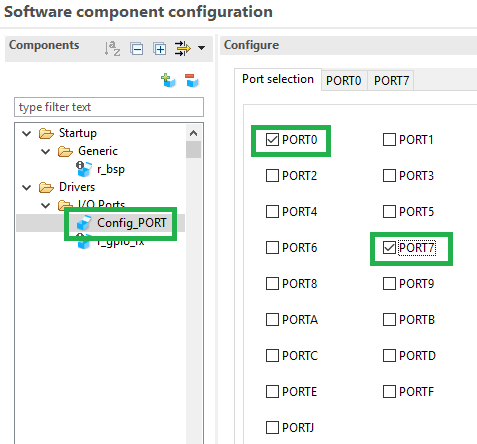
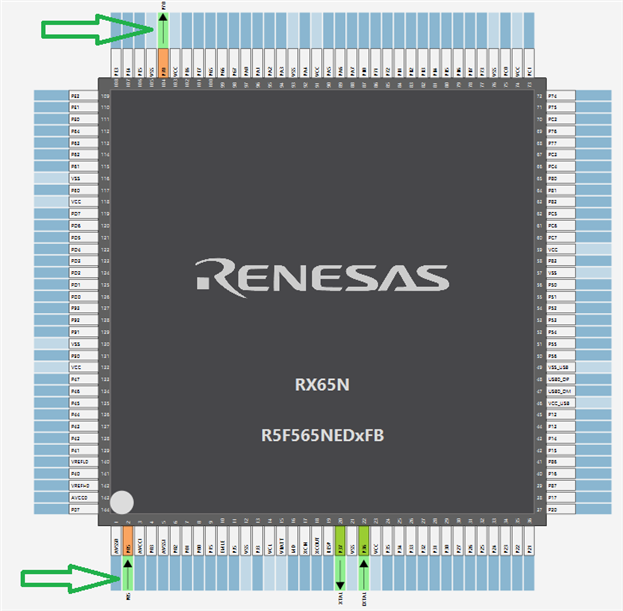
The user switch SW2 on the evaluation board is assigned to Port 0 bit 5, the LED2 blue led to Port 7 bit 0.

We'll set these pins as I/O functional inputs and outputs.


image


image


Select the Config_PORT module and enable PORT0 and PORT7. 2 new tabs appear.

image

Select tab PORT0 and set P05 to In.

image

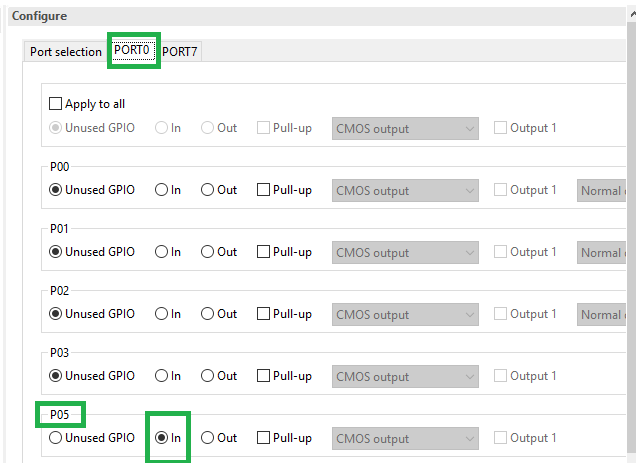
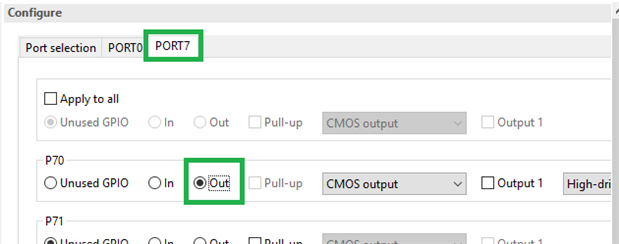
Select PORT7 and set P00 to Out.

image


In the MCU package view, these pins have changed colour and definition:

image


In the Pin tab, they have also changed (here P70 (port 7 pin 0) as example):

image


image


That's it. The r_gpio_rx component does not need to be maintained.

Save the configuration file, then Generate Code.


Write the C Code


Activate the IDE's C/C++ perspective.

image

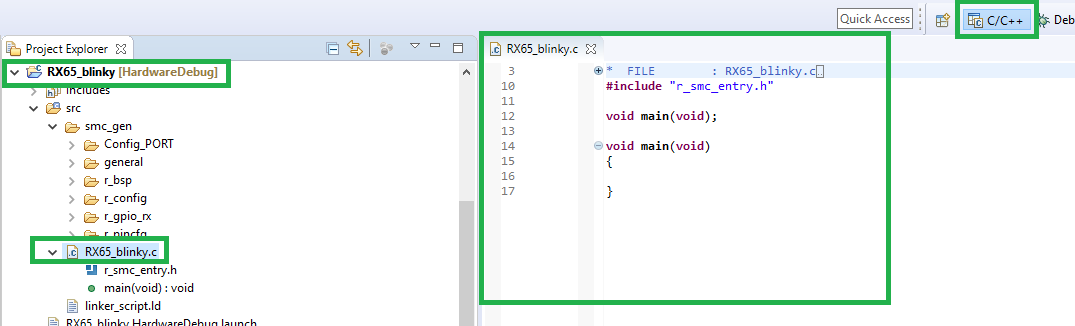
The configurator has created a project structure. Take some time to familiarise.

Then open the main file, RX65_blinky.c.


Let's add the header file for the driver code, and the pin definitions:


#include "r_gpio_rx_if.h"     /* Contains prototypes for the GPIO driver */

#define  SW_2    (GPIO_PORT_0_PIN_5)
#define  LED_2   (GPIO_PORT_7_PIN_0)


Then write a very simple main() loop.

It will check if the button state has changed, and if yes, update the LED state.


void main(void) {
    gpio_level_t lastLevel = GPIO_LEVEL_LOW;
    do {
        gpio_level_t level = R_GPIO_PinRead(SW_2);
        if (level != lastLevel) {user button on the lft of the board.


            lastLevel = level;
            R_GPIO_PinWrite ( LED_2, level);
        }
    } while (1);
}


Build and Debug


See the previous post for the instructions. It's identical for this project.

If you get a failure at startup, you mmay have skipped the step in that section to set the Power and Frequency options in the debug configuration.

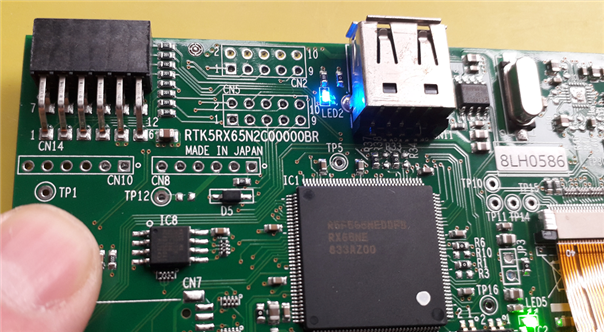
Once the code is running, the blue led next to the USB connector will be on when you push the


image


Related blog
part 1: Create an Empty Project
part 2a: Blinky with GCC Toolchain
part 2b: Blinky with Timer and Interrupt
part 3: Port an example from Renesas toolchain to GCC
part 4a: Low Power - Sleep
part 4b: Low Power - Software Standby
4c todo: power mode 3
4d todo: power mode 4
part 5: DAC
part 6: Software SHA
part 7: Blinky with FreeRTOS
part 8: DMA
part 9: UART
part 10: Reserve LCD Frame Buffer in Expansion RAM with GCC
part 11: port emWIN to GCC and run an LCD Widget
Renesas RX65N MCU EV Kit - Review
Andrew Johnson's blog series
Renesas Envision Kit RPBRX65N Roadtest
Attachments:
RX65_blinky.zip
  • Sign in to reply
  • Jan Cumps
    Jan Cumps over 5 years ago

    A new GCC version 8.3 is released for Renesas RX: https://gcc-renesas.com/

    • Cancel
    • Vote Up 0 Vote Down
    • Sign in to reply
    • More
    • Cancel
element14 Community

element14 is the first online community specifically for engineers. Connect with your peers and get expert answers to your questions.

  • Members
  • Learn
  • Technologies
  • Challenges & Projects
  • Products
  • Store
  • About Us
  • Feedback & Support
  • FAQs
  • Terms of Use
  • Privacy Policy
  • Legal and Copyright Notices
  • Sitemap
  • Cookies

An Avnet Company © 2025 Premier Farnell Limited. All Rights Reserved.

Premier Farnell Ltd, registered in England and Wales (no 00876412), registered office: Farnell House, Forge Lane, Leeds LS12 2NE.

ICP 备案号 10220084.

Follow element14

  • X
  • Facebook
  • linkedin
  • YouTube