element14 Community
element14 Community
    Register Log In
  • Site
  • Search
  • Log In Register
  • Community Hub
    Community Hub
    • What's New on element14
    • Feedback and Support
    • Benefits of Membership
    • Personal Blogs
    • Members Area
    • Achievement Levels
  • Learn
    Learn
    • Ask an Expert
    • eBooks
    • element14 presents
    • Learning Center
    • Tech Spotlight
    • STEM Academy
    • Webinars, Training and Events
    • Learning Groups
  • Technologies
    Technologies
    • 3D Printing
    • FPGA
    • Industrial Automation
    • Internet of Things
    • Power & Energy
    • Sensors
    • Technology Groups
  • Challenges & Projects
    Challenges & Projects
    • Design Challenges
    • element14 presents Projects
    • Project14
    • Arduino Projects
    • Raspberry Pi Projects
    • Project Groups
  • Products
    Products
    • Arduino
    • Avnet Boards Community
    • Dev Tools
    • Manufacturers
    • Multicomp Pro
    • Product Groups
    • Raspberry Pi
    • RoadTests & Reviews
  • Store
    Store
    • Visit Your Store
    • Choose another store...
      • Europe
      •  Austria (German)
      •  Belgium (Dutch, French)
      •  Bulgaria (Bulgarian)
      •  Czech Republic (Czech)
      •  Denmark (Danish)
      •  Estonia (Estonian)
      •  Finland (Finnish)
      •  France (French)
      •  Germany (German)
      •  Hungary (Hungarian)
      •  Ireland
      •  Israel
      •  Italy (Italian)
      •  Latvia (Latvian)
      •  
      •  Lithuania (Lithuanian)
      •  Netherlands (Dutch)
      •  Norway (Norwegian)
      •  Poland (Polish)
      •  Portugal (Portuguese)
      •  Romania (Romanian)
      •  Russia (Russian)
      •  Slovakia (Slovak)
      •  Slovenia (Slovenian)
      •  Spain (Spanish)
      •  Sweden (Swedish)
      •  Switzerland(German, French)
      •  Turkey (Turkish)
      •  United Kingdom
      • Asia Pacific
      •  Australia
      •  China
      •  Hong Kong
      •  India
      •  Korea (Korean)
      •  Malaysia
      •  New Zealand
      •  Philippines
      •  Singapore
      •  Taiwan
      •  Thailand (Thai)
      • Americas
      •  Brazil (Portuguese)
      •  Canada
      •  Mexico (Spanish)
      •  United States
      Can't find the country/region you're looking for? Visit our export site or find a local distributor.
  • Translate
  • Profile
  • Settings
Embedded and Microcontrollers
  • Technologies
  • More
Embedded and Microcontrollers
Blog Renesas RX65 Envision Kit - part 3: Port an example from Renesas toolchain to GCC
  • Blog
  • Forum
  • Documents
  • Quiz
  • Polls
  • Files
  • Members
  • Mentions
  • Sub-Groups
  • Tags
  • More
  • Cancel
  • New
Join Embedded and Microcontrollers to participate - click to join for free!
  • Share
  • More
  • Cancel
Group Actions
  • Group RSS
  • More
  • Cancel
Engagement
  • Author Author: Jan Cumps
  • Date Created: 24 Nov 2019 10:10 PM Date Created
  • Views 1828 views
  • Likes 6 likes
  • Comments 5 comments
  • RoadTest
  • rt
  • renesas
  • e2studio
Related
Recommended

Renesas RX65 Envision Kit - part 3: Port an example from Renesas toolchain to GCC

Jan Cumps
Jan Cumps
24 Nov 2019

I'm evaluating the Renesas RX65N MCU EV Kit.

In this post,  I'll port the LCD driver example from the Renesas proprietary CC-RX

image


Renesas offers a GCC toolchain that can build firware for the RX65 family. I have been using it for most of my developments and it works .

The toolchain is nicely integrated in the e2 Studio IDE. The full cycle from project creation to debug is supported.

Let's see how you can port a project from CC-RX to GCC: the QE for Display [RX] Sample Program.


First, create a GCC project in e2 studio. Look at post 2a for  instructions.

Then, use the configurator to add the r_glcdc_rc component.

Enable LCD_CLK Pin and LCD_TCO0 -> 15.

Save and generate code.


Then copy the example sources from the Renesas project over from src to src:

main.c

r_image_config_RX65N_Envision.h

r_lcd_timing_RX65N_Envision.h


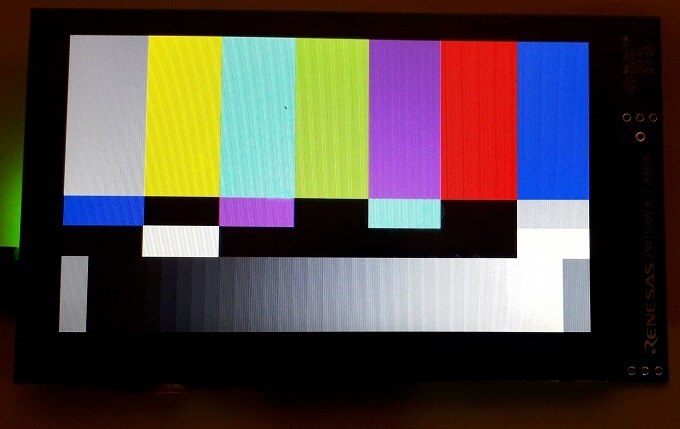
Also copy over the image folder. It contains the test pattern.image shown at the beginning of this post.

When you build the cde, it will fail for one source line:


#define FRAME_BUF_BASE_ADDR  (__sectop("FRAME_BUFFER"))


This is because __sectop() is a Renesas toolchain specific construct. It returns the address of the begin of the FRAME BUFFER section.

An other option is to read the documentation. It says that this address = 0x0800000.


image

That means I can get away by replacing the line with:


#define FRAME_BUF_BASE_ADDR   0x00800000


No other changes are needed. Build and debug.

Once this line in the main() function has been executed, we can manipulate the screen:


    /* ---- Initialization of frame buffer area ---- */
    frame_buffer_initialize();

    /* ---- Initialization of the GLCDC, and start display ---- */
    glcdc_initialize();


image


note: I was not successful in porting these Renesas components to GCC: the FAT and SHA1 modules.

These modules don't publish all sources. Part of the implementation comes in a pre-compiled .lib binary.

These libraries are specific for the Renesas rlink optimised linker. They aren't compatible with GCC linkers.

There is a tool available to convert Renesas .lib of type SH (fixed location libs) but the libs provided with the two modules above are not of that type.


That means that the default secure bootloader example (it uses SHA1 to validate new firmware and uses FAT to get the signed firmware from a USB stick) is not easy to port. I managed to port the soource compilation but haven't found a way to link in the FAT and SHA1 blobs.


If you plan to build the out-of-box example from source, do that within the first 60 days after you first used the Renesas toolchain, the archive those project with the build artifacts for later use. The toolchain is fully functional the first 60 days. After that, a few options are restricted. One of those options affects your ability to build those examples: a code size restriction of 128K (for the RX family). You need more for the default demo.

The price for a one year names STD licence for the CC-RX packet is a little over USD 300. That will give access to full-size binaries.

A one seat PRO license adds security and compliance related functionality (e.g.: MISRA-C rule validation) and costs approx. USD 350 / year.

For professional use, those are fair prices.


The e2 studio project is attached.


Related blog
part 1: Create an Empty Project
part 2a: Blinky with GCC Toolchain
part 2b: Blinky with Timer and Interrupt
part 3: Port an example from Renesas toolchain to GCC
part 4a: Low Power - Sleep
part 4b: Low Power - Software Standby
4c todo: power mode 3
4d todo: power mode 4
part 5: DAC
part 6: Software SHA
part 7: Blinky with FreeRTOS
part 8: DMA
part 9: UART
part 10: Reserve LCD Frame Buffer in Expansion RAM with GCC
part 11: port emWIN to GCC and run an LCD Widget
Renesas RX65N MCU EV Kit - Review
Andrew Johnson's blog series
Renesas Envision Kit RPBRX65N Roadtest
Attachments:
RX65N_GCC_QE_for_Display_sample_RX65N_Envision.zip
  • Sign in to reply
  • Jan Cumps
    Jan Cumps over 1 year ago

    I'm trying a few new things with this kit.

    Here, I'm using a different display: EastRising 5" 480 * 272. It's the same resolution as the original (an Newhaven), but larger. It doesn't have a capacitive touch screen. I ordered one that (hopefully) matches.

    image

    Some sites mention that it has resistive touch, but I don't know how to enable that on RX65N.

    • Cancel
    • Vote Up 0 Vote Down
    • Sign in to reply
    • More
    • Cancel
  • Jan Cumps
    Jan Cumps over 5 years ago in reply to Jan Cumps

    I've added a dedicated blog on frame buffer allocation in GCC: Renesas RX65 Envision Kit - part 10: Reserve LCD Frame Buffer in Expansion RAM with GCC

    • Cancel
    • Vote Up 0 Vote Down
    • Sign in to reply
    • More
    • Cancel
  • Jan Cumps
    Jan Cumps over 5 years ago in reply to Jan Cumps

    In e2 studio, there's a loader file graphical editor:


    (note: I've resized the buffer block to 261120. That' 2 bytes * 480 * 272 - only frame buffer 2 is used in this program and its at the beginning of the expansion RAM section)

    image


    image


    image

    • Cancel
    • Vote Up 0 Vote Down
    • Sign in to reply
    • More
    • Cancel
  • Jan Cumps
    Jan Cumps over 5 years ago

    In this blog, I took a shortcut to define the LCD frame buffer:


    #define FRAME_BUF_BASE_ADDR   0x00800000


    The default GCC toolchain  loader file does not list this part of expansion RAM - not unexpected because frame buffer is application dependent.


    The CC-RX linker settings in Renesas' example do handle this:

    In the linker, the section start address is defined:

    image


    and in the code a CC-RX specific construct is used to reference that memory section's start address ( __sectop() ):


    #define FRAME_BUF_BASE_ADDR  (__sectop("FRAME_BUFFER"))


    I think this is good practice, to avoid hard-coding the address in source, when you have the linker/loader that's the guardian of memory sections.


    Although I took a shortcut, there's no real reason to do that. GCC has a construct that performs the same:


    Reserve the MEMORY block and define a SECTION for the buffer in the linker file:


    MEMORY
    {
    // ...
    FRAME_BUFFER : ORIGIN = 0x800000, LENGTH = 0x80000
    }
    // ...
    SECTIONS
    {
    // ...
    .FRAME_BUFFER 0x00800000 (NOLOAD) : 
      {
        "_FRAME_BUFFER" = .;    
      } > FRAME_BUFFER
    }


    This will define a virtual C variable _FRAME_BUFFER that does not take memory space but has an address. That address is available in our C code:


    extern uint16_t FRAME_BUFFER;
     #define FRAME_BUF_BASE_ADDR   &FRAME_BUFFER


    You'll see that, when the FRAME_BUF_BASE_ADDR is used, it points to the 0x008000000 location.


        /* Get the top address of the frame buffer */
        p_pixel_addr = (uint16_t *)FRAME_BUF_BASE_ADDR;


    image


    I don't have a very strong opinion on what's the best approach. If the LCD driver would come with a header file that has the address defined, I'd definitely use that.

    In this case, where it's dependent on memory mapping in the controller's extended RAM, I prefer to put it in the loader because it sets clear boundaries of external resources that are memory mapped in a single location.

    • Cancel
    • Vote Up 0 Vote Down
    • Sign in to reply
    • More
    • Cancel
  • Jan Cumps
    Jan Cumps over 5 years ago

    Here's a list of all Renesas examples, application notes and downloads for the RX65 family. There's a lot available.

    • Cancel
    • Vote Up 0 Vote Down
    • Sign in to reply
    • More
    • Cancel
element14 Community

element14 is the first online community specifically for engineers. Connect with your peers and get expert answers to your questions.

  • Members
  • Learn
  • Technologies
  • Challenges & Projects
  • Products
  • Store
  • About Us
  • Feedback & Support
  • FAQs
  • Terms of Use
  • Privacy Policy
  • Legal and Copyright Notices
  • Sitemap
  • Cookies

An Avnet Company © 2025 Premier Farnell Limited. All Rights Reserved.

Premier Farnell Ltd, registered in England and Wales (no 00876412), registered office: Farnell House, Forge Lane, Leeds LS12 2NE.

ICP 备案号 10220084.

Follow element14

  • X
  • Facebook
  • linkedin
  • YouTube