element14 Community
element14 Community
    Register Log In
  • Site
  • Search
  • Log In Register
  • Community Hub
    Community Hub
    • What's New on element14
    • Feedback and Support
    • Benefits of Membership
    • Personal Blogs
    • Members Area
    • Achievement Levels
  • Learn
    Learn
    • Ask an Expert
    • eBooks
    • element14 presents
    • Learning Center
    • Tech Spotlight
    • STEM Academy
    • Webinars, Training and Events
    • Learning Groups
  • Technologies
    Technologies
    • 3D Printing
    • FPGA
    • Industrial Automation
    • Internet of Things
    • Power & Energy
    • Sensors
    • Technology Groups
  • Challenges & Projects
    Challenges & Projects
    • Design Challenges
    • element14 presents Projects
    • Project14
    • Arduino Projects
    • Raspberry Pi Projects
    • Project Groups
  • Products
    Products
    • Arduino
    • Avnet Boards Community
    • Dev Tools
    • Manufacturers
    • Multicomp Pro
    • Product Groups
    • Raspberry Pi
    • RoadTests & Reviews
  • Store
    Store
    • Visit Your Store
    • Choose another store...
      • Europe
      •  Austria (German)
      •  Belgium (Dutch, French)
      •  Bulgaria (Bulgarian)
      •  Czech Republic (Czech)
      •  Denmark (Danish)
      •  Estonia (Estonian)
      •  Finland (Finnish)
      •  France (French)
      •  Germany (German)
      •  Hungary (Hungarian)
      •  Ireland
      •  Israel
      •  Italy (Italian)
      •  Latvia (Latvian)
      •  
      •  Lithuania (Lithuanian)
      •  Netherlands (Dutch)
      •  Norway (Norwegian)
      •  Poland (Polish)
      •  Portugal (Portuguese)
      •  Romania (Romanian)
      •  Russia (Russian)
      •  Slovakia (Slovak)
      •  Slovenia (Slovenian)
      •  Spain (Spanish)
      •  Sweden (Swedish)
      •  Switzerland(German, French)
      •  Turkey (Turkish)
      •  United Kingdom
      • Asia Pacific
      •  Australia
      •  China
      •  Hong Kong
      •  India
      •  Korea (Korean)
      •  Malaysia
      •  New Zealand
      •  Philippines
      •  Singapore
      •  Taiwan
      •  Thailand (Thai)
      • Americas
      •  Brazil (Portuguese)
      •  Canada
      •  Mexico (Spanish)
      •  United States
      Can't find the country/region you're looking for? Visit our export site or find a local distributor.
  • Translate
  • Profile
  • Settings
Embedded and Microcontrollers
  • Technologies
  • More
Embedded and Microcontrollers
Blog Renesas RX65 Envision Kit - part 7: Blinky with FreeRTOS
  • Blog
  • Forum
  • Documents
  • Quiz
  • Polls
  • Files
  • Members
  • Mentions
  • Sub-Groups
  • Tags
  • More
  • Cancel
  • New
Join Embedded and Microcontrollers to participate - click to join for free!
  • Share
  • More
  • Cancel
Group Actions
  • Group RSS
  • More
  • Cancel
Engagement
  • Author Author: Jan Cumps
  • Date Created: 1 Dec 2019 8:37 PM Date Created
  • Views 1205 views
  • Likes 6 likes
  • Comments 1 comment
  • freertos
Related
Recommended

Renesas RX65 Envision Kit - part 7: Blinky with FreeRTOS

Jan Cumps
Jan Cumps
1 Dec 2019

I'm evaluating the Renesas RX65N MCU EV Kit.

In this post: A Blinky, with the FreeRTOS managing the clock.

image


Create the Project


As usual, use Blog #1 to create the project.

The only extra action is to select FreeRTOS while going through the project creation steps:

image

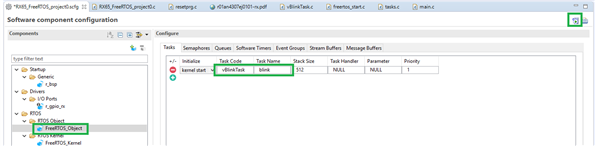
First, let's add an RTOS task that will blink the LED.

In the Smart Configurator, select the correct board, then go to Components.

Select FreeRTOS_Object, and in the Task tab, push the image  button.

Enter

image

In a few steps, when we generate the code from the configurator, this will create a file /src/frtos_skeleton/vBlinkTask.c, where we'll write the blink code.

Because we need the RX65 GPIO registers, we need to add the r_gpio_rx block in the configurator. Use the dd Component button to add this (see also blog post 2a for a step-by-step guide for this).


When using FreeRTOS projects, it seems that the "Ports" SmartConfig module can't be used.

That's the one that sets in- and outputs. No worries. We'll set the LED2 pin on our board to output mode in our RTOS task.

Now it's time to save the configuration and generate the code.


Let's first modify the main task now. It needs to be modified for each project.

In the Renesas port, this task can be used to manually create tasks.

But we will not do that because our task is started by the kernel (we selected that earlier in the configurator).

In the main_task function, delete the while(1) placeholder.

image

If you forget to do this, your project will forever loop there, without giving control to the FreeRTOS scheduler.


The FreeRTOS Blinky Task


The main goal of this project is to create a task that will be called every so many ms and toggle LED2.

The configuarator has created /src/frtos_skeleton/vBlinkTask.c for us.


We'll adopt that file. Take care to always put your code between the placeholders in that file.

/* Start user code for *****. Do not edit comment generated here */
// your code here
/* End user code. Do not edit comment generated here */


This will take care that the next time you generate from the configurator, your code is preserved.

Anything you put outside these comment pairs will be lost.


First, let's include the gpio register definitions and define LED2:


/* Start user code for import. Do not edit comment generated here */
#include "r_gpio_rx_if.h"     /* Contains prototypes for the GPIO driver */
#define  LED_2   PORT7.PODR.BIT.B0
/* End user code. Do not edit comment generated here */


Then, write the main task (again, stay within the comments to preserve your code.

Anything before the for(;;) construct will run once, at the first run of the task.

This is where we define the pin for the LED as output.

The code in the for() loop itself will be activated every 1000 ms by the FreeRTOS task manager.

That's where we toggle LED2.


void vBlinkTask(void * pvParameters)
{
/* Start user code for function. Do not edit comment generated here */
  // initialise
  /* ---- Set the PORT7.PODR register ---- */
  PORT7.PODR.BYTE |= 0x01;      /* high output pin: P70 */
  /* ---- Set the PORT7.PDR register ---- */
  PORT7.PDR.BYTE |= 0x01;      /* output pin: P70 */

  for(;;)   {
    /* Toggle LED2 with timer tick */
    LED_2 = ~LED_2;  // Toggle LED2 with each callback
    vTaskDelay(1000);
  }
/* End user code. Do not edit comment generated here */
}


Make and Run. That's it. Have fun. The e2 studio project is attached.


The FreeRTOS configuration modules from Renesas require that you use the CC-RX toolchain.

FreeRTOS itself should work on the Renesas with GCC, however. I haven' tried this.


Related blog
part 1: Create an Empty Project
part 2a: Blinky with GCC Toolchain
part 2b: Blinky with Timer and Interrupt
part 3: Port an example from Renesas toolchain to GCC
part 4a: Low Power - Sleep
part 4b: Low Power - Software Standby
4c todo: power mode 3
4d todo: power mode 4
part 5: DAC
part 6: Software SHA
part 7: Blinky with FreeRTOS
part 8: DMA
part 9: UART
part 10: Reserve LCD Frame Buffer in Expansion RAM with GCC
part 11: port emWIN to GCC and run an LCD Widget
Renesas RX65N MCU EV Kit - Review
Andrew Johnson's blog series
Renesas Envision Kit RPBRX65N Roadtest
Attachments:
RX65_FreeRTOS_project0.zip
  • Sign in to reply
  • Jan Cumps
    Jan Cumps over 5 years ago

    The led is flashing twice the speed as expected. That's because the example is made for an other evelopment board with a 24 MHz Chrystal.

    The Envision board has a 12 MHz one. Therefore, change r_config/r_bsp_config.h:


    /* Input clock frequency in Hz (XTAL or EXTAL). */
    #define BSP_CFG_XTAL_HZ                 (12000000)

    • Cancel
    • Vote Up 0 Vote Down
    • Sign in to reply
    • More
    • Cancel
element14 Community

element14 is the first online community specifically for engineers. Connect with your peers and get expert answers to your questions.

  • Members
  • Learn
  • Technologies
  • Challenges & Projects
  • Products
  • Store
  • About Us
  • Feedback & Support
  • FAQs
  • Terms of Use
  • Privacy Policy
  • Legal and Copyright Notices
  • Sitemap
  • Cookies

An Avnet Company © 2025 Premier Farnell Limited. All Rights Reserved.

Premier Farnell Ltd, registered in England and Wales (no 00876412), registered office: Farnell House, Forge Lane, Leeds LS12 2NE.

ICP 备案号 10220084.

Follow element14

  • X
  • Facebook
  • linkedin
  • YouTube