element14 Community
element14 Community
    Register Log In
  • Site
  • Search
  • Log In Register
  • Community Hub
    Community Hub
    • What's New on element14
    • Feedback and Support
    • Benefits of Membership
    • Personal Blogs
    • Members Area
    • Achievement Levels
  • Learn
    Learn
    • Ask an Expert
    • eBooks
    • element14 presents
    • Learning Center
    • Tech Spotlight
    • STEM Academy
    • Webinars, Training and Events
    • Learning Groups
  • Technologies
    Technologies
    • 3D Printing
    • FPGA
    • Industrial Automation
    • Internet of Things
    • Power & Energy
    • Sensors
    • Technology Groups
  • Challenges & Projects
    Challenges & Projects
    • Design Challenges
    • element14 presents Projects
    • Project14
    • Arduino Projects
    • Raspberry Pi Projects
    • Project Groups
  • Products
    Products
    • Arduino
    • Avnet Boards Community
    • Dev Tools
    • Manufacturers
    • Multicomp Pro
    • Product Groups
    • Raspberry Pi
    • RoadTests & Reviews
  • Store
    Store
    • Visit Your Store
    • Choose another store...
      • Europe
      •  Austria (German)
      •  Belgium (Dutch, French)
      •  Bulgaria (Bulgarian)
      •  Czech Republic (Czech)
      •  Denmark (Danish)
      •  Estonia (Estonian)
      •  Finland (Finnish)
      •  France (French)
      •  Germany (German)
      •  Hungary (Hungarian)
      •  Ireland
      •  Israel
      •  Italy (Italian)
      •  Latvia (Latvian)
      •  
      •  Lithuania (Lithuanian)
      •  Netherlands (Dutch)
      •  Norway (Norwegian)
      •  Poland (Polish)
      •  Portugal (Portuguese)
      •  Romania (Romanian)
      •  Russia (Russian)
      •  Slovakia (Slovak)
      •  Slovenia (Slovenian)
      •  Spain (Spanish)
      •  Sweden (Swedish)
      •  Switzerland(German, French)
      •  Turkey (Turkish)
      •  United Kingdom
      • Asia Pacific
      •  Australia
      •  China
      •  Hong Kong
      •  India
      •  Korea (Korean)
      •  Malaysia
      •  New Zealand
      •  Philippines
      •  Singapore
      •  Taiwan
      •  Thailand (Thai)
      • Americas
      •  Brazil (Portuguese)
      •  Canada
      •  Mexico (Spanish)
      •  United States
      Can't find the country/region you're looking for? Visit our export site or find a local distributor.
  • Translate
  • Profile
  • Settings
Embedded and Microcontrollers
  • Technologies
  • More
Embedded and Microcontrollers
Blog Renesas RX65 Envision Kit - part 11: port emWin to GCC and run an LCD Widget
  • Blog
  • Forum
  • Documents
  • Quiz
  • Polls
  • Files
  • Members
  • Mentions
  • Sub-Groups
  • Tags
  • More
  • Cancel
  • New
Join Embedded and Microcontrollers to participate - click to join for free!
  • Share
  • More
  • Cancel
Group Actions
  • Group RSS
  • More
  • Cancel
Engagement
  • Author Author: Jan Cumps
  • Date Created: 2 Jan 2020 11:04 AM Date Created
  • Views 3282 views
  • Likes 8 likes
  • Comments 12 comments
  • rx65n
  • lcd
  • gcc
  • rt
  • emwin
  • cc-rx
Related
Recommended

Renesas RX65 Envision Kit - part 11: port emWin to GCC and run an LCD Widget

Jan Cumps
Jan Cumps
2 Jan 2020

I'm evaluating the Renesas RX65N MCU EV Kit.

In this post,  I make the emWin libraries work with the GCC toolchain

image


Renesas CC-RX Dependencies


The emWin that's available for the Renesas RX family can be built with the GCC Toolchain, but there are changes needed

  • a CC-RX construct is used to call the NOP() machine instruction.
  • a compile time definition needs to be set.
  • a different emWin library needs to be linked in.
  • take care that code and data are not overlapping the fixed drawing buffer areas.


These steps are easy, but it took me a good day to figure everything out.

In particular the memory location of the buffers was tricky to find out. The firmware crashes when you use the default locations for code and data. More in the Memory Management section below.


I've attached the completely configured project at the end of this post. If you're stuck following the instructions, you can use that known-working archive as a start point.


Create GCC Project and Configure Peripherals


Start off with an empty GCC project. Follow the instructions of the Create the Project section of part 2a: Blinky with GCC Toolchain.

Then open the Smart Configurator file and start setting up the hardware:


  1. Set Board and Configure Board Startup
    On the Board tab, set EnvisionRX65N as the active board.
    Then have a look at the r_bsp module in the Components tab. The default settings are OK for this project.
  2. add r_dma_rx module, keep the defaults
  3. add r_gpio_rx, also keep defaults
  4. add r_sci_iic_rx. This module is the i2c peripheral that will talk to the touch screen on i2c channel 6.
    Set these attributes:
    MCU CH6: supported
    IIC bitrate for CH6: 38400
    Interrupt Priority for CH6: Level 2
    Digital Noise Filter for CH6: Enable
    Noise Filter Setting Register for CH6: clock / 1
    i2c mode register 1 for CH6: 18
    Software Bus Busy counter: 1000
    Setting port : Include Port Setting
    SCI6: check
    SSCL6 pin: check
    SSDA6 pin: check
  5. add r_glcdc_rc, then set:
    LCD_CLK
    LCD_TCON0
    LCD_TCON2 -> LCD_DATA15
  6. add r_cmt_rx and accept default attributes.


Save the configuration file and click the Generate Code button.

It's good to try to build and run the project at this time, just to confirm that all is working.


Add emWin dependencies and Example Program.


When you installed (unzipped) emWin for the RX family, it created an example project subfolder called emWin_RX65N.

Grab these emWIN folders and copy them into your project's ./src folder (accept overwrite when asked):

  • Config
  • drw_2d
  • GUI

Also create an Application folder under ./src.


Download the Segger emWin Tutorial example source.

Unzip that examples archive, then copy the file WIDGET_ButtonRound.c to the Application folder you just created in e2 studio.


Adapt your main() code so that the Segger example is called:


#include "GUI.h"
#include "Pin.h"
#include "DIALOG.h"

void MainTask(void);

void main(void) {
    R_Pins_Create();
    MainTask();
}


Add a port folder under ./src, and create a machine.h file with the below contents:


#ifndef PORT_MACHINE_H_
#define PORT_MACHINE_H_

#define nop()                            __asm("nop")

#endif /* PORT_MACHINE_H_ */


GCC has a different way of calling the nop machine instruction. The construct above takes care that a GCC compatible definition is available, without having to change emWin sources.


Don't build yet, there are project settings that need to be done...


licensing:

The license file in the package is somewhat fuzzy. It says you can only build PC projects.

The licensee (YOU) will receive the software as object code and some tools in executable code from SEGGER.

YOU may use the code for evaluation purposes only. You may not use or port the software on another platform other than a PC, use, port or embed it in a product or for any commercial purposes without entering a separate License Agreement.

The Renesas and Segger websites however say that it's free for commercial use with Renesas products:


Renesas:

GUI development tools:

- emWin by Segger is free of charge

Segger:

Please create your free user account to download the full package for your commercial application design


Configure GCC Project Settings


There's a significant number of includes to add, and a macro definition:

image


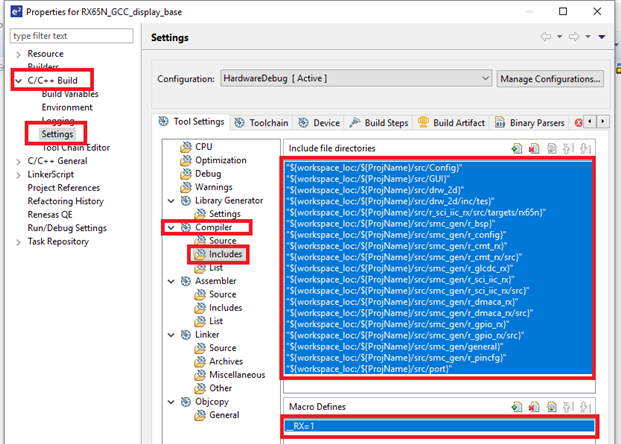
In the emWin version licensed for this evaluation kit, most of the logic comes as a precompiled library. We have to link it in (there's a dedicated one for GCC).

First add the library path to the user defined archives directory. The lib is located in the ./src/GUI folder you copied over from emWin's example earlier.

Then add the emWinLib to the user defined libraries.


image


Try to build the project. It should be successful.

You can try to run it too, but it will fail at the GUI_Init() call, because that will overwrite part of our code in RAM with graphic data. Fixed in the next section...


Memory Mangement

.

The RX libraries define two buffers on fixed memory addresses.

Renesas has configured the CC-RX linker settings to not use these sections for code. We'll have to do the same for the GCC linker file.


note: In the prevous post I've documented how to use a structured approach to guard the buffers. In this post I'm not using it.

I'm using Renesas approach with fixed addresses and telling the loader to load all code and data after the 2nd buffer in expanded RAM.

In a next post I'll convert this to structured memory sections, but that requires changing some example code. I tried to avoid that in this first post.


The CC-RX example starts loading user code at address 0x00840000.

image

The two buffers are in 2 fixed areas of the RAM, at the start of the standard and expansion RAM blocks.

This construct is in ./config/LCDConfig.c.


/*********************************************************************
*
*       Static data
*
**********************************************************************
*/
static const U32 _aBufferPTR[] = {
  0x00000100,  // Begin of On-Chip RAM
  0x00800000   // Begin of Expansion RAM
};


Renesas has given 0x00840000 as the safe address to start (giving all standard RAM and 0x40000 bytes of expansion RAM to the graphic library as buffer).

The total expansion size is 0x60000. That leaves 0x20000 for code and data.

The easiest way to explain that to GCC's linker is as such in the linker file:


image


Now build the project again, then execute it.

You will get a dialog window with 5 controls. You can freely drag the dialog across the screen.

The button on the right side is the custom widget. Standard, it behaves as a normal button.

Press the callback button on the left and it turns into a custom round one. You can change its attributes by pressing the other buttons on the left screen part.

Check how it behaves by clicking on it...


Related blog
part 1: Create an Empty Project
part 2a: Blinky with GCC Toolchain
part 2b: Blinky with Timer and Interrupt
part 3: Port an example from Renesas toolchain to GCC
part 4a: Low Power - Sleep
part 4b: Low Power - Software Standby
4c todo: power mode 3
4d todo: power mode 4
part 5: DAC
part 6: Software SHA
part 7: Blinky with FreeRTOS
part 8: DMA
part 9: UART
part 10: Reserve LCD Frame Buffer in Expansion RAM with GCC
part 11: port emWIN to GCC and run an LCD Widget
Renesas RX65N MCU EV Kit - Review
Andrew Johnson's blog series
Renesas Envision Kit RPBRX65N Roadtest
Attachments:
RX65N_GCC_display_base_20200102_1200.zip
  • Sign in to reply

Top Comments

  • Jan Cumps
    Jan Cumps over 5 years ago +3
    The size of each buffer is: #define BYTES_PER_LINE ((BITS_PER_PIXEL * XSIZE_PHYS) / 8) #define LINE_OFFSET (((BYTES_PER_LINE + 63) / 64) * 64) // ... #define BYTES_PER_BUFFER (LINE_OFFSET * YSIZE_PHYS…
  • Jan Cumps
    Jan Cumps over 5 years ago in reply to Jan Cumps +2
    I found something I have to resolve: With the GCC linker, the memory for the buffers is not initialised. You see the result in the image above where the pixelated backdrop shows the random state of the…
  • Andrew J
    Andrew J over 5 years ago +1
    This will be very useful for anyone not wanting to lump out for a CC-RX license after 60 days.
  • Jan Cumps
    Jan Cumps over 5 years ago in reply to Jan Cumps

    Well, I've brought it down to the function GUI_Clear()  not working under the GCC toolchain.

    It's a bit rough to debug because it's in a binary library.

    During its execution, it call some low level functions that I have the code for (the Renesas dave 2D draw source), so I could break on them and hope the issue is in those ...

    It means debugging in both the CC-RX and GCC toolchain then see what's different. Not something for a Saturday evening ...

    • Cancel
    • Vote Up 0 Vote Down
    • Sign in to reply
    • More
    • Cancel
  • Jan Cumps
    Jan Cumps over 5 years ago in reply to Jan Cumps

    2nd error, found by Andrew:

    My calculation for the buffer size is wrong. it's 261120 per buffer, not 130560...


    Checking my code again, because I believe standard RAM is overflowing ...

    • Cancel
    • Vote Up +1 Vote Down
    • Sign in to reply
    • More
    • Cancel
  • Jan Cumps
    Jan Cumps over 5 years ago in reply to Jan Cumps

    One error I found is that I moved the memory pointer with 0xFE00 instead of 0x1F00.

    That gives frame buffers of 65024 instead of 130560 bytes.


      .FRAME_BUFFER1 ALIGN(4) :
    {
      KEEP(*(.FRAME_BUFFER1))
    "_FRAME_BUFFER1" = .;
    . += 0x1FE00;
    } >RAM 
    
    .FRAME_BUFFER2 :
    {
      KEEP(*(.FRAME_BUFFER2))
      "_FRAME_BUFFER2" = .;
    . += 0x1FE00;
    } >RAM2


    after correction:


    image


    I was not expecting that fixing this would make a difference during execution, because for both buffers, there's no data used behind their address.

    And indeed, this doesn't fix it when testing ...

    • Cancel
    • Vote Up 0 Vote Down
    • Sign in to reply
    • More
    • Cancel
  • clem57
    clem57 over 5 years ago in reply to Jan Cumps

    Nothing looks obvious yet...

    • Cancel
    • Vote Up 0 Vote Down
    • Sign in to reply
    • More
    • Cancel
  • Jan Cumps
    Jan Cumps over 5 years ago

    I've tried to set up a loader file and adapt the display settings to use the allocated areas.

    It's not successful yet. The program does not go past the GUI_Init(), indicating that something gets overwritten or I made another mistake ...


    Linker file.


    ...
      .ustack :
      {
        "_ustack" = .;
      } >RAM 
      
      .FRAME_BUFFER1 ALIGN(4) :
    {
      KEEP(*(.FRAME_BUFFER1))
    "_FRAME_BUFFER1" = .;
    . += 0xFE00;
    } >RAM 
    
    .FRAME_BUFFER2 :
    {
      KEEP(*(.FRAME_BUFFER2))
      "_FRAME_BUFFER2" = .;
    . += 0xFE00;
    } >RAM2


    Code:


    extern U32  FRAME_BUFFER1[];
    #define FRAME_BUF_BASE_ADDR1   FRAME_BUFFER1
    extern U32  FRAME_BUFFER2[];
    #define FRAME_BUF_BASE_ADDR2   FRAME_BUFFER2
    
    static const U32 _aBufferPTR[] = {
        FRAME_BUF_BASE_ADDR1, 
        FRAME_BUF_BASE_ADDR2  
    };


    image


    image


    ... I'll investigate further ...

    • Cancel
    • Vote Up +1 Vote Down
    • Sign in to reply
    • More
    • Cancel
>
element14 Community

element14 is the first online community specifically for engineers. Connect with your peers and get expert answers to your questions.

  • Members
  • Learn
  • Technologies
  • Challenges & Projects
  • Products
  • Store
  • About Us
  • Feedback & Support
  • FAQs
  • Terms of Use
  • Privacy Policy
  • Legal and Copyright Notices
  • Sitemap
  • Cookies

An Avnet Company © 2025 Premier Farnell Limited. All Rights Reserved.

Premier Farnell Ltd, registered in England and Wales (no 00876412), registered office: Farnell House, Forge Lane, Leeds LS12 2NE.

ICP 备案号 10220084.

Follow element14

  • X
  • Facebook
  • linkedin
  • YouTube