


Introduction
This is it, the end of the Sci Fi Your Pi Design Challenge. It's been a long journey, with lots of learning, building, sharing and blogging. I hope you have enjoyed tagging along as I made progress on project PiDesk!
This post is the final summary of the project.
Blog posts
Over the course of the challenge, a lot of content was created. I experimented with a new blogging approach with which I separated project updates from guides. The guides were kept as generic as possible, so that readers would not be required to know about the challenge to understand the content. With the challenge over, I'll be renaming the guides and moving them to the appropriate sections of the website, hopefully making them easier to find for others. They will however remain linked in the project updates, so no information is lost in the process.
These are the blog posts created during the challenge.
Project Updates
- Sci Fi Your Pi: PiDesk - Project Description
- Sci Fi Your Pi: PiDesk - Project Update #1
- Sci Fi Your Pi: PiDesk - Project Update #2
- Sci Fi Your Pi: PiDesk - Project Update #3
- Sci Fi Your Pi: PiDesk - Project Update #4
- Sci Fi Your Pi: PiDesk - Project Update #5
- Sci Fi Your Pi: PiDesk - Project Update #6
- Sci Fi Your Pi: PiDesk - Project Update #7
- Sci Fi Your Pi: PiDesk - Project Update #8
- Sci Fi Your Pi: PiDesk - Project Update #9
- Sci Fi Your Pi: PiDesk - Project Update #10
- Sci Fi Your Pi: PiDesk - Project Update #11
- Sci Fi Your Pi: PiDesk - Project Update #12
- Sci Fi Your Pi: PiDesk - Project Update #13
- Sci Fi Your Pi: PiDesk - Project Update #14
- Sci Fi Your Pi: PiDesk - Project Update #15
- Sci Fi Your Pi: PiDesk - Project Update #16
- Sci Fi Your Pi: PiDesk - Project Update #17
- Sci Fi Your Pi: PiDesk - Project Update #18
- Sci Fi Your Pi: PiDesk - Project Update #19
Guides
- Sci Fi Your Pi: PiDesk - Guide: Setting Up the Raspberry Pi 2
- Sci Fi Your Pi: PiDesk - Review: Bare Conductive Touch Board
- Sci Fi Your Pi: PiDesk - Guide: Stepper Motors with Gertbot
- Sci Fi Your Pi: PiDesk - Guide: Controlling NeoPixels with the Raspberry Pi A+/B+
- Sci Fi Your Pi: PiDesk - Guide: Capacitive Touch with Atmel's AT42QT1070 Touch Sensor IC
- Sci Fi Your Pi: PiDesk - Guide: Magic Lamp with wireless charger, Adafruit Trinket & NeoPixels
- Sci Fi Your Pi: PiDesk - Guide: Endstops with Gertbot
Project Summary
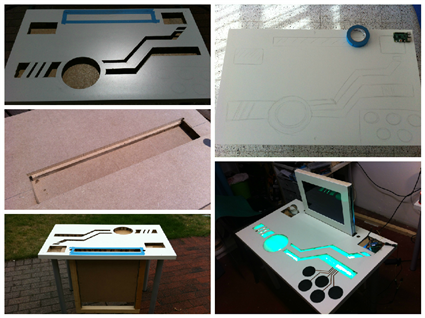
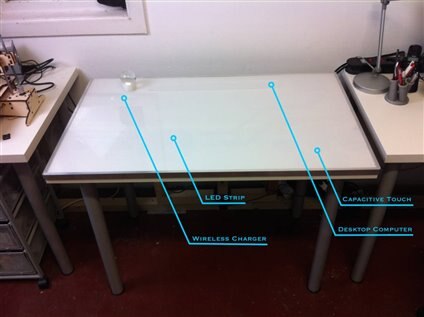
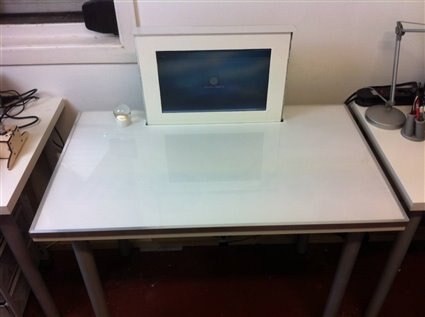
If this is the first time you stumble upon a PiDesk blog post, have a look at the blog posts above. To get a quick idea of what the project is about, have a look at the pictures below.
The collages represent different parts of the project in different stages. The final result is unveiled at the end of this post. To summarise though, the goal was to create a futuristic desk. I did so by integrating things such as LEDs, a wireless charger and capacitive touch controls inside the desk. There is even a computer that pops out of the desk when the correct button is touched!
Components
A lot of different components and technologies are used in this project: stepper motors, addressable LEDs, capacitive touch, wireless charging, etc ...
| Description | Quantity | Used in |
|---|---|---|
| Raspberry Pi B+Raspberry Pi B+ | 1 | Desk controls |
| WiPi USB DongleWiPi USB Dongle | 2 | Desk controls / Desktop computer |
| No brand USB Sound Card | 1 | Desk controls |
| Adafruit Mono 2.5W Class D Amplifier (PAM8302) | 1 | Desk controls |
| GertbotGertbot | 1 | Desk controls |
| NEMA 17 Stepper MotorNEMA 17 Stepper Motor | 2 | Desk controls |
| WS2812 LED Strip | 2 meters | Desk controls |
| AT42QT1070 Capacitive Touch ICAT42QT1070 Capacitive Touch IC | 1 | Desk controls |
| Micro Switch ON/OFF | 2 | Desk controls |
| Mini Speaker 8ohm | 1 | Desk controls |
| Raspberry Pi 2 BRaspberry Pi 2 B | 1 | Desktop computer |
| Adafruit Stereo 2.8W Class D Amplifier (TS2012) | 1 | Desktop computer |
| Recuperated Laptop LCD Display | 1 | Desktop computer |
| LCD Display Controller | 1 | Desktop computer |
| Speaker 8ohmSpeaker 8ohm | 2 | Desktop computer |
| Qi Wireless Charger | 1 | Magic Lamp |
| Qi Wireless Receiver | 1 | Magic Lamp |
| Adafruit NeoPixel Ring WS 2812 (12) | 1 | Magic Lamp |
| Adafruit Trinket 5V | 1 | Magic Lamp |
| 12V to 5V DC-DC Converter | 2 | Desk controls / Desktop computer |
| 12V Power Supply | 1 | Desk controls / Desktop computer / Magic Lamp |
I made these image, trying to illustrate how everything fits together and interacts:
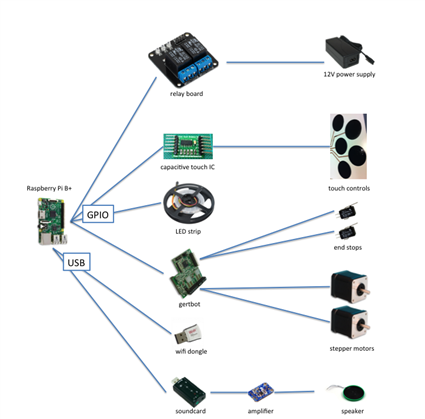
From left to right, top to bottom, we have:
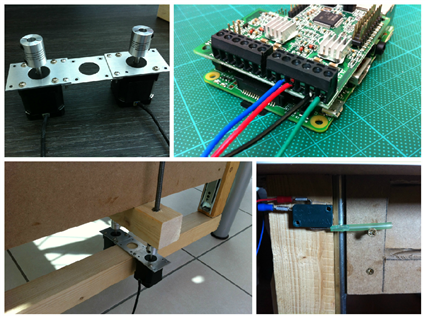
- Raspberry Pi B+: This is the heart of project PiDesk, as it is in charge of controlling all the different components involved in the project. I originally opted for the Raspberry Pi A+, but was forced to move to B+ as the workaround required to have both audio and neopixels work, required a USB sound card.
- Dual channel relay board: The relay board is controlled by the Raspberry Pi GPIO pins. It makes it possible to turn a 12 power supply ON or OFF, powering the laptop display, and a 5V power supply for the Raspberry Pi 2 desktop computer.
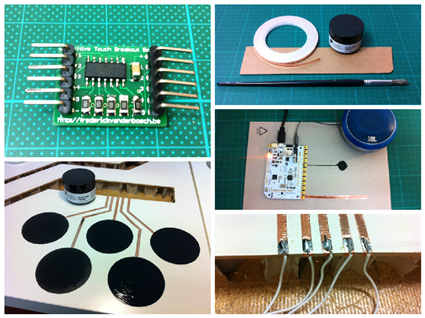
- Capacitive touch IC (AT42QT1070): The custom breakout board is used to convert Raspberry Pi GPIO pins into capacitive touch input sensors. The touch sensors have been created using copper tape and conductive paint.
- LED strip (WS2812): The LED strip is controlled by the Raspberry Pi and has been built into the desk's surface. It displays animations depending on the ongoing action.
- Gertbot: The gertbot has two functions: raising and lower the screen assembly by controlling two stepper motors, and knowing when to stop using end stops.
- Wifi dongle (WiPi): Wifi connectivity, mainly used during programming and testing.
- Soundcard with amplifier (PAM8302): Play sound effects depending on the action to be executed.
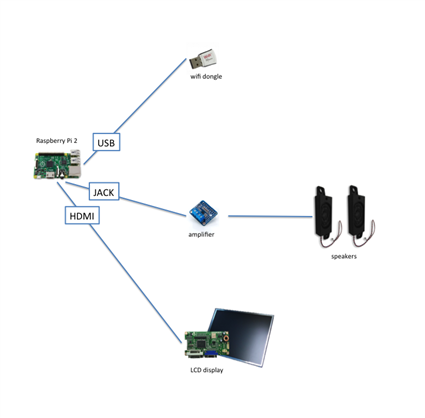
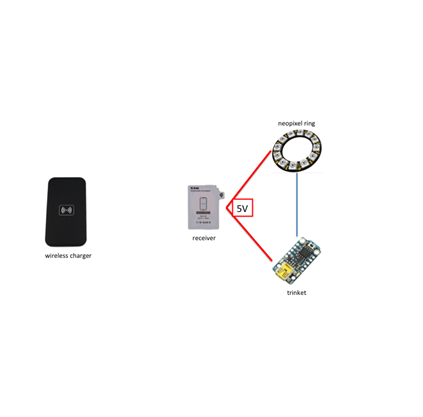
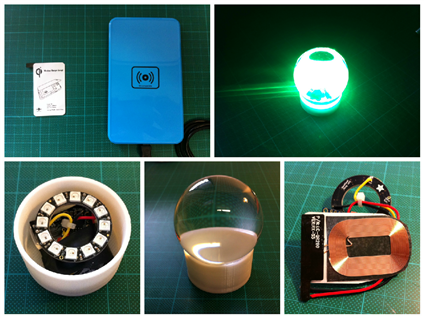
The pictures above represent on one side, the Pi 2 desktop computer, on the other, the magic lamp. As you can see, these items are very straightforward compared to the desk controls and require very little explanation.
For the desktop computer, a Pi 2 is used in combination with a recuperated laptop screen for which a controller board was found. A combination of a stereo amplifier and speakers are used for sound.
As for the magic lamp, a Trinket microcontroller and NeoPixel ring are powered via a wireless receiver. The circuit is powered on when placed on top of the wireless charger.
Power distribution
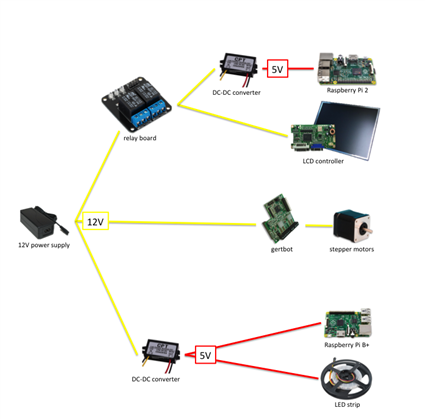
The main power supply is a beefy 12V one. It is used to power the stepper motors via the Gertbot and the LCD screen via the controller board. The other components of the project require 5V, which is achieved using DC-DC converters. The 12V input to the desktop components (Raspberry Pi 2 & LCD controller) are interrupted by a relay which is controlled by the Raspberry Pi B+. Two channels have been foreseen, although only one is currently in use.
Code
All of the different components illustrated above require some code to work.
To get the NeoPixels and Gertbot to work, external Python libraries were used. Here are the links:
- NeoPixels: https://github.com/jgarff/rpi_ws281x
- Gertbot: http://www.gertbot.com/download.html
Two scripts are in charge of combining the different features and make everything work together. The full code is available on GitHub.
PiDesk Main Script:
PiDesk LED Animations Script:
Demo
Finally, the "moment supreme", the moment you (may) have been waiting for, the final result.
Because it wouldn't be a real demo without an actual video, here it is. The first part is a montage of various stages of the build, followed by some demonstrations.
Thank you
I'd like to thank element14, the sponsors, the judges and anyone involved in this challenge for setting this up, providing the kits and allowing me to participate. I had fun, I hope you did too following this project and you like the end result.
To my fellow contestants and members: thank you for following the project, liking the posts and providing feedback along the way.
Top Comments