


During these last 2 days and before the official end of the Challenge, I have managed to integrate my Foscam IPCam into the DomPi project. This will probably be the last post with some solid progress. Let´s go into the details!
Previous Posts
Project Status

Foscam IPCam integration
At home I have an IPCam like the one in the picture below. The reason for leveraging this ipcam instead of the PiCam is based on two points:
- Redundancy. This ipcam is in itself a standalone alarm system, meaning, you can configure it to detect motion, raise an alarm and send you an email - among many other features. By using the alarm feature of DomPi together with the alarm system of the IPCam I have two different devices, if one fails (crashes, looses connectivity, it is hacked, it dies, etc) I still have the second system to monitor my home
- Range. The IPCam includes a motor and it can rotate to cover a wider range. I am leveraging this function to cover two zones with a single camera: the living room and the corridor. By monitoring these two rooms, I am covering the "hot places" at home and those where it is more probably that someone would break in: the main entrance and the garden. Below you can see a diagram which shows the current position of the IPCam and both monitored zones. In green the living room and by asking the IPCam to move to the second position, the corridor with the main entrance in purple

IPCam configuration
The first step to integrate the camera is to configure it using the web interface that Foscam includes. I will skip the basic configuration steps like the user and password, or IP configuration. Specially relevant for the DomPi project is to set up the preset points. A preset point is a position of the camera indicated on the X and Y axis so that it points to the desired place. In my case, I am setting up two preset positions: the preset to point at the living room and the preset to point at the corridor (and main entrance). I have placed the ipcam on top of my fridge where I can cover these two places with the same camera.
The web interface of IPCam is quite intuitive and adding a preset point is easy, you just need to move the camera with the web buttons to the desired positions and save them. It is important to remember the names you save them with, as they will be the key part of the openHAB integration. There are some other interesting features to configure: sensitivity level (to trigger the alarm if motion is detected), trigger interval (how many seconds to wait before raising a new alarm), etc. I will touch these later on during the openHAB integration.
 |  |
Before leaving the IPCam configuration, I have configured the email account where the Foscam camera has to send the pictures to. I have also configured my router to always assign the same IP to this camera since it will be required for the openHAB.
Foscam IPCamera CGI
My camera supports CGI string requests and the manufacturer has provided the CGI manual (here). This enables the control of the IPCam via http requests sent out from the openHAB. An example of these strings can be:
http://foscam_IPaddress:88/cgi-bin/CGIProxy.fcgi?cmd=setMotionDetectConfig&isEnable=1&linkage=7&snapInterval=2&sensitivi…
With this line, the IPCam will enable the Motion detection (see the &isEnable=1 part). If the motion is detected, it will inform the user via an email, it will also take a picture of the image and attache it to the email and finally it will also ring the ipcam´s buzzer (see the &linkage=7), etc, etc. To make it easier to follow, please find a snapshot of the above CGI manual that explains the setMotionDetectConfig parameter.
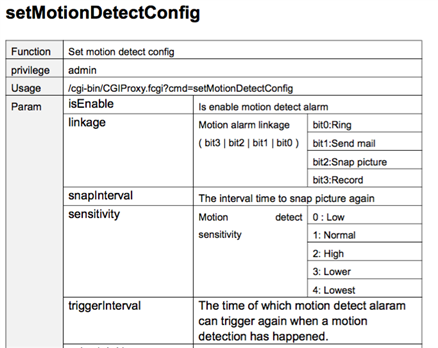 |  |
In the openHAB I am using the setMotionDetectConfig function, as well as two other more: getDevState (to check if there is motion detected) and the ptzGotoPresetPoint (to point the ipcam at the living room or the corridor).
openHAB Integration
There is as such no openHAB binding, however, there is a nice webpage with key information to help you move faster on understanding how to integrate the camera (here). For DomPi, I just need the three functions below, so I have decided to implement it in a maybe not very sexy way, but... it works. I have created four items:
- One switch: to enable or disable the Foscam IPcam alarm. When the switch is turned on, it sends to the camera the below cgi string that instructs the ipcam to start detecting motion. If turned off, it sends the "OFF:GET:..." string to the camera which stops the detection
- One switch: to move the camera to the preset position of the living room or the corridor. If the switched is moved to the "On" position, DomPi points the camera at the living room. If it is moved to "off", the camera will point at the corridor
- One string: that captures the motion alarm status: not enabled, no motion detected, detected motion
- One string: to capture the sound alarm status: not enabled, no sound heard, heard sound
Here is the code at the .items file:
/* Foscam IPCam */
String Foscam_Motion     "Movimiento IPCam [MAP(ipcam.map):%s]"    <camera> (gStatus, gFoscam)     { http="<[http://foscam_IPaddress:88/cgi-bin/CGIProxy.fcgi?cmd=getDevState&usr=USER&pwd=PASSWORD:4000:REGEX(.*?<motionDetectAlarm>(.*?)</motionDetectAlarm>.*)]" }
String Foscam_Sound     "Sonido IPCam [MAP(ipcam.map):%s]"         <camera> (gStatus, gFoscam)     { http="<[http://foscam_IPaddress:88/cgi-bin/CGIProxy.fcgi?cmd=getDevState&usr=USER&pwd=PASSWORD:4000:REGEX(.*?<soundAlarm>(.*?)</soundAlarm>.*)]" }
Switch Foscam_Move        "Apuntar IPCam"                            <camera> (gStatus, gFoscam)     { http=">[ON:GET:http://foscam_IPaddress:88/cgi-bin/CGIProxy.fcgi?cmd=ptzGotoPresetPoint&name=salon&usr=USER&pwd=PASSWORD] >[OFF:GET:http://foscam_IPaddress/cgi-bin/CGIProxy.fcgi?cmd=ptzGotoPresetPoint&name=pasillo&usr=USER&pwd=PASSWORD]"}
Switch Foscam_AlarmSwitch    "Habilitar Alarma IPCam"            <shieldalarm>    (gStatus, gFoscam)    { http=">[ON:GET:http://foscam_IPaddress:88/cgi-bin/CGIProxy.fcgi?cmd=setMotionDetectConfig&isEnable=1&linkage=7&snapInterval=2&sensitivity=1&triggerInterval=5&usr=USER&pwd=PASSWORD] >[OFF:GET:http://foscam_IPaddress:88/cgi-bin/CGIProxy.fcgi?cmd=setMotionDetectConfig&isEnable=0&usr=USER&pwd=PASSWORD]"}
I have added something new in the items description, it is the MAP, which transforms a string (0, 1 or 2 in this case) into something more user friendly: not enabled, no motion detected, detected motion. This is done via the ipcam.map file which needs to be copied into the /configurations/transform folder. The ipcam.map file looks like this:
# Map file for DomPi - IPcam Foscam
0=Disabled
1=No Alarm
2=IPCam Alarm
undefined=unknown
To manage the IPCam I have coded two rules. You can read the comments below. As a summary, DomPi points the camera to the living room or the corridor depending on where DomPi detects movement via the PIR sensors. The system starts by pointing the camera at the living room, with this view, the camera monitors any movement happening in the living room and covers the two doors to the garden. If any of the PIR sensors of the kids´ room or the parents´ room detects movement, then DomPi points the camera at the corridor and the main entrance.
Once the camera has reached any of the two preset positions (living room or corridor), it starts monitoring movement by itself. If the IPcam confirms the movement detected by the PIR, it will take a picture of the motion and email it to me. If the camera is pointing at the corridor and there is no movement after 30s, it is probably a false a larm and DomPi instructs the camera to point back at the living room.
All this only happens, of course, if I have turned on the Alarm switch, meaning, if I armed the alarm and want to protect my home while I am out.
The second rule is quite simple and just enables or disables the Foscam IPcam standalone alarm. When I activate the Alarm switch in DomPi, it automatically turns on the alarm in the ipcam. This is good as I want to avoid the camera emailing me when I am at home 
/*
 * Rules for IPCam movement
 *
 */
//This rule moves the IPCam from the default position Living room to Corridor
//This happens when the alarm is active and there is some motion detected in the kids or parents rooms
//It waits 30s and confirms if ipcam has detected motion as well
//After 30s since last movement, move cam to living room
rule "Move IPCam when motion detected"
when
    Item Nodo01Movimiento changed from 0 to 1 or    //Kids room
    Item Nodo02Movimiento changed from 0 to 1    //Parents room
then
    if (Nodo09AlarmSwitch.state==ON) {
        //If alarm switch is off, this means we are not interested in monitoring presence at home
        if (Foscam_Move.state==ON) {
            //If the cam is pointing to the living room (Foscam_Move.state==ON) we move it to the corridor
            postUpdate(Foscam_Move, OFF)
            Thread::sleep(5000)        //Allow some time for the ipcam to move to its new position
        }
        ipcam_secs2go = 30        //resets timer to 30 secs
        while (ipcam_secs2go>0 && Nodo09AlarmSwitch.state==ON) {
            Thread::sleep(1000)
            if ((Nodo01Movimiento.state==1) || (Nodo02Movimiento.state==1)) {
                //if there is still movement, reset timer to 30 secs
                ipcam_secs2go = 30
            } else ipcam_secs2go = ipcam_secs2go -1
        }
        postUpdate(Foscam_Move, ON)    //After 30 secs with no motion, move the ipcam to the living room
    }
end

rule "Mimic AlarmSwitch in IPCam Alarm Switch"
//Mimics any change in status of the Alarm Switch to the IPCam:
//   If I activate the home alarm, let´s also activate the IPCam one
//   If I deactivate home alarm, let´s deactivate the IPCam one
when
    Item Nodo09AlarmSwitch changed
then
    postUpdate(Foscam_AlarmSwitch, Nodo09AlarmSwitch.state)
end
With this code, I am able to integrate the Foscam ipcam into DomPi. The camera includes many more features, which are not relevant to this project. One improvement if I need any of those features in the future, would be to leverage the general API from Foscam and the REST API from openHAB.
Additional improvements
These two days I have made one additional improvement to a previous rule. I added some fine tunning to the alarm, so that when the Alarm Switch is activated, it resets the Alarm Status by turning it off.
OpenHAB - Final View
These are some snapshots of the final view of the openHAB web interface for DomPi.
 |  |
 |  |
 | 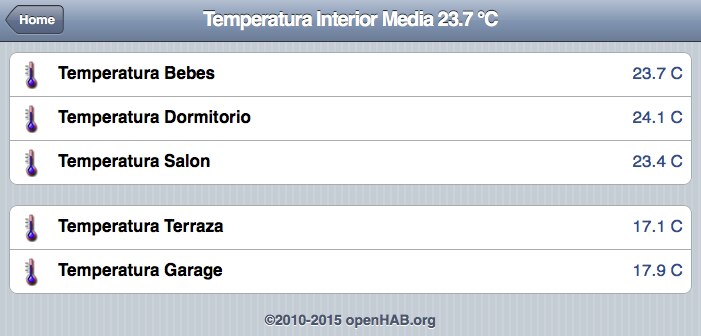 |
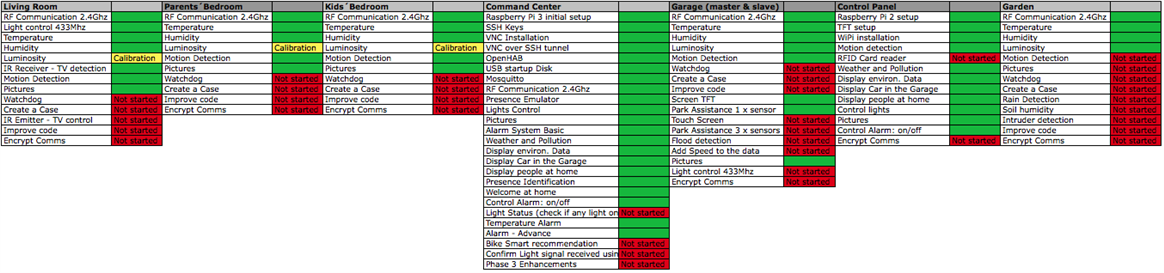
Nodes´ Dashboard
This is the final dashboard of the nodes, I am conscious that not all of the cells are green, but hope that you have enjoyed the journey since May till now with the DomPi project
Attached you can find the latest version of the openHAB files and the final part for the project!! I hope you have enjoyed the DomPi posts as much as I have done it  Many thanks to all of you that have read the posts and have shared your comments with me on the things done well and also on what could be improved. I have learned a lot! And it´s been a great pleasure. A great pleasure that I shared also with my friends and family
Top Comments