


This post is part of my Roadtest Review of Cypress PSoC 62S2 Wi-Fi & BT5.0 Pioneer Dev Kit - Review. My review is splitted into multiple reviews and tutorials. Main page of review contains brief description of every chapter. Some projects are implemented in multiple variants. Main page of review contains brief description about every chapter, project and variants and contains some reccomendations for reading.
Table of Contents
- Intruction, Table of Contents, Overview of Table of Contets
- Review of Development Board
- Review of Microcontroller
- Review of Wi-FI and BT Module
- Review of Onboard Peripherals
- Review of Onboard Programmer and Debugger
- Review of Development Software
- Review of Documentation
- Project 1 - Serial Interfaces
- Project 2 - Simple Cloud Application
- Project done using AWS Service (this article)
- Project done using Azure services
- Project 3 - FRAM
- Project 4 - CapSense and Bluetooth
- Project 5 - Dual Core Application
- Project 6 - Profiler
- Summary and Score
Project 2 – Simple Cloud Application
In this project I will build application that sends measured temperature and humidity using MQTT protocol to cloud. This project is implemented in 2 variants. One variant use AWS as cloud service provider and second one use Microsoft Azure. Both variant implement the same but use quite different services and approaches to do that.
Disclaimer: This project shows how to build application using paid cloud services. Author of this article do not hold any reliability for any of your charges (even the high charges). Pricing may vary between region and pricing policies may change over time.
This article is first variant of project. It is implemented using AWS Cloud services. Hardware side is almost the same as Azure version of this project.
Create project based on template AnyCloud MQTT Client template. Tutorial with pictures is as part of PSoC 6 Pioneer Kit Roadtest - Project 1 - Serial Interfaces (register accesses in C) . We do not start with blank project because we will require AWS SDK and it is not easy to integrate it (even using Library Manager) to empty project due some bugs in IDE. Template contains two parts - MQTT subscriber and MQTT publisher. Publisher publish message when button is pressed or released, and subscriber waits for messages from cloud and then turn on or off LED based on the received message. I will not use subscriber so at beginning we remove all subscriber related code from template.
Removing subscriber support from example
Delete subscriber_task.c and subscriber_task.h file from source folder. Then open mqtt_task.c file and remove include to subscriber_task.h file. Do the same deletion also for publisher_task.c file. In mqtt_task.c file remove following section which creates FreeRTOS task for subscriber thread.
/* Create the subscriber task and cleanup if the operation fails. */
if (pdPASS != xTaskCreate(subscriber_task, "Subscriber task", SUBSCRIBER_TASK_STACK_SIZE,
                          NULL, SUBSCRIBER_TASK_PRIORITY, &subscriber_task_handle))
{
 printf("Failed to create the Subscriber task!\n");
    goto exit_cleanup;
}
In the infinite loop in the same file is also chceck if subscriber failed and in this case subscriber thread is removed. Delete following code.
if (subscriber_task_handle != NULL)
{
 vTaskDelete(subscriber_task_handle);
}
Remove also mqtt_unsubscribe unsubscribe from the same switch and remove publisher_cleanup because we will modify publisher later. So delete
/* Unsubscribe from the topic before cleanup. */
mqtt_unsubscribe();
and
publisher_cleanup();
Now go to config folder and open wifi_config.h file. Configure WIFI_SSID, WIFI_PASSWORD and optionally WIFI_SECURITY constants. Now go to mqtt_client_config.h and also go to AWS administration using your browser.
Register device in AWS
We need to setup AWS to allow device to connect to cloud, register him and generate authentication private key and certificate for it. After you login to the AWS Management console You will see following.
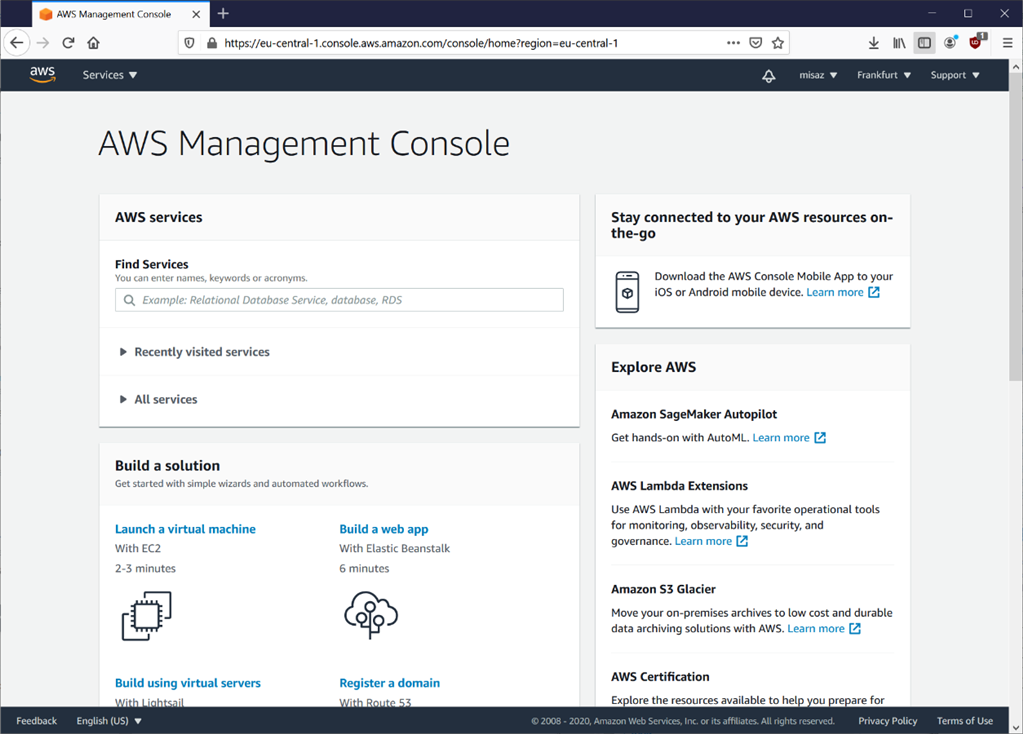
Open Services dropdown and search for IoT Core and open IoT Core administration.
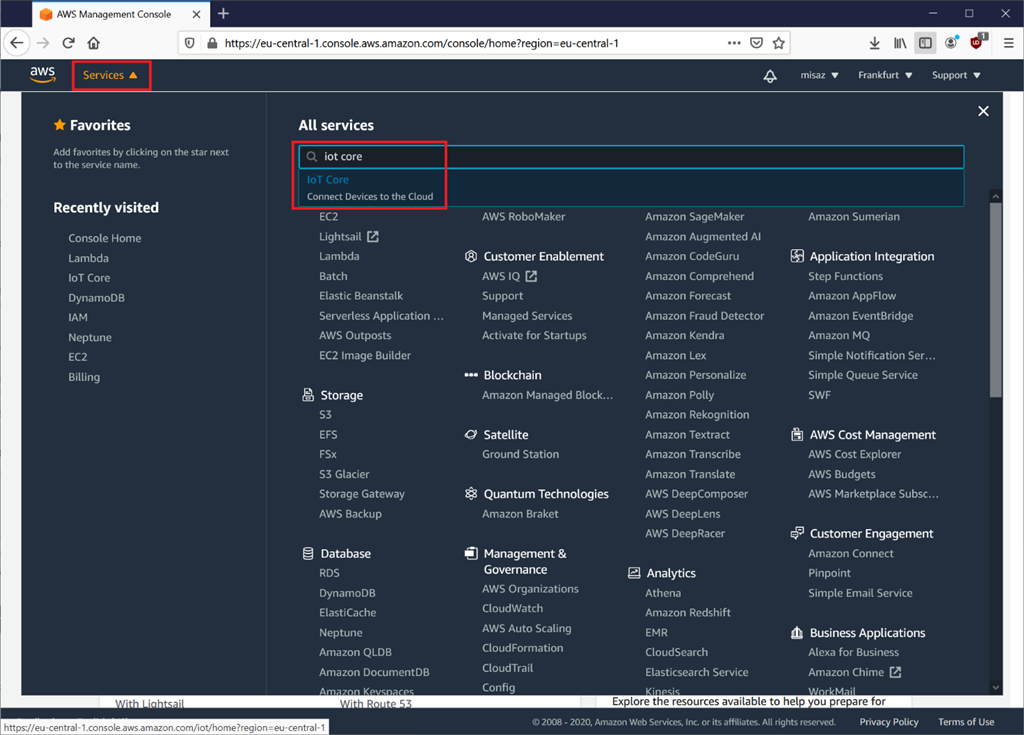
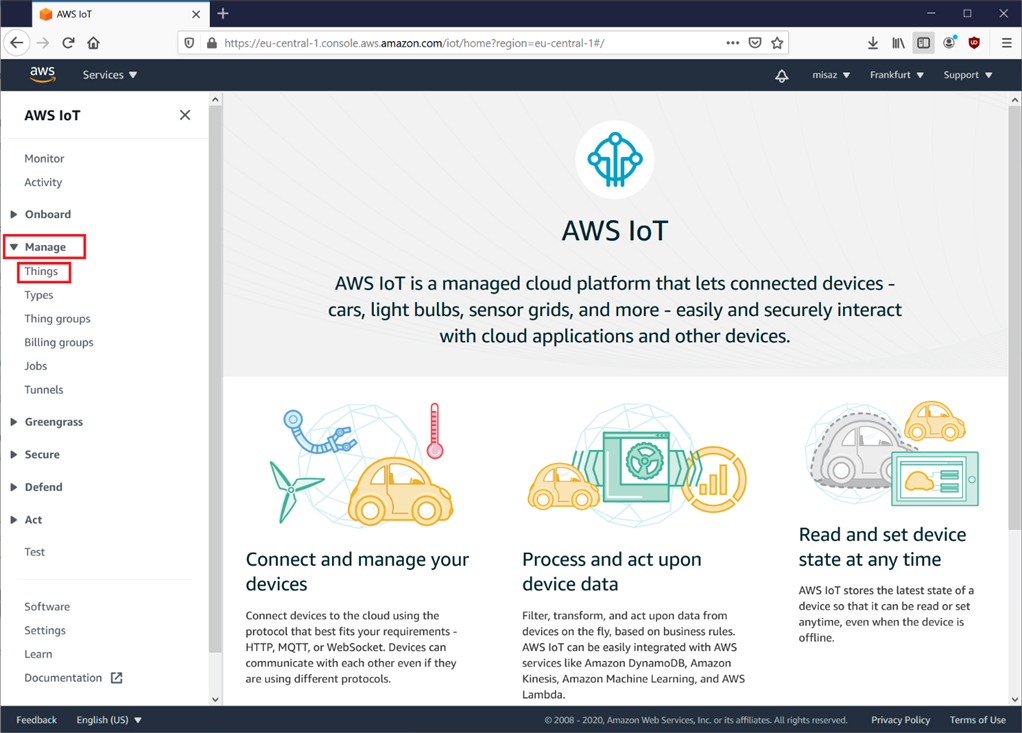
You are navigated to AWS IoT console now. You see following.

Open the Manage section from menu and then go to Things.
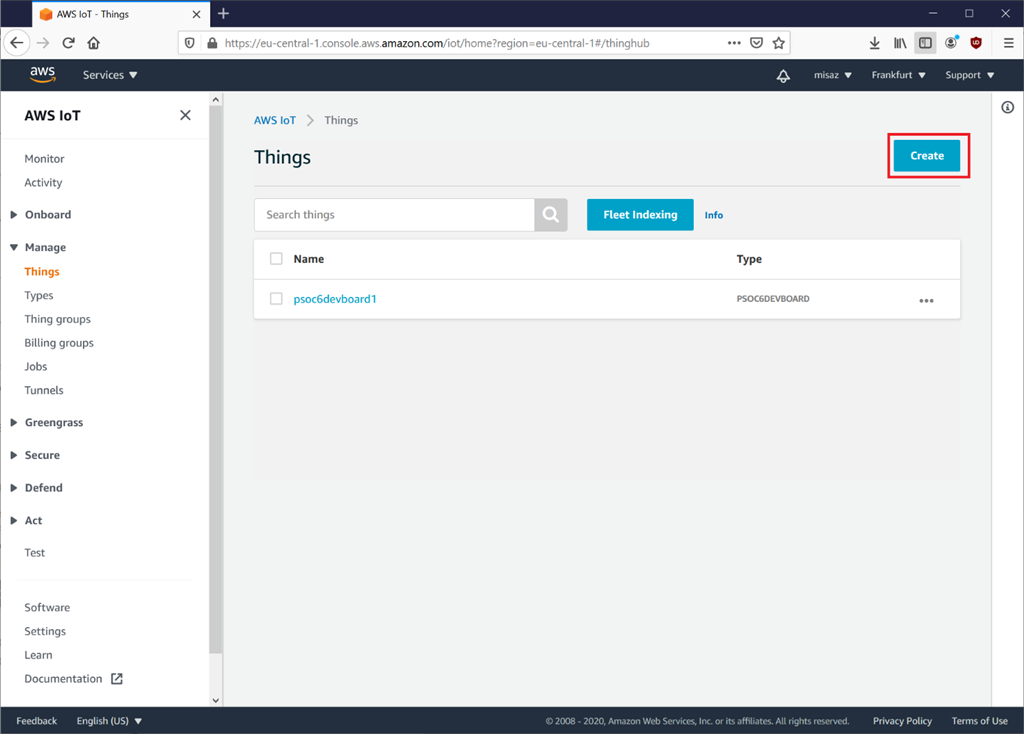
You now see the following page. You probably do not see any thing If you have never used AWS IoT before.
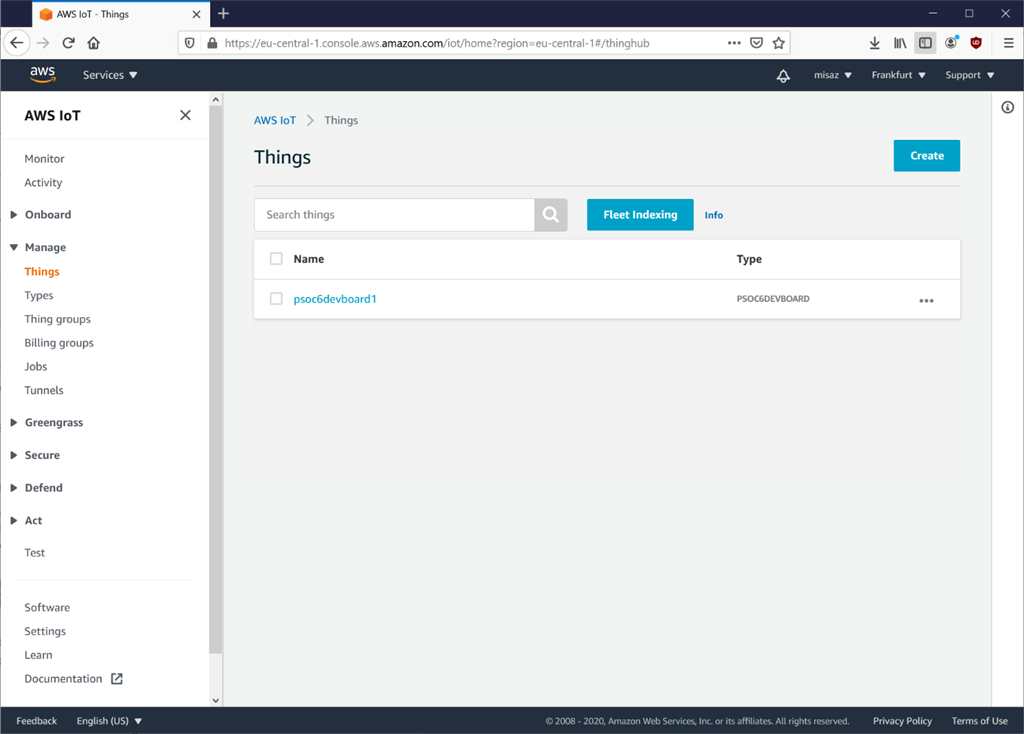
Click Create button.
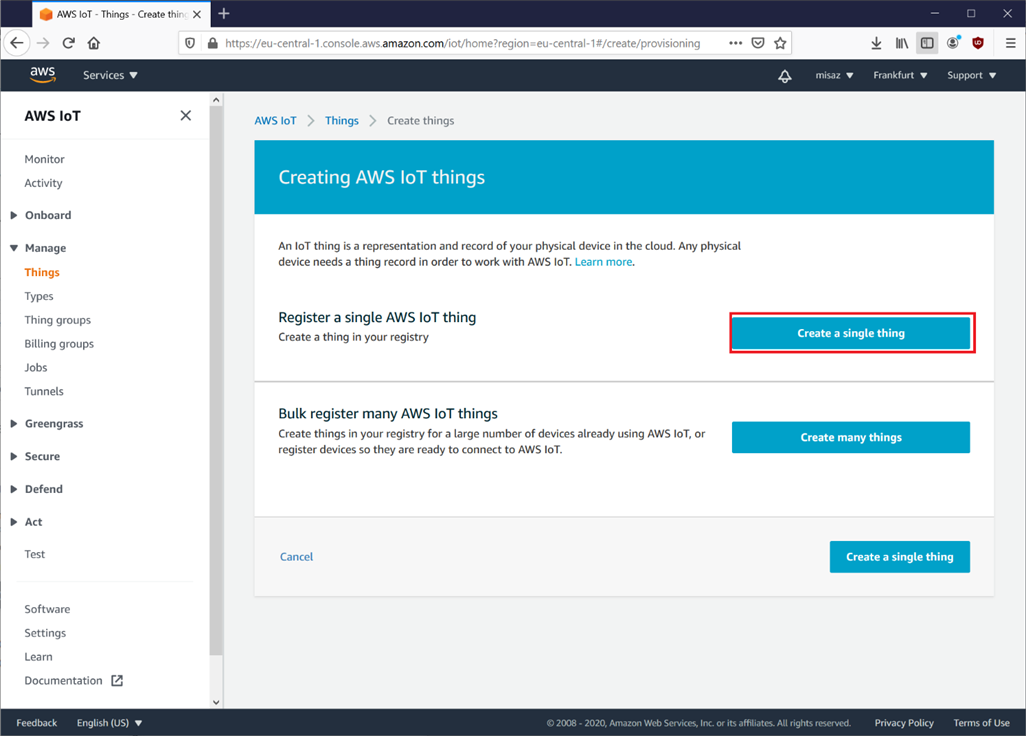
Click Create a single thing.
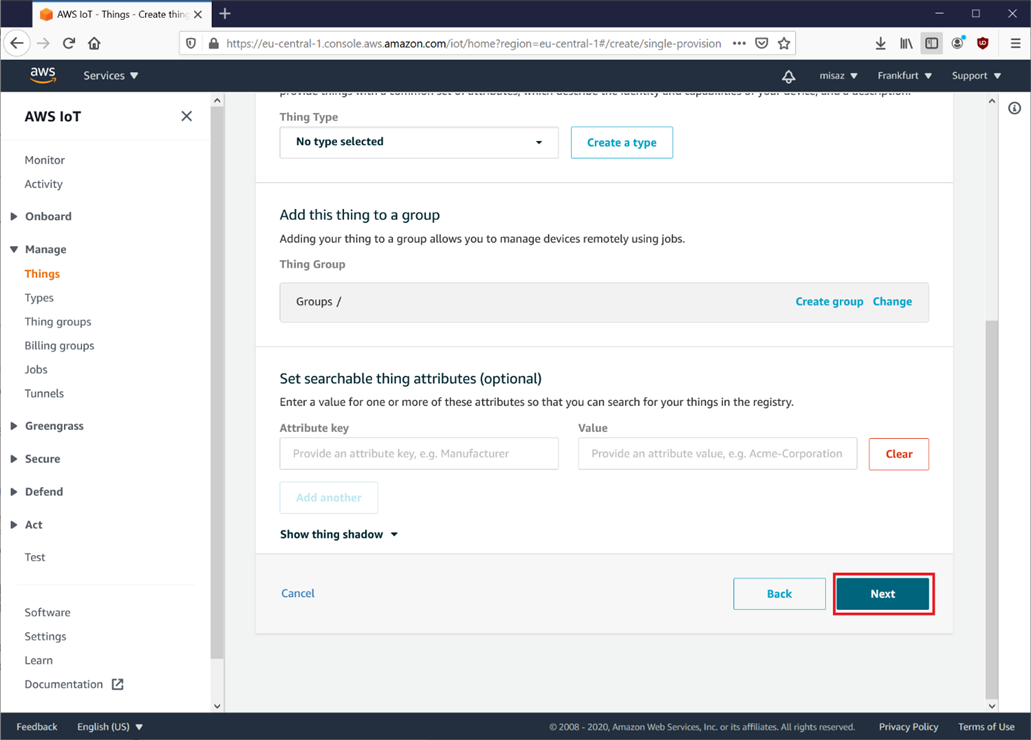
Enter the device name.
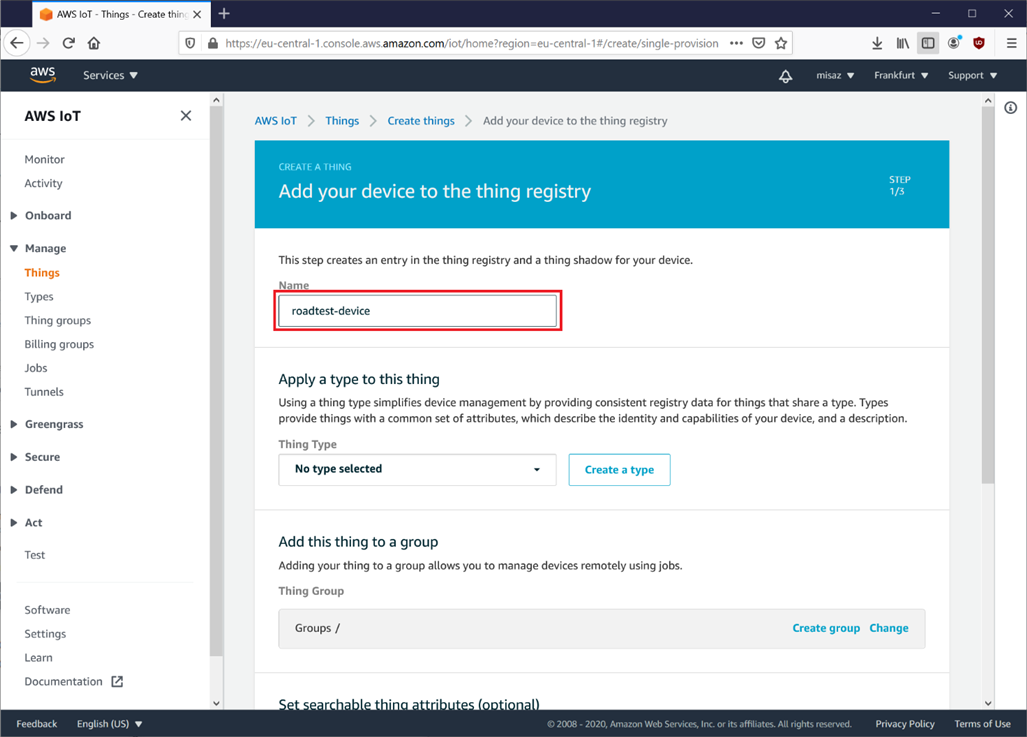
And press next.
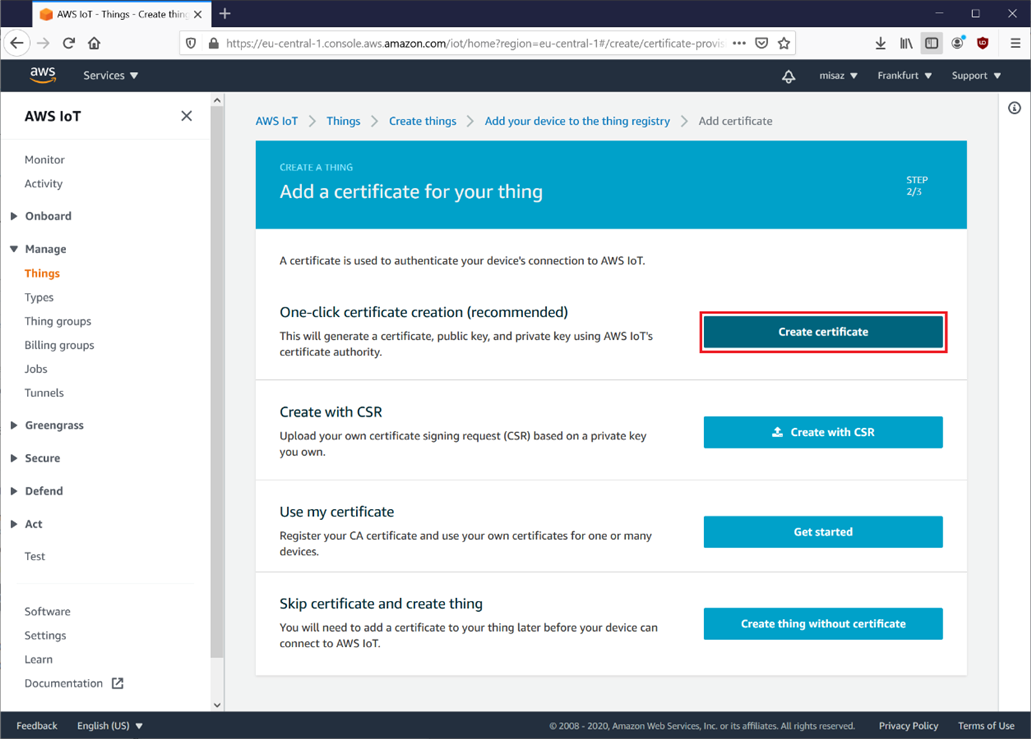
Press Create certificate.
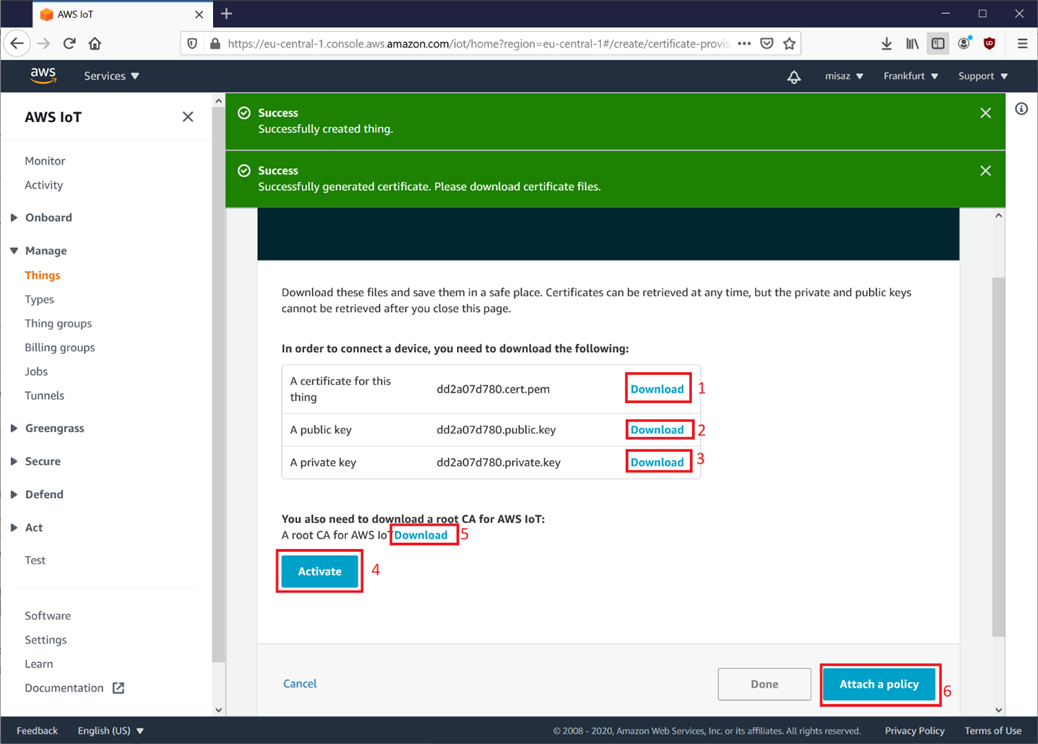
Now download pem, public and private key, click Activate and go to link “Download” next to “A root CA for AWS IoT”.
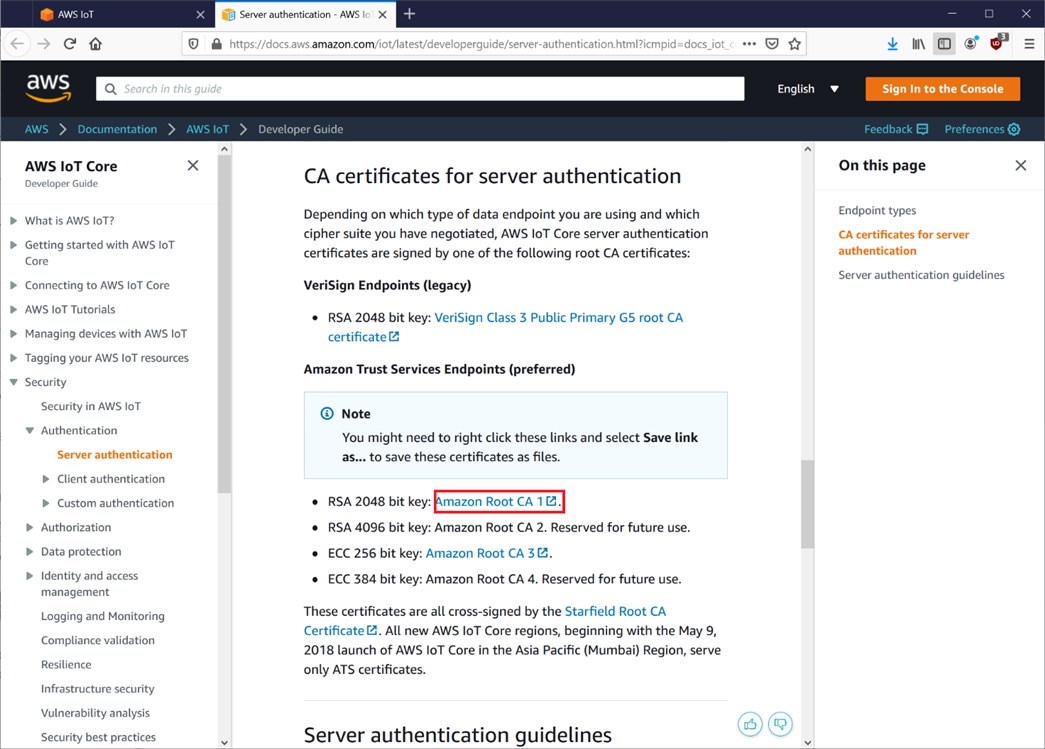
5th step navigates you to documentation page. Download Amazon Root CA 1.
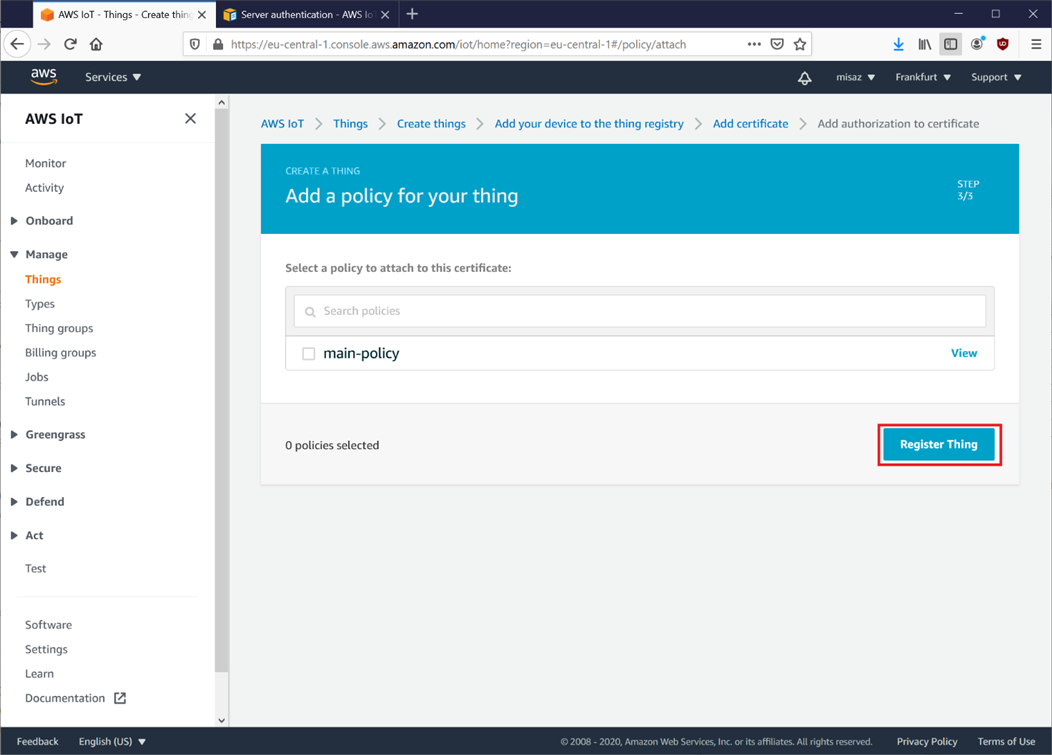
Then go back to administration and confirm and press Attach a policy as stated before.
You probably do not see any policy. Click Register Thing. We will create policy later.
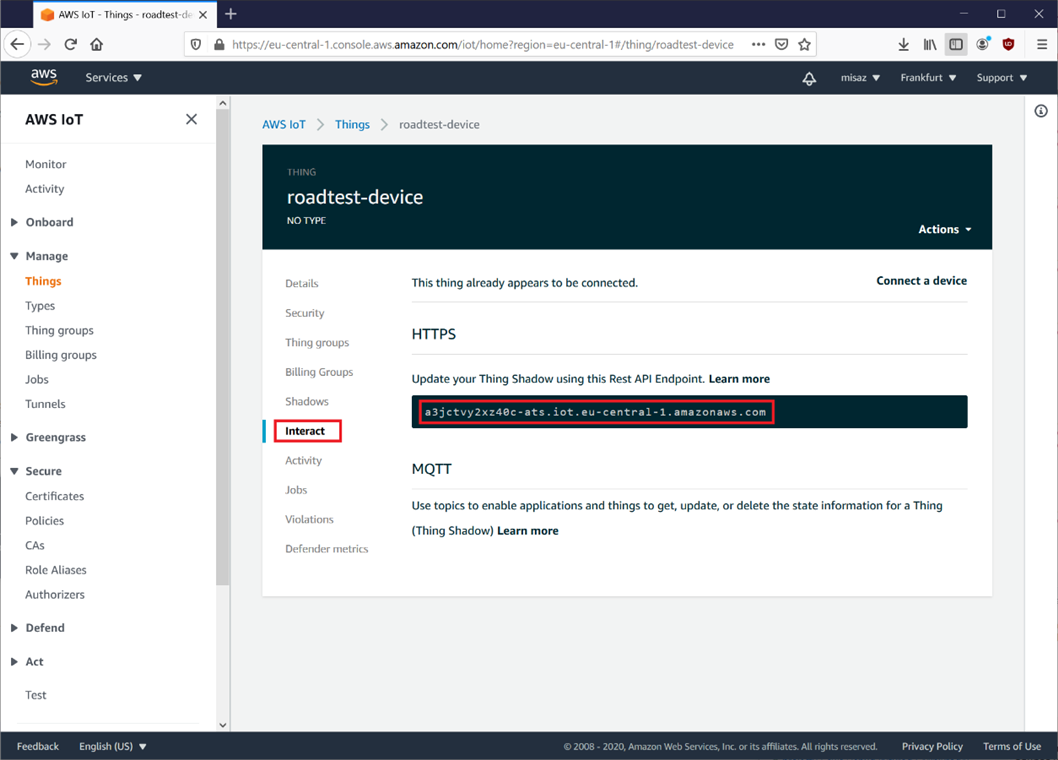
Now you have registered device. Go to Interact section of your device and copy endpoint address to MQTT_BROKER_ADDRESS constant in mqtt_client_config.h file.
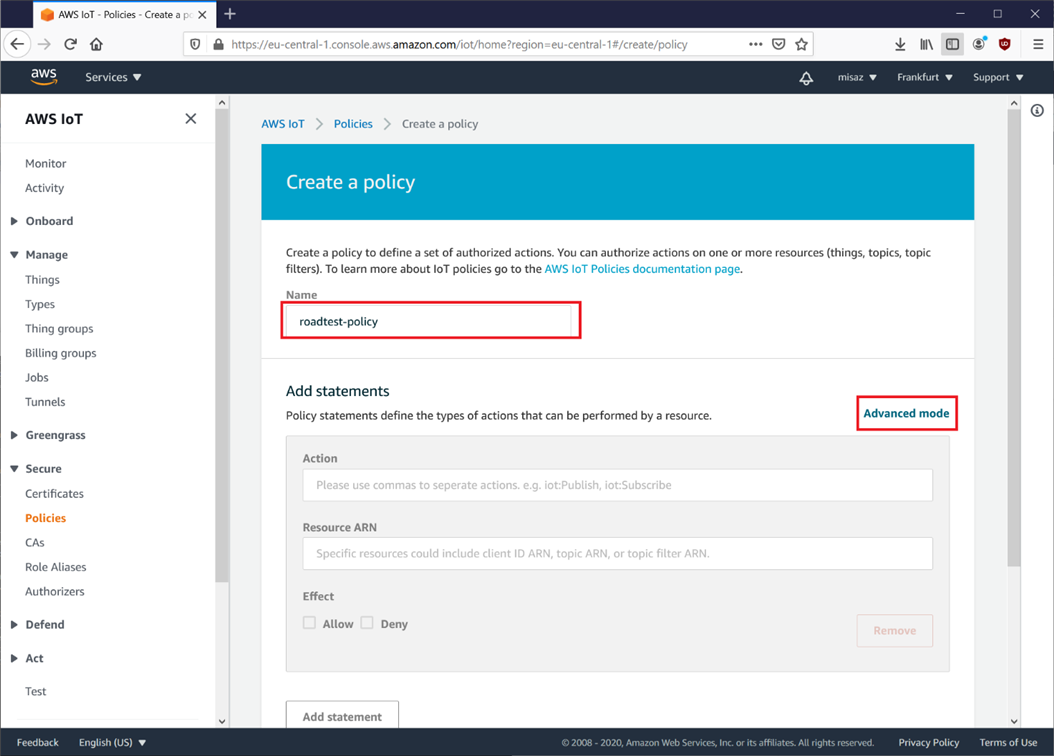
Now go to Policies section in main menu. You probably do not see any policy If you have not used AWS IoT Core before. Click Create.

Enter the policy name and switch to Advanced mode.
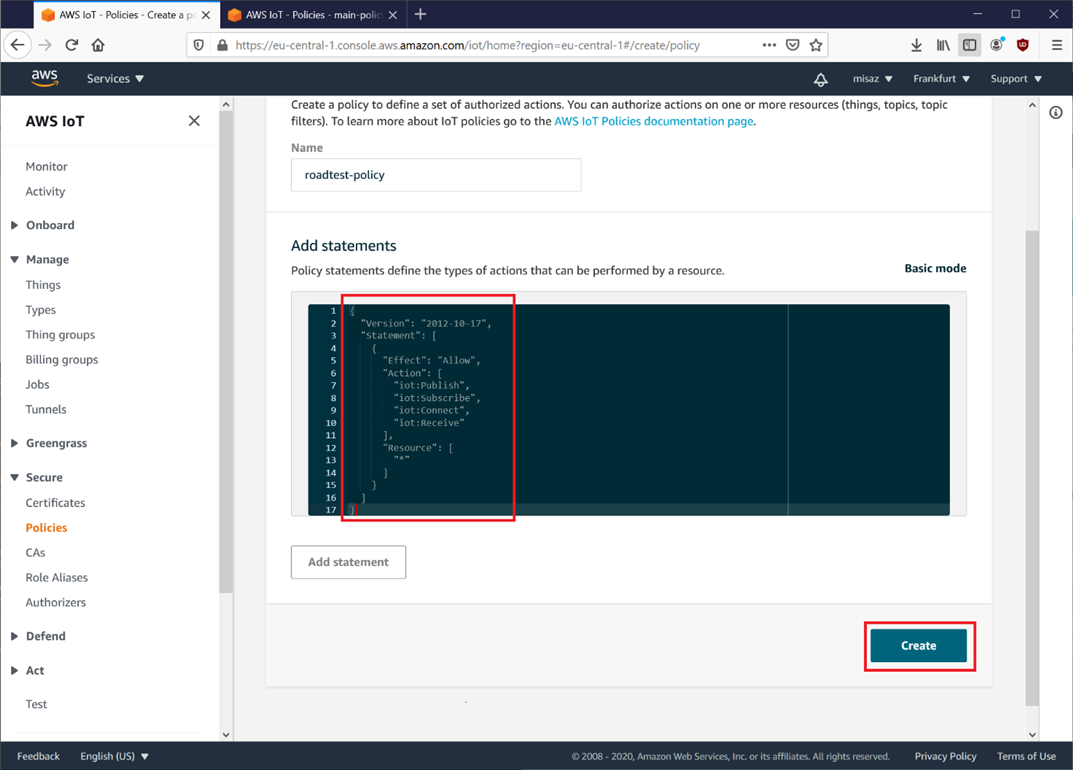
Enter the following policy.
{
 "Version": "2012-10-17",
 "Statement": [
    {
 "Effect": "Allow",
 "Action": [
 "iot:Publish",
 "iot:Subscribe",
 "iot:Connect",
 "iot:Receive"
      ],
 "Resource": [
 "*"
      ]
    }
  ]
}
Security notice: This policy is simple, but it is completely insecure. This policy allows any device to access any resource in any way. Never use this policy in production. Always specify as much restrictive policy as possible.
Then confirm by Create button.
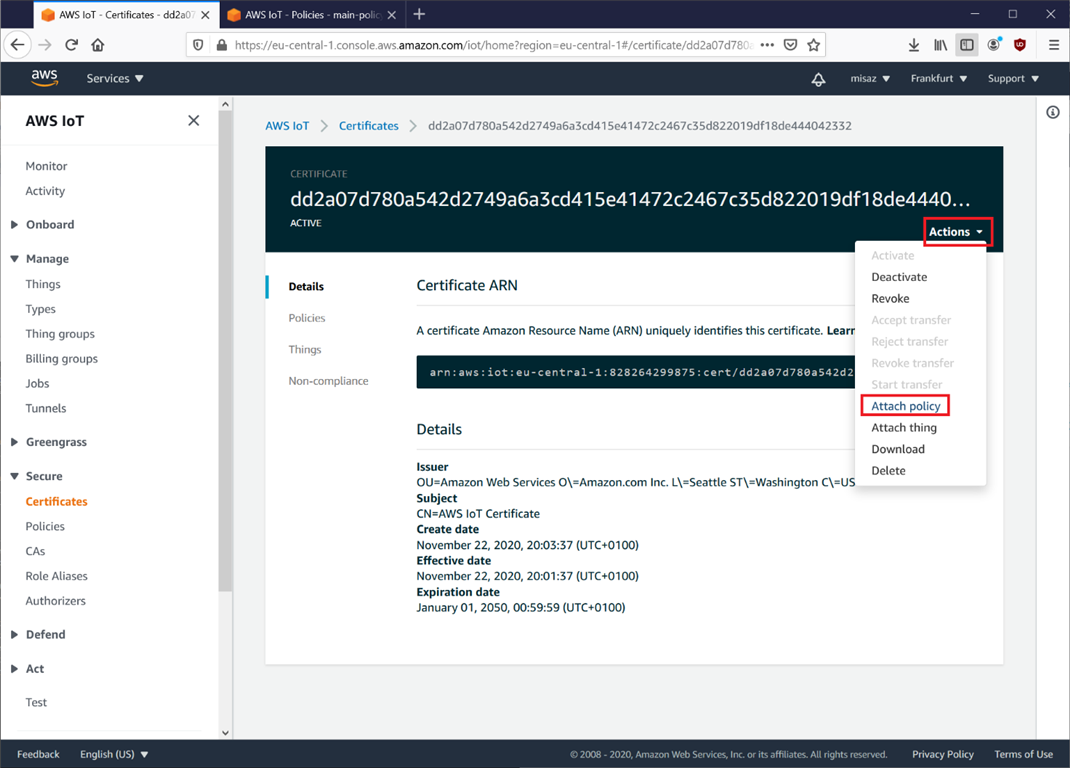
Now go to certificates. You will se single certificate. Open them.
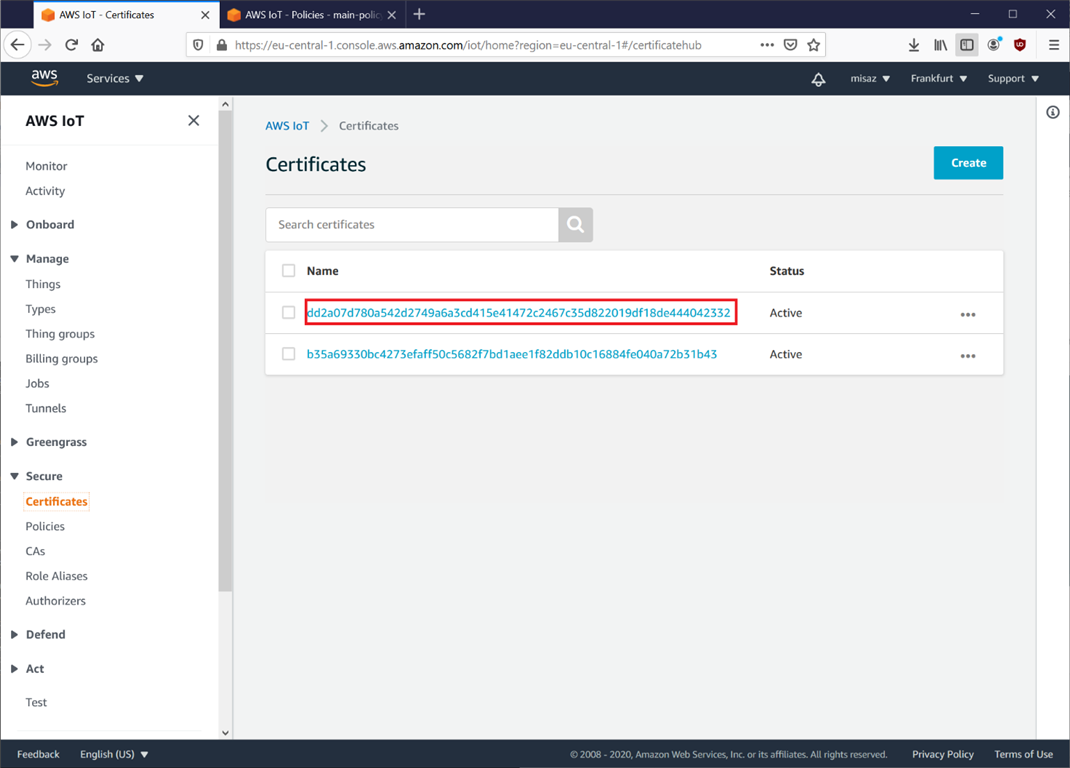
Select Action and then Attach policy.
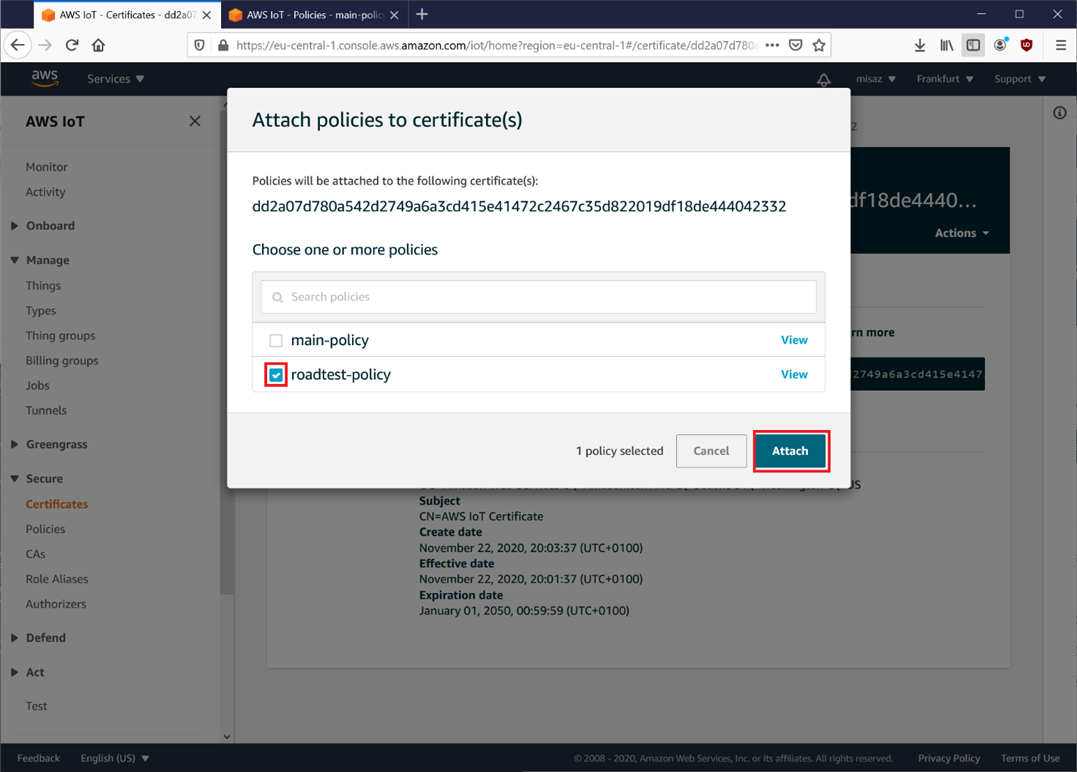
Select created policy and confirm by Attach button.
Copy cryptography assets to config file.
That is all in AWS Management console for now. We will come back later. Now go back o mqtt_client_config.h file. You need to fill CLIENT_CERTIFICATE, CLIENT_PRIVATE_KEY and ROOT_CA_CERTIFICATE constant with content of downloaded file. Open downloaded .cert.pem file in text editor and copy content of the file to the constant. Every line must begins with
”
and ends with following sequence.
\n” \
For example it should looks like following.
#define CLIENT_CERTIFICATE      \
"-----BEGIN CERTIFICATE-----\n"\
"MIIDWjCCAkKgAwIBAgIVANBIjFkYVxs4RUOjmOA2J4vHM3fVMA0GCSqGSIb3DQEB\n"\
"CwUAME0xSzBJBgNVBAsMQkFtYXpvbiBXZWIgU2VydmljZXMgTz1BbWF6b24uY29t\n"\
"IEluYy4gTD1TZWF0dGxlIFNUPVdhc2hpbmd0b24gQz1VUzAeFw0yMDExMjAyMTA3\n"\
"MjlaFw00OTEyMzEyMzU5NTlaMB4xHDAaBgNVBAMME0FXUyBJb1QgQ2VydGlmaWNh\n"\
"dGUwggEiMA0GCSqGSIb3DQEBAQUAA4IBDwAwggEKAoIBAQD69mXQxpxatzQUf0NB\n"\
"l4Nf9nkX08D96McI2voxRAX9vyZ6URLLcuqi0oa63u3eCukc3nL66aQmKWMdYy3R\n"\
"uVKKZGrka0kri/rvforqKXvpYxxlKYE/6w7GJxe9+7HKAsI6Zbrr1dy1EK/BDsDR\n"\
"zd98OAnDFPsA3VmSorVYSG4fz/1AH2UbyGwJ5XkGhn/QypacIhe32dssRx10YlRN\n"\
"nCQS4qyp4gRZV0RnIu13C9nECxlHppItnELYNjlYBXOhebqX8SQj8E2dxHE/kjHd\n"\
"vj2FQzRPD9lj0s+F4+2FQWmJZ0Ci0zrWQfD++UZusFjNG2CkhrjIEDo4QfZB7nsV\n"\
"9/APAgMBAAGjYDBeMB8GA1UdIwQYMBaAFAbYigA1bVnVmEUS564fy5mcOX3yMB0G\n"\
"A1UdDgQWBBRz+d8HD26fcEe2xNFVQTvQVCn70zAMBgNVHRMBAf8EAjAAMA4GA1Ud\n"\
"DwEB/wQEAwIHgDANBgkqhkiG9w0BAQsFAAOCAQEA20EZMppi47ZigPFzWTSTxQMM\n"\
"sulYKhjc28OaFBUWquuxpCO1339S2pcQm01LLwsJq3lyuQ0V+iuSuaJfehhZ7aDc\n"\
"emFzJa8KRKgAMtrYdpkMoZ833bATPBUeJIDxOqjB66/JdaBL8xT2daAmFJhrIaF6\n"\
"pbT1sE4ODYMKU74MHSyXhKUnFN0akIRIx68eHUwABCq4cGOY2NMiWxN8jncW8vzY\n"\
"+YHIA2pteSmWN7llxmLtocJCNVYeigjpk8Eiq2BqJXgQy0BXnKyA9ej1W9i3KXj/\n"\
"PBfhm4mPMe2+Xsq6hVu9HhIik4eJ+FsnlShcTzPEAJsLiq083rag+9Ad3d+I5g==\n"\
"-----END CERTIFICATE-----"
Then open private key file and similarly copy their content to CLIENT_PRIVATE_KEY macro. At the end copy downloaded AWS Root CA certificate and copy it’s content to ROOT_CA_CERTIFICATE macro.
Security notice: It should be considered as security risk placing private key in directly in source code. Private key should be private by definition. It should not be shared between multiple subjects even If they are completely the same devices.
When one your device became compromised It should act as any other device sharing the same key. Similarly, if you leek your firmware file all your devices (and data) may be compromised.
Better solution is to generate private key (key) in device at first run of device, generate signing request (csr) for the certificate, transfer CSR to computer when you can sign csr for example using USB, sing device certificate using some certificate authority (CA) (even sign it by your own authority, there are usually no need to pay any fees for security) and then deploy signed certificate (crt) back to device. There should not exists any way how to read private key outside from the device. Device should be the only one actor who can read private key. It should be for example stored in internal flash which must be locked for reading by external programmer (for hacker it is easy to read flash with private key simple using external programmer).
Integrate HTU21DHTU21D library
Go to https://github.com/misaz/HTU21DLibrary. It is my library for HTU21DHTU21D temperature sensor ported to PSoC6 platform. Download repository and copy HTU21DHTU21D.c, HTU21DHTU21D.h, HTU21DHTU21D_PlatformSpecificPSoC6.c and HTU21DHTU21D_PlatformSpecificPSoC6.h files from src folder to your project. Rename Platform specific files by removing PSoC6 from their name. For you should have 4 new additional files in your project. They are:
- HTU21D.c
- HTU21D.h
- HTU21D_PlatformSpecific.c
- HTU21D_PlatformSpecific.h
Include HTU21D.h in main.c and publisher_task.c files. In main add initialization call after initialization of retarget-io library.
HTU21D_Init();
Open HTU21D_PlatformSpecific.h and change HTU21D_SCB_CLOCK_DIVIDER_VALUE from 64 to 40 because project is configured to lower peripheral clock frequency (PERI) then I have used in project 1 so divider must divide frequency by lower value to reach correct I2C clock frequency.
Writing code for publisher thread
Now go to publsiher_task.c file. I will most of them completely rewrite.
Delete whole publisher_cleanup and isr_button_press functions and USER_BTN_INTR_PRIORITY macro because I do not use button at all.
Delete publishInfo global variable because I will use similar local variable.
Delete content of publisher_task because I will write a new one.
Now let’s write logic that will in infinite loop read humidity and temperature from the sensor and publish it using MQTT client to the cloud.
Declare following variables and initialize crypto engine. I will use random numbers as IDs of messages sent to cloud.
float temperature, humidity;
cyhal_trng_t trng;
cy_rslt_t result;

result = cyhal_trng_init(&trng);
CY_ASSERT(result == CY_RSLT_SUCCESS);
Write a new infinite loop.
while (1) {
}
Read temperature and humidity using HTU21DHTU21D library.
if (HTU21D_ReadTemperature(&temperature) != HTU21D_E_OK) {
      printf("Error while reading temperature from HTU21D sensor.\r\n");
      break;
}
if (HTU21D_ReadHumidity(&humidity) != HTU21D_E_OK) {
      printf("Error while reading humidity from HTU21D sensor.\r\n");
      break;
}
Generate random 32 hexadecimal characters as ID of message.
char messageId[33];
for (int i = 0; i < 4; i++) {
      uint32_t randomValue = cyhal_trng_generate(&trng);
      snprintf(messageId + i * 8, 9, "%08lx", randomValue);
}
And finaly complete the full message.
char message[1024];
snprintf(message, 1023, "{\"id\": \"%s\", \"temperature\":\"%.2f\", \"humidity\": \"%.2f\"}", messageId, temperature, humidity);
Now setup the IotMqttPublishInfo_t structure with data which will be published to cloud. I am using htu21d_readings as MQTT topic name (this name we should use at cloud side later), QOS set to 1, retain to false, retry timeout to 1 second and retry limit to 10 attempts.
IotMqttPublishInfo_t publishInfo;
publishInfo.pTopicName = "htu21d_readings";
publishInfo.topicNameLength = strlen(publishInfo.pTopicName);
publishInfo.pPayload = message;
publishInfo.payloadLength = strlen(message);
publishInfo.qos = IOT_MQTT_QOS_1;
publishInfo.retain = false;
publishInfo.retryMs = 1000;
publishInfo.retryLimit = 10;
Then publish the message to cloud and print result.
result = IotMqtt_PublishSync(mqttConnection, &publishInfo, 0, MQTT_TIMEOUT_MS);
if (result == IOT_MQTT_SUCCESS) {
      printf("temperature and humidity was successfully published.\r\n");
} else {
      printf("Error while publishing message.\r\n");
}
After that wait 1 minute before processing next iteration.
cyhal_system_delay_ms(60 * 1000);
Testing device
Now If you run application. On the terminal you should see some header which comes from original code example, information’s about WLAN firmware and message that first message was successfully sent to cloud.

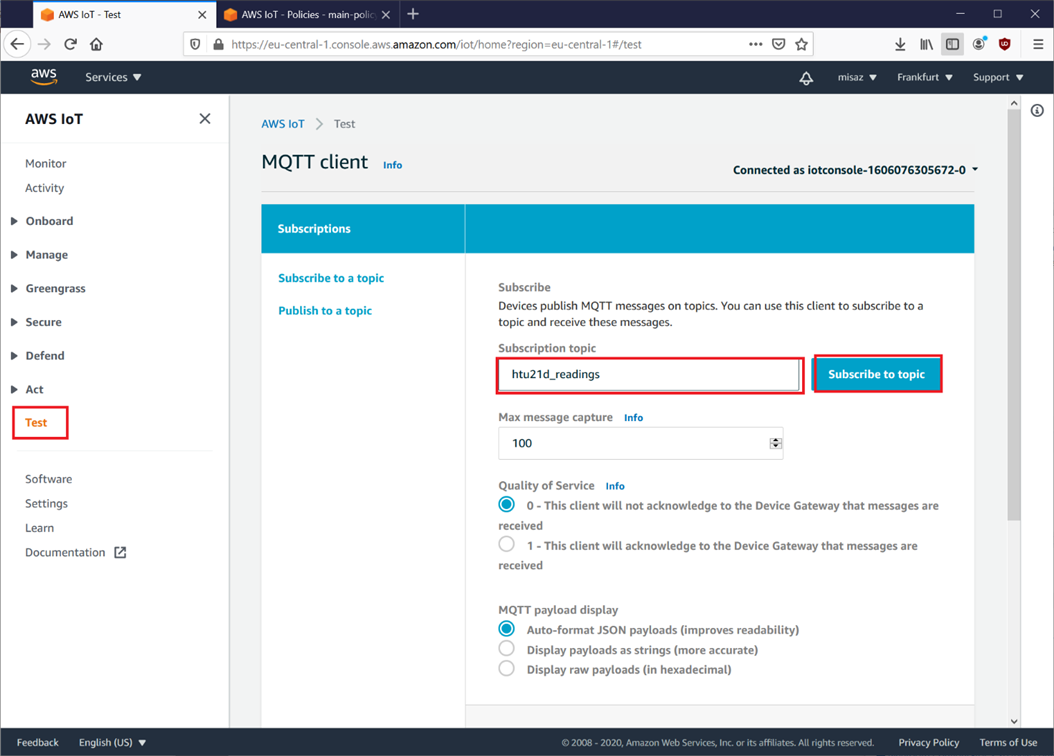
Testing reception of data in cloud
Go back to AWS Management Console and in menu click Run. Then fulfill the topic name to the topic specified in firmware of device and press Subscribe.
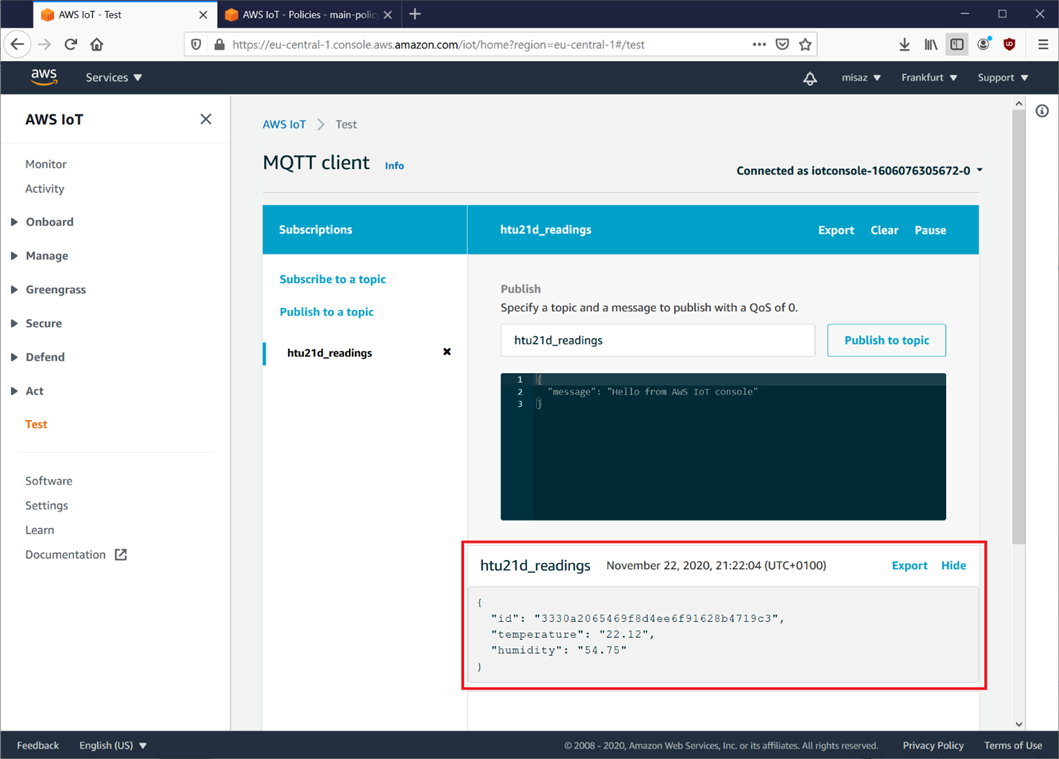
After a while you will see that MQTT client running in cloud received message sent from your device with measured values.
In next part of chapter I configure database service and automatic saving of received values to the database. As a database I use DynamoDB because you pay only for consumed requests (I consume only low requests, 1 per minute means only 43800 write requests per month, and DynamoDB billing specify price per 1 000 000 requests, so It will run mostly at the price near to 0.00 using this DB in my case) and you do not need run any (expensive) server like for other databases. DynamoDB is serverless.
Creating database for received data
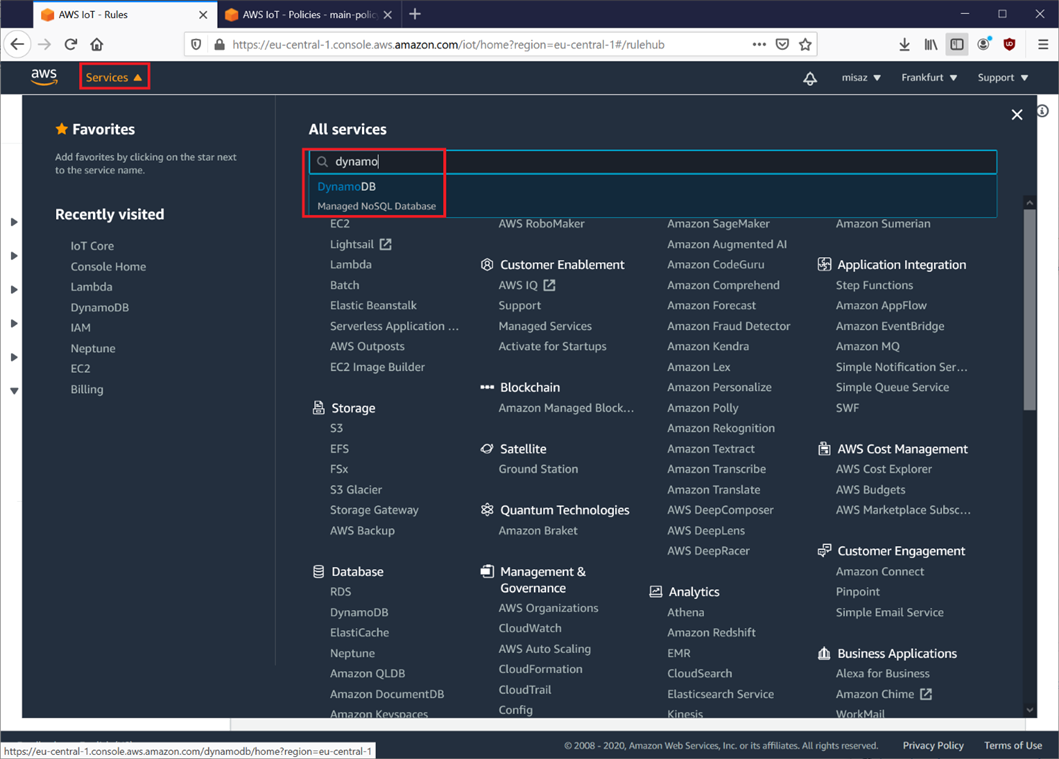
Open Services lookup and search for DynamoDB. Then go to DynamoDB administration.
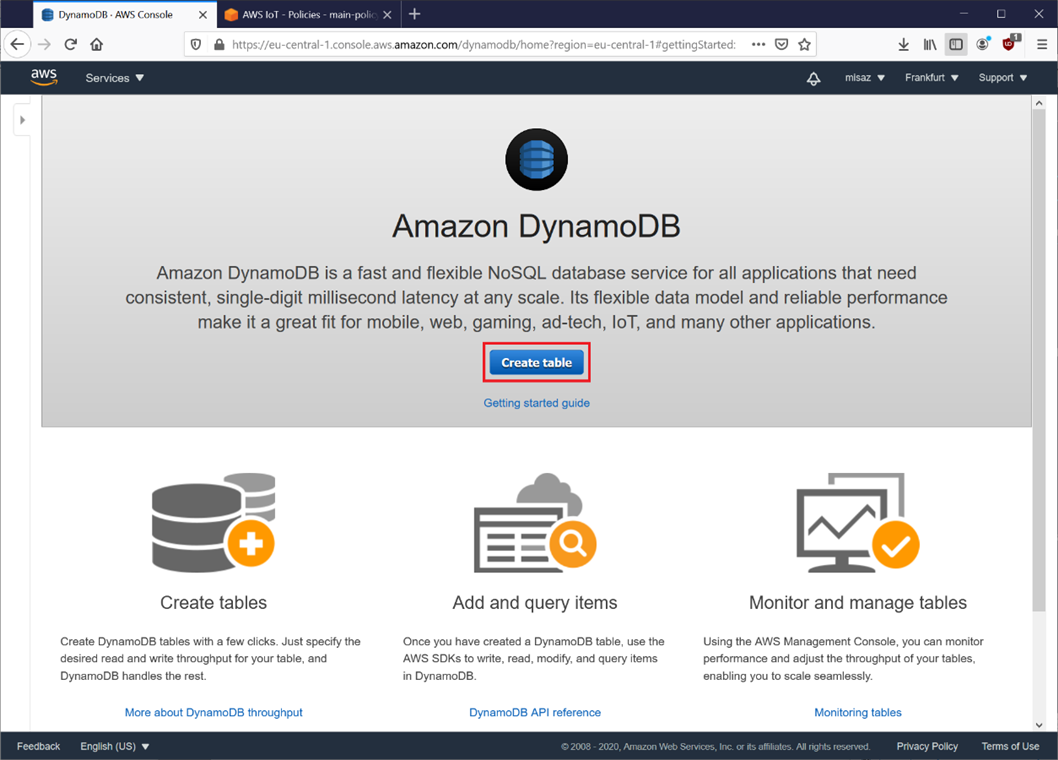
Click Create table.
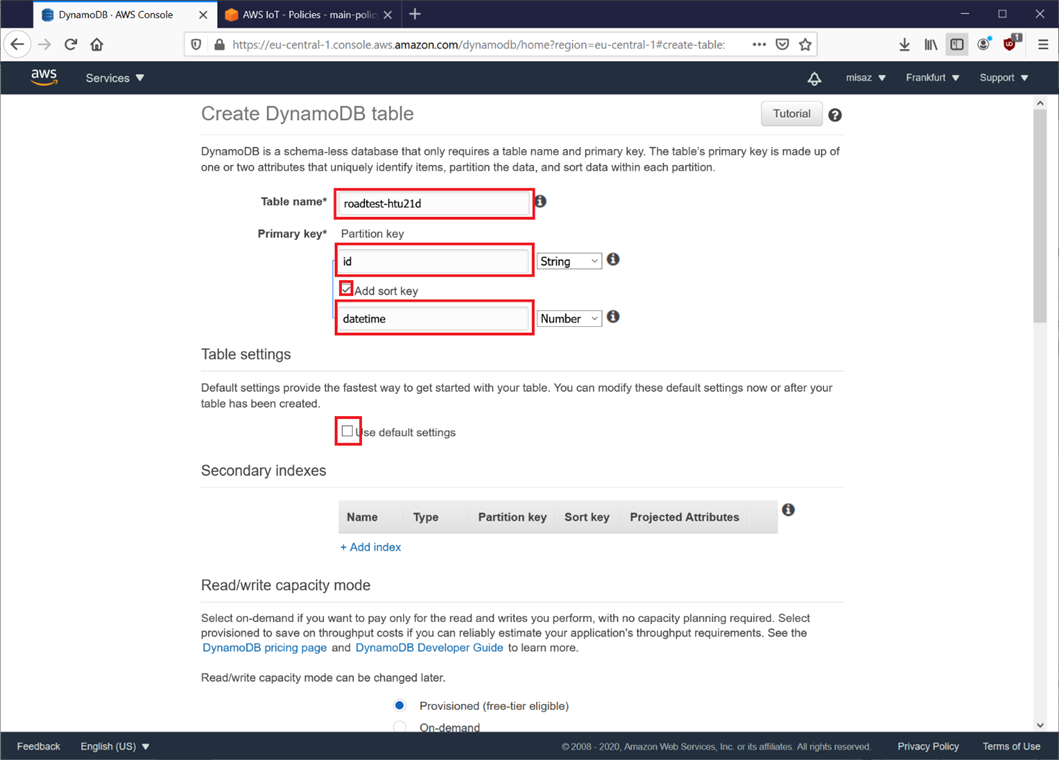
Enter the table name, as a primary key choose id (it is not a good primary key for nosql database, I recommend consulting documentation to make a better key in production). Then select Add sort key and type datetime as sort key. Select type of datetime to Number. Then uncheck Use default settings.
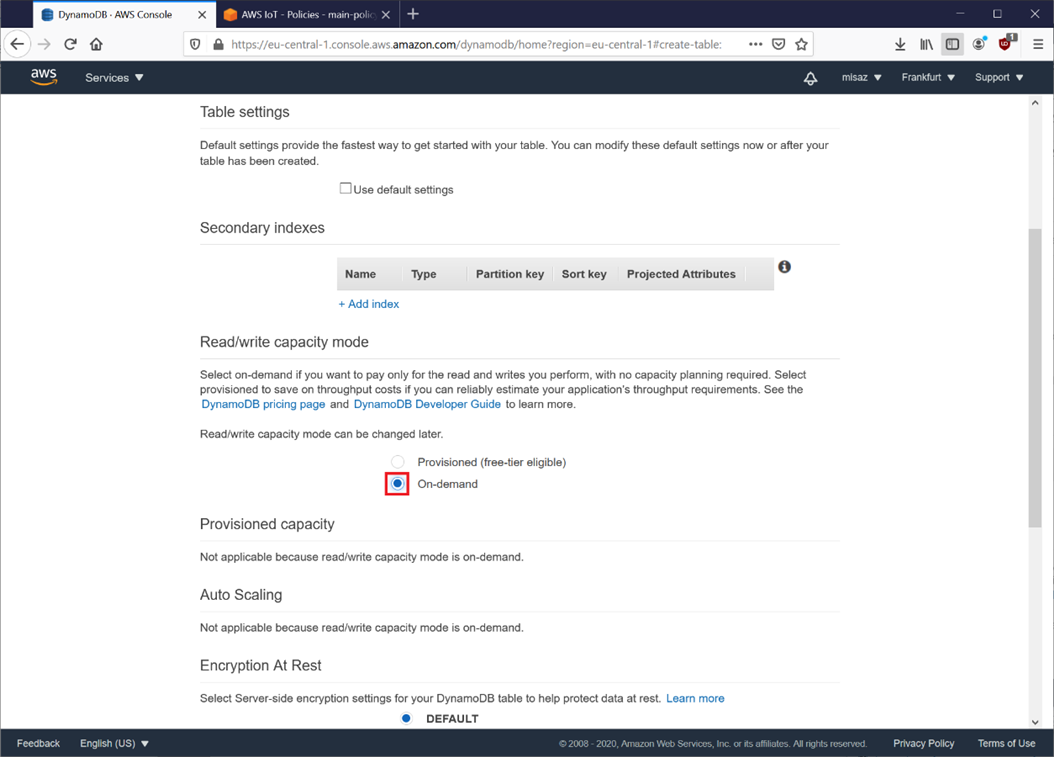
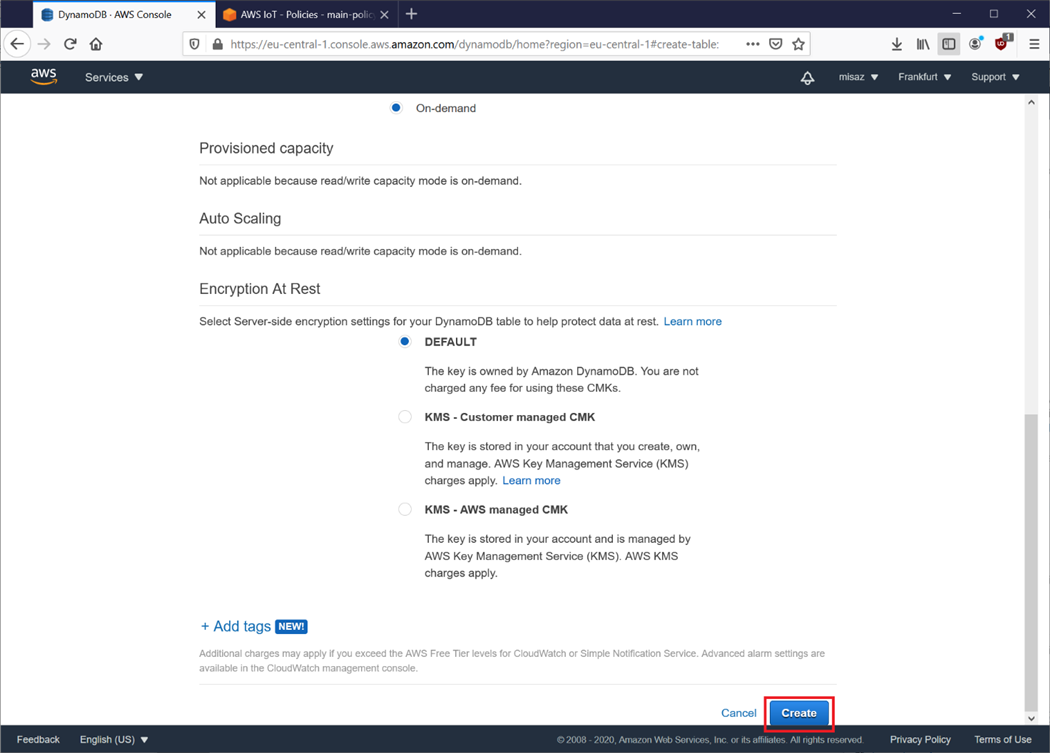
Capacity mode switch to On-demand.
Confirm by Create.
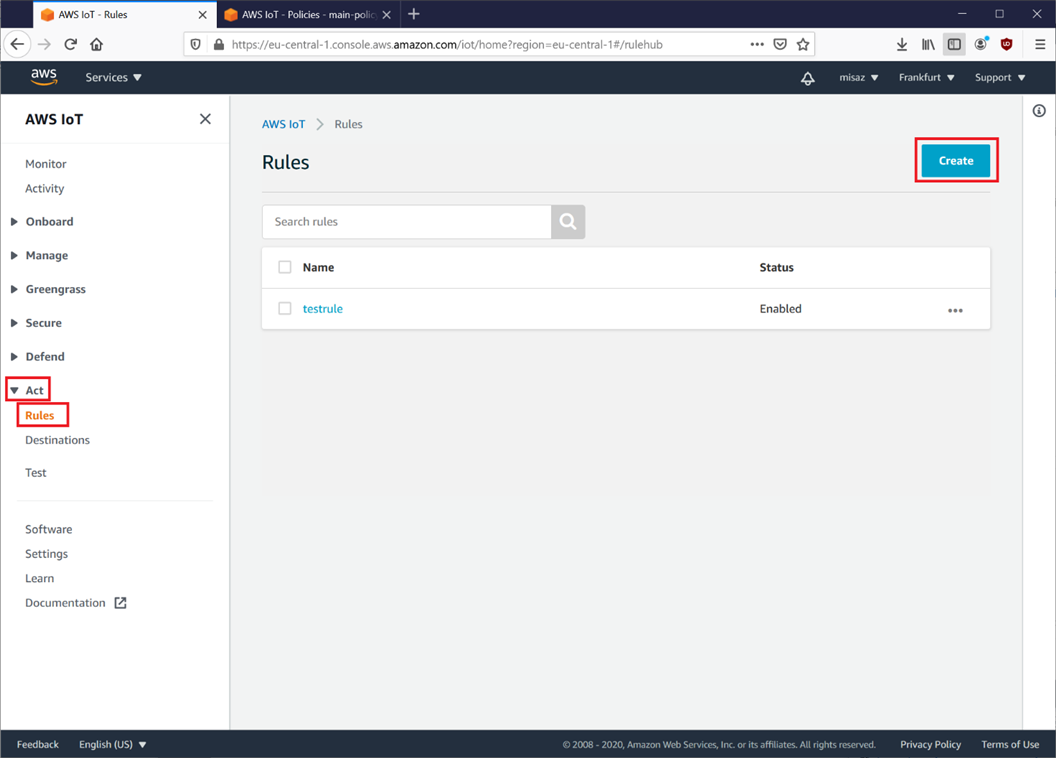
Create IoT Core rule pushing data to database
Now go back to IoT Core console. Go to Act menu and Rules section. Then create to Create. You probably do not see any rule If you have not used AWS IoT Core before.
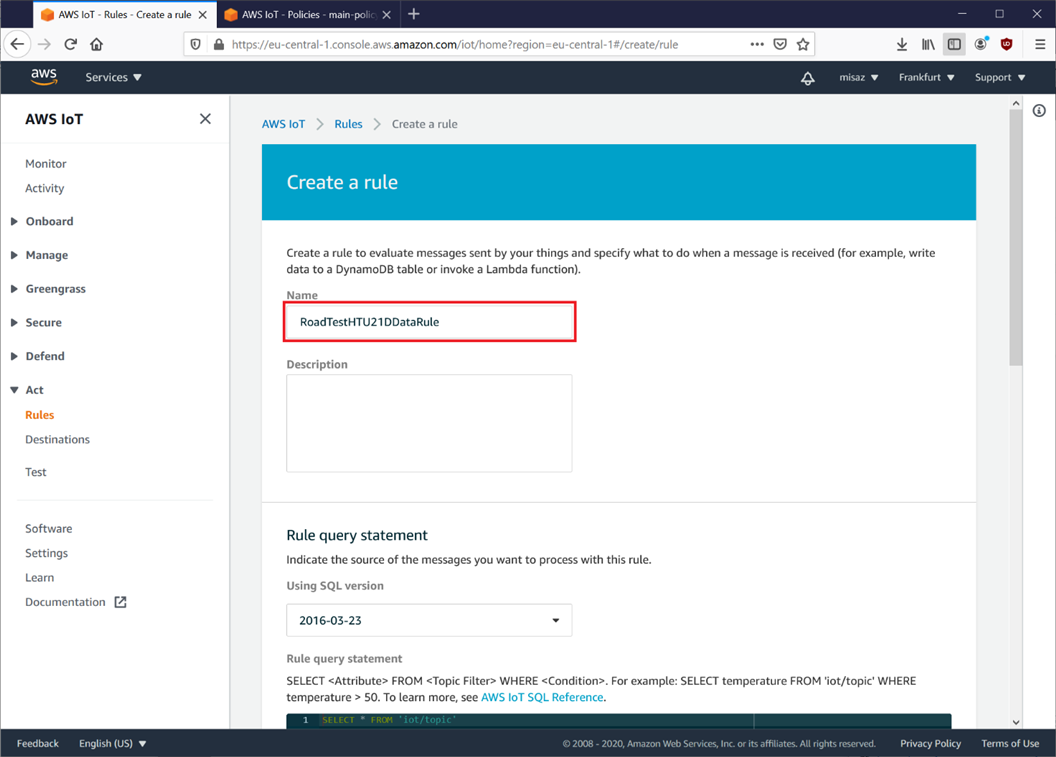
Enter the rule name.
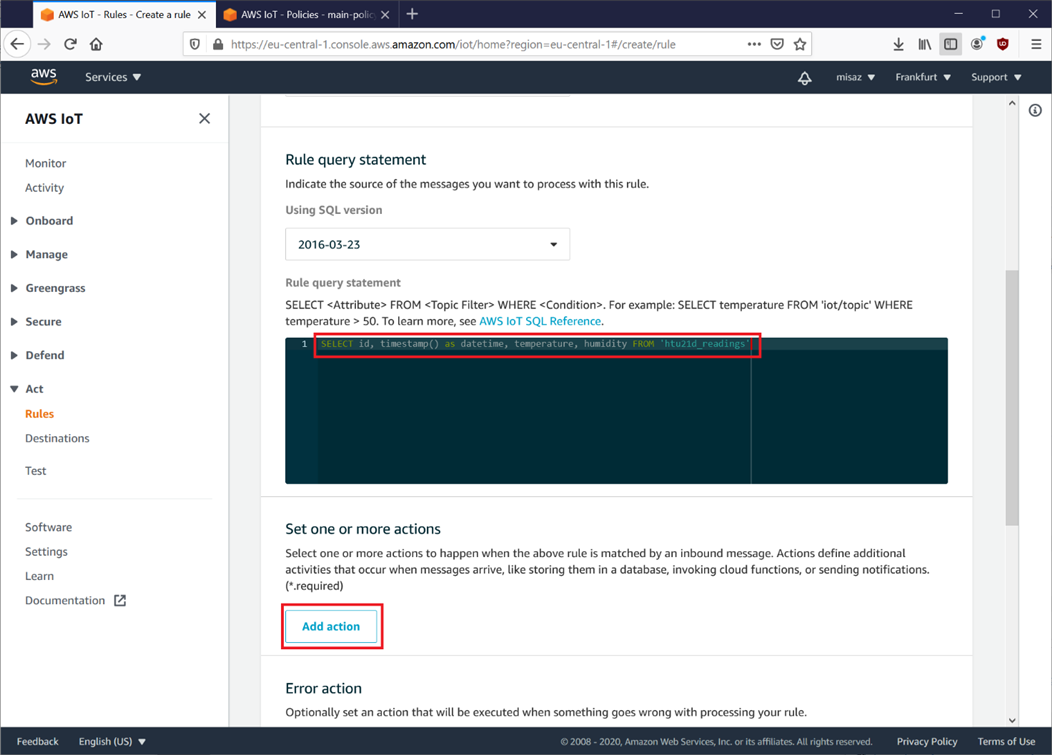
Enter the following SQL command and press Add action.
SELECT id, timestamp() as datetime, temperature, humidity FROM 'htu21d_readings'
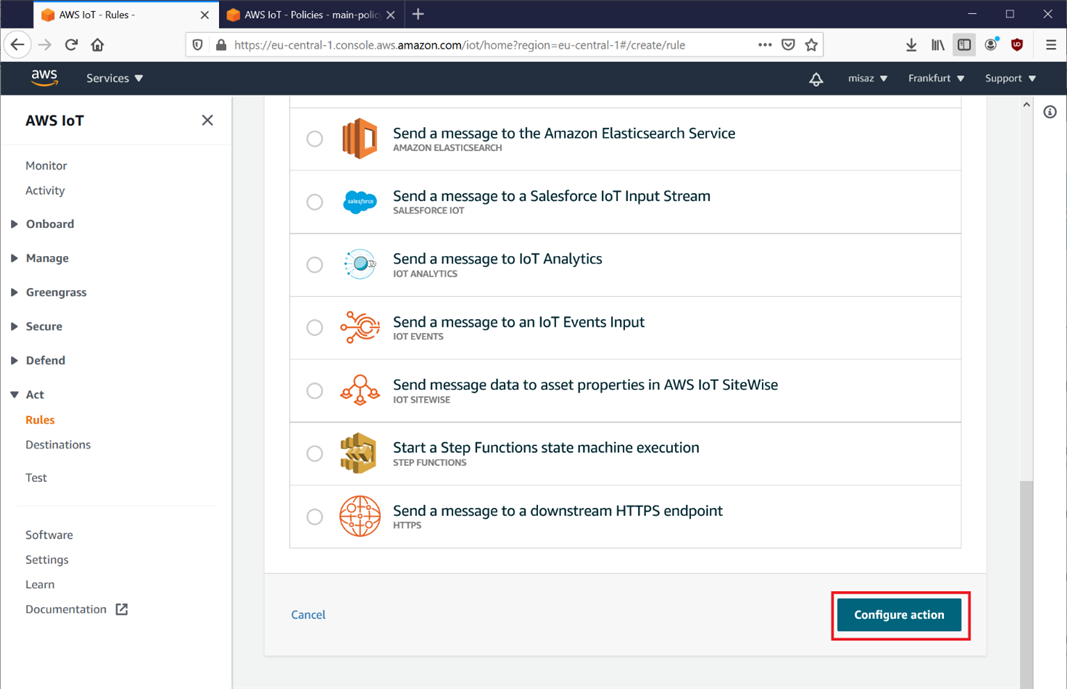
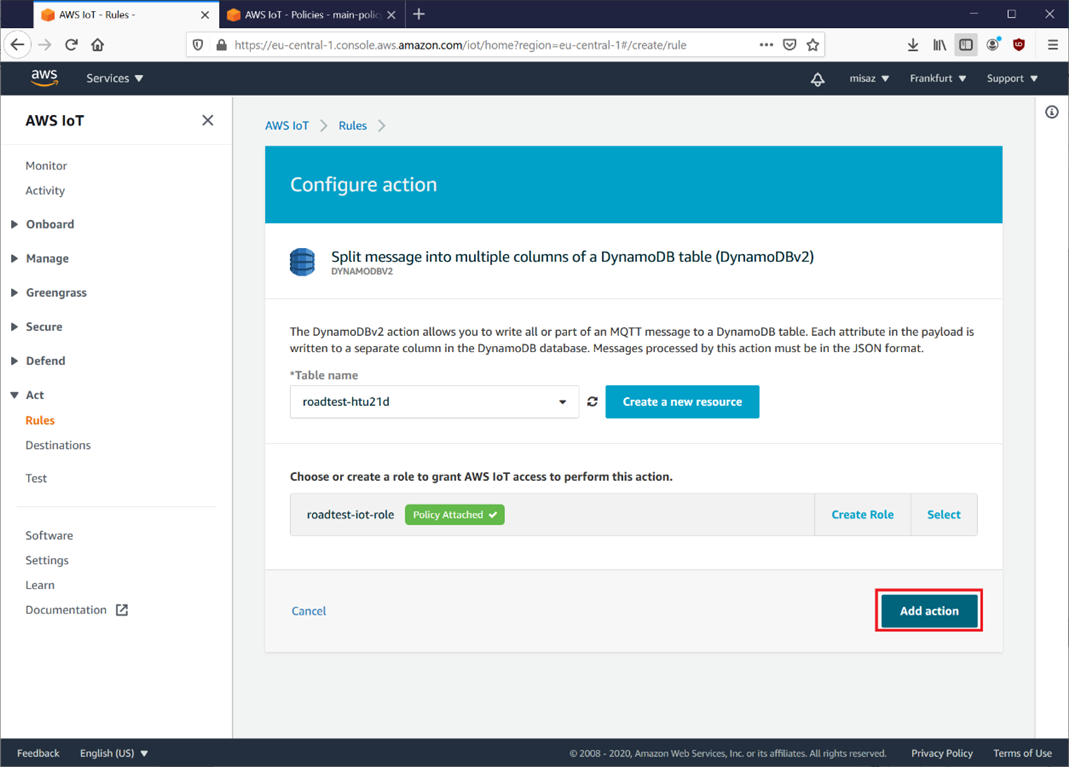
Select Split messages into multiple columns of DynamoDB table (DynamoDBv2).
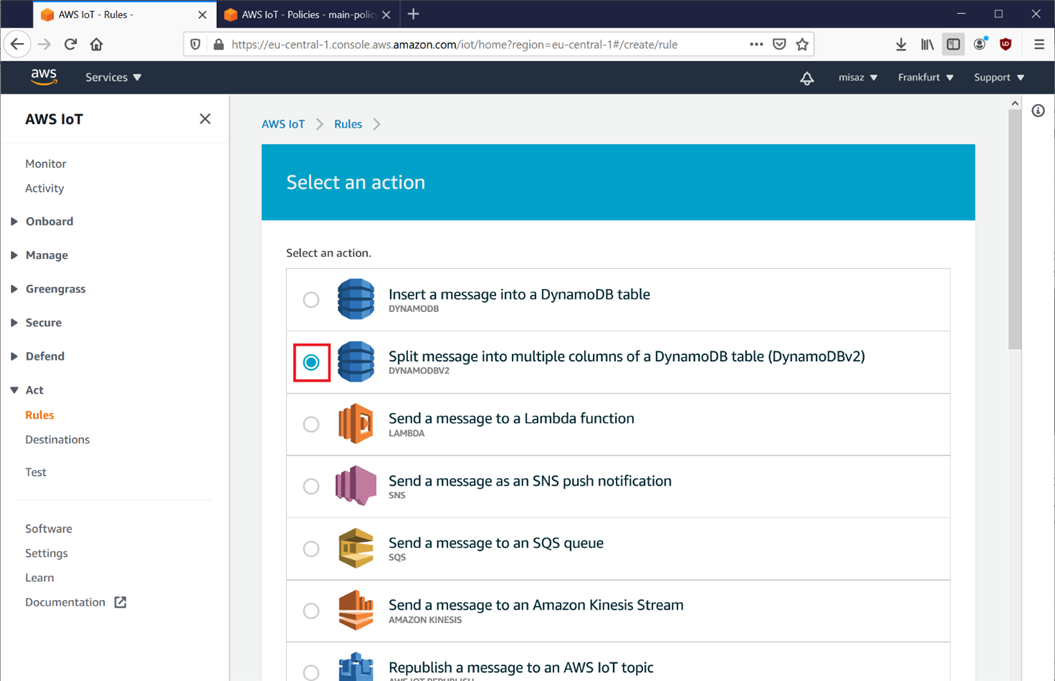
Then press Configure action.
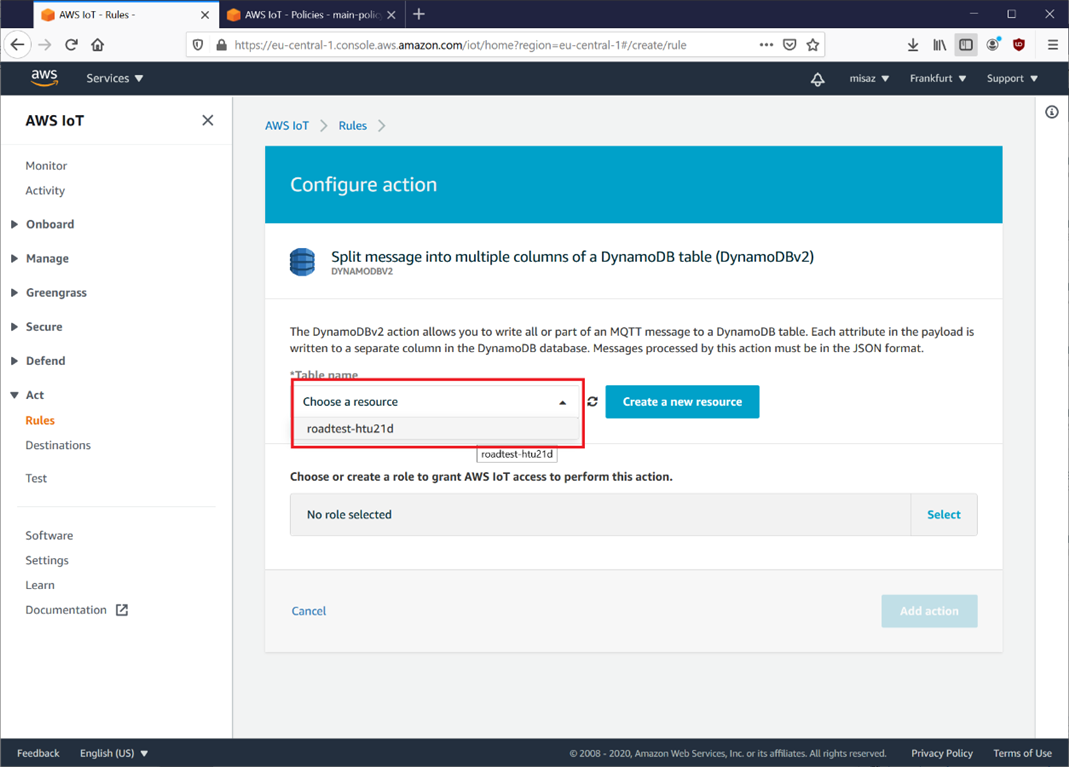
Select a DynamoDB table.c
Create new Role, enter their name and confirm.
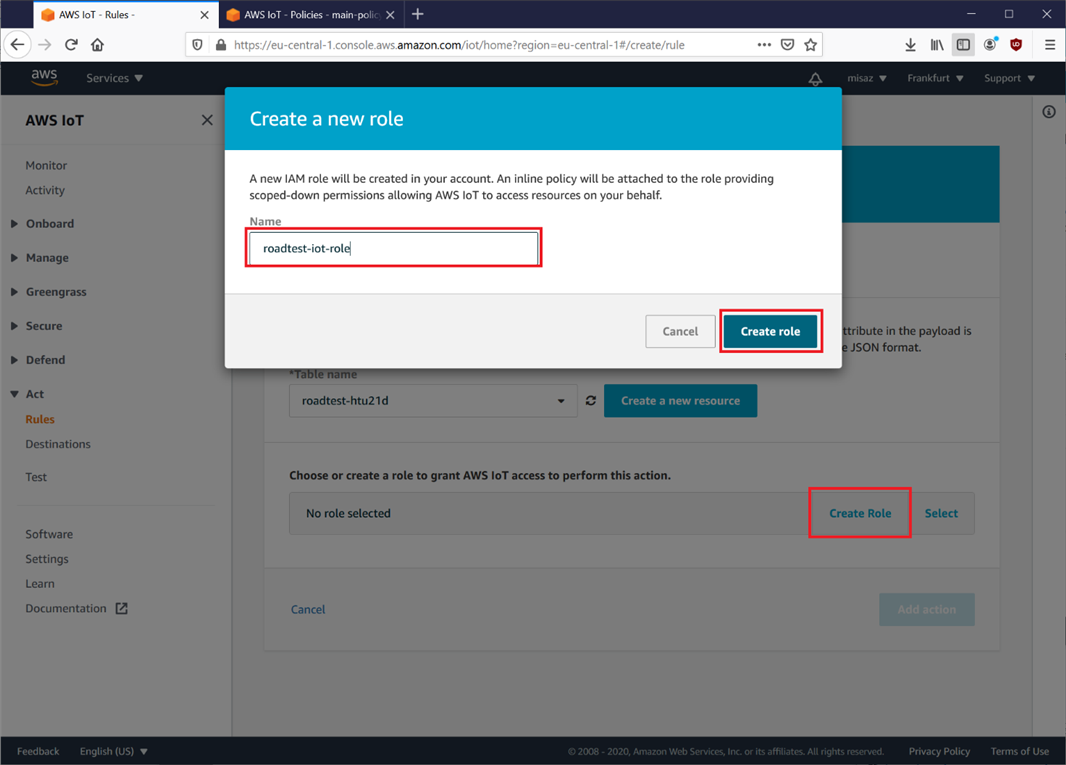
Then confirm by Add action.
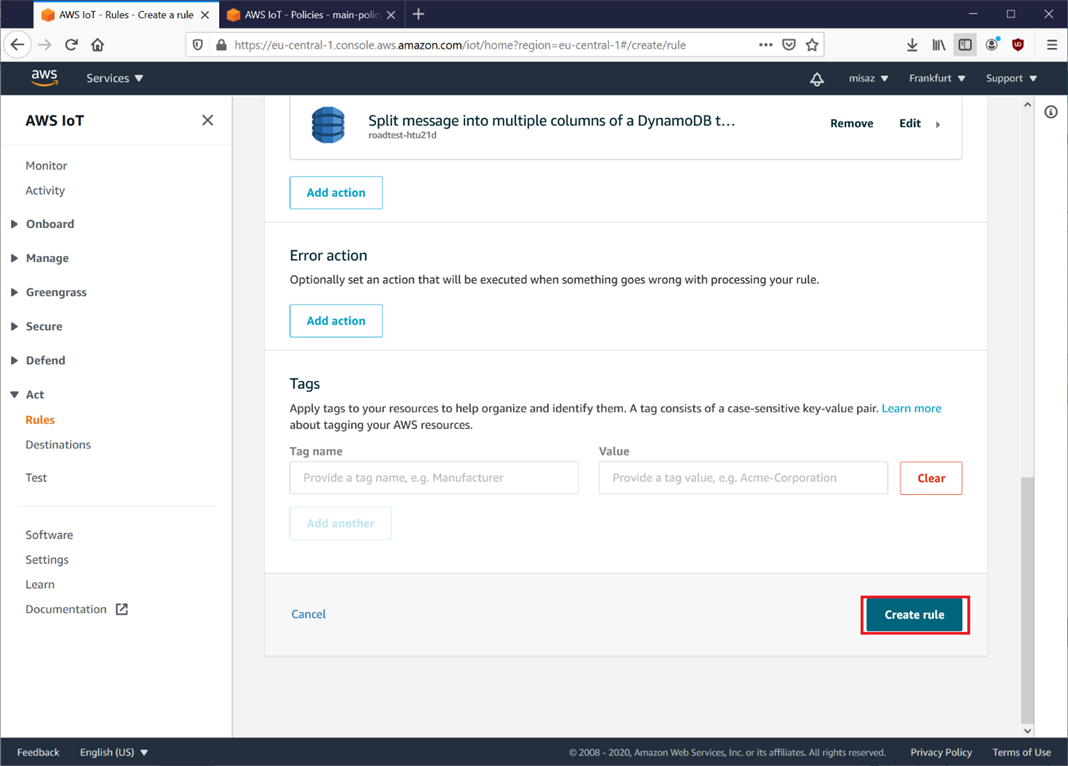
And confirm by Create rule.
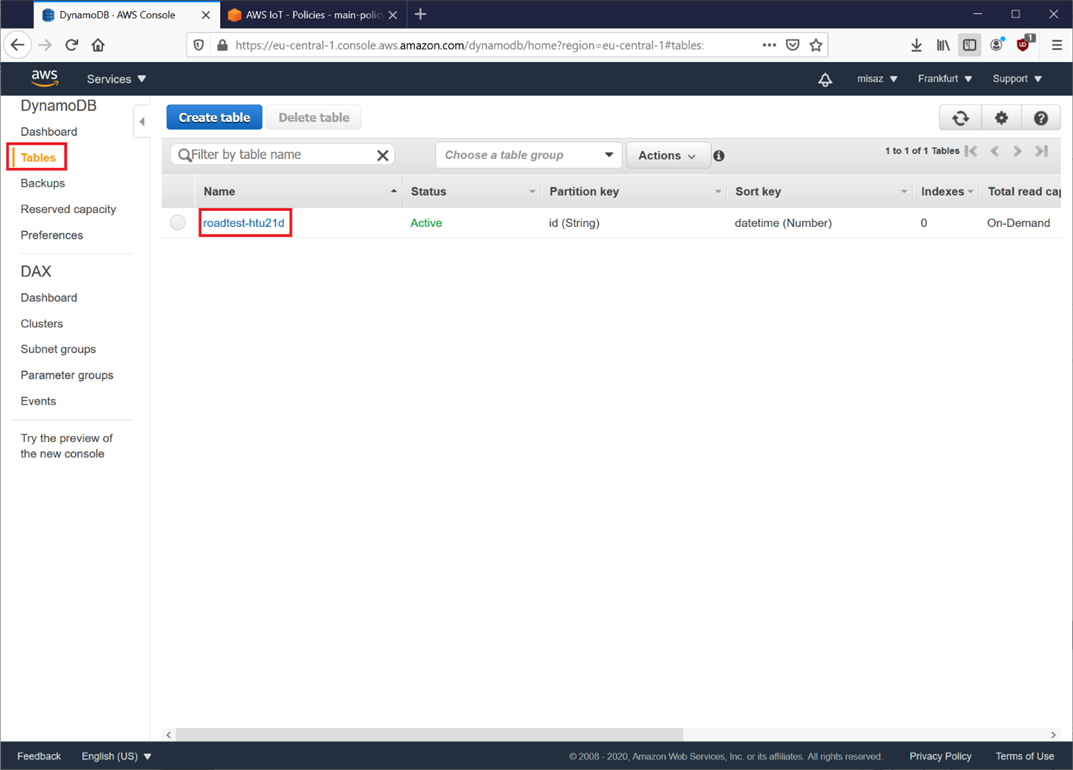
Now you can go back to table, wait until your device publish new measurement and check them in table. Open the table in DynamoDB administration.
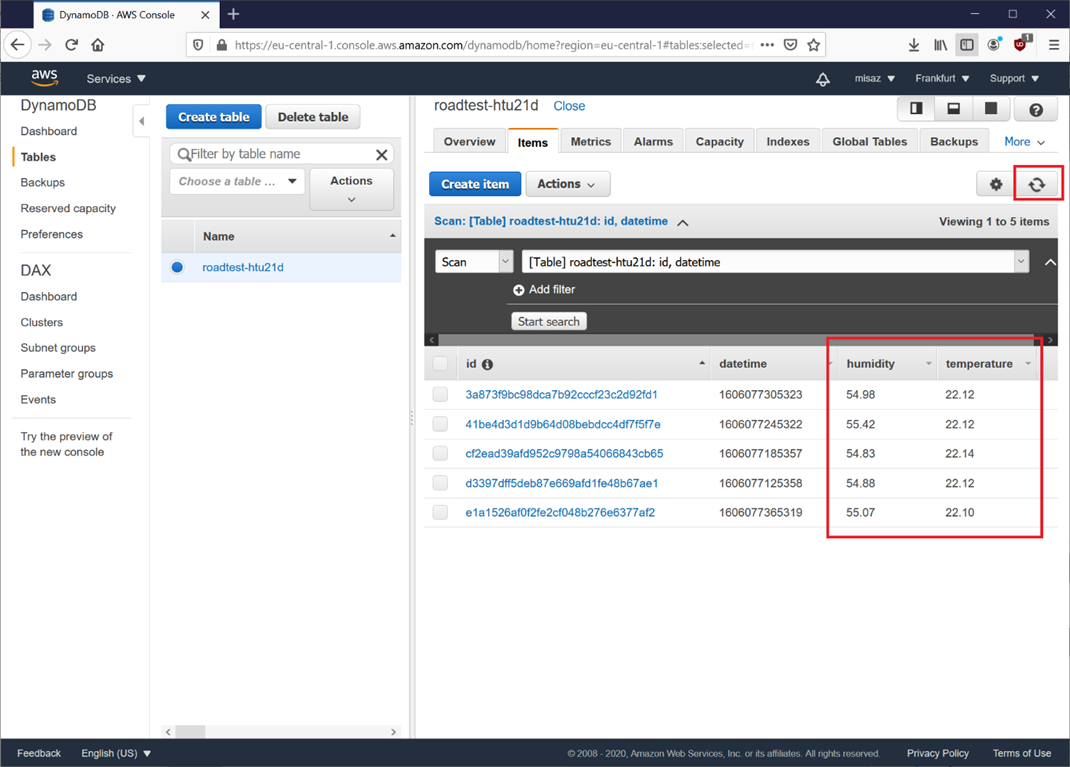
And after some time you will see data. You can update view by Refresh button.
Web interface to cloud data
I have created ASP.NET Core application that connects to DynamoDB and renders chart with measured data. His description is outside of scope of this roadtest review. This application is available to download with source code at the bottom of this article. It is Visual Studio solution. You have to update AWS credentials in appsettings.json file before run.
The most interesting part of code is function downloading data from cloud. It is following.
public async Task<IEnumerable<Measurement>> GetData(long startTime, long endTime) {
      AmazonDynamoDBClient cli = AwsServicesConfiguration.GetDynamoDbClient();

      ScanRequest request = new ScanRequest("roadtest-htu21d");
      request.FilterExpression = "#dt between :param_from and :param_end";
      request.ExpressionAttributeValues = new Dictionary<string, AttributeValue>() {
            { ":param_from", new AttributeValue() { N = startTime.ToString() } },
            { ":param_end", new AttributeValue() { N = endTime.ToString() } },
      };
      request.ExpressionAttributeNames = new Dictionary<string, string> {
            {"#dt", "datetime" }
      };
      request.ProjectionExpression = "#dt, temperature, humidity";

      ScanResponse response = await cli.ScanAsync(request);
As you can see It has two parameters which are unix timestamps and it builds request to AWS for data which has datetime filed set to value between these parameters. After that function process the output to internal structures and then build HTML page with this data. You can run this application in AWS, but it requires full time hosting server, so I am running it only on localhost. At the page you can see combined chart of humidity and temperature. For example, it should look as follows.
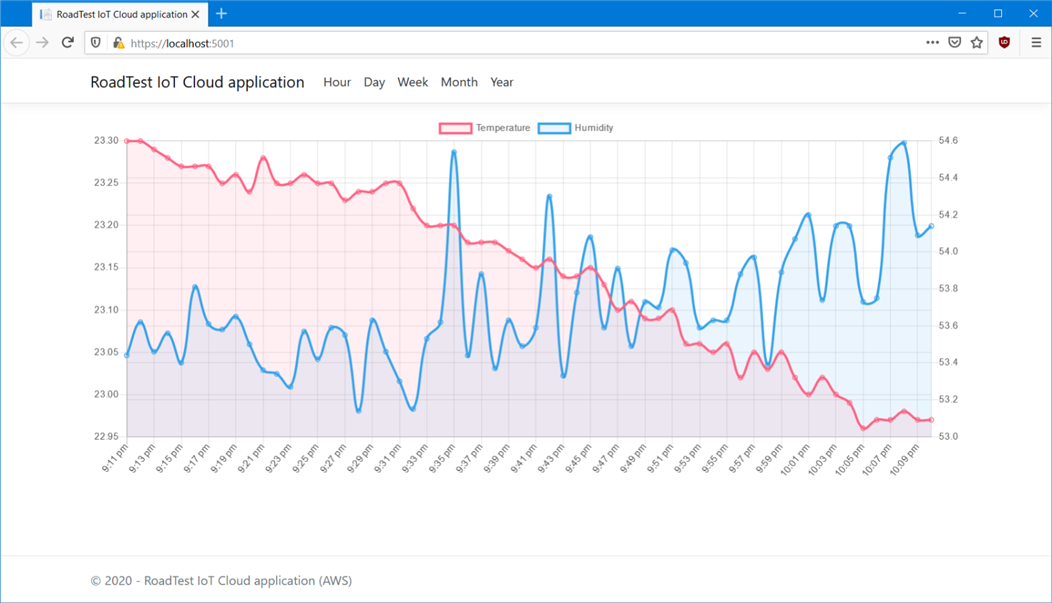
You can switch time range from Hour (default) to day for example.
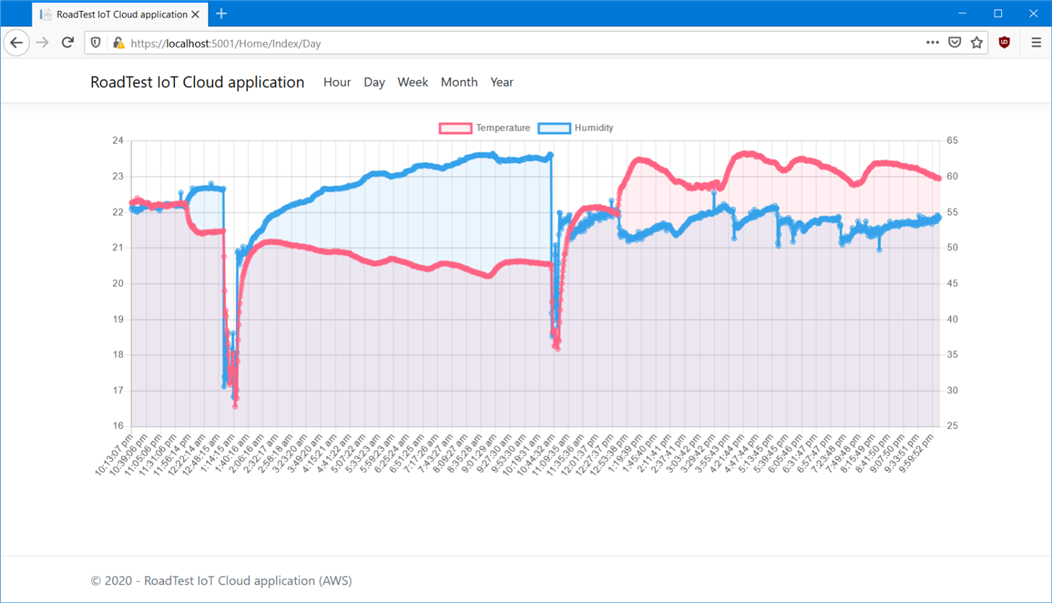
You can analyze behavior of your temperature and humidity. I run this application in my room. The huge drops are times when I opened windows. The temperature slowly drops and grow when heater is enabled which should be easily interpreted from charts.
Pricing of cloud services
Disclaimer: The following prices are based one less than one day of running app under specific cost optimized conditions. I am not responsible for any of your high charges which you may incur by doing the same as in this tutorial. Always check all pricing conditions in documentation and be careful. Pricing conditions may have changed since I wrote this article.
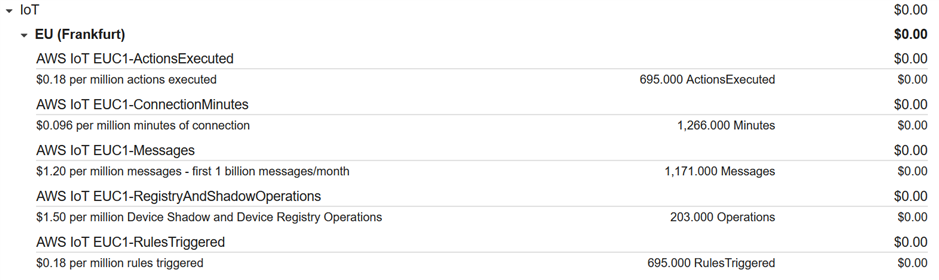
Because the app is designed as completely serverless, their hosting (except web interface) is very cheap. After a day of running I have checked billing section. For DynamoDB I paid nothing because the app (both IoT part and my web interface) do not produce enough requests to pay anything. It depends mostly on How often do you check web interface because every load of web interface page makes request to DynamoDB service.

Similarly, when running with one device It also do not use IoT Core service so much to pay any high cost.
This is because it is very simple app running on one development board. You may be incurred higher cost and pricing conditions and prices may change over time.

