element14 Community
element14 Community
    Register Log In
  • Site
  • Search
  • Log In Register
  • About Us
  • Community Hub
    Community Hub
    • What's New on element14
    • Feedback and Support
    • Benefits of Membership
    • Personal Blogs
    • Members Area
    • Achievement Levels
  • Learn
    Learn
    • Ask an Expert
    • eBooks
    • element14 presents
    • Learning Center
    • Tech Spotlight
    • STEM Academy
    • Webinars, Training and Events
    • Learning Groups
  • Technologies
    Technologies
    • 3D Printing
    • FPGA
    • Industrial Automation
    • Internet of Things
    • Power & Energy
    • Sensors
    • Technology Groups
  • Challenges & Projects
    Challenges & Projects
    • Design Challenges
    • element14 presents Projects
    • Project14
    • Arduino Projects
    • Raspberry Pi Projects
    • Project Groups
  • Products
    Products
    • Arduino
    • Avnet Boards Community
    • Dev Tools
    • Manufacturers
    • Multicomp Pro
    • Product Groups
    • Raspberry Pi
    • RoadTests & Reviews
  • Store
    Store
    • Visit Your Store
    • Choose another store...
      • Europe
      •  Austria (German)
      •  Belgium (Dutch, French)
      •  Bulgaria (Bulgarian)
      •  Czech Republic (Czech)
      •  Denmark (Danish)
      •  Estonia (Estonian)
      •  Finland (Finnish)
      •  France (French)
      •  Germany (German)
      •  Hungary (Hungarian)
      •  Ireland
      •  Israel
      •  Italy (Italian)
      •  Latvia (Latvian)
      •  
      •  Lithuania (Lithuanian)
      •  Netherlands (Dutch)
      •  Norway (Norwegian)
      •  Poland (Polish)
      •  Portugal (Portuguese)
      •  Romania (Romanian)
      •  Russia (Russian)
      •  Slovakia (Slovak)
      •  Slovenia (Slovenian)
      •  Spain (Spanish)
      •  Sweden (Swedish)
      •  Switzerland(German, French)
      •  Turkey (Turkish)
      •  United Kingdom
      • Asia Pacific
      •  Australia
      •  China
      •  Hong Kong
      •  India
      •  Korea (Korean)
      •  Malaysia
      •  New Zealand
      •  Philippines
      •  Singapore
      •  Taiwan
      •  Thailand (Thai)
      • Americas
      •  Brazil (Portuguese)
      •  Canada
      •  Mexico (Spanish)
      •  United States
      Can't find the country/region you're looking for? Visit our export site or find a local distributor.
  • Translate
  • Profile
  • Settings
Enchanted Objects
  • Challenges & Projects
  • Design Challenges
  • Enchanted Objects
  • More
  • Cancel
Enchanted Objects
Blog 1958 Turntable from the Black Forest - 10: SMD Time - Solder the IR Speed Sensor PCB
  • Blog
  • Forum
  • Documents
  • Polls
  • Files
  • Events
  • Mentions
  • Sub-Groups
  • Tags
  • More
  • Cancel
  • New
  • Share
  • More
  • Cancel
Group Actions
  • Group RSS
  • More
  • Cancel
Engagement
  • Author Author: Jan Cumps
  • Date Created: 16 Apr 2015 12:24 PM Date Created
  • Views 1012 views
  • Likes 2 likes
  • Comments 8 comments
  • motor_driver
  • ir_sensor
  • kicad
  • enchanted_player
  • enchanted_objects
  • sample
  • pwm
  • arduino_uno
  • arduino
Related
Recommended

1958 Turntable from the Black Forest - 10: SMD Time - Solder the IR Speed Sensor PCB

Jan Cumps
Jan Cumps
16 Apr 2015

image


In post 6 I made a breadboard prototype of the speed signal circuit. I made a KiCAD layout and sent my fab files to oshpark.com.

My PCBs arrived yesterday. This is the story of the build and test.


image


Let's start with a short recap of the sensor schematic.


The Sensor Setup


image

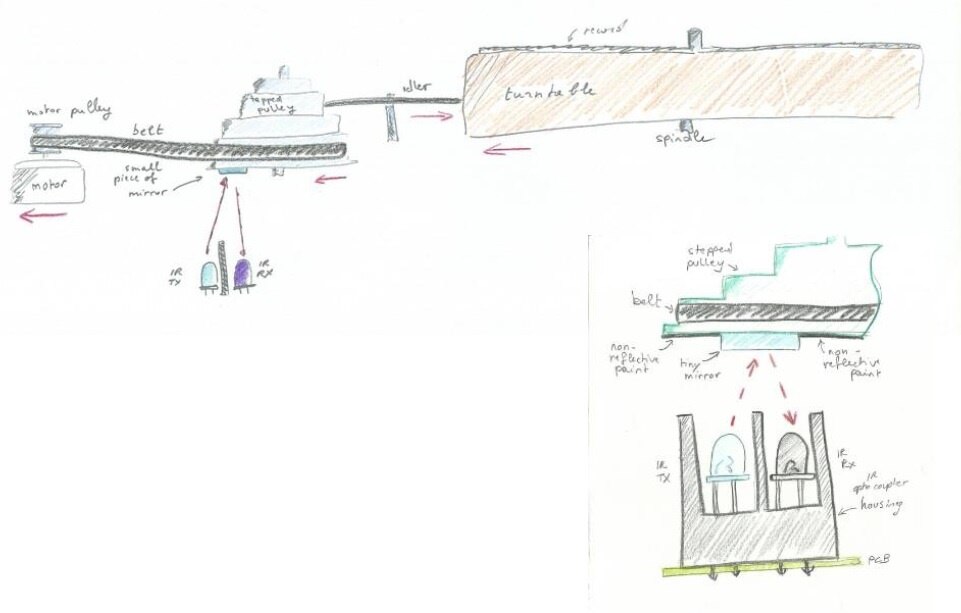
The infrared light from the optocoupler that's mounted under one of the pulleys of the turntable drive gets reflected once per rotation,

because I mounted a tiny mirror on the underside of that pulley. We're going to measure how much time there is between two reflections.


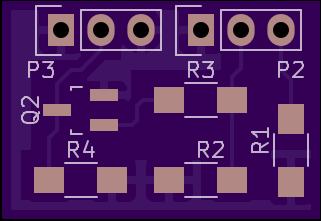
The Sensor Circuit and PCB


image


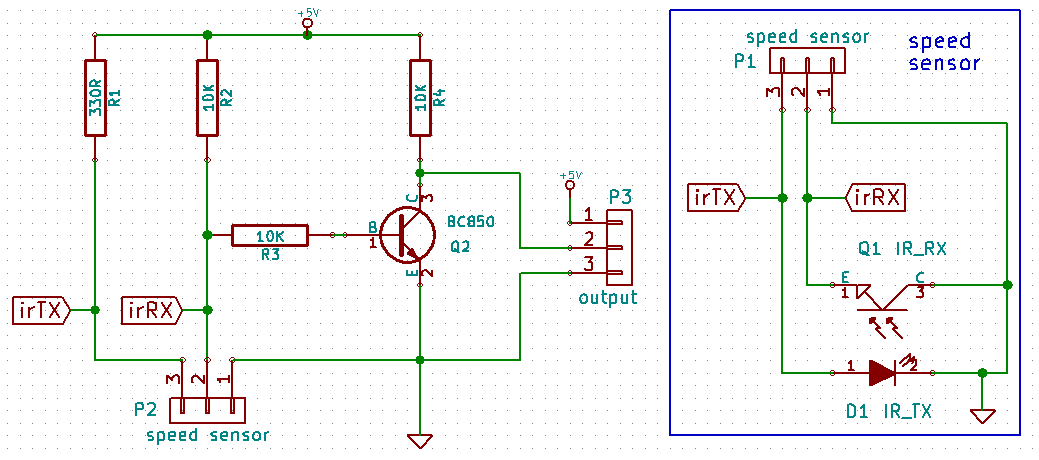
My other post has a breakdown of the circuit, with signals before and after amplification. Let's check here how it turns out when the final circuit is finished.

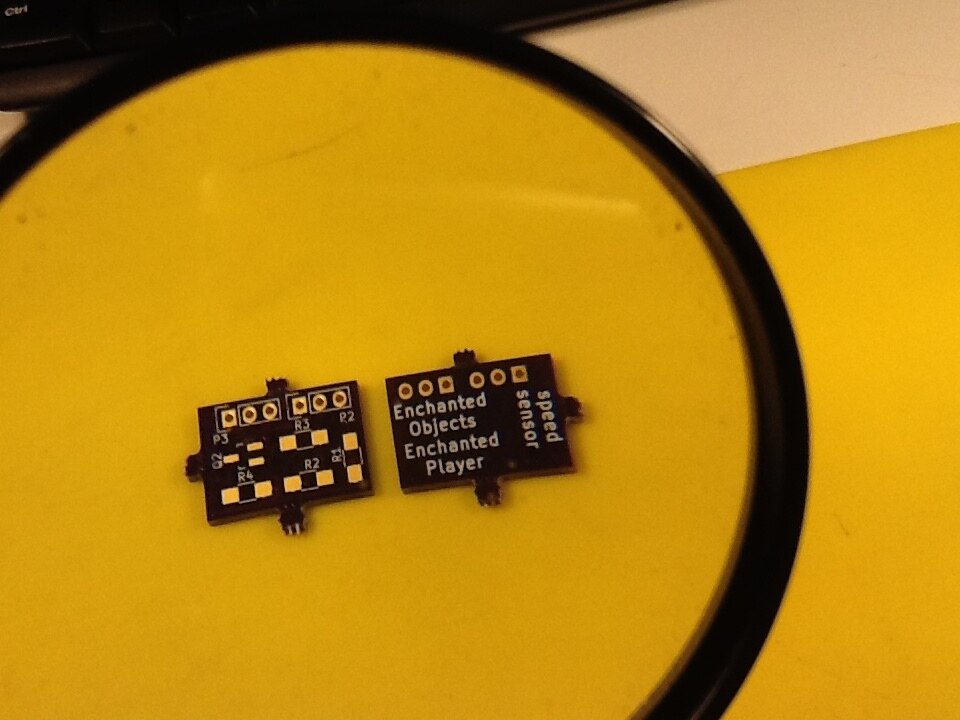
When you order PCBs from oshpark.com, you get a preview. I'm putting that against the real ones here.


imageimageimage


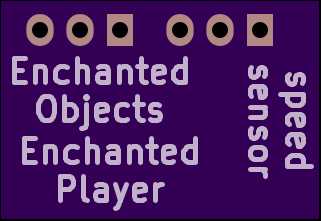
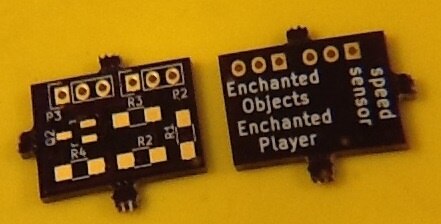
You can see here that the predicted result very well matches the PCBs that you get.


SMD Solder Time


I used a pizza oven to solder. My technique for simple boards is quite basic.

I put paste on the pads, put the parts on, preheat the oven a bit (to 50° C), put the board in, look through the window to see what's happening, open the door when it looks okay.


image


My components are 1206 and SOT-23.

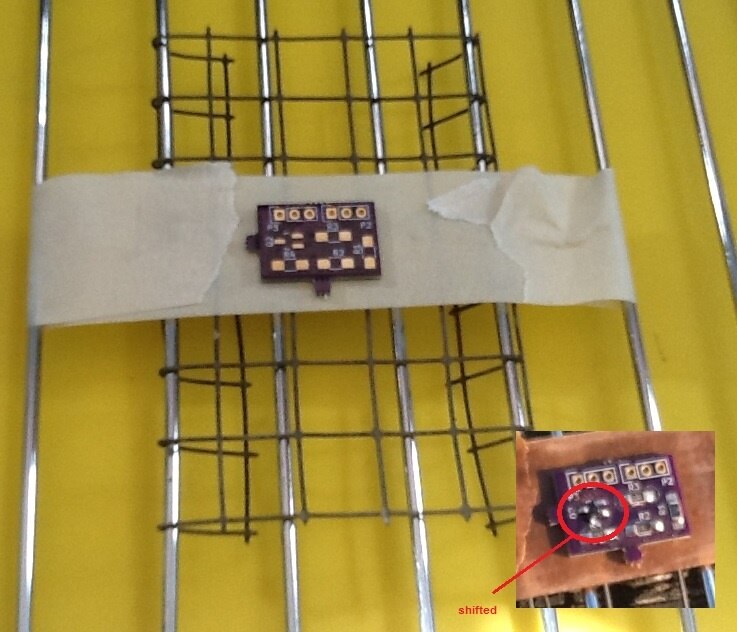
For some reason the transistor decided to move on the board. It ended up with the emitter on the base pad, and the base pin sitting where there is no pad.

I had to rework it with hot air, but all turned out well.

image


The Test


I checked all connections with a multimeter to see if all was right, and double-checked the transistor because it has been heated three times (oven, hot air to remove, hot air to solder it on again).

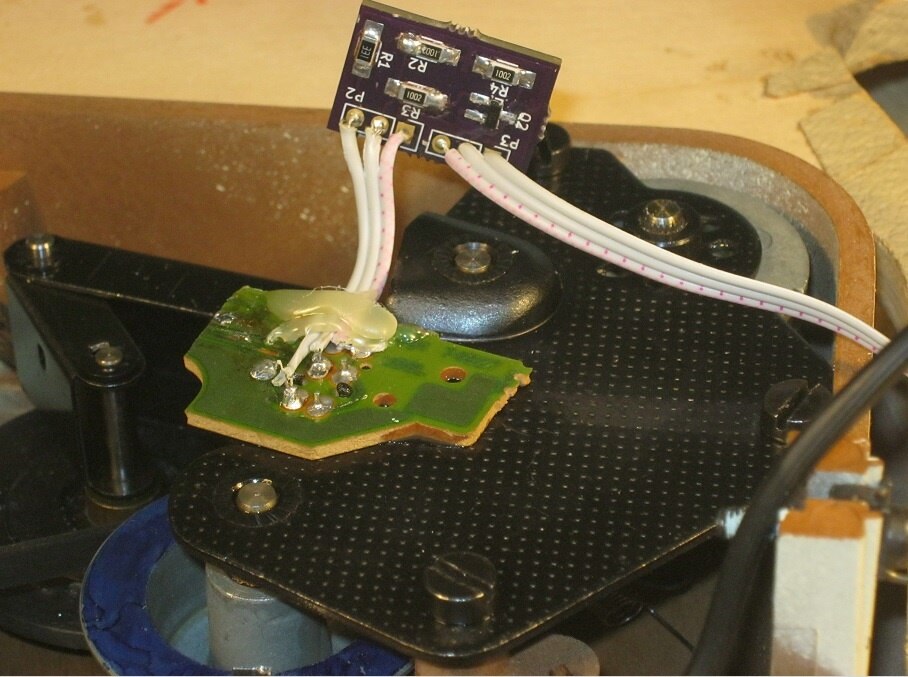
All was ok, and I connected it up to the IR optocoupler.

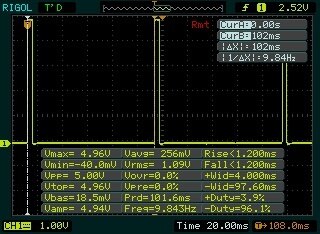
I connected my scope for a quick validation. All worked from the first try.


image


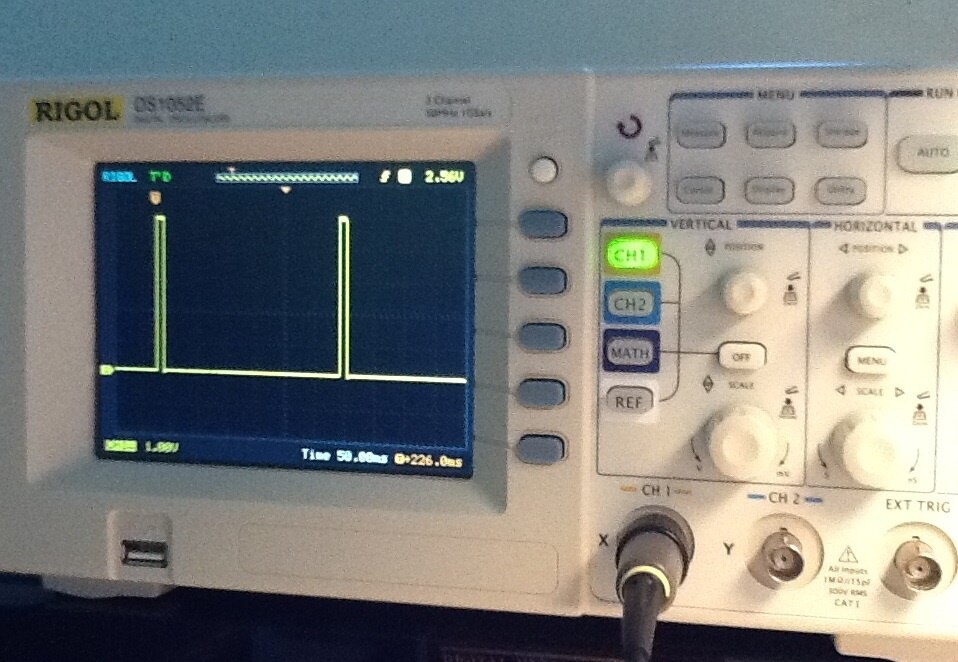
I got a perfect signal. Because the inverting amp is so closely mounted to the sensors, the signal is also a bit nicer than with the breadboarded and Veriboarded setups.


image


Finally some simple but real electronics have entered the design.


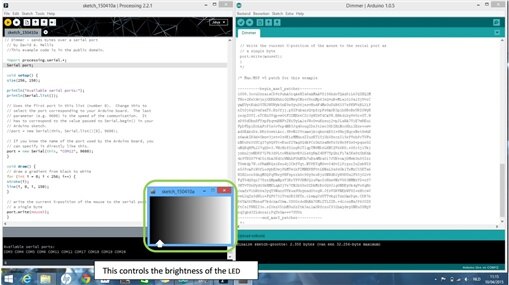
What's happening with the Arduino Kit?


I've given it to one of my kids. She's going to work through the workshops. She promised to take photos and videos along the way.

Here's the second activity: A dimmer that is controlled from Processing


You don't have permission to edit metadata of this video.
Edit media
x
image
Upload Preview
image


image

image


Table of Contents
Chapter 1: Fix the turntable
1: Perpetuum Ebner Musical 1
2: A Time to Kill and a Time to Heal
3: Preparation for Motor Drive
4: Motor control with Infineon Motor Shield and Arduino UNO
5: Turntable speed sample testbed with Arduino UNO
6: Turntable Speed Sensor design
7: Control Theory - End of Chapter 1
Chapter 2: First Enchantments
8: Digital Light Organ Enchantment
9: Autonomous Servo Lift
10: SMD Time - Solder the IR Speed Sensor PCB
11: Yelp - who can Help me to Compile and Run my First SAMA5D4 C Program
12: Son et Lumiere - End of Chapter 2
Chapter 3: Taming the Board
13: Breakthrough - Run my own C++ Program on the SAMA5D4
14: Digital Light Organ Input Buffer
15: SAMA5D4 Blinky
16: Scope Creep
17: Audio Sampling with 16-bit ADC ADS8343
18: Sending Files to SAMA5D4 over USB
19: Port my Light Organ from Arduino to SAMA5D4
20: Fast Fourier Transform on the SAMA5D4 - End of Chapter 3
Epilogue: Reaching for the Clouds
21: Right-Sizing my Plans
22: My Own C++ Buffered Sampler on the SAMA5D4
Interlude
23: Building In the Motorized Light Organ
24: Up to the Clouds with Yún
25: Publish or Perish
26: Turntable Finished
Stretch & Boni
Bonus 1a: Remote Light Organ with WiFI pt. 1
Bonus 1b: Remote Light Organ with WiFI pt. 2
Grande Finale: Paho MQTT Client on the SAMA5D4
Related blog
Vintage Turntable repair: Can I fix a Perpetuum Ebner from 1958
Review 1: Atmel SMART SAMA5D4 Xplained Ultra Unboxing and First Steps
Review 2: Atmel SMART SAMA5D4 Xplained Ultra - Building the Libraries from Source
Review 3: Digital Continuous Rotation (360°) Servo Part 1
Review 4: Digital Continuous Rotation (360°) Servo Part 2
Review 5: Atmel SMART SAMA5D4 Xplained Ultra - TCP/IP running
Review 6: Atmel SMART SAMA5D4 Xplained Ultra - LINUX Distro with SSH support
poem
Enchanted Objects: Let's work together to tame the ATMEL SMART SAMA5D4 Xplained Ultra kit
17 bis: Off South...
Review 7: Atmel SMART SAMA5D4 Xplained Ultra - C++ ADC Example on Linux
Review 8: Atmel SMART SAMA5D4 Xplained Ultra - Product Review
Review 9a: Atmel SMART SAMA5D4 Xplained Ultra - Set up ADC Buffer with Hardware Trigger Part 1
Review 9b: Atmel SMART SAMA5D4 Xplained Ultra - Set up ADC Buffer with Hardware Trigger Part 2
Review 10: Atmel SMART SAMA5D4 Xplained Ultra - New Content on AT91.com
1958 Turntable from the Black Forest - Summary of the Enchanted Player Story
  • Sign in to reply

Top Comments

  • mcb1
    mcb1 over 10 years ago +2
    Jan. Nice work. The boys at work suggested using instant glue to hold the component in place ... which might not work with paste. Great waveform, just shows how much stray capacitance there is in breadboards…
  • DAB
    DAB over 10 years ago +1
    Your boards look good. My eyesight is just not good enough to work with components that small. DAB
  • Jan Cumps
    Jan Cumps over 10 years ago in reply to DAB +1
    The 1206 that I used are still doable for me (I'm 47, with eyesight typical for that age and not so steady hands). Those I can solder by hot air or with the iron. It becomes a mess when I go smaller than…
  • mcb1
    mcb1 over 10 years ago in reply to shabaz

    thanks

    The temperature is a bit cold compared to the other place....image

    • Cancel
    • Vote Up 0 Vote Down
    • Sign in to reply
    • More
    • Cancel
  • shabaz
    shabaz over 10 years ago in reply to mcb1

    BTW welcome back!!

    • Cancel
    • Vote Up +1 Vote Down
    • Sign in to reply
    • More
    • Cancel
  • shabaz
    shabaz over 10 years ago in reply to mcb1

    Hi Mark,


    I seem to recall with the old wave soldering process the components being held in place with glue too.

    For limited production runs a laser would shine where to place the component manually, and I think the glue dot was automatic, but I can't recall. Been ages since I've seen the process though : ( it was always fun to watch.

    • Cancel
    • Vote Up 0 Vote Down
    • Sign in to reply
    • More
    • Cancel
  • Jan Cumps
    Jan Cumps over 10 years ago in reply to mcb1

    instant glue would work good for hand soldering, I recon.

    (when I hand solder, I use the mechanism if getting one pin soldered in place to get the component fixed, but I may try out your team's suggestion).


    for oven baking, the drag force from the solder is expected to auto-place the parts. I think that in the case of my SOT-23 issue, it was my own fault. I must have been too sloppy to place the transistor good enough to start with. I can't see how it would have otherwise dragged itself from one pad to another. Lesson learned.

    • Cancel
    • Vote Up 0 Vote Down
    • Sign in to reply
    • More
    • Cancel
  • mcb1
    mcb1 over 10 years ago

    Jan.

    Nice work.

    The boys at work suggested using instant glue to hold the component in place ... which might not work with paste.


    Great waveform, just shows how much stray capacitance there is in breadboards.

    Mark

    • Cancel
    • Vote Up +2 Vote Down
    • Sign in to reply
    • More
    • Cancel
>
element14 Community

element14 is the first online community specifically for engineers. Connect with your peers and get expert answers to your questions.

  • Members
  • Learn
  • Technologies
  • Challenges & Projects
  • Products
  • Store
  • About Us
  • Feedback & Support
  • FAQs
  • Terms of Use
  • Privacy Policy
  • Legal and Copyright Notices
  • Sitemap
  • Cookies

An Avnet Company © 2025 Premier Farnell Limited. All Rights Reserved.

Premier Farnell Ltd, registered in England and Wales (no 00876412), registered office: Farnell House, Forge Lane, Leeds LS12 2NE.

ICP 备案号 10220084.

Follow element14

  • X
  • Facebook
  • linkedin
  • YouTube