element14 Community
element14 Community
    Register Log In
  • Site
  • Search
  • Log In Register
  • Members
    Members
    • Benefits of Membership
    • Achievement Levels
    • Members Area
    • Personal Blogs
    • Feedback and Support
    • What's New on element14
  • Learn
    Learn
    • Learning Center
    • eBooks
    • STEM Academy
    • Webinars, Training and Events
    • Learning Groups
  • Technologies
    Technologies
    • 3D Printing
    • FPGA
    • Industrial Automation
    • Internet of Things
    • Power & Energy
    • Sensors
    • Technology Groups
  • Challenges & Projects
    Challenges & Projects
    • Design Challenges
    • element14 presents
    • Project14
    • Arduino Projects
    • Raspberry Pi Projects
    • Project Groups
  • Products
    Products
    • Arduino
    • Dev Tools
    • Manufacturers
    • Raspberry Pi
    • RoadTests & Reviews
    • Avnet Boards Community
    • Product Groups
  • Store
    Store
    • Visit Your Store
    • Choose Another Store
      • Europe
      •  Austria (German)
      •  Belgium (Dutch, French)
      •  Bulgaria (Bulgarian)
      •  Czech Republic (Czech)
      •  Denmark (Danish)
      •  Estonia (Estonian)
      •  Finland (Finnish)
      •  France (French)
      •  Germany (German)
      •  Hungary (Hungarian)
      •  Ireland
      •  Israel
      •  Italy (Italian)
      •  Latvia (Latvian)
      •  
      •  Lithuania (Lithuanian)
      •  Netherlands (Dutch)
      •  Norway (Norwegian)
      •  Poland (Polish)
      •  Portugal (Portuguese)
      •  Romania (Romanian)
      •  Russia (Russian)
      •  Slovakia (Slovak)
      •  Slovenia (Slovenian)
      •  Spain (Spanish)
      •  Sweden (Swedish)
      •  Switzerland(German, French)
      •  Turkey (Turkish)
      •  United Kingdom
      • Asia Pacific
      •  Australia
      •  China
      •  Hong Kong
      •  India
      •  Korea (Korean)
      •  Malaysia
      •  New Zealand
      •  Philippines
      •  Singapore
      •  Taiwan
      •  Thailand (Thai)
      • Americas
      •  Brazil (Portuguese)
      •  Canada
      •  Mexico (Spanish)
      •  United States
      Can't find the country/region you're looking for? Visit our export site or find a local distributor.
  • Translate
  • Profile
FPGA
  • Technologies
  • More
FPGA
Blog Learning Xilinx Zynq: use AXI with a VHDL example in Pynq
  • Blog
  • Forum
  • Documents
  • Events
  • Polls
  • Files
  • Members
  • Mentions
  • Sub-Groups
  • Tags
  • More
  • Cancel
  • New
FPGA requires membership for participation - click to join
Blog Post Actions
  • Subscribe by email
  • More
  • Cancel
  • Share
  • Subscribe by email
  • More
  • Cancel
Group Actions
  • Group RSS
  • More
  • Cancel
Engagement
  • Author Author: Jan Cumps
  • Date Created: 10 Jun 2021 9:03 PM Date Created
  • Views 3588 views
  • Likes 8 likes
  • Comments 4 comments
  • pynq-z2
  • zynq
  • xilinx
  • jupyter
  • fpga
  • vivado
  • vhdl
  • pynq
Related
Recommended

Learning Xilinx Zynq: use AXI with a VHDL example in Pynq

Jan Cumps
Jan Cumps
10 Jun 2021

The goal of this blog series is to master the Xilinx Zynq.

I'm using the PWM design of my previous post and switch to AXI memory map interface between ARM and FPGA.

image

I learned this from beacon_dave 's PYNQ-Z2 Workshop - AXI GPIO post.


ARM/Linux to FPGA interface: from GPIO to AXI memory mapped register


in the previous post, I made a PWM generator in VHDL for the Zynq. I used the ARM EMIO GPIO bus as the interface between ARM and FPGA fabric.

This is a 64 bit bus. I used 8 bits of that bus for the PWM duty cycle, and 4 bits for the  dead time of my PWM signal.

Now I'm going to use a different interface: a memory mapped register.


image

This construct is called AXI in ARM speak. It is not Zynq specific. If you have an ARM controller that has memory-mapped registers to talk to a peripheral (SPI, counters, I2C, ...), it may use AXI too on the silicon.


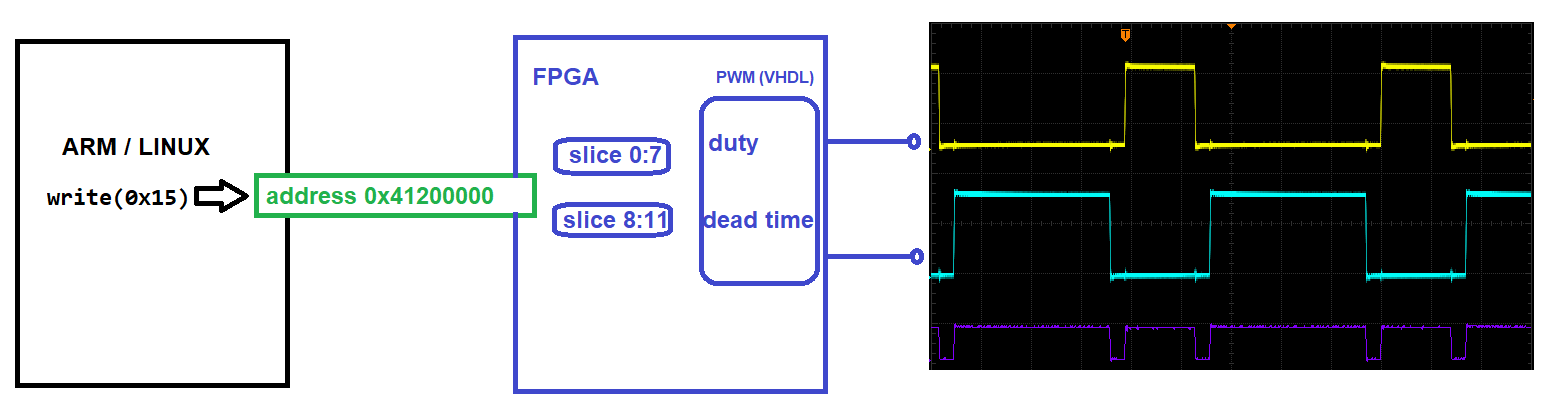
The most obvious difference when you use an AXI design, is that you set a value on a memory location.

In my previous design, with GPIO, you would set duty cycle (8 bits) and dead time (4 bits) in this way:


# duty cycle 50%
bit_0.write(1)
bit_1.write(1)
bit_2.write(1)
bit_3.write(1)
bit_4.write(1)
bit_5.write(1)
bit_6.write(1)
bit_7.write(0)

# dead time 8 clock ticks
bit_8.write(0)
bit_9.write(0)
bit_10.write(0)
bit_11.write(1)


With memory mapped register and AXI:


#duty cycle 0 - 255 (0 - 100%)
pwm_register[0:8].write(127)
#dead time 0 - 15 (clock cycles)
pwm_register[8:12].write(8)


Changes to the Design

The PWM VHDL does not change. Latest source on github: https://gist.github.com/jancumps/36f21e89bfb8e44f3dba7bf014ffd198

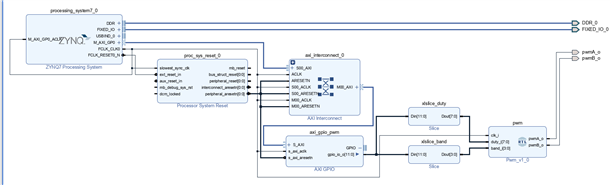
For the processing block, you have to enable AXI and not enable GPIO.

The easiest way to do that is to start from a fresh Zynq block, and run the block automation after that. That's it.

image

If you replicate this exercise: there is a mistake. The interconnect reset should go tho the first reset of the AXI Interconnect IP.

All other resets should connect to the peripheral reset pin.


You need 3 additional blocks, Reset, AXI interconnect and AXI GPIO.

The interconnect will interface the protocols beteen PS and PL (beacon_dave  explains it in his post). The Reset is also part of the integration management

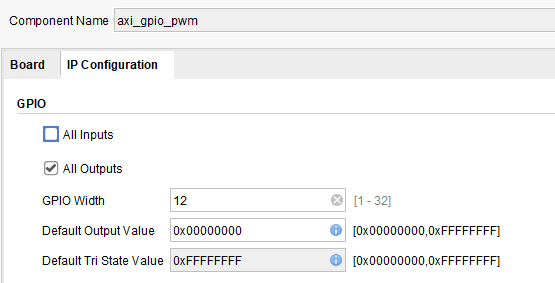
The AXI GPIO is our access to the 12 bit memory location.

image


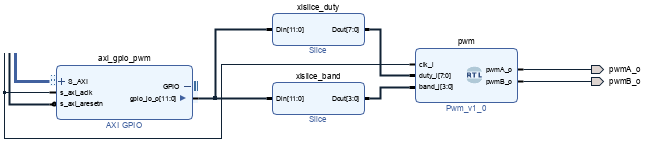
From here on, we're back on common ground. Just like in my previous post, we'll use 2 slices to extract the 8 bits for duty cycle and 4 bits for dead time

image


The Python code in the Jupyter book


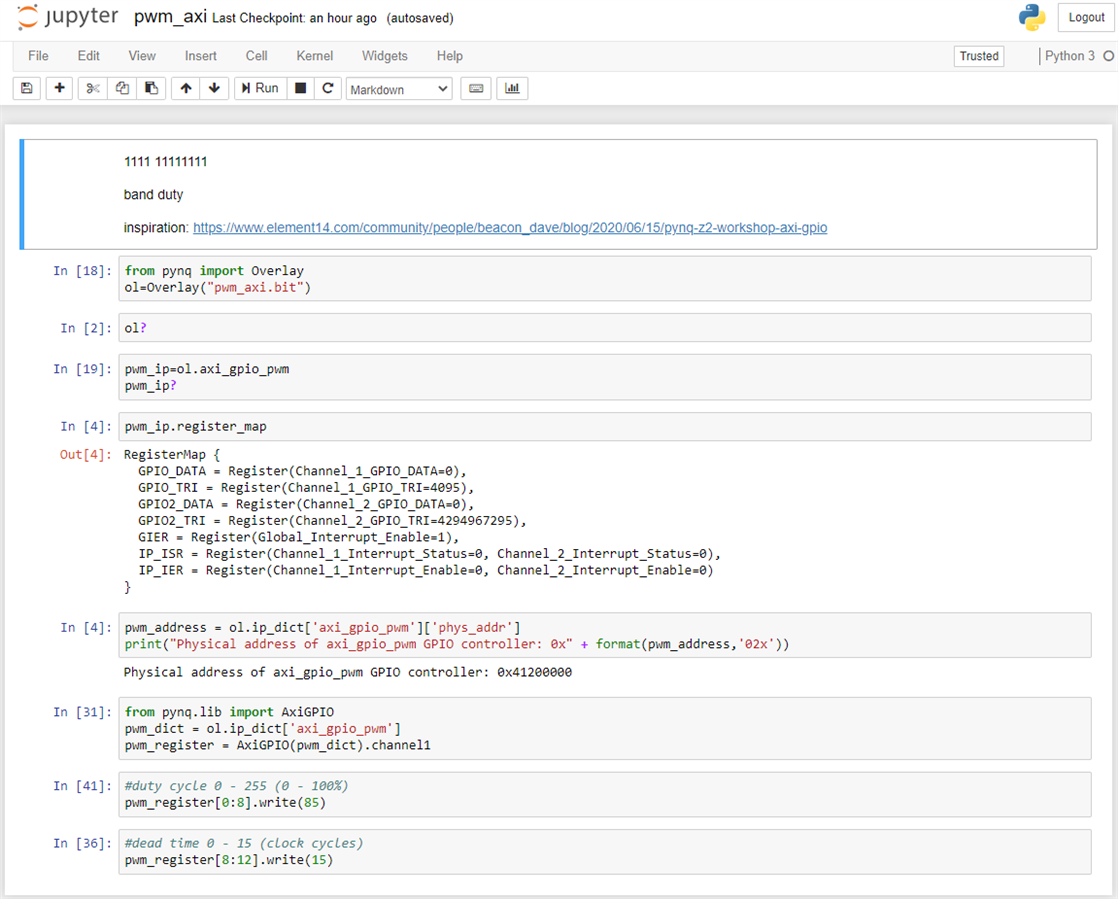
from pynq import Overlay
ol=Overlay("pwm_axi.bit")

from pynq.lib import AxiGPIO  
pwm_dict = ol.ip_dict['axi_gpio_pwm']
pwm_register = AxiGPIO(pwm_dict).channel1  

#duty cycle 0 - 255 (0 - 100%)
pwm_register[0:8].write(85)
#dead time 0 - 15 (clock cycles)
pwm_register[8:12].write(15)


image


Tip: you can set duty cycle and dead time in a single call:

pwm_register[0:12].write(0b100010000000)


I'm attaching the Vivado project and the Jupyter notebook to this post.


Pynq - Zync - Vivado series
Add Pynq-Z2 board to Vivado
Learning Xilinx Zynq: port a Spartan 6 PWM example to Pynq
Learning Xilinx Zynq: use AXI with a VHDL example in Pynq
VHDL PWM generator with dead time: the design
Learning Xilinx Zynq: use AXI and MMIO with a VHDL example in Pynq
Learning Xilinx Zynq: port Rotary Decoder from Spartan 6 to Vivado and PYNQ
Learning Xilinx Zynq: FPGA based PWM generator with scroll wheel control
Learning Xilinx Zynq: use RAM design for Altera Cyclone on Vivado and PYNQ
Learning Xilinx Zynq: a Quadrature Oscillator - 2 implementations
Learning Xilinx Zynq: a Quadrature Oscillator - variable frequency
Learning Xilinx Zynq: Hardware Accelerated Software
Automate Repeatable Steps in Vivado
Learning Xilinx Zynq: Try to make my own Accelerated OpenCV Function - 1: Vitis HLS
Learning Xilinx Zynq: Try to make my own Accelerated OpenCV Function - 2: Vivado Block Design
Learning Xilinx Zynq: Logic Gates in Vivado
Learning Xilinx Zynq: Interrupt ARM from FPGA fabric
Learning Xilinx Zynq: reuse and combine components to build a multiplexer
PYNQ version 2.7 (Austin) is released
PYNQ and Zynq: the Vitis HLS Accelerator with DMA training - Part 1: Turn C++ code into an FPGA IP
PYNQ and Zynq: the Vitis HLS Accelerator with DMA training - Part 2: Add the Accelerated IP to a Vivado design
PYNQ and Zynq: the Vitis HLS Accelerator with DMA training - Part 3: Use the Hardware Accelerated Code in Software
PYNQ and Zynq: the Vitis HLS Accelerator with DMA training - Deep Dive: the data streams between Accelerator IP and ARM processors
Use the ZYNQ XADC with DMA part 1: bare metal
Use the ZYNQ XADC with DMA part 2: get and show samples in PYNQ
VHDL: Convert a Fixed Module into a Generic Module for Reuse
  • Sign in to reply

Top Comments

  • Jan Cumps
    Jan Cumps over 1 year ago +2
    fun addon: from time import sleep try: while True: for i in range (0, 255): pwm_register[0:8].write(i) sleep(0.005) except KeyboardInterrupt: pass
  • cstanton
    cstanton over 1 year ago in reply to Jan Cumps +1
    You're making good progress with this
  • Jan Cumps
    Jan Cumps over 1 year ago +1
    I'm now going through the workshops. It's similar to what's been presented on the element14 webinars: Unlock the Power of FPGAs through Python: Building Reconfigurable Embedded Systems with PYNQ The documents…
  • Jan Cumps
    Jan Cumps over 1 year ago in reply to Jan Cumps

    Jan Cumps  wrote:


    I.... the Jupyter terminal window (suggestion: change user to xilinx by executing su xilinx):


    A little follow up on the Jupyter terminal that connects as root:

    I added these two lines to /root/.bashrc


    echo "jc: set user to xilinx. Type exit for root."
    su xilinx


    It switches to user xilinx when you open the terminal.


    image


    My goal is not to achieve higher security. It's a convenience measure to directly have the user active.

    • Cancel
    • Vote Up 0 Vote Down
    • Sign in to reply
    • More
    • Cancel
  • Jan Cumps
    Jan Cumps over 1 year ago

    I'm now going through the workshops. It's similar to what's been presented on the element14 webinars: Unlock the Power of FPGAs through Python: Building Reconfigurable Embedded Systems with PYNQ


    The documents, examples and bitstreams are on GIT. To make them available and executable from the Pynq board, I used this set of commands, executed from the Jupyter terminal window (suggestion: change user to xilinx by executing su xilinx):


    mkdir /home/xilinx/pynq_workshop
    cd /home/xilinx/pynq_workshop
    git clone https://github.com/Xilinx/PYNQ_Workshop.git
    ln -s /home/xilinx/pynq_workshop/PYNQ_Workshop /home/xilinx/jupyter_notebooks/PYNQ_Workshop


    It keeps the workshop files separate from any other software, but integrates it with the Jupyter notebook:

    image


    Action photo:

    image

    How to get at the terminal:

    image


    That's it. A small set of 4 commands to get started.

    • Cancel
    • Vote Up +1 Vote Down
    • Sign in to reply
    • More
    • Cancel
  • cstanton
    cstanton over 1 year ago in reply to Jan Cumps

    You're making good progress with this image

    • Cancel
    • Vote Up +1 Vote Down
    • Sign in to reply
    • More
    • Cancel
  • Jan Cumps
    Jan Cumps over 1 year ago

    fun addon:


    from time import sleep
    try:
        while True:
            for i in range (0, 255):
                pwm_register[0:8].write(i)
                sleep(0.005)
    except KeyboardInterrupt:
        pass


    image

    • Cancel
    • Vote Up +2 Vote Down
    • Sign in to reply
    • More
    • Cancel
element14 Community

element14 is the first online community specifically for engineers. Connect with your peers and get expert answers to your questions.

  • Members
  • Learn
  • Technologies
  • Challenges & Projects
  • Products
  • Store
  • About Us
  • Feedback & Support
  • FAQs
  • Terms of Use
  • Privacy Policy
  • Legal and Copyright Notices
  • Sitemap
  • Cookies

An Avnet Company © 2023 Premier Farnell Limited. All Rights Reserved.

Premier Farnell Ltd, registered in England and Wales (no 00876412), registered office: Farnell House, Forge Lane, Leeds LS12 2NE.

ICP 备案号 10220084.

Follow element14

  • Facebook
  • Twitter
  • linkedin
  • YouTube