element14 Community
element14 Community
    Register Log In
  • Site
  • Search
  • Log In Register
  • Community Hub
    Community Hub
    • What's New on element14
    • Feedback and Support
    • Benefits of Membership
    • Personal Blogs
    • Members Area
    • Achievement Levels
  • Learn
    Learn
    • Ask an Expert
    • eBooks
    • element14 presents
    • Learning Center
    • Tech Spotlight
    • STEM Academy
    • Webinars, Training and Events
    • Learning Groups
  • Technologies
    Technologies
    • 3D Printing
    • FPGA
    • Industrial Automation
    • Internet of Things
    • Power & Energy
    • Sensors
    • Technology Groups
  • Challenges & Projects
    Challenges & Projects
    • Design Challenges
    • element14 presents Projects
    • Project14
    • Arduino Projects
    • Raspberry Pi Projects
    • Project Groups
  • Products
    Products
    • Arduino
    • Avnet Boards Community
    • Dev Tools
    • Manufacturers
    • Multicomp Pro
    • Product Groups
    • Raspberry Pi
    • RoadTests & Reviews
  • Store
    Store
    • Visit Your Store
    • Choose another store...
      • Europe
      •  Austria (German)
      •  Belgium (Dutch, French)
      •  Bulgaria (Bulgarian)
      •  Czech Republic (Czech)
      •  Denmark (Danish)
      •  Estonia (Estonian)
      •  Finland (Finnish)
      •  France (French)
      •  Germany (German)
      •  Hungary (Hungarian)
      •  Ireland
      •  Israel
      •  Italy (Italian)
      •  Latvia (Latvian)
      •  
      •  Lithuania (Lithuanian)
      •  Netherlands (Dutch)
      •  Norway (Norwegian)
      •  Poland (Polish)
      •  Portugal (Portuguese)
      •  Romania (Romanian)
      •  Russia (Russian)
      •  Slovakia (Slovak)
      •  Slovenia (Slovenian)
      •  Spain (Spanish)
      •  Sweden (Swedish)
      •  Switzerland(German, French)
      •  Turkey (Turkish)
      •  United Kingdom
      • Asia Pacific
      •  Australia
      •  China
      •  Hong Kong
      •  India
      •  Korea (Korean)
      •  Malaysia
      •  New Zealand
      •  Philippines
      •  Singapore
      •  Taiwan
      •  Thailand (Thai)
      • Americas
      •  Brazil (Portuguese)
      •  Canada
      •  Mexico (Spanish)
      •  United States
      Can't find the country/region you're looking for? Visit our export site or find a local distributor.
  • Translate
  • Profile
  • Settings
FPGA
  • Technologies
  • More
FPGA
Blog Add Pynq-Z2 board to Vivado
  • Blog
  • Forum
  • Documents
  • Quiz
  • Events
  • Polls
  • Files
  • Members
  • Mentions
  • Sub-Groups
  • Tags
  • More
  • Cancel
  • New
Join FPGA to participate - click to join for free!
  • Share
  • More
  • Cancel
Group Actions
  • Group RSS
  • More
  • Cancel
Engagement
  • Author Author: Jan Cumps
  • Date Created: 31 May 2021 7:47 PM Date Created
  • Views 28700 views
  • Likes 12 likes
  • Comments 40 comments
  • zynq
  • xilinx
  • jupyter
  • fpga
  • vivado
  • pynq
Related
Recommended

Add Pynq-Z2 board to Vivado

Jan Cumps
Jan Cumps
31 May 2021

Instructions on how to add the Pynq-Z2Pynq-Z2 board to Vivado.

This allows you to create projects and custom FPGA bit streams for it.


image

image source: customer action video after completing the instruction video of Cathal McCabe listed at the end of this post.


In the Vivado project creation wizard, there is a possibility to prime your design from a board definition.

You don't need to find out what the exact FPGA is, and what hardware is available.

There are more project preparation tools. Constraint files and TCL files that fully define the board with all possibilities enabled.

This post focuses on the board definition.

image


Get the board file


The files listed on pync.io are not available. I found them here.

image


Install and register the board in Vivado


Then there are two options.

  • (deprecated) Directly put the files in the Vivado boards folder: <Xilinx installation directory>\Vivado\<version>\data\boards\board_files.
  • Or (preferred)  put them at a location you decide, and add a line to the Vivado init file, %APPDATA%/Xilinx/Vivado/init.tcl (create it if it does not exist)
    set_param board.repoPaths [list "D:/Xilinx/pynq-z2/A.0"]

I used the 2nd option. You have to restart the editor.


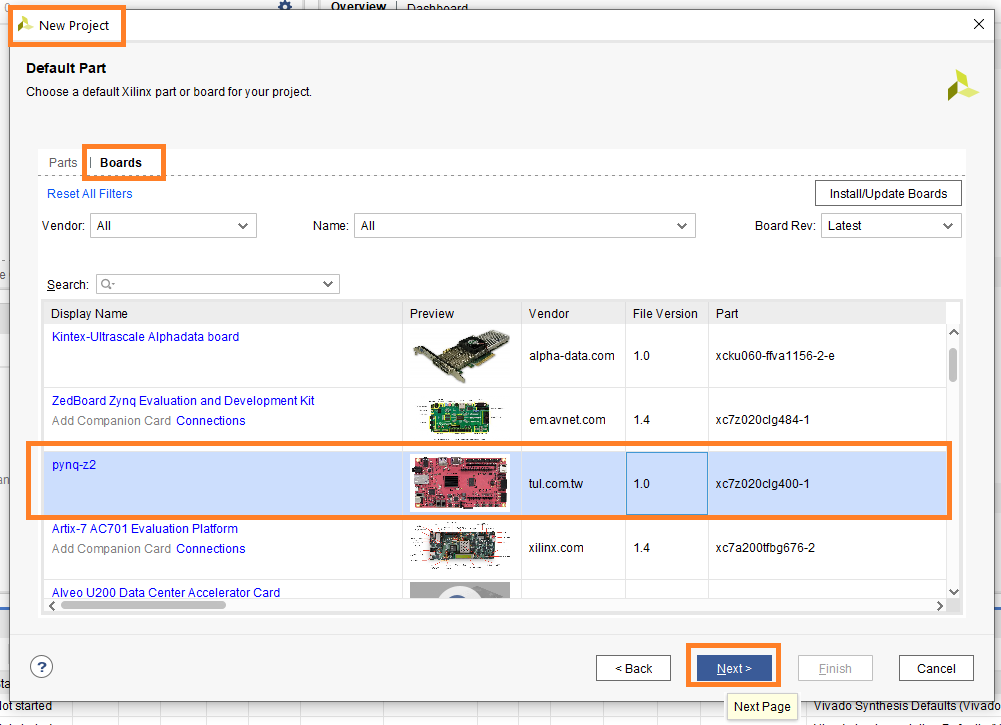
The result is that you can now create projects that have the right FPGA info for the Pynq-Z2:

image


My goal for this week is to replicate this exercise from Cathal McCabe from the Pynq community:

You don't have permission to edit metadata of this video.
Edit media
x
image
Upload Preview
image


I attached the project to this post, and the jupyter notebook.

I changed some things:

32 bit GPIO instead of 64

A reset input for the Johnson Counter module

Translated the Verilog Counter code to VHDL.


Pynq - Zync - Vivado series
Add Pynq-Z2 board to Vivado
Learning Xilinx Zynq: port a Spartan 6 PWM example to Pynq
Learning Xilinx Zynq: use AXI with a VHDL example in Pynq
VHDL PWM generator with dead time: the design
Learning Xilinx Zynq: use AXI and MMIO with a VHDL example in Pynq
Learning Xilinx Zynq: port Rotary Decoder from Spartan 6 to Vivado and PYNQ
Learning Xilinx Zynq: FPGA based PWM generator with scroll wheel control
Learning Xilinx Zynq: use RAM design for Altera Cyclone on Vivado and PYNQ
Learning Xilinx Zynq: a Quadrature Oscillator - 2 implementations
Learning Xilinx Zynq: a Quadrature Oscillator - variable frequency
Learning Xilinx Zynq: Hardware Accelerated Software
Automate Repeatable Steps in Vivado
Learning Xilinx Zynq: Try to make my own Accelerated OpenCV Function - 1: Vitis HLS
Learning Xilinx Zynq: Try to make my own Accelerated OpenCV Function - 2: Vivado Block Design
Learning Xilinx Zynq: Logic Gates in Vivado
Learning Xilinx Zynq: Interrupt ARM from FPGA fabric
Learning Xilinx Zynq: reuse and combine components to build a multiplexer
PYNQ version 2.7 (Austin) is released
PYNQ and Zynq: the Vitis HLS Accelerator with DMA training - Part 1: Turn C++ code into an FPGA IP
PYNQ and Zynq: the Vitis HLS Accelerator with DMA training - Part 2: Add the Accelerated IP to a Vivado design
PYNQ and Zynq: the Vitis HLS Accelerator with DMA training - Part 3: Use the Hardware Accelerated Code in Software
PYNQ and Zynq: the Vitis HLS Accelerator with DMA training - Deep Dive: the data streams between Accelerator IP and ARM processors
Use the ZYNQ XADC with DMA part 1: bare metal
Use the ZYNQ XADC with DMA part 2: get and show samples in PYNQ
VHDL: Convert a Fixed Module into a Generic Module for Reuse
Attachments:
johnson_counter.zip
johnson_counter_jupyter_notebook.zip
  • Sign in to reply

Top Comments

  • Jan Cumps
    Jan Cumps over 4 years ago +2
    So far so good ...
  • narrucmot
    narrucmot over 4 years ago in reply to Jan Cumps +2
    Very cool! Glad you got this working! --Tom
  • drozwood90
    drozwood90 over 4 years ago in reply to Jan Cumps +2
    Hi Jan, Can I offer a suggestion? Please bold " set_param board.repoPaths [list "D:/Xilinx/pynq-z2/A.0"]" That is something that so many people miss. That is really the proper way that Xilinx suggests…
  • Jan Cumps
    Jan Cumps over 3 years ago

    The Pynq community started a new set of tutorials: https://discuss.pynq.io/t/tutorial-pynq-dma-part-1-hardware-design/3133 .


    To get the working set in your jupyter workbooks:

    form /home/xilinx , execute these 3 steps:

    git clone https://github.com/cathalmccabe/PYNQ_tutorials.git
    cd jupyter_notebooks
    ln -s /home/xilinx/PYNQ_tutorials ./PYNQ_tutorials


    If you want to have the Vivado project created automatically (not needed, the bit and .hwh files are provided and instructions to manually create the project are lesson part 1) , there are scripts available.

    If you are on a windows pc, Start Vivado Tcl Shell 2020.1

    cd <directory where you cloned the repository>
    cd dma
    source dma_tutorial.tcl


    The project will be available in a new myproj subfolder.


    image

    • Cancel
    • Vote Up 0 Vote Down
    • Sign in to reply
    • More
    • Cancel
  • Jan Cumps
    Jan Cumps over 3 years ago

    I've translated the Johnson Counter from Verilog to VHDL. Another VHDL implementation is available from Jon: VIDOR 4000: Johnson Counter

    We're presenting this project in the PYNQ workshops next week and I can't explain Verilog code image. Also a reset signal is added.


    library IEEE;
    use IEEE.STD_LOGIC_1164.ALL;
    
    entity jc is
      port ( 
        nLeft_i  : in std_logic;
        nRight_i : in std_logic;
        nStop_i  : in std_logic;
        clk_i    : in std_logic;
        nReset_i : in std_logic;
        q_o      : out std_logic_vector (3 downto 0)
      );
    end jc;
    
    architecture Behavioral of jc is
    
      signal run_s     : std_logic;
      signal dir_s     : std_logic;
      signal outputs_s : std_logic_vector (3 downto 0);
    
    begin
    
    process (clk_i, nReset_i)
    begin
      if (rising_edge(clk_i)) then
        if (nReset_i = '0') then
          dir_s <= '0';
          outputs_s <= (others => '0');
        else
          if (nLeft_i = '0') then
            dir_s <= '0';
            run_s <= '1';   
          elsif (nRight_i = '0') then
            dir_s <= '1';
            run_s <= '1';   
          end if;
          if (nStop_i = '0') then
            run_s <= '0';
          end if;
        
          if (run_s = '1') then
            if (dir_s = '1') then -- right
              outputs_s (3 downto 1) <= outputs_s (2 downto 0);
              outputs_s(0) <= not outputs_s(3); 
            else 
              outputs_s (2 downto 0) <= outputs_s (3 downto 1);
              outputs_s(3) <= not outputs_s(0); 
            end if;
          end if;
        end if;
      end if;
    end process;
    
      q_o <= outputs_s;
    
    end Behavioral;

    • Cancel
    • Vote Up 0 Vote Down
    • Sign in to reply
    • More
    • Cancel
  • Jan Cumps
    Jan Cumps over 3 years ago

    The VHDL code used in this series is available as GISTs on github:

    https://gist.github.com/search?l=VHDL&q=user%3Ajancumps


    I've put the link to the individual sources in each post.

    • Cancel
    • Vote Up 0 Vote Down
    • Sign in to reply
    • More
    • Cancel
  • Jan Cumps
    Jan Cumps over 3 years ago in reply to navadeepganeshu

    After you run synthesis, open the synthesized design.

    then, (I Think under the Windows menu) there is a I/O options item.

    There you can reassign the outputs to different pins. (Your first picture)

    Check the example constraint file for the Z2 to find the PMOD pins.

    Save' and run the steps again to generate the bitfile (and .hwh) file. Including synthesis, I think.

    If you renamed any pins or blocks, regenerate the wrapper for the Block Design.


    The TCL file is no longer needed by Pynq. The .hwh plays that role now.

    • Cancel
    • Vote Up +1 Vote Down
    • Sign in to reply
    • More
    • Cancel
  • navadeepganeshu
    navadeepganeshu over 3 years ago

    Jan Cumps, thanks for explaining the full procedure of implementation. The johnson counter did work well.


    I was trying to pullout those 4 IOs mapped to onboard LEDs to the PMODA to control stepper motor using the same johnson counter. I believe the synthesis remains same and rerun the implementation directly to change pin mappings over .xdc file.

    imageimage

    I changed pinouts to PMODA's 4 IOs and overwrote the bitstream and .tcl block design file. Then copied to Jupyter notebook and ran the same script(johnson_counter as in video tutorial). I now see still the onboard LEDs blink(scroll over) even if mappings are changed. I am wondering if i missed any critical steps........ Any clues?

    • Cancel
    • Vote Up 0 Vote Down
    • Sign in to reply
    • More
    • Cancel
>
element14 Community

element14 is the first online community specifically for engineers. Connect with your peers and get expert answers to your questions.

  • Members
  • Learn
  • Technologies
  • Challenges & Projects
  • Products
  • Store
  • About Us
  • Feedback & Support
  • FAQs
  • Terms of Use
  • Privacy Policy
  • Legal and Copyright Notices
  • Sitemap
  • Cookies

An Avnet Company © 2025 Premier Farnell Limited. All Rights Reserved.

Premier Farnell Ltd, registered in England and Wales (no 00876412), registered office: Farnell House, Forge Lane, Leeds LS12 2NE.

ICP 备案号 10220084.

Follow element14

  • X
  • Facebook
  • linkedin
  • YouTube