


 | Electronics & Design Projects Enter Your Electronics & Design Project for a Chance to Win Up to a $200 Shopping Cart of Product! | Project14 Home |
| Monthly Themes | ||
| Monthly Theme Poll |

This is the first list in a five part series where we list the Greatest Hits of the Project14 as part of the first Makevember celebration on the element14 community in honor of the third Makevember event. Makevember is an event that encourages everyone to spend 5 minutes a day working on projects to make things for the fun of it. The idea of a Greatest Hits compilation is borrowed from music. On a Greatest Hits compilation you'll see 20-25 songs in no particular order and you'll notice a lot of gems missing if you're at all familiar with the artist's work. In the spirit of Makevember its not about whose project is "best", won prizes, and it is not a ranked or ordered list. It's a celebration of the effort, the learning, the fun, the creativity, the skill, and the entertainment that you have provided to make this program possible.
We'll be releasing parts of the 25 54 greatest Hits of Project14 throughout Makevember and by the time we have finished this list, you'll have a representative sample of all the great work that's been done by the community members in support of this program. The purpose is not to exclude but to celebrate, and the hope is that the 25 53 projects selected are representative of everything that's been going on around here since things got started.
Here is the first batch (Projects 25-20) of the 25 54 Greatest Hits on Project14:
- Project 27: The micro:bit Quartet in Clustered MCUs
- Project 26: The Trickle Charger in Energy Harvesting
- Project 25: Mini Gameboy Home Console: The Gamebox DMG Consolizer by nobble
- Project 24: Arduino Powered MSE-6 (Mouse Droid) by jomoenginer
- Project 23: (Semi)Automated Plant Irrigation System by urkraft
- Project 22: Simple Solar BOT by snidhi
- Project 21: The Dancing Birds by balearicdynamics
The following Greatest Hits have been added to the list:
- Project 021: Solar Panel Monitoring Using Particle Photon by ruchir1674
- Project 022: LockNFC by Fred27
- Project 023: Infinity Living Christmas Wreath by dwinhold
- Project 024: BoneCommander - A Ruggedized BeagleBone Linux Computer by ninjatrent
- Project 025: My late (and incomplete) entry for the Portable Electronics Kit - The Pi-IDE (Pie-Eyed). by the-dubster
- Project 026: Fancy Eye in Electronic Toys
- Project 027:Process Duration Timer (Final Chapter) Assembly and Testing by jw0752
Check out more Greatest Hits from the element14 Community:
- Greatest Hits (Projects 27-21)(Projects 021-027): Project14 | Makevember 2019: Weekly Winners: 54 Greatest Hits (Projects 27-21) plus (Projects 021-027)!
- Greatest Hits (Projects 20-16)(Projects 016-020): Project14 | Makevember 2019: Weekly Winners: 54 Greatest Hits (Projects 20-16) plus (Projects 016-020)!
- Greatest Hits (Projects 15-11)(Projects 011-015): Project14 | Makevember 2019: Weekly Winners: 54 Greatest Hits (Projects 15-11) plus (Projects 011-015)!
- Greatest Hits (Projects 10-6)(Projects 06-10): Project14 | Makevember 2019: Weekly Winners: 54 Greatest Hits (Projects 10-6) plus (Projects 06-010)!
- Greatest Hits (Projects 5-1)(Projects 01-05): Project14 | Makevember 2019: Weekly Winners: 54 Greatest Hits (Projects 5-1) plus (Projects 01-05)!
| {tabbedtable} Tab Label | Tab Content | |||||||||||||||||||||||||||||||||||
|---|---|---|---|---|---|---|---|---|---|---|---|---|---|---|---|---|---|---|---|---|---|---|---|---|---|---|---|---|---|---|---|---|---|---|---|---|
| Project 27: The Microbit Quartet |
This is a worthy entry that was entered after judging took place but was well worth the wait because it's awesome and it has to do with music. Using three yellow micro:bits, by kind permission of the Colchester Public Library, along a fourth micro:bit to create The micro:bit Quartet : four micro:bits playing music in unison! Keeping things simple, he took advantage of the existing sound capability of the micro:bit but added an additional amplifier to drive miniature 8 ohm loudspeakers at a reasonable volume. Each micro:bit is monophonic and plays a single note at a time. Synchronisation between the microbits keeps them in time with one micro:bit acting as the conductor!
| |||||||||||||||||||||||||||||||||||
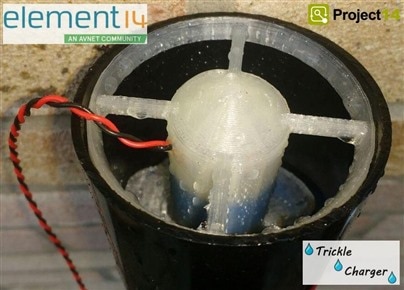
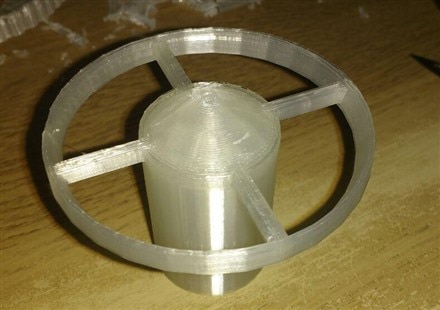
| Project 26: The Trickle Charger |
In reality there are much better sources of wasted energy to get tapped into rather than the infrequent rainwater flow in a downpipe - light wind/breezes and solar will likely generate more energy over a longer period.
But for extra fun....then 14rhb hopes you enjoy reading about the Trickle Charger. Such a turbine could be used where there is a fall in height of a stream but much simpler mechanisms like a water wheel would likely be a better choice...
Recommended Product:
| |||||||||||||||||||||||||||||||||||
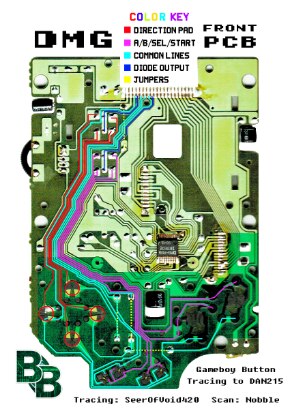
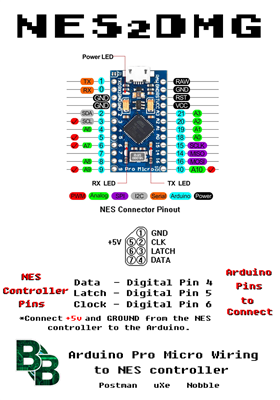
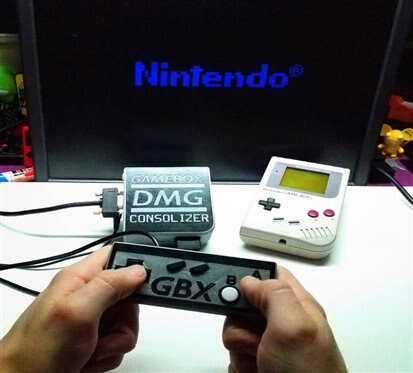
| Project 25: Mini Gameboy Home Console |
This project came from the A Question of Scale competition. The theme was to shrink or grow a project. Most people know Nobble from his custom handheld’s and unique video game mods, a few may remember him from his Hack Like Heck project. A fan since he was a kid, Ben Heck was the main source of inspiration for his projects and ideas for custom builds. The idea of portablizing a video game console or making a giant handheld device seemed too cliché so he decided to turn a small handheld into an even smaller home console. He morphs Gameboy DGM-01 into a full-fledged Big Screen device thus playing off of both the "Shrink" AND "Grow" theme.
Recommended Products:
| |||||||||||||||||||||||||||||||||||
| Project 24: Arduino Powered MSE-6 (Mouse Droid) |
This project won the top prize in the Open Arduino competition so that right there tells you its not an ordered list. Project14 chose to celebrate its birthday by celebrating Arduino Day with an Open Ended Arduino competition while also paying homage to the 25th anniversary of Star Wars: A New Hope. If memory serves correct, jomoenginer discovered he was the Grand Prize winner the same night he took his daughter to a Star Wars Movie. The alignment of all these events was the Arduino Powered MSE-6 (a.k.a. Mouse Droid). For those of you who are not familiar, this is the little wheeled droid that Chewy roared at causing it to run off scared in A New Hope. Apparently, there is a whole Mouse Droid Builders group and many examples of how to build this but most seem to be Radio Controlled. His intent was to create a completely autonomous MSE-6 that can self navigate an area, as well as, go to a designated location. Based on Star Wars lore, these were maintenance droids used to perform minor repairs or as messenger bots which were voice activated to open and deliver a private message. His version would include WiFi (and/or Bluetooth) where the Droid could be accessed remotely and given instructions for its next task. To do this he set up a Mouse Droid webpage that was hosted on the Arduino Yun. He was able to send a message to the Yun TFT screen, play the Mouse Droid sounds as well as control the droid by moving it Forward, Backward, Left, Right and Stop. He added the ping sensor to the front but didn't use the sweep servo due to space. To create the body of the Mouse droid he used black foam board. This was cheap and easy to work with, although he did some work to get the shape he was looking for. He took a few sheets and cut the individual pieces he needed. After hot cluing the pieces together, the Mouse Droid shape started to take form. With the chassis and the body together, it was time to put the guts (electronics) in the Droid. This included the Arduino Yun, Ardiuno UNO, Seeed TFT Screen, Speaker, 7.2 to 5 volt regulator, Steering servo, Photon Speed 2 Motor, and ESC.
Recommended Products:
Also on Project14 from jomoenginer :
| |||||||||||||||||||||||||||||||||||
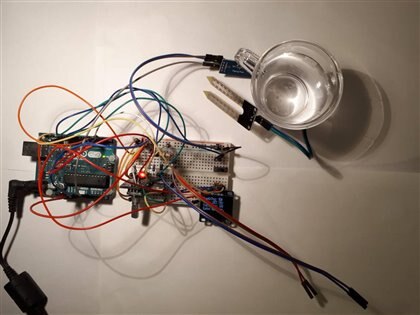
| Project 23: (Semi)Automated Plant Irrigation System |
This is an automated system for watering urkraft 's olive tree. The main components for this are a soil moisture sensor, a 10 gallon bucket of water with a water level sensor, an Adafruit Feather HUZZAH ESP8266 microcontroller, and a peristaltic water pump.
The two sensors are connected to inputs of the feather, and the water pump is controlled by an output signal from the feather. There are two built in LED’s on the feather:
There are three criteria which all have to be met in order to turn on the pump (and water the plant):
Any one of the following criteria will cause the pump to be turned off:
Recommended Products:
| |||||||||||||||||||||||||||||||||||


| {tabbedtable} Tab Label | Tab Content | ||||||||||||||||||||||||||||||||
|---|---|---|---|---|---|---|---|---|---|---|---|---|---|---|---|---|---|---|---|---|---|---|---|---|---|---|---|---|---|---|---|---|---|
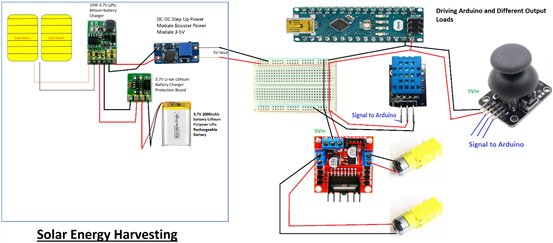
| Project 22: Simple Solar Bot |
Simple Power Bot was conceived as a simple solar powered robot capable of harnessing energy from solar panels. Part of this project involved learning more about how an Arduino handled power consumption and whether it could get the voltage and current that it needed from solar power boards. What's really impressive, is the fact that this was snidhi 's first attempt working with solar energy, an undertaking that she was very enthusiastic about. If everything goes according to plan, the Simple Solar Bot would be able to self sustain its energy requirements and be smart enough to go into sleep mode to consume less energy when there was no activity. Adjustments were necessary throughout the process to nail down the right motors to use for the mechanical design. This project involves an Arduino NaNo
| ||||||||||||||||||||||||||||||||
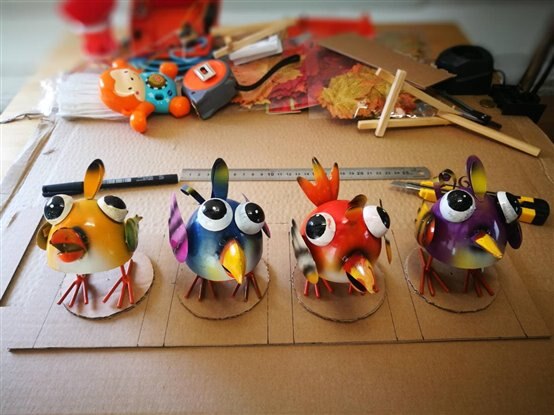
| Project 21: The Dancing Birds |
This project was experiment to demonstrate that birds do not always have to be angry! As balearicdynamics sets out to prove, they can do something else! He hypothesizes that birds can dance and that it is in fact possible to set up some sort of a small ecosystem where they can dance comfortably. This project was chosen as the craziest project to use two or more microcontrollers. It uses 6 micro servos and an Arduino Mega 2560 to control the motion and sync the servos. The Arduino Mega was chosen because it has many pins, good speed, and a reasonable amount of programming memory and RAM. With the Arduino Mega in control of The Dancing Birds , who was going to control the Arduino Mega? balearicdynamics 's solution was none other than a BBC micro:bit!
Also on Project14 from balearicdynamics :
| ||||||||||||||||||||||||||||||||
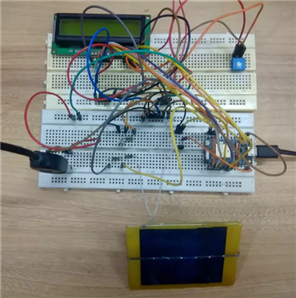
| Project 021: Solar Panel Monitoring Using Particle Photon |
The aim of the project was to improve the efficiency of solar panels. The project is designed to supervise solar photovoltaic power generation to enhance the performance, monitoring and maintenance of the solar plant. With advancement of technologies the cost of renewable energy equipment is going down globally encouraging large scale solar photovoltaic installations. This massive scale of solar photovoltaic deployment requires sophisticated systems for automation of the plant monitoring remotely using web based interfaces as majority of them are installed in inaccessible locations and therefore are easy to be monitored from a dedicated location. The project allows monitoring power output of a solar panel, incident light intensity and the operating temperature. In this project, the particle photon is interfaced with the voltage output pin of the solar panel, LM-35 temperature sensor and LDR sensor to monitor the power output, temperature and the incident light intensity respectively. A character LCD is also interfaced to the particle photon for real time display of the measured parameters. The Photon not only displays the measured parameters on the LCD screen, but also sends the measured values to the cloud server. For viewing the real-time data and logs sent by the board, the user needs to log in to the registered account from the Particle's official website.
Also on Project14 from ruchir1674: | ||||||||||||||||||||||||||||||||
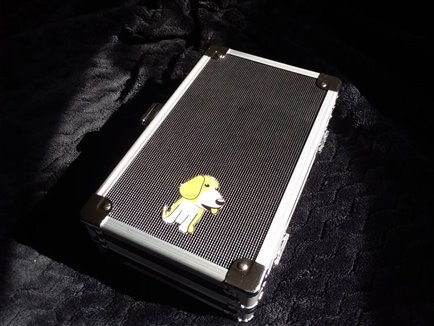
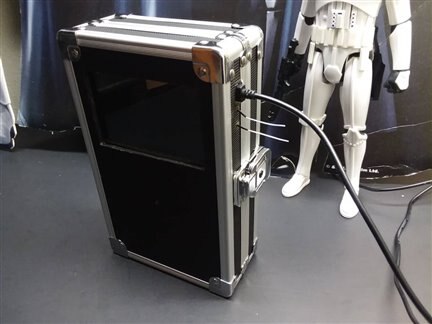
| Project 022: Lock NFC |
Fred27 wanted his NFC/keypad lock to have many uses. The garage door was the easiest as all I needed to do was simulate a button press. A loftier goal was to make something that fitted my front door. His requirements were that it must look professional with no dangling wires or bits duct taped to the back of the door, it must be possible to still use the normal key to open the door, any electronic failure must mean the door can be operated normally, and as you may have guessed there was the WAF (Wife Acceptance Factor). For the PCB design he wanted an NFC reader that was tuned to his NFC implant and which also included a keypad for his (unmodified) kids to use. After waiting for the PCB to arrive from Seed, it was time to populate it, run it through the toaster oven and see if there were any mistakes made. As usual, QFN soldering of the TRF7970A NFC transceiver was a struggle. The final result looks professional enough with the naked eye even if the process certainly wasn't. You can't really test the hardware without some firmware running on the microcontroller, so he quickly adapted my test code from the development board. It wasn't too long until he had the capacitive touch button code running and working. Then he got the NFC code reading an NFC tag. It's all very well deciding that the PCB itself will be the front panel for the lock, but it will still need an enclosure. He decided to tackle the simplest lock first - and that was his garage door. The reason for this is that all he has to do is simulate a button press, At worst a relay across the existing push-button would do. Of course, that still leaves the issue of how to mount it outside the garage. Once again, this is probably the simplest use case. He can go with a 3D printer box and route the cable straight through the single-skin brickwork of my garage. Being a coder at heart, his tool of choice for 3D modelling is OpenSCAD. It's very different from the more artistic modelling tools, but particularly suits a parametric design. He has a "normal" UK lock or nightlatch on the front door. They work pretty well, but it’s a little trickier to attach a motor to what appears to be a more common lock in the US - the deadbolt.
| ||||||||||||||||||||||||||||||||


| {tabbedtable} Tab Label | Tab Content | |||||||||||||||||||||||||
|---|---|---|---|---|---|---|---|---|---|---|---|---|---|---|---|---|---|---|---|---|---|---|---|---|---|---|
| Project 023: Infinity Living Christmas Wreath |
The Infinity Living Christmas Wreath was done as a family project. Dale made this with his kids. They wanted to make something unique and what they came up with was awesome!
To create the wreath they used 144 RGB LED light string, an Arduino, a Raspberry Pi, Screen, speakers, 2 pieces of one way mirror and a 12 volt transformer. The LED strip was placed between the one way mirrors. The Arduino is used to control the LED pattern and the transformer is used to power the LED's. Meanwhile, the Raspberry Pi and screen is used to display the burning log behind the mirror with speakers for fire crackling sound.
| |||||||||||||||||||||||||
| Project 024: BoneCommander - A Ruggedized BeagleBone Linux Computer |
The BoneCommander by ninjatrent is a rugged and mobile BeagleBone Linux Computer powered by a BeagleBone Black Wireless SBC. An element14 BeagleBone 4.3" LCD Display Cape is the primary display interface for the BBB W.
There is a 4 port USB Hub connected to the USB Host on the BeagleBone and a Wireless USB Keyboard with touchpad connected to this USB Hub. Power is provided by an Adafruit PowerBoost 1000C 5V Lipo USB Boost Charger and a 3.7v 2500mAh Lithium Ion Polymer Battery. The PowerBoost 1000C utilizes the TPS61090 boost converter from TI.
Also on Project14 from ninjatrent: | |||||||||||||||||||||||||
| Project 025: My late (and incomplete) entry for the Portable Electronics Kit - The Pi-IDE (Pie-Eyed). |
After the-dubster watched Episode 231: Ben Heck’s Lunch Box Dev Kit Episode he thought to himself "I could do with one of those - but a bit different."
The Dev Kit was great for boards that had a video output, but it wasn’t so useful for an Arduino - the-dubster needed something that he could use to program the Arduino as well as practice his Dev skills on . . . he needed a laptop type sort-of-device!
He presents his idea for a RPi 3 based Portable dev / electronics kit: The Pi-IDE.
"I appreciate the effort of building a kit into a briefcase. This is a truly portable electronics kit
| |||||||||||||||||||||||||
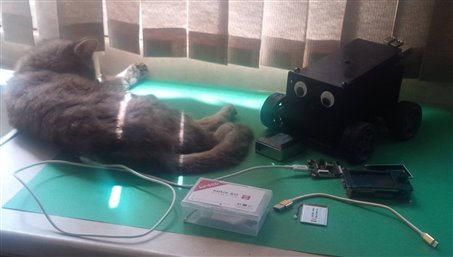
| Project 026: Fancy Eye |
Fancy Eye is a roving robot with the Maix Go Board for Machine Vision. armour999 brushed off her Gertbot and attached it to a Raspberry Pi 3. Software can be uploaded to the Maix Go using Arduino !
| |||||||||||||||||||||||||
| Project 027: Process Duration Timer |
"A well defined project that met all the objectives. It used cheap and readily available parts which were repurposed to suit the project." - Anonymous Judge
"Timing events can be really important in a lab, and this project was unique in that it took a low-cost circuit (a clock) and transformed it into a timer in a very unique way. Then John extended it further by using an Arduino to control it based on voltage thresholds. It would be very useful for anyone wishing to characterise a battery or capacitor." - Anonymous Judge
"If I had to vote for just one, it would be the Process Duration Timer, because it is something I've always wanted to make for myself too, a timer for measuring things in the lab." - Anonymous Judge
This was a universal pick from all the community members that were asked to help pick a piece of DIY Test Equipment as you can see from the comments above. Its part of a 4-part blog series from jw0752 and it was a favorite of the judges because they could appreciate the importance of a timer for measuring things in the lab. The final entry is highlighted here but you can view the entire series on the DIY Test Equipment page:
| |||||||||||||||||||||||||


Top Comments
-

urkraft
-
Cancel
-
Vote Up
+3
Vote Down
-
-
Sign in to reply
-
More
-
Cancel
-

urkraft
in reply to urkraft
-
Cancel
-
Vote Up
0
Vote Down
-
-
Sign in to reply
-
More
-
Cancel
Comment-

urkraft
in reply to urkraft
-
Cancel
-
Vote Up
0
Vote Down
-
-
Sign in to reply
-
More
-
Cancel
Children